|
Your bathroom shelf holds everything you need to begin and end your day, so why not make it beautiful? Don’t let the chaos of cluttered countertops and overflowing cabinets disrupt your self-care. Yep, it’s possible to have a bathroom shelf space that keeps all your beauty and daily routine items organized and aesthetically appealing. With a bit of creativity and the right shelving, you can transform your bathroom into a beautiful and organized space. We’ll explore a few ideas ranging from boho to industrial and more! 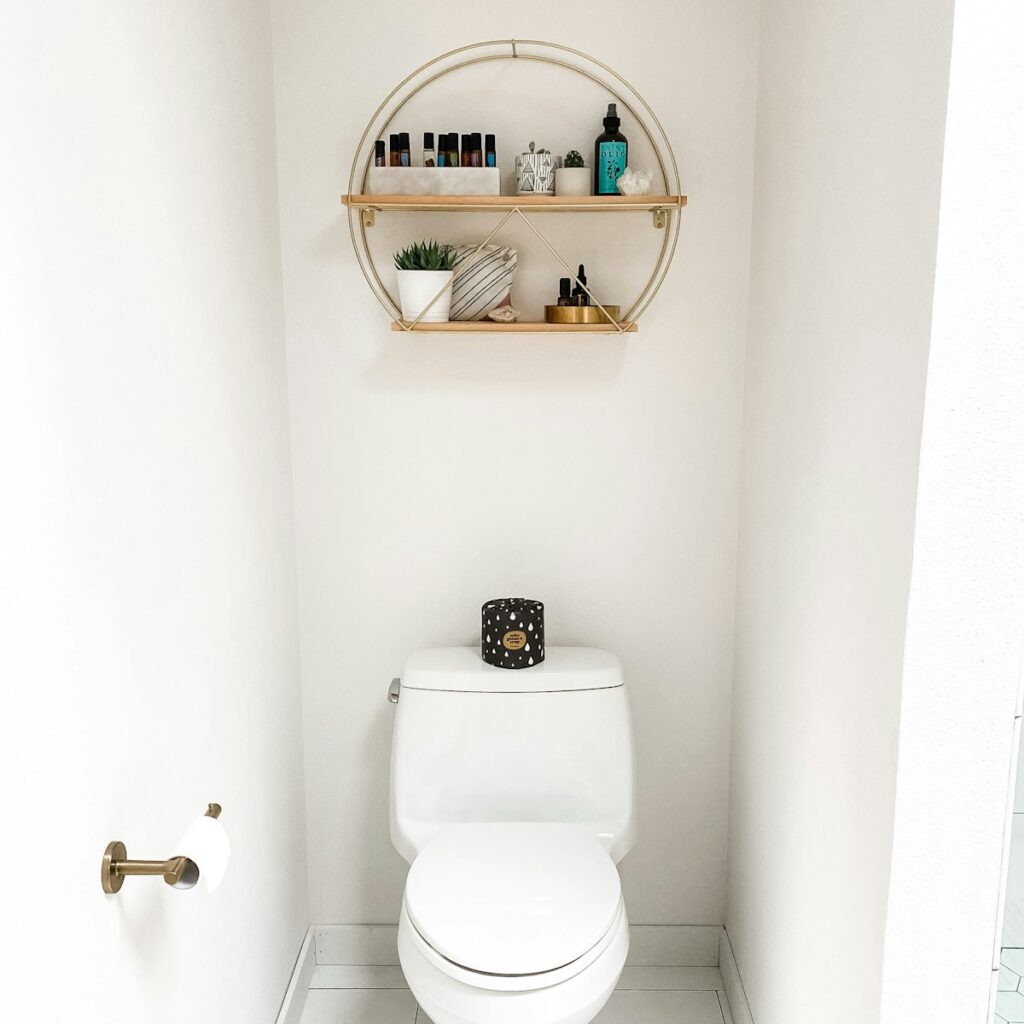
1. Add a Tropical TouchConsider unconventional options for your next bathroom shelf like shelves made from bamboo or rattan for a tropical vibe. These shelves offer a unique look and provide ample storage space for towels and toiletries. 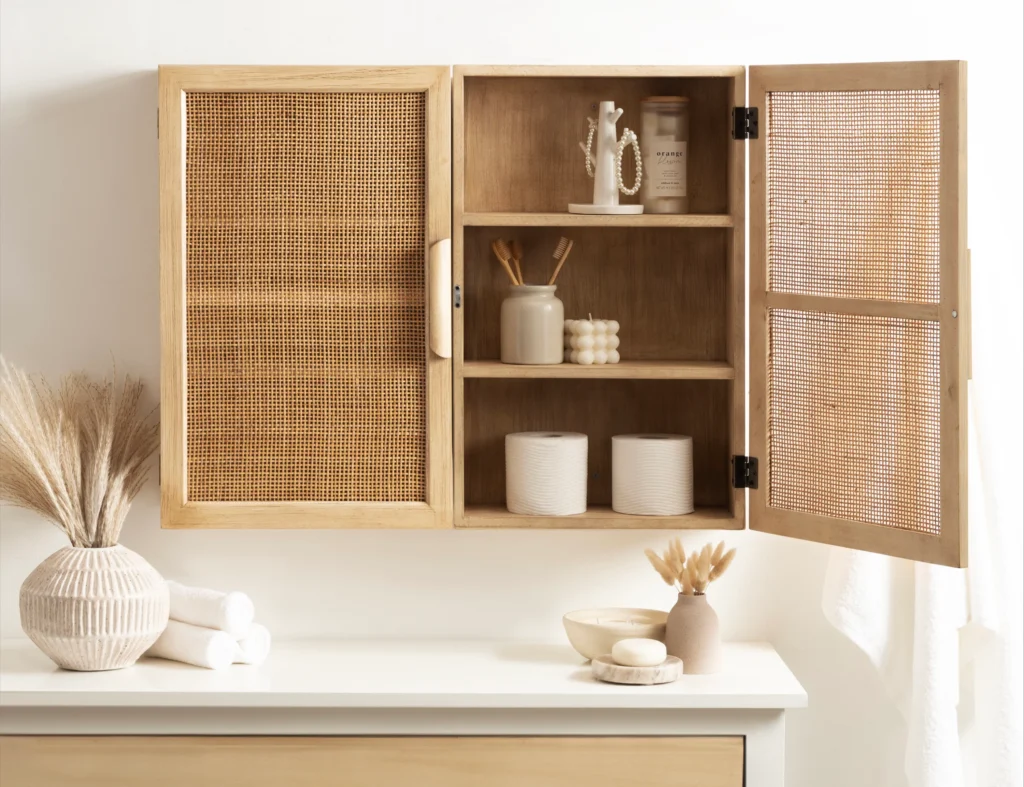
2. Embrace Open ShelvingTry experimenting with open shelving. Add decorative hooks underneath shelves to hang towels or robes for both functionality and visual interest. Don’t forget to mix and match storage containers like woven baskets, ceramic jars, and wire bins to enhance the texture and personality of your shelves. 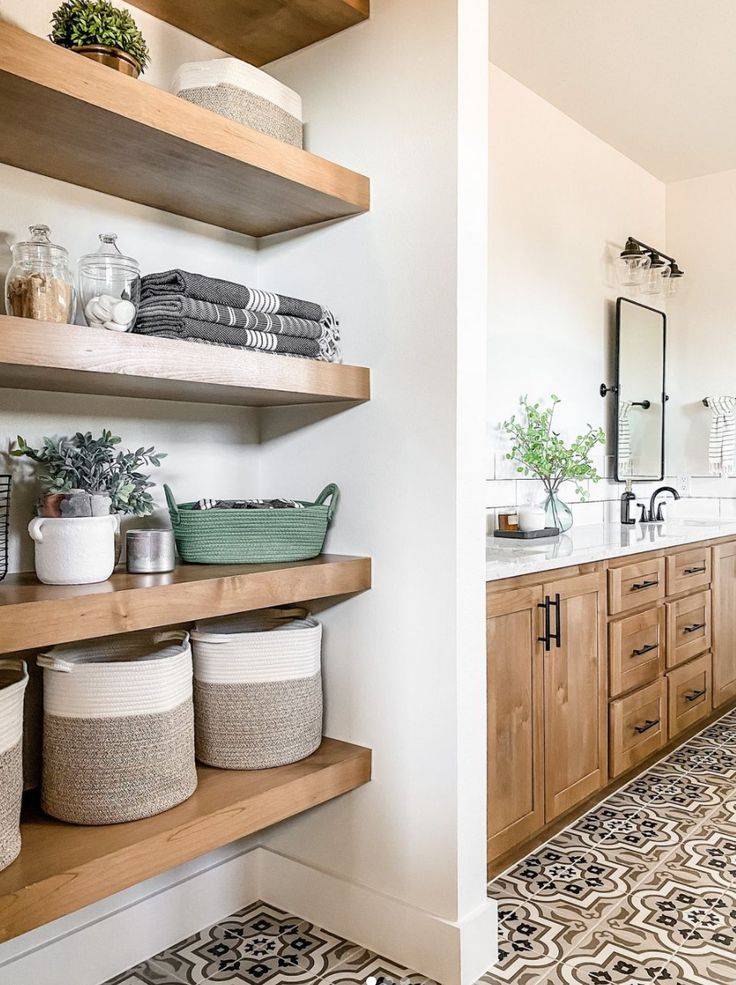
3. Get CreativeFeeling inspired to start a new DIY project? You can start by upcycling old crates or wooden pallets and turning them into custom storage. Install tension rods between shelves to create additional hanging space for towels or small baskets. You can also repurpose vintage ladders as towel racks or shelving units for a little more character and charm. 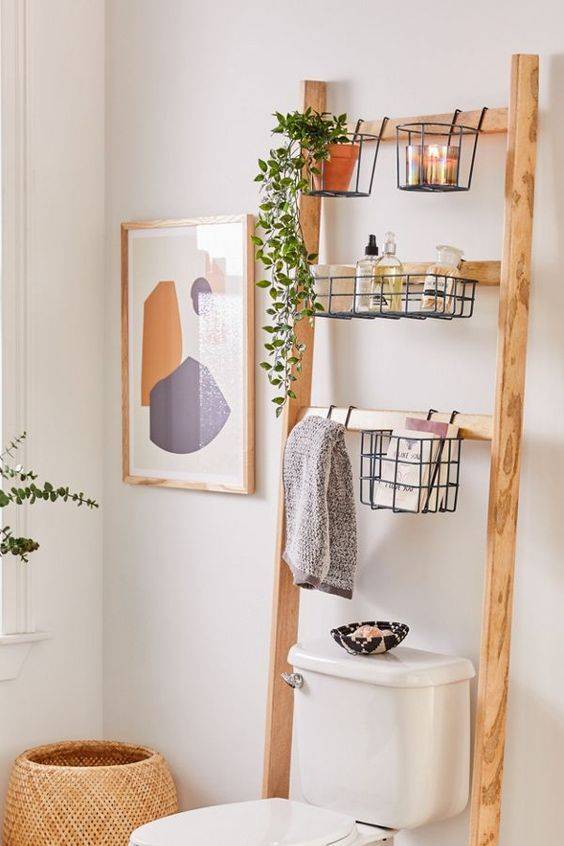
4. Elevate Your VanityDoes your bathroom have a vanity space that needs an update? Enhance your vanity’s storage space with drawer dividers, acrylic organizers, and stackable bins to keep makeup, skincare products, and grooming tools neatly organized. Install a mirror with built-in storage or shelves to maximize vertical space above the vanity, providing easy access to everyday essentials while adding a decorative touch to your bathroom. We love the functionality! 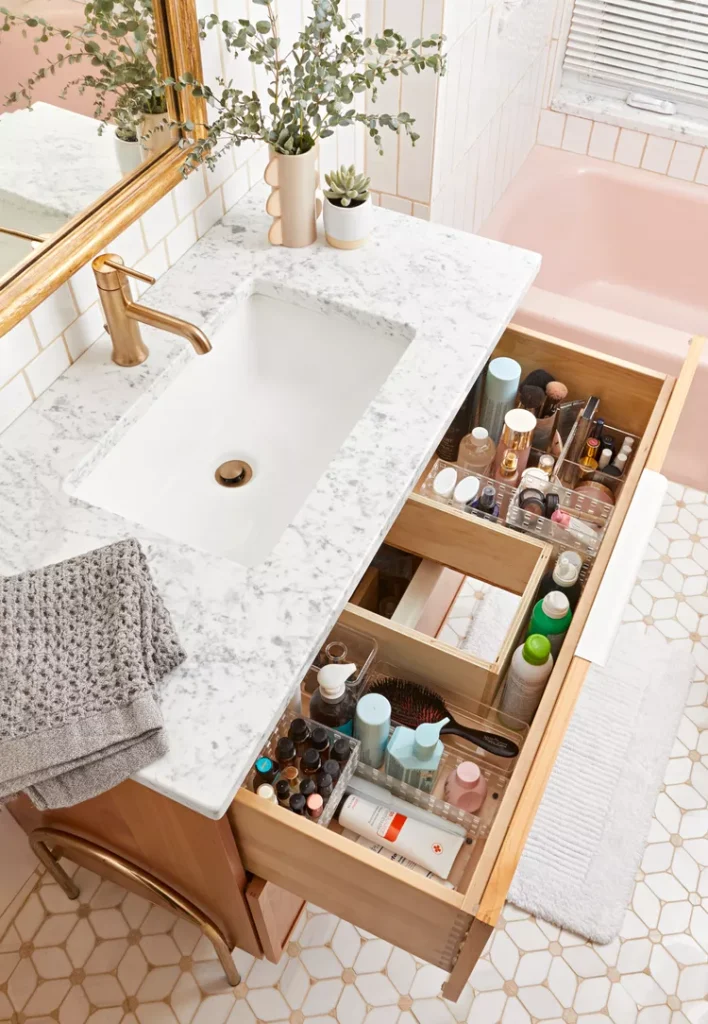
5. Take it to the ShowerMaximize small spaces by installing corner shelves or a built-in shower niche to store shampoo, conditioner, and body wash. Opt for waterproof materials like ceramic or resin to ensure durability and easy maintenance. For a renter-friendly option you can install a shower caddy or organizer with adjustable shelves to accommodate different-sized bottles and toiletries to keep everything within reach. 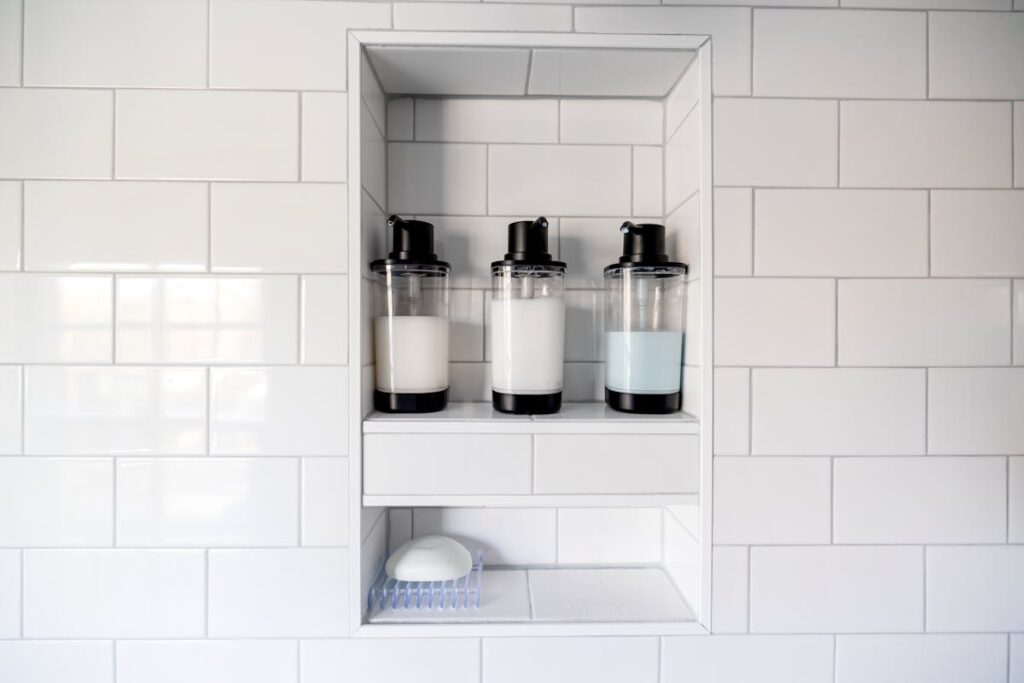
6. Wall Space for Small SpaceVertical storage is your friend in compact bathrooms. Make the most of unused wall space with tall shelving that can be wall-mounted. Add floating shelves above the toilet or beside the vanity to create additional storage for towels, toiletries, and decorative accents. Hang a wall-mounted cabinet or medicine chest to store medications, first aid supplies, and other essentials while keeping them out of sight. 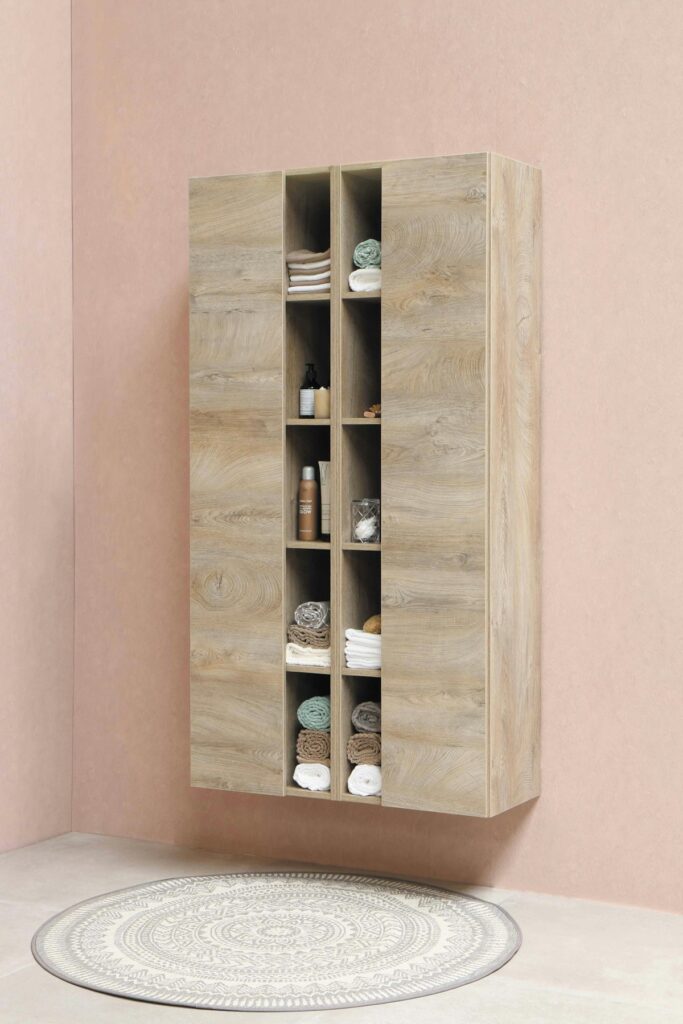
7. Add Aesthetic AppealYour bathroom shelves are a great place to add ambient lighting or string lights to create a cozy atmosphere. To add boldness to the look, you can also introduce depth and warmth with painted shelves. 
8. Keep Linens OrganizedNo linen closet? No problem! Roll towels and stack them on open shelves or in decorative baskets. Label bins or baskets with embroidered tags or chalkboard labels on different types of linens, such as bath towels, hand towels, and washcloths. Try adding towel racks or hooks on the back of the bathroom door to keep linens within reach. 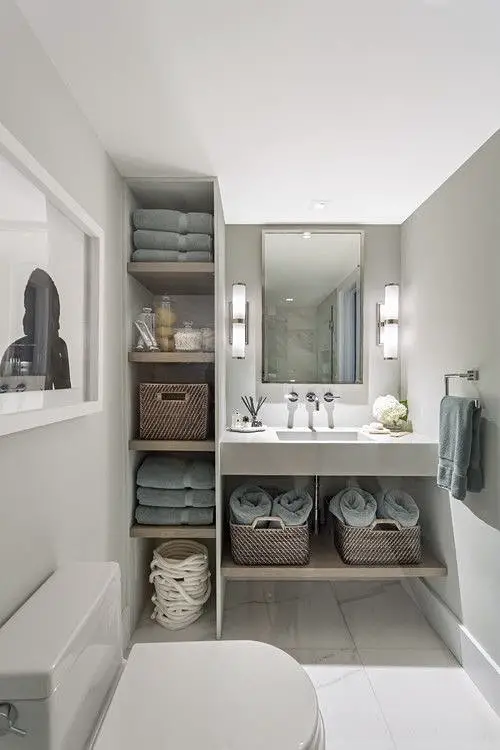
9. Get Clever with Drawers and HooksUse under-sink storage with pull-out bins, sliding trays, or stackable shelves to make the most of limited cabinet space. Install hooks on the inside of cabinet doors to hang hairdryers, flat irons, and other styling tools, keeping them off countertops and out of sight when not in use. 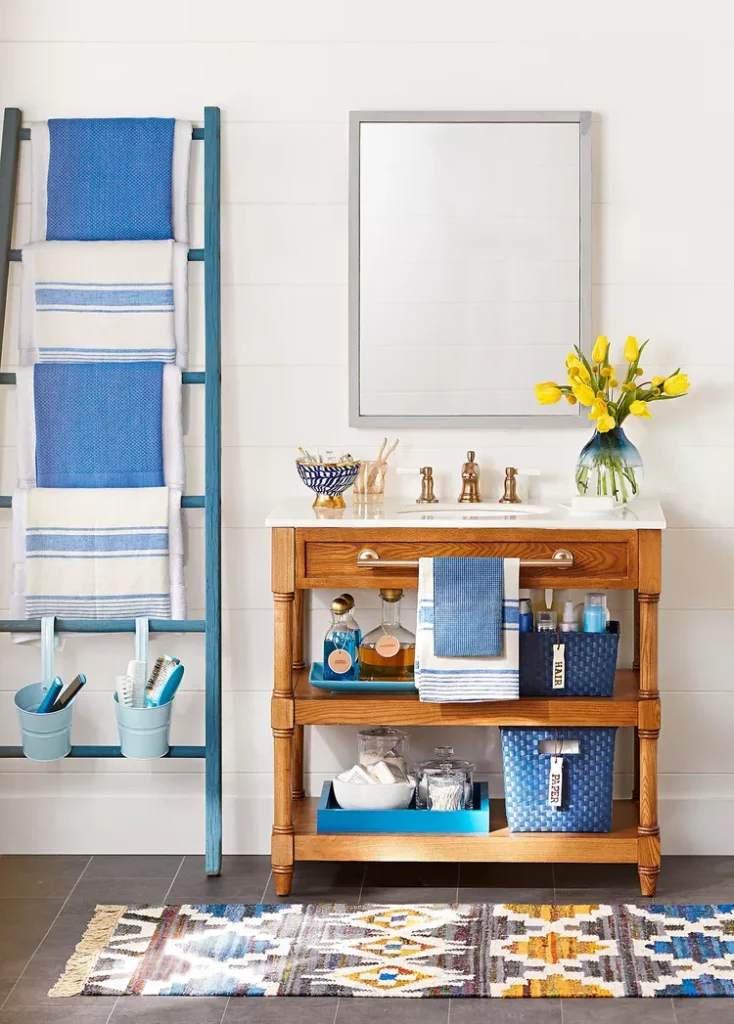
10. Create a Spa-like AtmosphereUpdate your bathroom with a spa-like ambiance by displaying luxurious amenities like body scrubs, bath salts, and plush bathrobes displayed on open shelves or in decorative trays. Additionally, incorporating natural elements like bamboo bath accessories, river rock accents, and live plants can add to the calm. Take it up a notch by installing a rainfall showerhead, heated towel rack, or aromatherapy diffuser. 
11. Pick Smart Storage SolutionsIn addition to your bathroom shelf, choose smart storage solutions like pull-out drawers with built-in organizers or adjustable shelving systems that can be customized to fit your specific storage needs. These innovative solutions maximize space efficiency and help keep your bathroom clutter-free. 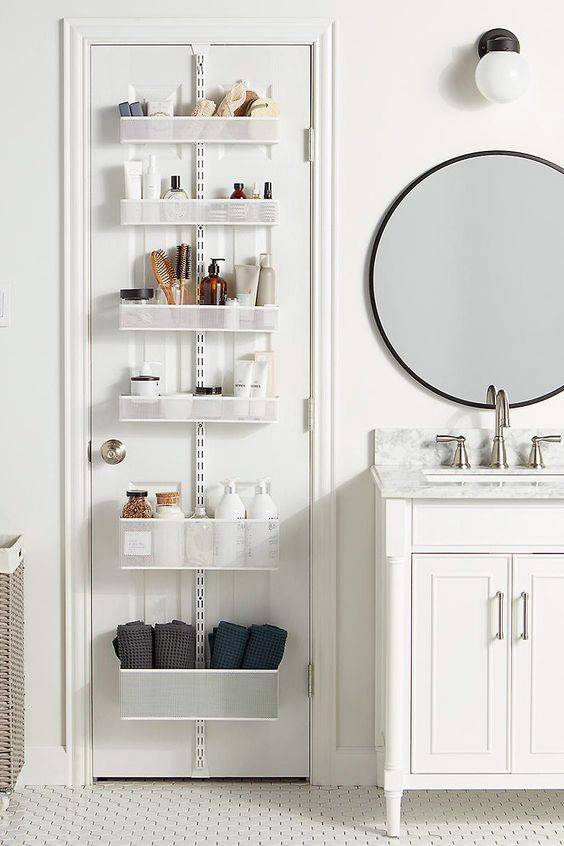
12. Over-the-Toilet ShelvingThe space above the toilet is often overlooked. It’s time to use it! Install shelves or a cabinet unit designed to fit over the tank. This area can provide valuable vertical storage space for extra towels, toilet paper, and decorative accents, helping to free up floor space and keep your bathroom organized. Choose a unit with closed cabinets or open shelves, depending on your storage preferences. 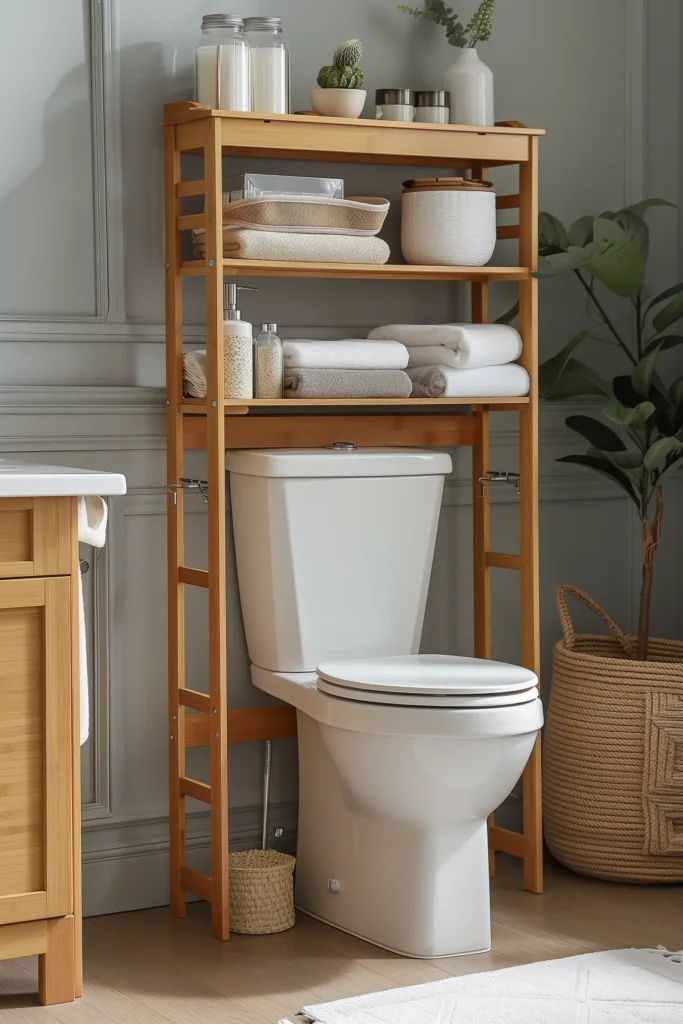
13. Opt for Hidden StorageLove a sleek and minimalist look in your bathroom? Explore hidden storage options. You can install recessed shelving units or cabinets into the walls to create hidden storage space for toiletries and other essentials. In addition, you can use mirrored cabinets that double as storage for a discreet way to keep your bathroom tidy. 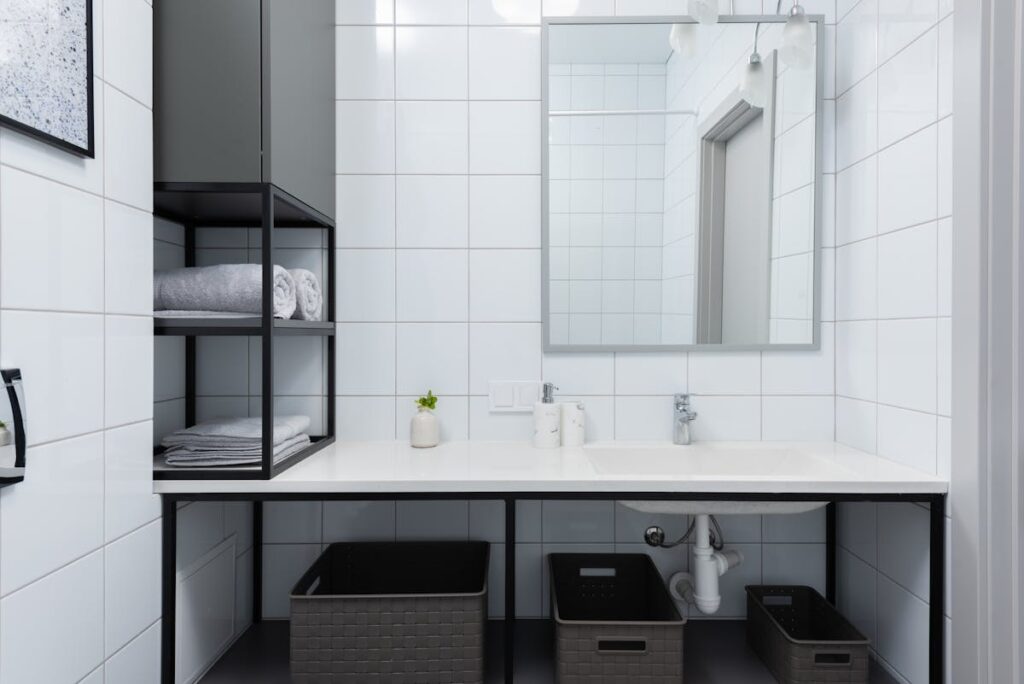
14. Mix and Match Shelving StylesMix and match different shelving styles to create a dynamic and visually interesting display. Combine floating shelves with traditional wall-mounted shelves or integrate open shelving with closed cabinets. You can play with varying heights, depths, and materials to add depth and dimension. 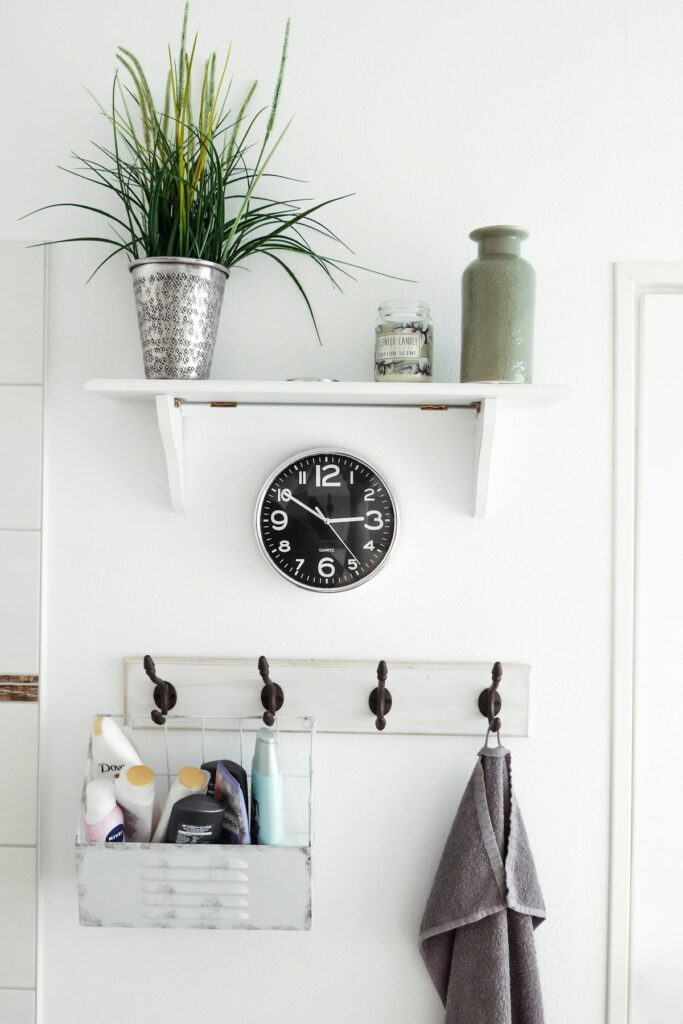
15. Create a Personalized DisplayAdd your personality by showcasing your favorite decorative items, such as framed photos, artwork, or travel souvenirs. Mix in personal touches like scented candles, small sculptures, or vintage finds to create a curated display that reflects your unique style and interests. Don’t be afraid to rotate these pieces seasonally, but be mindful of bathroom ventilation and items that can’t withstand humidity. 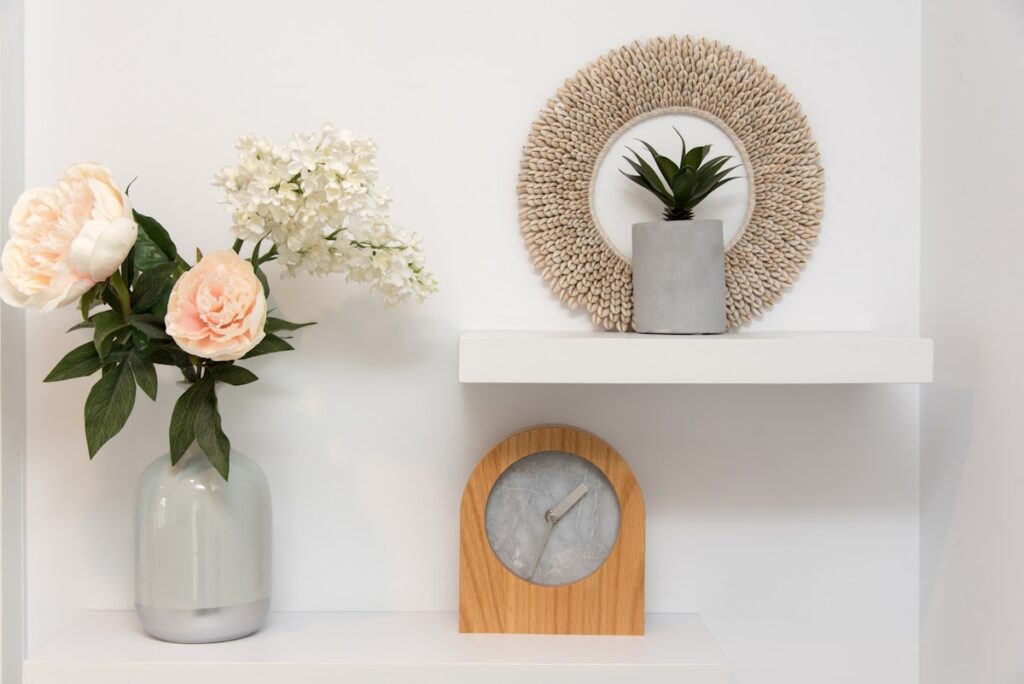
16. Charm with Wooden ShelvesIntroduce warmth and natural beauty to your bathroom with the addition of wooden shelves. Whether you prefer rustic reclaimed wood or sleek and polished finishes, wooden shelves are the perfect option. Opt for floating wooden shelves for a modern look, or choose sturdy wall-mounted wooden shelves for a more traditional feel. 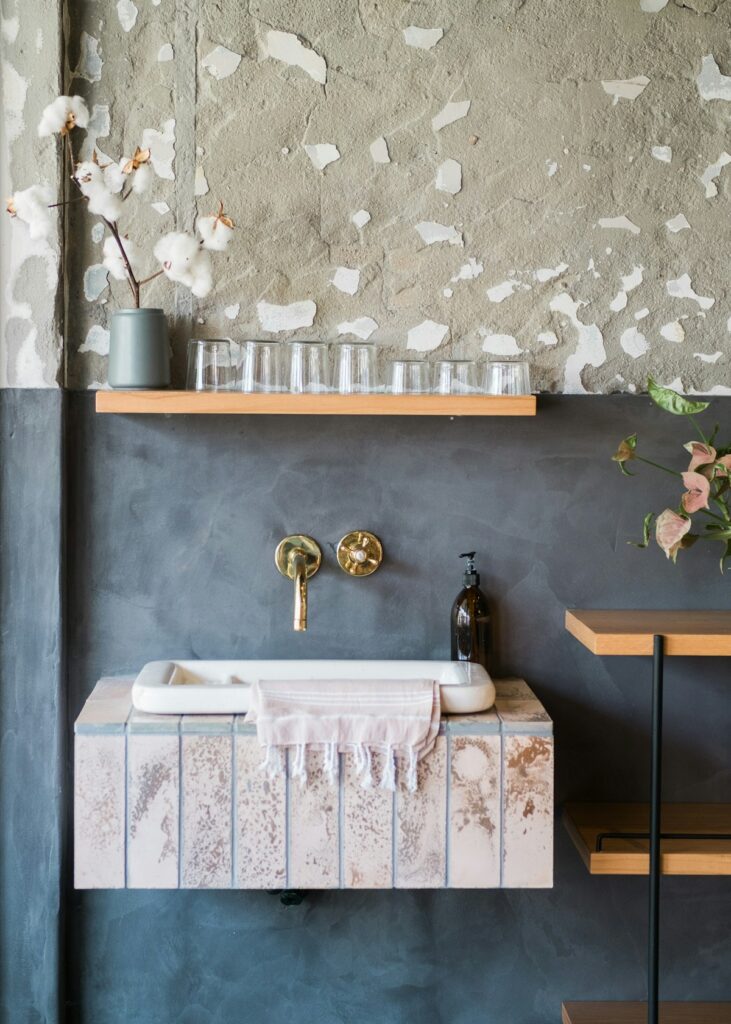
17. Go Industrial ChicFor a trendy and industrial-inspired look, use pipe shelves in your bathroom design. Industrial pipe shelves combine rugged functionality with modern aesthetics. Install pipe shelves above the vanity or toilet to store towels, toiletries, and baskets, or use them as open shelving. You can customize the size of your pipe shelves to fit your space perfectly and pair them with reclaimed wood or metal accents. 
With these ideas, you can take your bathroom shelf organization to the next level. Not only will you create a functional and organized space, but it’ll also be beautiful. Whether you choose to optimize wall space, use over-the-toilet shelving, or include hidden storage options, there are countless ways to enhance your bathroom shelves. Looking for more bathroom upgrades?
The post Tidy Up With These Beautiful Bathroom Shelf Ideas appeared first on Curbly. Via https://www.curbly.com/bathroom-shelf-ideas
0 Comments
Thinking about updating your attic storage? We’ll help you get started. Since attics are usually the most neglected space in the house, they hold tons of untapped potential for storage. Instead of being a messy home for random forgotten items, your attic can be turned into a well-organized place for efficiently storing seasonal decorations, out-of-season clothing, and more. It’s time to turn that underutilized area into your biggest asset against clutter! 
A Few Reasons to Love AtticsOnce upon a time, there was an old dusty attic full of cobwebs. It was considered a scary place, only visited by children or guests who wanted to get extra spooky on Halloween. Then, like magic, the homeowners discovered a few transformational ways to upgrade the attic. Now, it’s a useful place for storage without the creepy vibes. If this story resonated with you (or made you laugh), great! We think transforming your attic as a storage space is smart for a few reasons. But before diving into storage ideas, it’s worth considering the benefits of attics. 
Functional Attic Storage IdeasFeeling inspired? Then, let’s explore attic storage ideas to help you make the most of your attic while keeping it organized. 1. Shelve ItWhen it comes to maximizing storage space in your attic, shelves are your best friend. Consider installing sturdy shelves along the walls to store boxes, bins, and bulky items. You can also opt for adjustable shelving units to customize according to your storage needs. 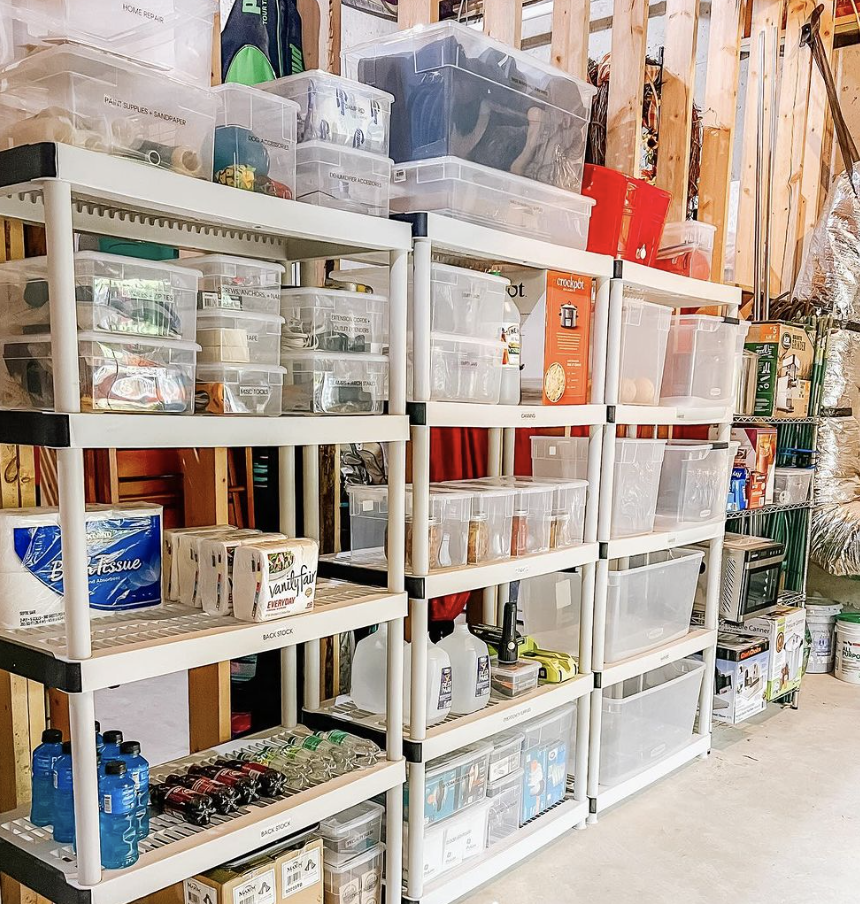
2. Harness the Power of HooksWhat about that overlooked space on the attic ceiling? Try installing shelves to hold lightweight items like decorations and wreaths. Hooks are a universal storage solution that you can use to free up floor and shelf space in your attic. Install hooks on walls and beams to hang items like holiday decor, bags, and even accessories. Be sure to secure the hooks properly to support the weight of the items you plan to hang. 
3. Break Out the Baskets and BinsBaskets and clear bins are essential for organizing smaller items in your attic. Group similar items together and use your clear containers for easy identification. Clear bins allow you to see the contents at a glance, so you don’t have to search through boxes to find what you need. 
4. Maximize Drawer SpaceDrawers are a great way to maximize storage space in your attic while keeping items organized and easily accessible. Simply add an old chest of drawers or install drawer units to store out-of-season clothing, holiday decorations, and other miscellaneous items. As a bonus, label each drawer to quickly identify what’s inside. 
5. Label EverythingLabel, label, label! A label maker is a great investment for organizing your storage container shelf in your attic. This simple yet effective method will help you quickly locate items when needed and ensure that everything stays easily accessible. 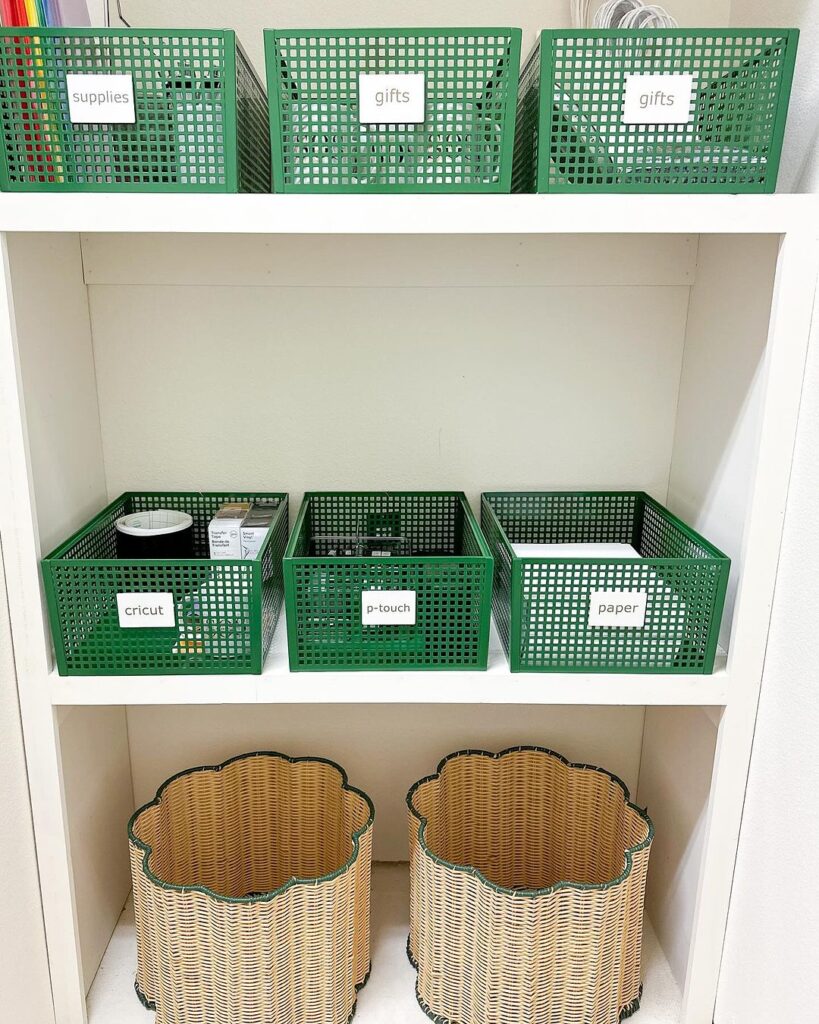
6. Use Unfinished SpacesIf your attic is unfinished, you can still make the most of the space by using plywood panels or pegboard to create sturdy surfaces for storing larger items such as sports equipment, tools, and gardening supplies. 
7. Fill up Filing CabinetsIf you have an old filing cabinet, use it! They are great for organizing paperwork, documents, and office supplies in your attic. Depending on your storage needs, opt for vertical or lateral filing cabinets to maximize your space. Label each drawer according to the type of documents stored inside, such as tax records, receipts, or important documents. 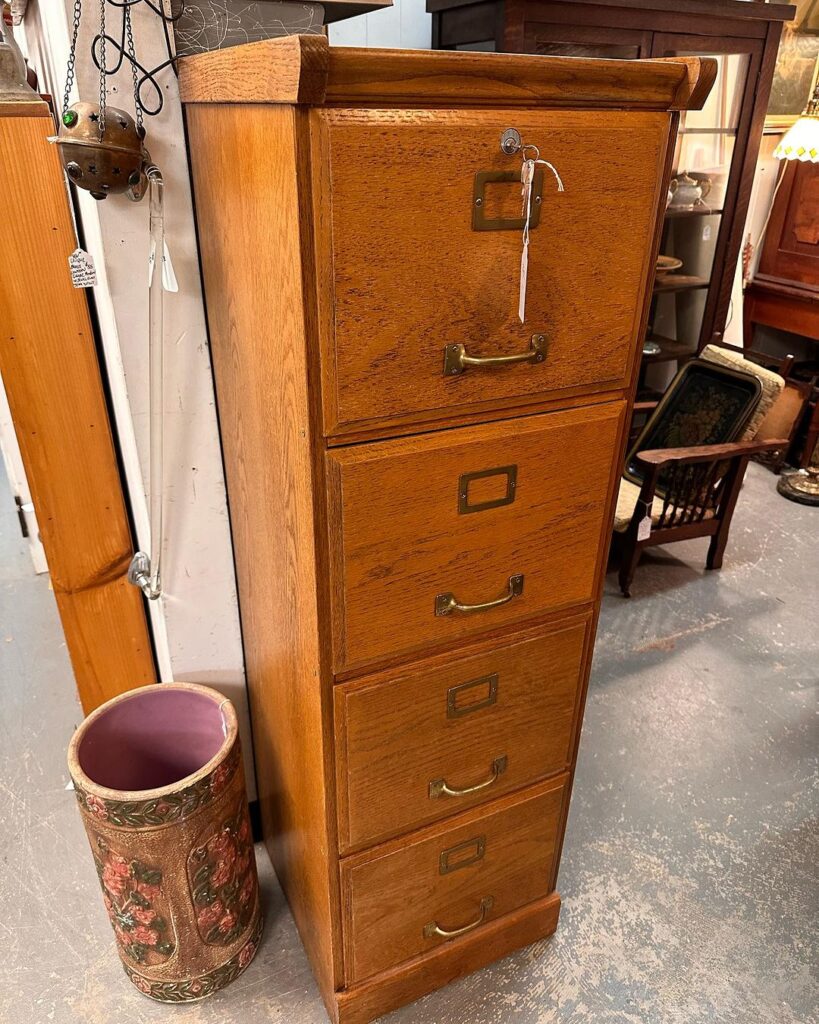
8. Truss Shelves for SpaceTruss shelves are specially designed to fit in the triangular space between attic trusses. These shelves are easy to install and provide a sturdy platform for storing bins, boxes, and other items. You can utilize truss shelves to take advantage of otherwise unused space in your attic, keeping belongings organized and within reach like seasonal decorations, camping gear, or holiday supplies. 
9. Get Durable ContainersWhen storing items in your attic, the type of container you use is important. Choose durable containers that can withstand temperature changes and protect your belongings from dust, moisture, and pests. Invest in heavy-duty plastic bins or containers with secure lids to keep items safe and secure. Additionally, try using vacuum-seal bags for storing clothing and bedding. 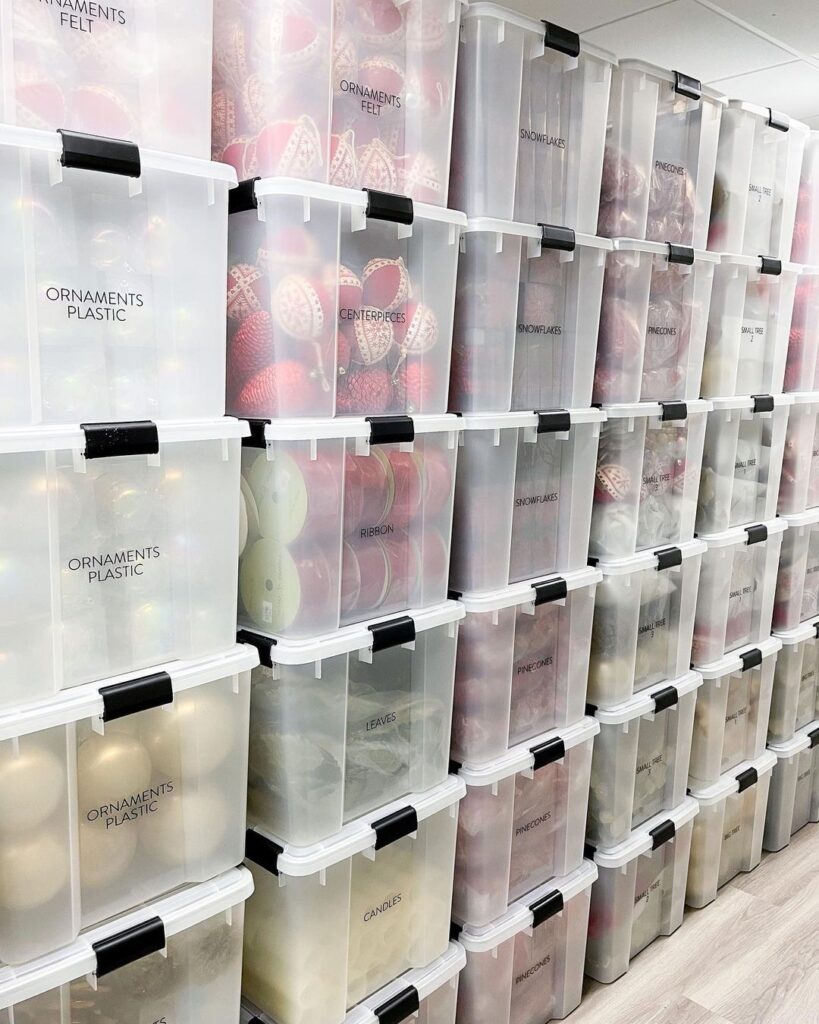
Additional Attic Storage Tips and Things to ConsiderAddress Moisture ConcernsMoisture buildup in attics can lead to mold, mildew, and damage to stored items. Make sure to install proper ventilation to promote air circulation and address any leaks or condensation issues right away. Consider using moisture-absorbing products like silica gel packs to keep humidity levels in check. Protect Against PestsAttics are prime real estate for pests such as mice, bugs, and even raccoons. Seal any cracks or openings in your attic to prevent pests from getting inside. If you live in an area prone to infestations, invest in pest repellents or traps as a preventive step. Invest in InsulationAttics are infamous for their temperature extremes, which can wreak havoc on stored items. Proper insulation will help regulate the temperature and humidity levels in your attic, protecting your belongings from long-term damage. 
With these attic storage ideas, you can transform your small attic space into a well-organized and functional storage area, instead of a dusty, scary place you never visit. By using shelving, hooks, bins, and proper insulation, you can maximize storage and also keep your belongings safe and easily accessible. It’s time to tap into your attic’s potential! Looking for more storage ideas?
The post Attic Storage Ideas To Maximize and Organize Your Space appeared first on Curbly. Via https://www.curbly.com/attic-storage-idea 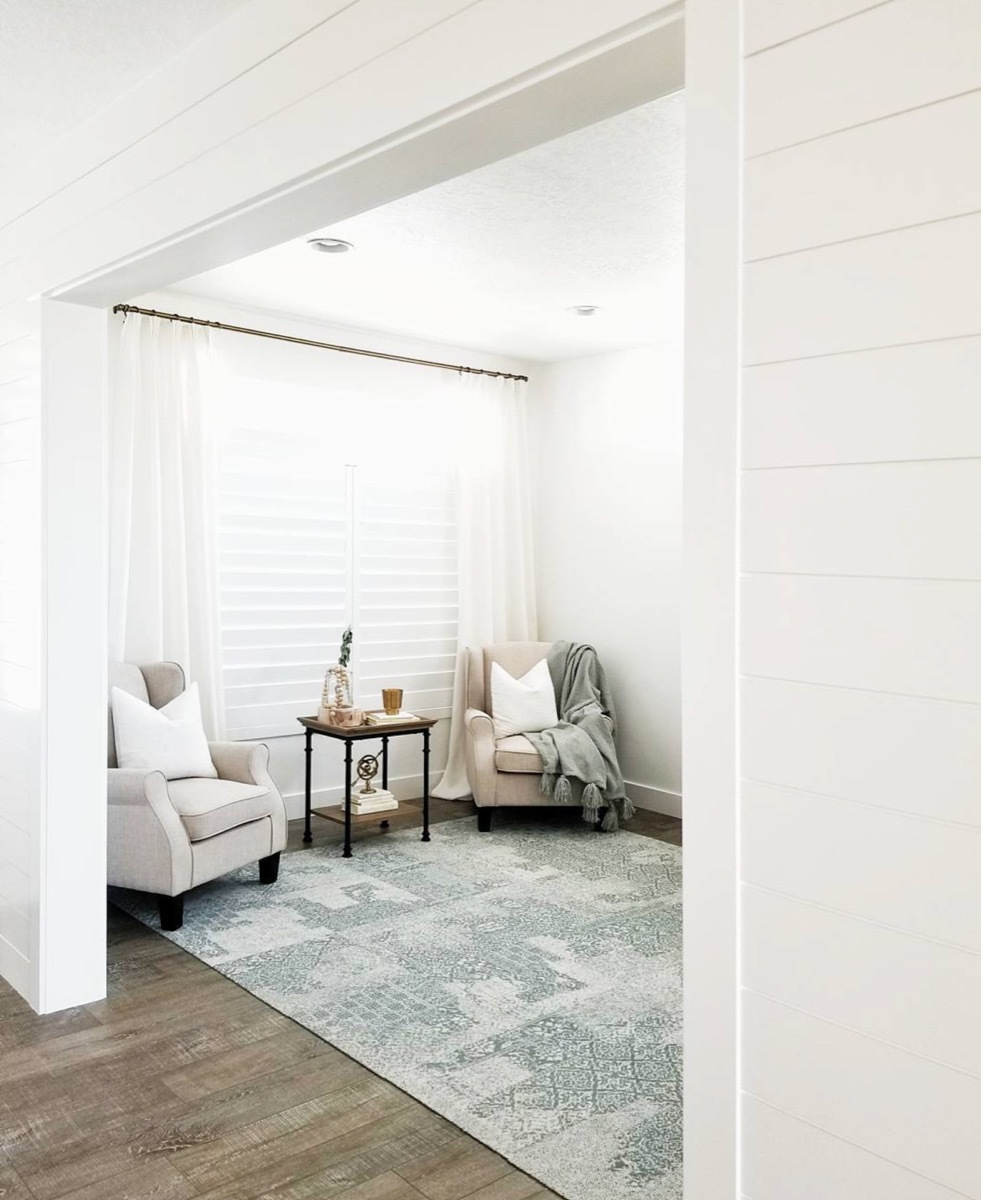
No matter how many trends come and go, there are a few classic home decor elements that never go out of style. Think of a simple round mirror, the Eames lounge chair, a quality Persian rug—designers come back to these pieces again and again. Today we’re going to talk about another classic, the perfect white cotton curtains from IKEA. The RITVA curtains are without a doubt, the best IKEA curtains. The Ikea RITVA curtains are versatile and classic, well-tailored, and can dress up literally any room; no matter the style. They’re 100% cotton, thick enough for privacy but thin enough to let in beautiful filtered light, with a linen like appearance and you can get them as long as 118″ in length – unheard of for affordable curtains. Speaking of affordable, the best part is their price tag. As pair of RITVA curtains is a very affordable upgrade to any space. The 57″ x 98″ curtain with tie backs will only cost you $39. The slightly longer version, 57″ x 118″, runs about $59 at the time of this post. Skip the higher price tag curtains. These are the perfect solution for any room in your house. Ready to get your own? Grab a curtain rod and dive into how some of our favorite designers and home decor bloggers have styled these classic curtains. RITVA Curtain Inspiration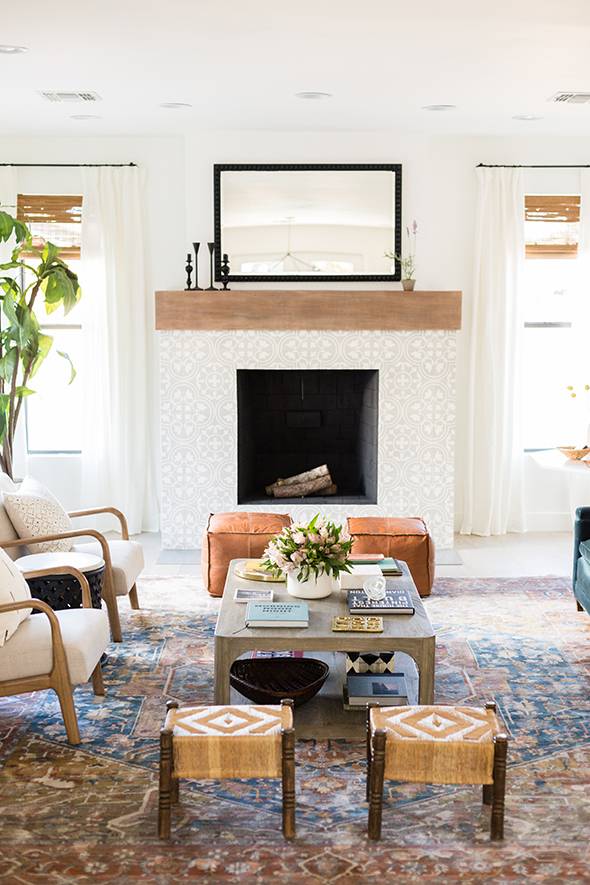
In this eclectic modern living room the curtains are hung with a pleat, high and wide, and are tailored to “kiss” the floor. The bamboo shades add another layer to give the windows a custom look and a cozy atmosphere, allowing for loads of natural light. 
The RITVA curtains look great in a more formal setting too. Even though they’re extremely affordable, they look high end. 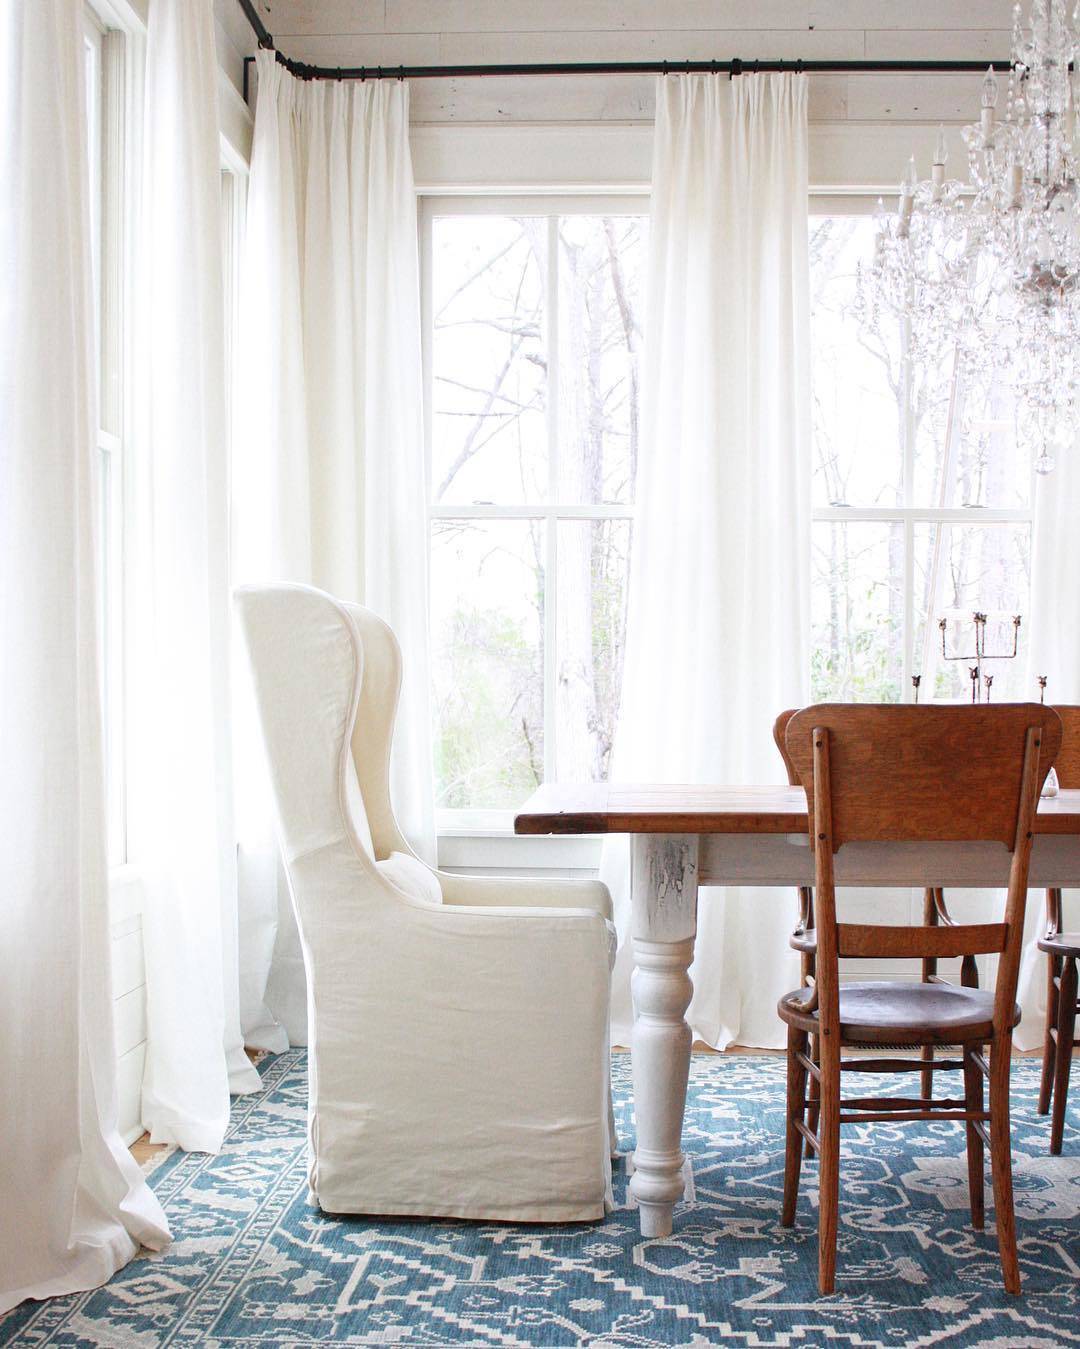
For a more casual farmhouse look, this dining room lets the curtains puddle at the floor a bit. The RITVA curtains come with their own hemming tape, allowing you to choose your own custom length – even if you can’t sew. 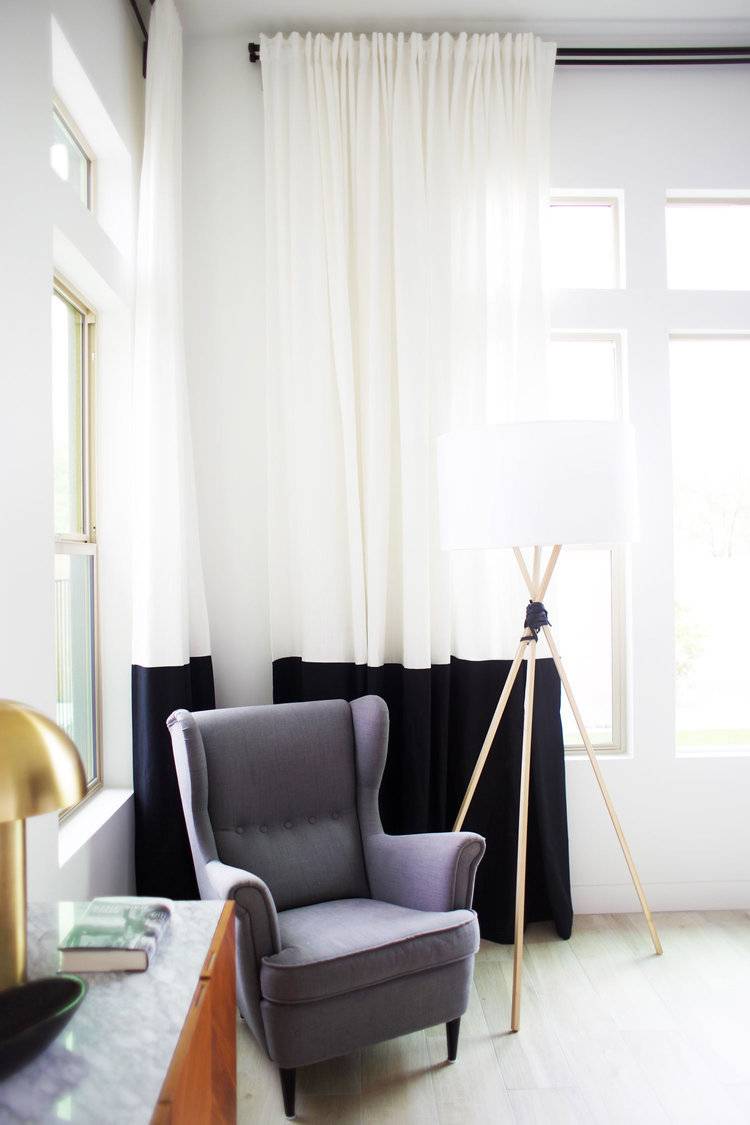
Because of their low price tag, the RITVA curtains are great for modifying with DIY projects. Adding black fabric to the bottom give them a whole new modern and custom look. 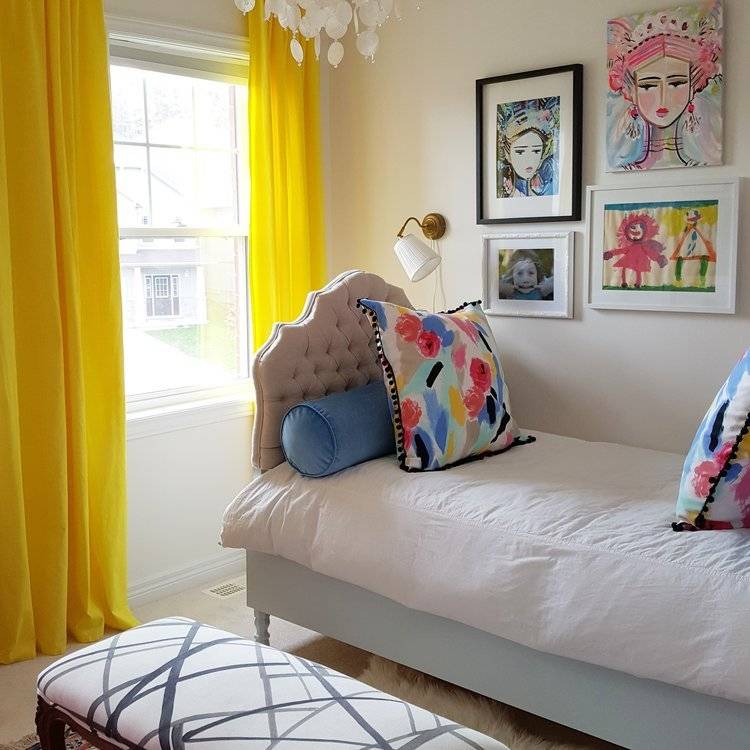
If you’re really bold, you can dye these white curtains any color you’d like. The result is designer-looking window treatments for a fraction of the cost. 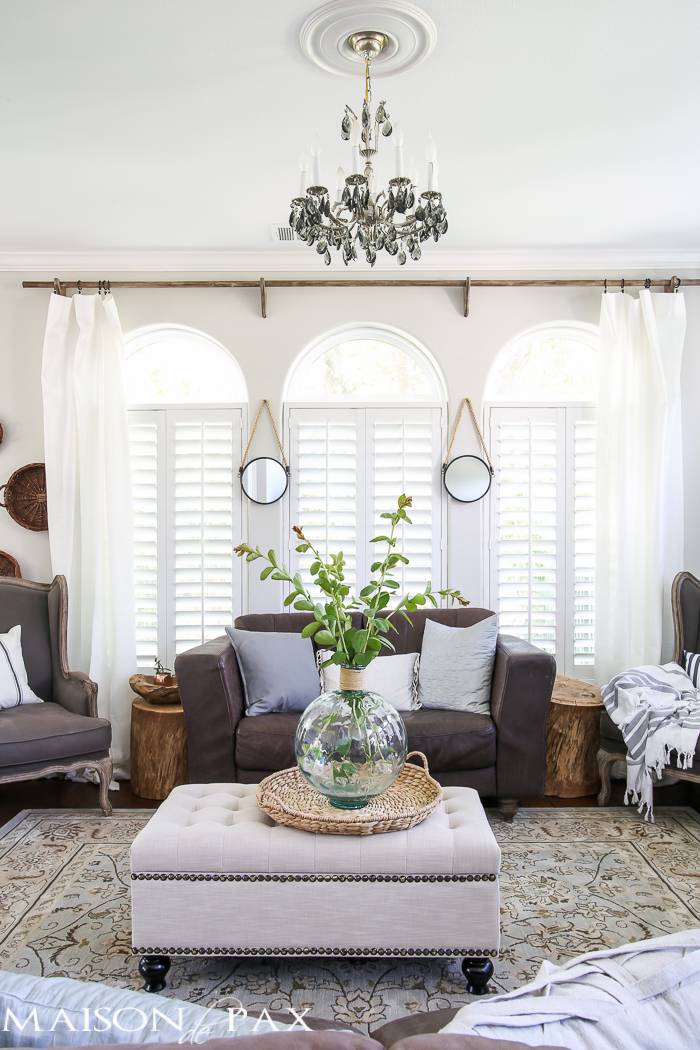
In this traditional living room the panels are hung with clip-on curtain rings. They look casual yet elegant around these almost floor-to-ceiling windows. 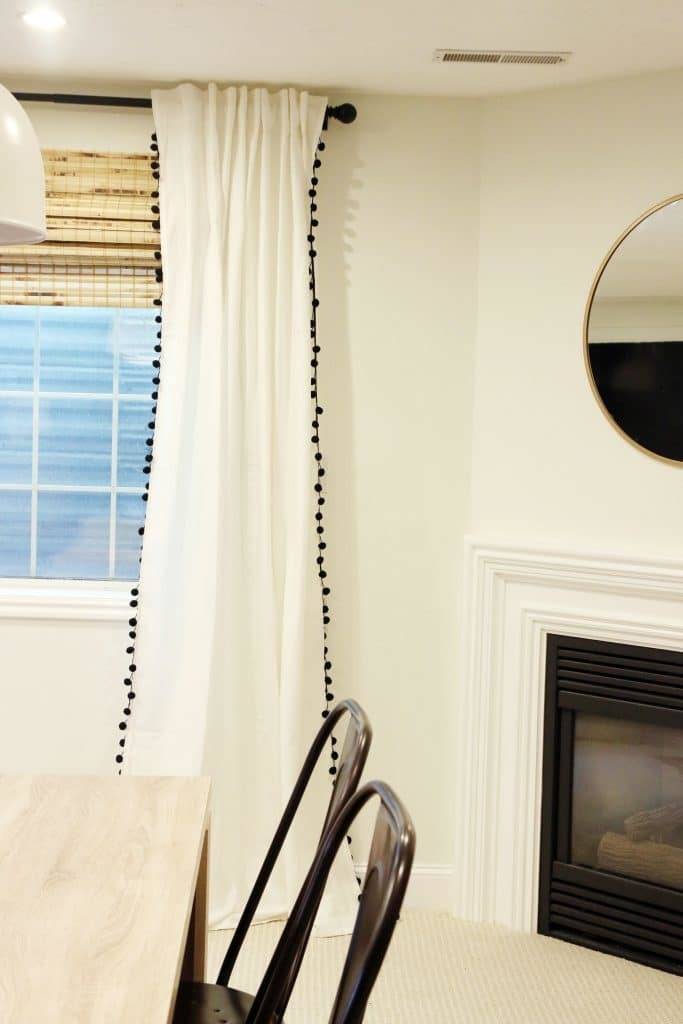
For a more playful look, consider lining the curtains with pom-pom ribbon. A fun idea for a playroom or child’s room. Common RITVA Questions
Can you see through the RITVA curtains?
The do let in a considerable amount of light, but you cannot see through the curtains.
Do IKEA RITVA curtains shrink?
The curtains are 100% cotton and do tend to shrink just a smidge. We recommend washing, drying, and ironing your new curtains before you hem them.
How do you get wrinkles out of RITVA curtains?
We recommend a very good ironing after washing. If you have a steamer, that would work great too.
Are RITVA curtains lined?
Nope! But you can add your own liners if you want to darken a room or add a blackout liner.
Are all IKEA curtains the same length?
The RITVA curtains come in two lengths, 98″ and 118″.
How can I make my IKEA curtains look more expensive?
You can add a lot of luxury with extra panels. The billowing fabric will give your room a more high-end luxurious look. At at that great price, you can afford the extra set! 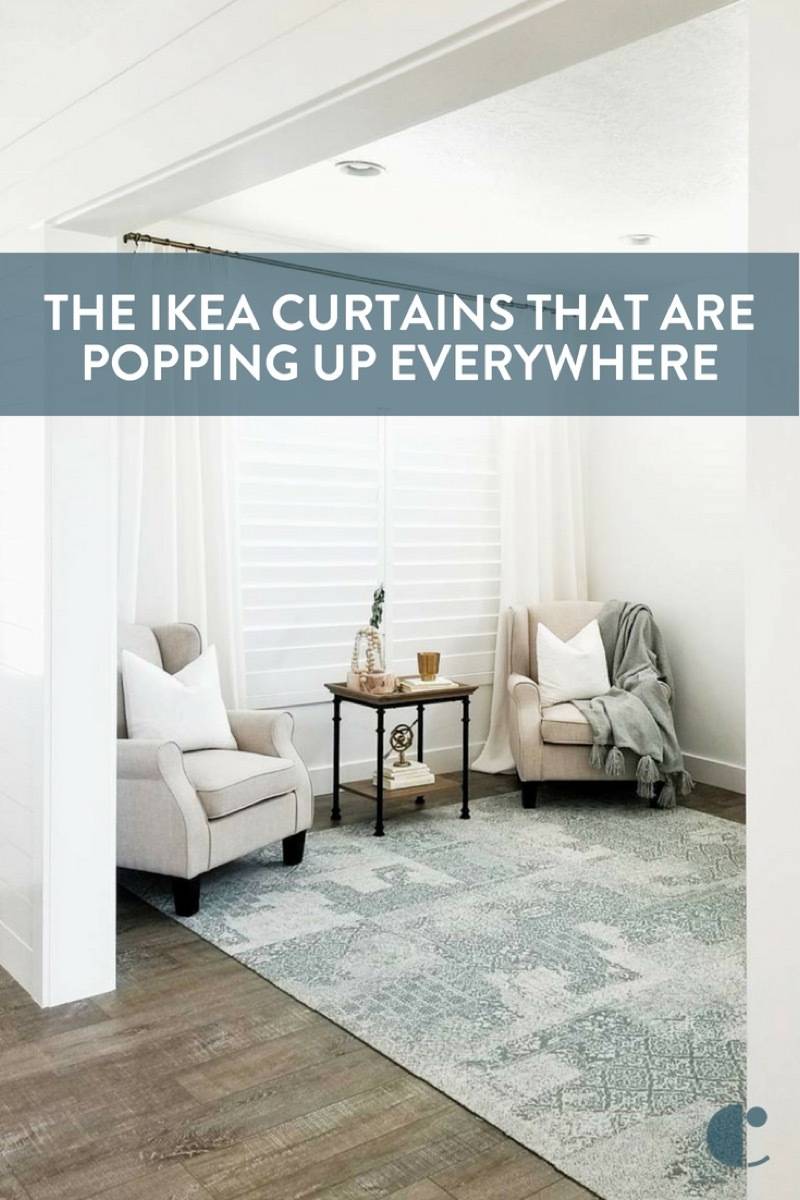
[Photo: @whitelanedecor] The post The IKEA Curtains That Every Designer Swears By appeared first on Curbly. Via https://www.curbly.com/ikea-curtains
Click to set custom HTML
Do you know about the amazing design possibilities of transom windows? Maybe you aren’t even familiar with them – and that’s okay! We’ll explore how these unique windows can add light and aesthetic appeal to your home (interior and exterior facing windows alike). You’ll see why transom windows have been a staple in architecture for centuries, as they are both functional and beautiful. Table of contentsTransom 101: History and TodayFrom their humble beginnings in 14th-century European architecture to their modern look today, transom windows have evolved to become a versatile element in interior and exterior design. 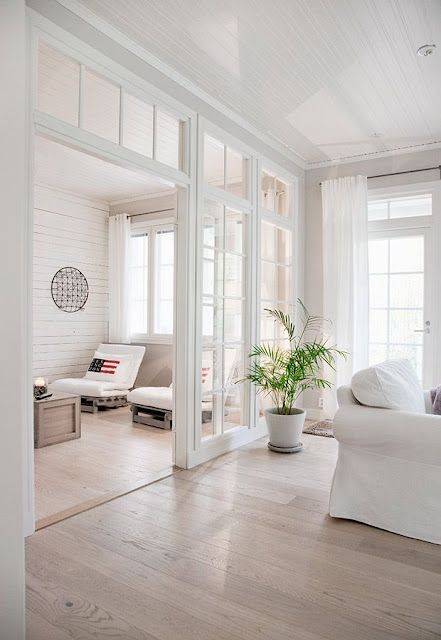
Also known simply as transoms, these windows are positioned horizontally above doors, sidelights, or other windows. They were originally introduced in medieval architecture as a way to allow fresh air and light into interior spaces while maintaining privacy and security. These early transoms, often referred to as fanlights, were typically semicircular in shape and adorned with decorative tracery. 
Over time, transom windows became more elaborate and varied in design to fit different architectural styles and preferences. In the early 20th century, transoms were commonly found in Victorian and Edwardian-style homes, often featuring intricate stained glass patterns. However, as architectural trends have changed and shifted towards simpler designs, these windows have taken on a new look. 
Uses and BenefitsThe main reason people love transom windows is they allow natural light into interior spaces. By positioning windows above front doors, sidelights, or other windows, they let in more daylight. They also maintain privacy since they are typically placed higher up. These windows are great because they can help reduce the reliance on artificial lighting during the day. 
In addition to their practical benefits, transom windows also add interest and aesthetic appeal to both interior and exterior spaces. Whether they feature clear glass for a contemporary look or stained glass for a little vintage charm, transoms are a great addition to your space. 
Installation and PlacementInstalling transom windows requires careful consideration of both practical and aesthetic factors. For new construction or major renovations, we suggest working with a licensed contractor experienced in transom window installation (unless you’re a DIY pro). Contractors can advise on the best placement for transoms based on factors such as the home’s architecture and the width of the door or window below. They also consider the desired level of natural light and ventilation. 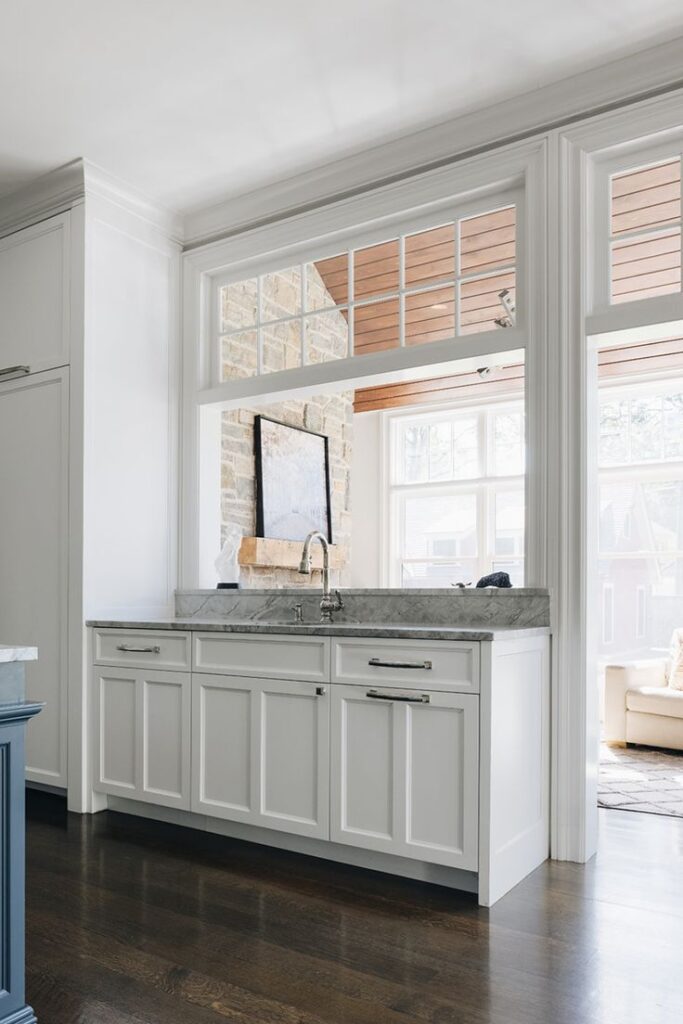
In older homes or buildings, adding transom windows may require special modifications to existing walls or structures. Depending on how much weight the walls can handle, you may need additional support. Brackets or some other reinforcement can help accommodate the weight of the window. 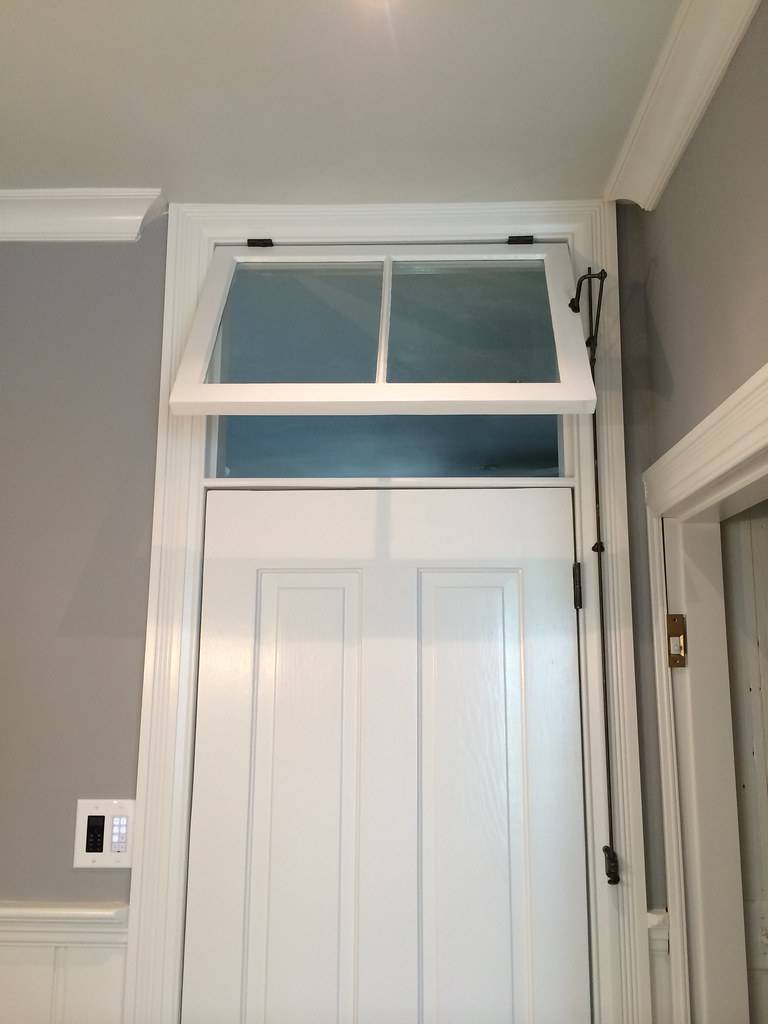
Styles and Design PossibilitiesTransom windows come in a range of styles and designs to fit different design preferences and aesthetic tastes. While traditional semicircular or arched transoms remain popular, there are many modern interpretations. These include rectangular, square, or even triangular shapes. Materials like fiberglass, vinyl, aluminum, and wood are all commonly used for transom frames, adding durability and versatility in design. 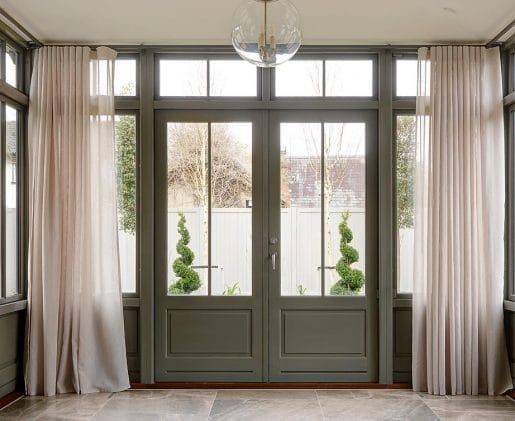
From beautiful stained glass to intricate metalwork, transoms can be customized to reflect your own ideas and complement the overall look of your home. Traditional Semicircular: These classic windows feature a curved, semicircular or arched shape similar to historic architectural styles. They are often adorned with decorative tracery or muntins, calling in a sense of elegance and sophistication to your space. 
Rectangular or Square: If you’re looking for a more modern aesthetic, rectangular or square transom windows are a great option. They offer clean lines and a streamlined appearance. These geometric shapes also compliment contemporary architecture and add a sleek, minimalist look. 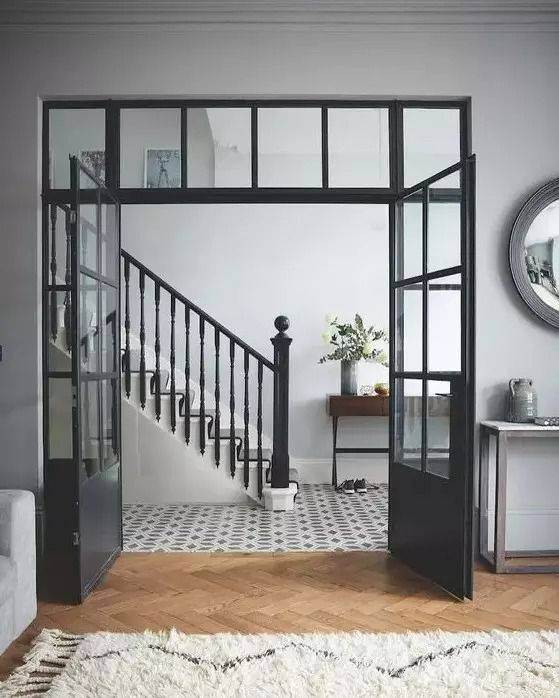
Triangles/Diamonds: Triangle or diamond shapes in transom windows add intriguing visual interest and flair. These shapes create a beautiful focal point while still allowing lots of natural light to enter the room. 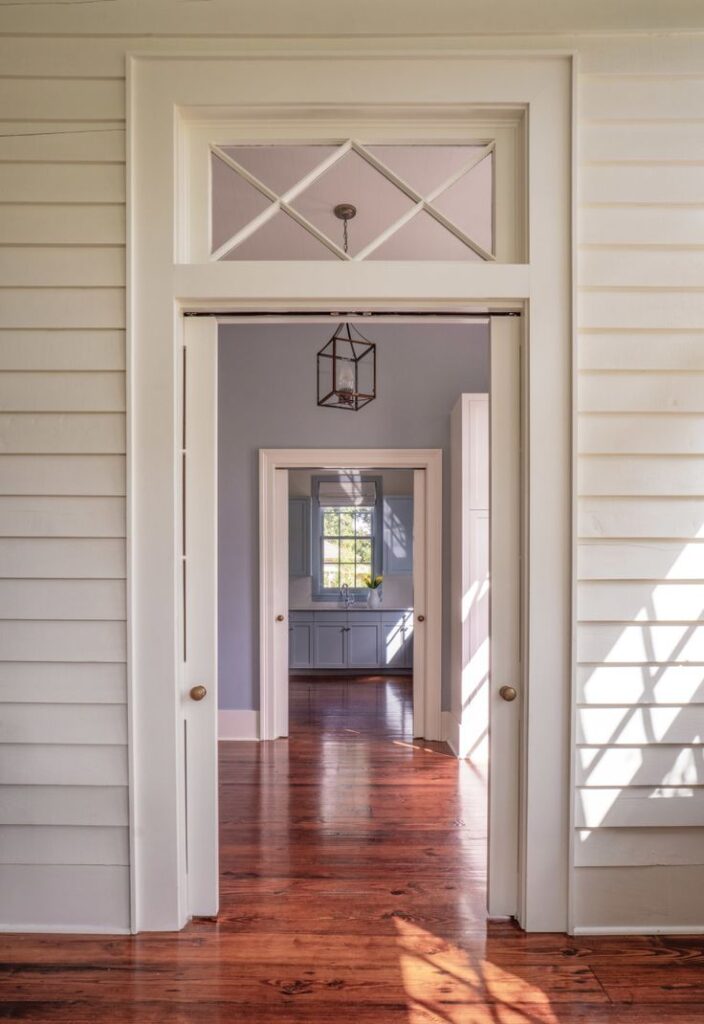
Stained Glass: Stained glass transom windows are a timeless choice if you want to add some color, texture, or visual interest. They often feature intricate patterns, botanical motifs, or geometric designs. Stained glass can serve as stunning works of art while still sticking to their practical function. 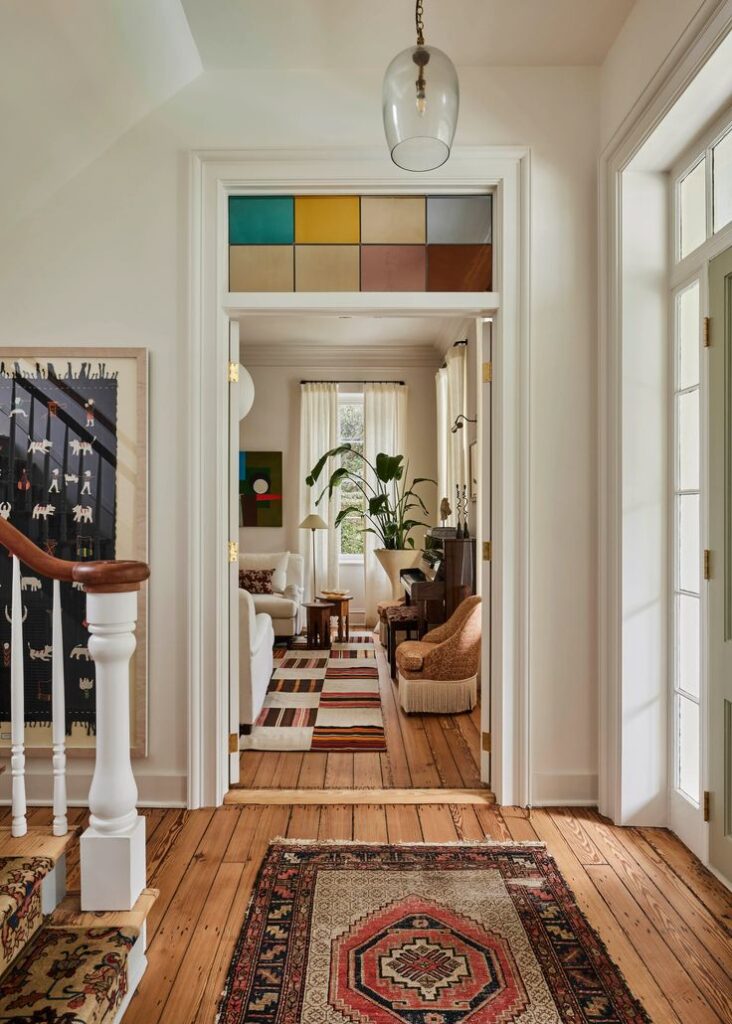
Frosted or Etched Glass: If privacy is a concern, you can frosted or etched glass without skimping on style. These windows diffuse light and hide views while still creating a sense of intimacy and letting natural light filter through. 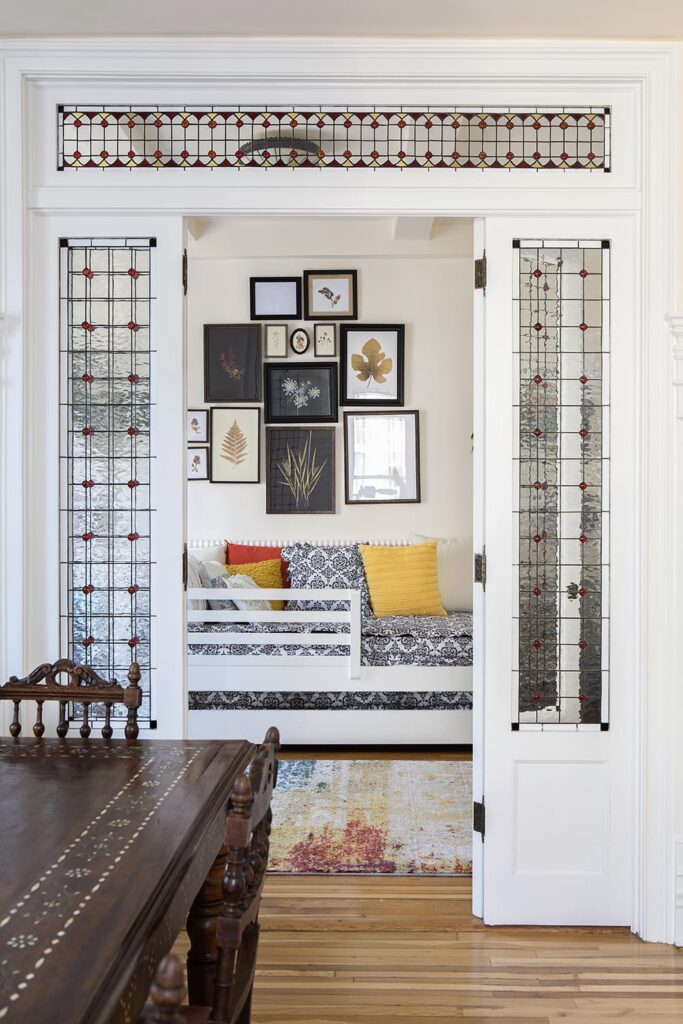
Custom Designs: If being unique and standing out is important, a custom transom window offers endless possibilities. From motifs or family crests to upgrading traditional transom windows, these customizations allow you to express your individual style and elevate the character of your home. 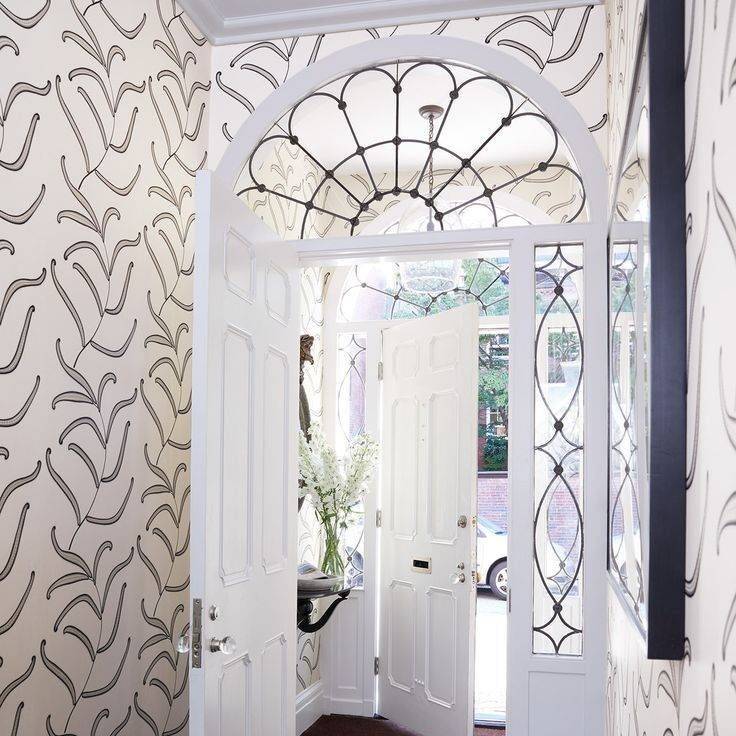
Other ConsiderationsWhen choosing transom windows for your home, it’s important to consider practical factors like energy efficiency and privacy. Choosing insulated glass and proper sealing can help improve energy efficiency and reduce heating and cooling costs. Also, consider installing transoms with hardware such as rods or hooks if you want more ventilation. 
Transom windows have the ability to bring in more natural light and add a touch of historic charm or modern elegance to your home. They are a beautiful and essential aspect of architectural design. So if you’re looking for a home improvement project that will bring a timeless element to your home, transom windows are the way to go. Looking for more window inspo? Check these out!
The post Window Wonders: All You Need To Know About Transom Windows appeared first on Curbly. Via https://www.curbly.com/transom-windows 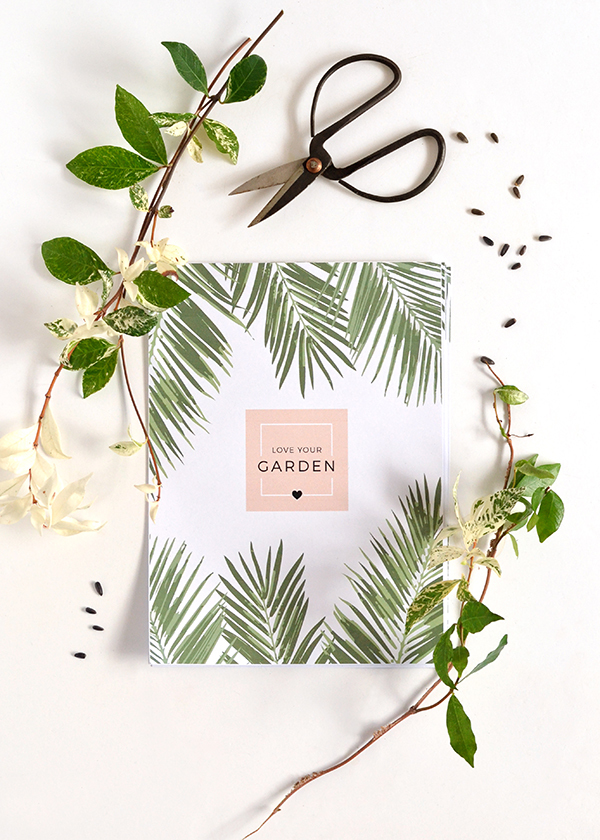
While I like to dream about becoming a skilled gardener someday, the reality is I have a terrible brown thumb. I think a lot of my garden woes have to do with inattentiveness. I forget to water my leafy friends, fertilize them, or do anything that might come close to caring for them. Terrible right? So I decided to make up a free downloadable garden planner to track my plant care, watch seedling growth, monitor pests and plan out my garden beds. Hopefully this will help me get organized in my backyard and straighten out by brown thumb! Materials
Step 1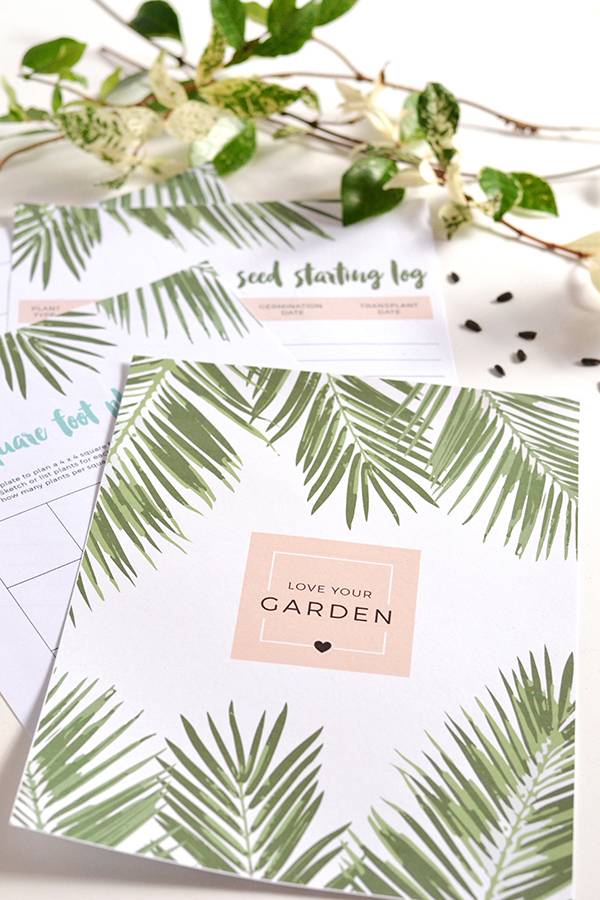
The instructions for this one are as simple as they come – grab some letter-sized copy paper and print out the garden planner. If you’re printing this at home it may print out with white edges; just trim these off with a pair of scissors. 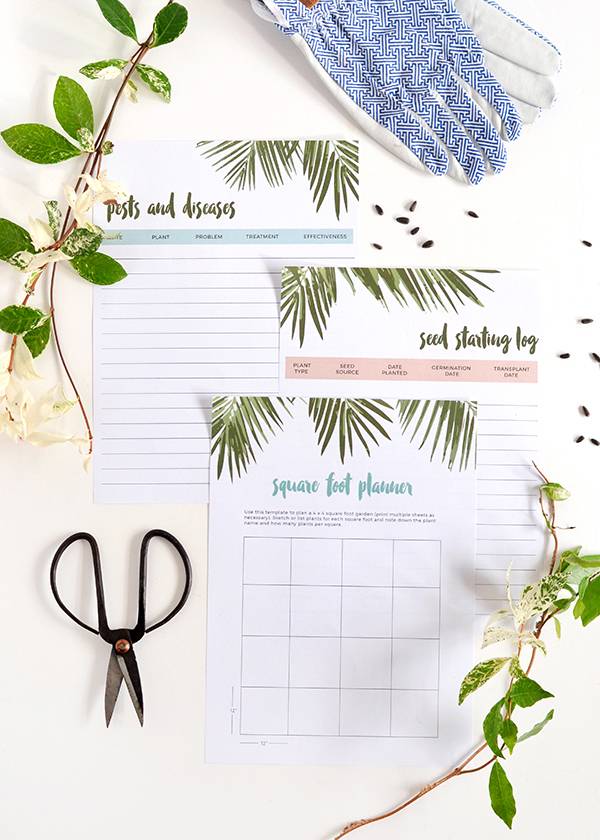
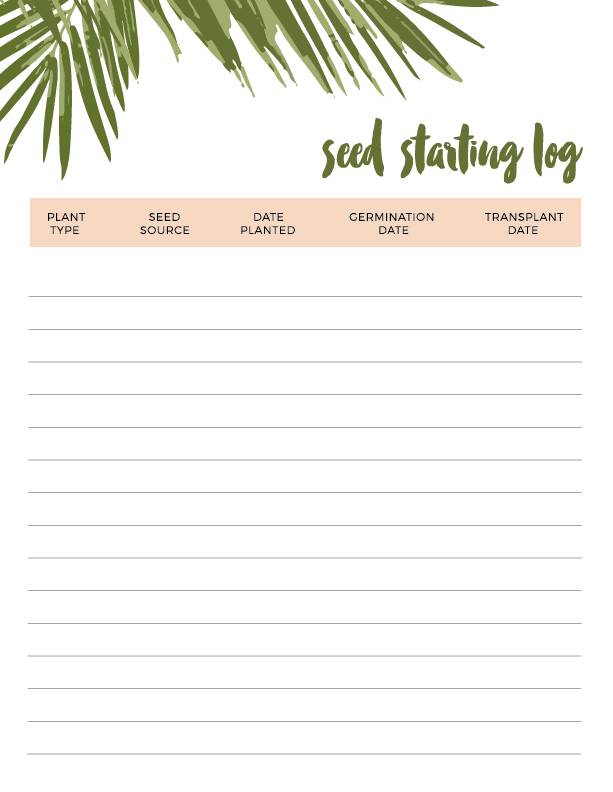
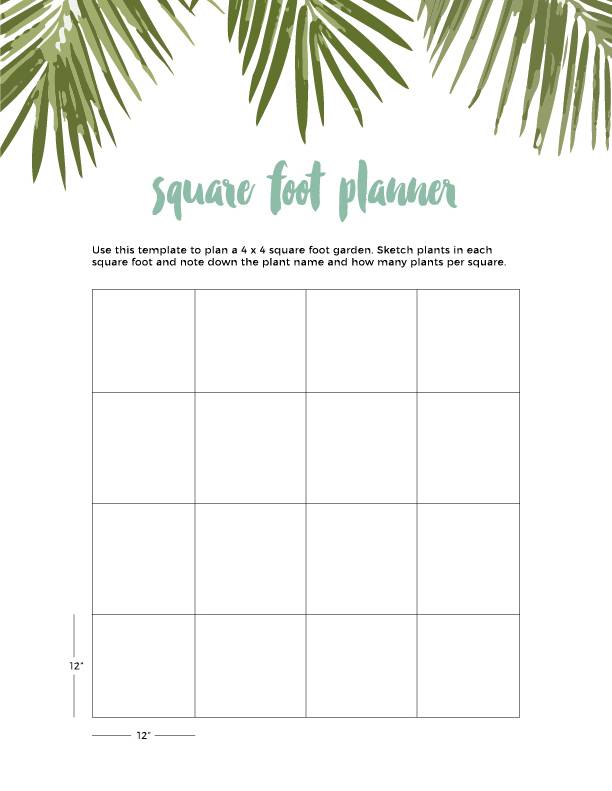
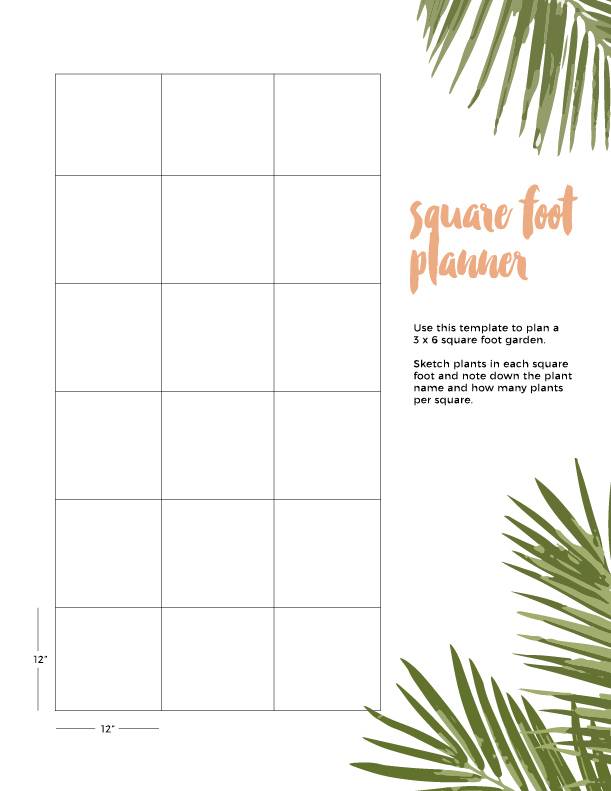
The file comes with 5 pages: a pest tracker, seedling log, 2 square foot planners (one in 4 x 4 format and one in 3 x 6 format) and a spiffy cover sheet to tie it all together. 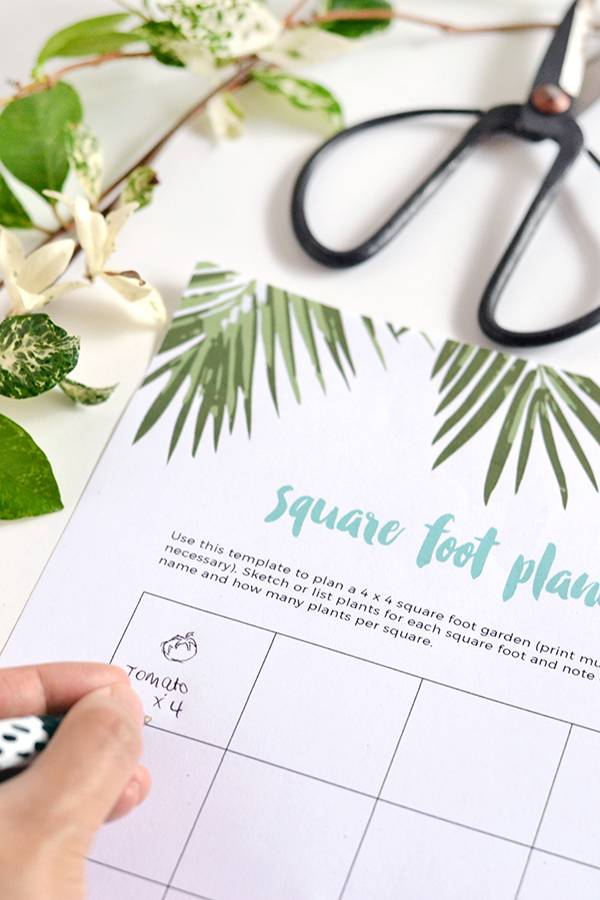
For the seedling log and pest tracker, simply fill the fields in as you plant your seedlings or spot pests. In the square foot planner, make a note of how you’d like to set out your garden beds by allocating each type of plant to a square foot. Draw in a sketch of the plant (if you feel up to drawing), then write in the name and quantity that will be housed in each square.
Note – my quantity of 4 tomatoes in one square foot is just an example and probably not correct! When dividing up your plants into a square foot garden planner, remember to follow the planting instructions on your seed packets to ensure each seed has enough room to grow.
See below for a preview of all the pages in the planner and happy gardening! 

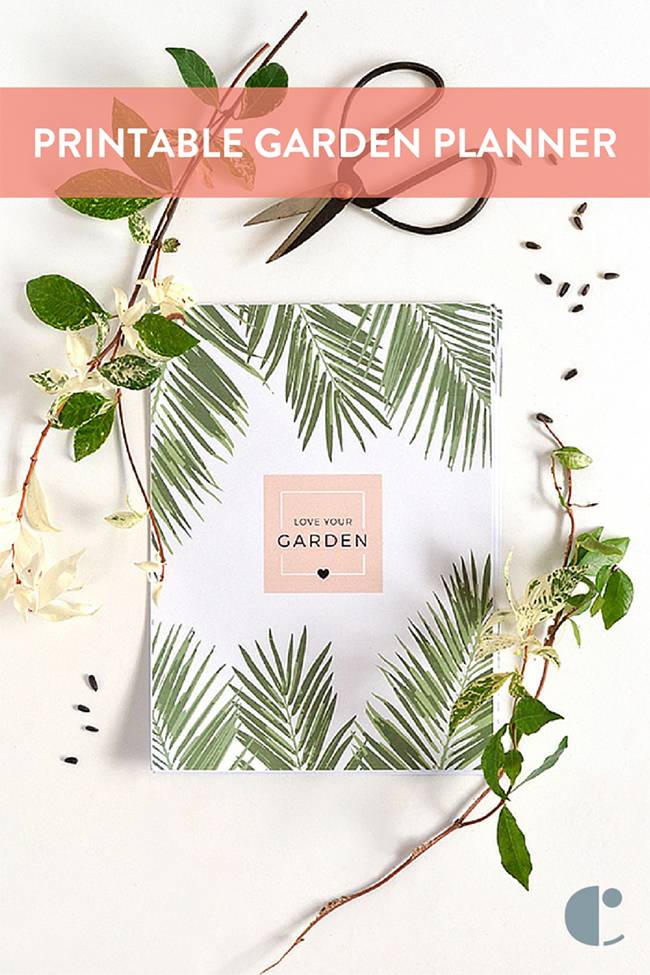
Plan your dream garden with ease using this printable garden planner! Organize your planting schedule, track progress, and design layouts that maximize your outdoor space. Whether you’re a seasoned gardener or just starting out, this free printable tool is a must-have for creating a beautiful and productive garden. Get inspired to cultivate your own oasis and enjoy the fruits of your labor all season long! The post Free Printable Garden Planner appeared first on Curbly. Via https://www.curbly.com/17904-make-it-printable-garden-planner In this article, I will explore the average curtain length and discuss whether you should opt for long or short curtains based on the style you are going for. When choosing the perfect curtains for your space, the length of the curtains can greatly impact the overall look and feel of the room. 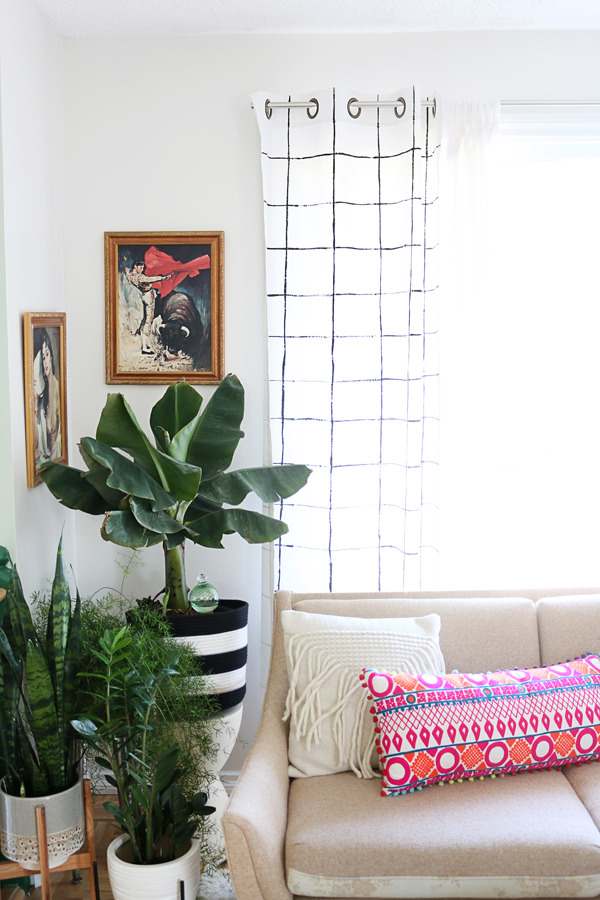
Choosing between long or short curtains is not just about aesthetics but also functionality and practicality. Is there a “right” option for curtain lengths? That depends on who you ask, and often, just asking the question can leave you more confused than you were before. The long and short of it is (no pun intended): it’s up to you. But we’re here to help as you answer the question, “How long should curtains be?” We’ll be taking a critical look at curtain lengths, tall and small. What side are you on? Understanding the Basics of Curtain LengthLet’s get into the nitty-gritty of what constitutes the average curtain length. Typically, curtains come in lengths from 63 inches, which just skim the window frame ledge, to a dramatic 144 inches, with an elegant puddle on the floor. However, the sweet spots that most homeowners gravitate towards are the 84-inch and 96-inch lengths. These sizes offer enough versatility to suit a range of window heights and room styles without overwhelming the space. In my experience, choosing the right length isn’t just a matter of measuring from the curtain rod to the floor. It’s about understanding the effect you want to achieve in the room. Do you want the space to feel more intimate and grounded or an airy, more expansive feel? The length of your curtains can significantly impact this. For example, opting for the longer 96-inch curtains can enhance a room’s height, making the ceiling seem higher than it is, whereas the 63-inch or 84-inch options can help create a more cozy, contained atmosphere. It’s fascinating how something as simple as the length of your curtains can transform the feel of a room, and it’s a testament to the power of thoughtful interior design. Curtain Lengths Overview:Floor Length Curtains
Let’s start with what’s probably the most common curtain length: to the floor. These are the standard curtain lengths for hanging curtains—either hitting the floor exactly or hovering a half inch off the ground. Sheer white curtains hung like the ones above (from Little Green Notebook), and the ones below (via A Cup of Jo) are both modern and classic. The curtain lengths make the ceilings seem taller and the room more polished, maybe even a bit formal. 
Cons to floor length?They may make your room look too formal for your liking. Dust will inevitably collect around the bottoms. Also, children may be more likely to grab them and use them as a climbing rope. If you’re asking yourself, “Should curtains go to the floor?,” and kids, pets, and dust aren’t a concern, then floor-length is probably your best bet. 
Floor-to-Ceiling Length Curtains
You may have heard that hanging your curtains from the ceiling will make your living space appear taller. But how? Visually, your eye tends to follow lines. Whether it’s the double yellow line on the highway or the walkway to your front door, your eye is drawn toward (and up) pathways. By hanging your curtains from the highest point on the wall, your eye travels up the line, causing you to notice that there is height in the space you are standing in. 
If your living space has high ceilings already, compliment them with tall curtain lengths. Floor-to-ceiling curtains can also help to divide space, whether you’re tucking away a window seat (like the floor-to-ceiling curtains above) or cutting a whole room in half. Heads up: The worst thing you can do when hanging curtains from the ceiling is to hang them too short. The heightening trick-of-the-eye doesn’t work well if the curtain line abruptly cuts off before it hits the ground. Short Curtains
Then there’s the other end of the curtain length spectrum: short curtains. Visually speaking, high-water style is not the most appealing way to hang curtains. The shorter length can appear dated. Also, it can cut the visual height of your room in half. However, short curtains are sometimes the best option from a purely practical standpoint. Many parents choose shorter curtains for their kids’ rooms, probably to avoid the whole Tarzan situation or just to limit sticky fingers from touching the window treatments. You may also be forced to hang short curtains in the presence of heat-producing radiators or heaters. 
If you hang short curtains, aim to hit a perpendicular mark on the wall. For instance, the curtain lengths should meet at the top of the baseboard or the bottom of the windowsill. 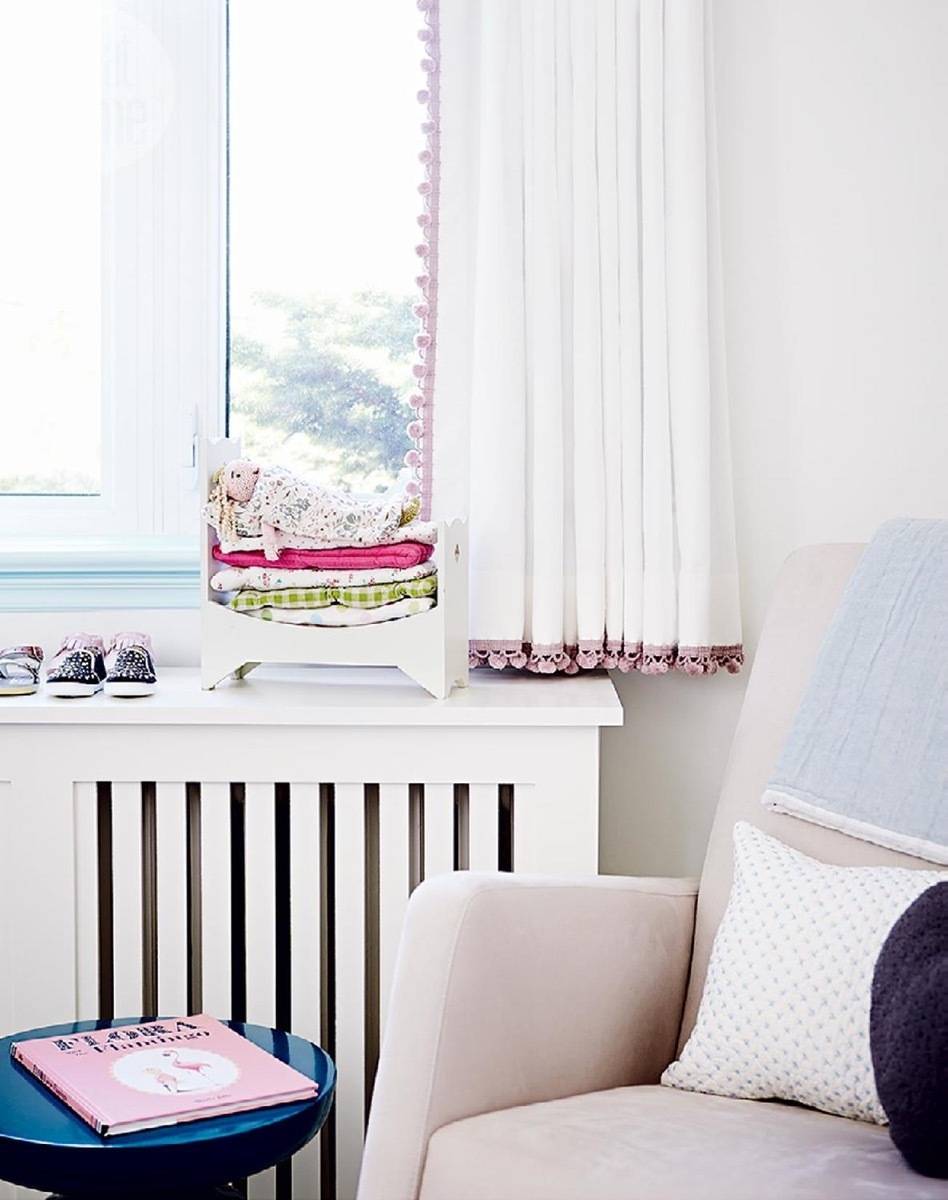
Café Length Curtains
Café curtains are fairly common where there’s a window sill over, say, a sink in a kitchen. Or, in their namesake, cafés, where you wouldn’t want curtains dragging the floor of such a busy, public place. 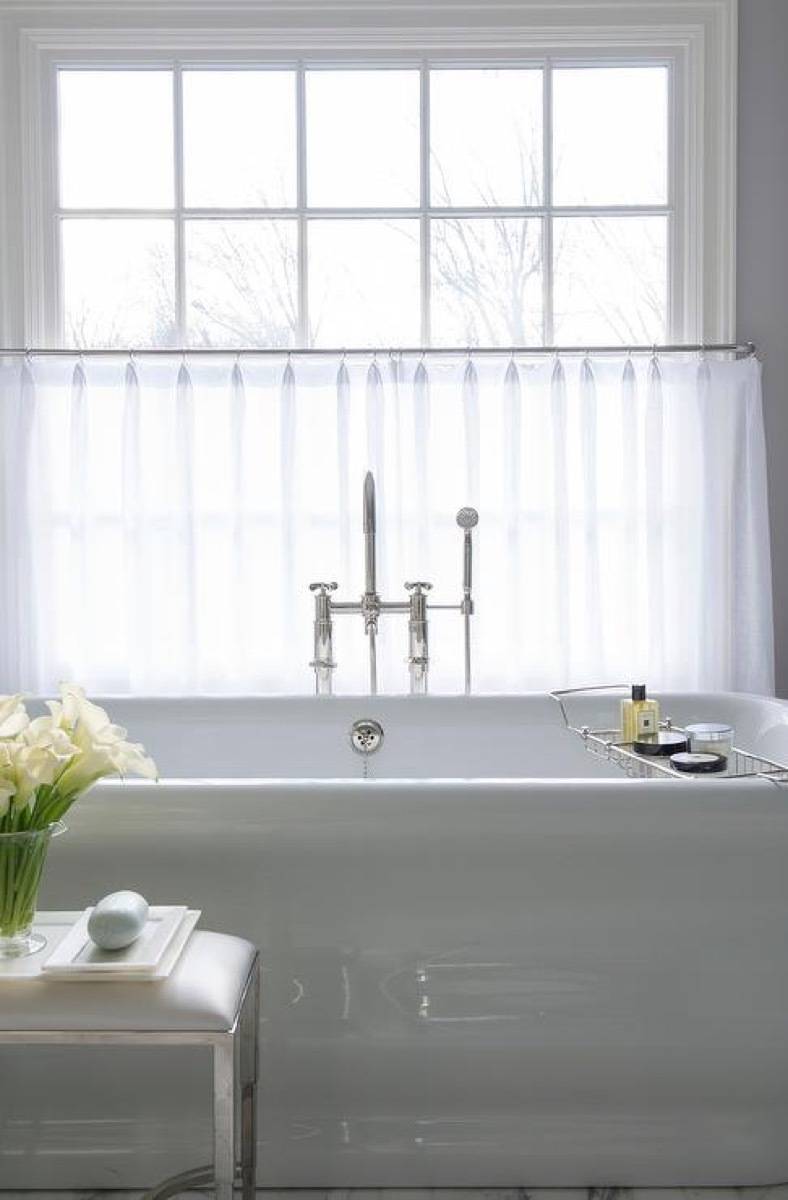
Café curtains are usually hung at the halfway point of a window or on the bottom pane of a two-part window. They’re great for when you need a bit of privacy (like in this bathroom pictured above) but don’t necessarily want to block out all the natural light coming through the window. Because café curtains are short and cute, they can give a room a more casual vibe. Breaking at the Floor
We’ve discussed short curtains and curtains that hit the floor perfectly. What curtain lengths are left? Long curtains. The more billowy a curtain becomes as it breaks at the floor, the more dramatic it will look. A simple “kiss” to the ground, like the curtains pictured above (via Amber Interiors), adds a touch of flair to this otherwise simple window treatment. This option is similar in style to floor length but will require more care – dust bunnies like to live in the folds of the billowing curtains! 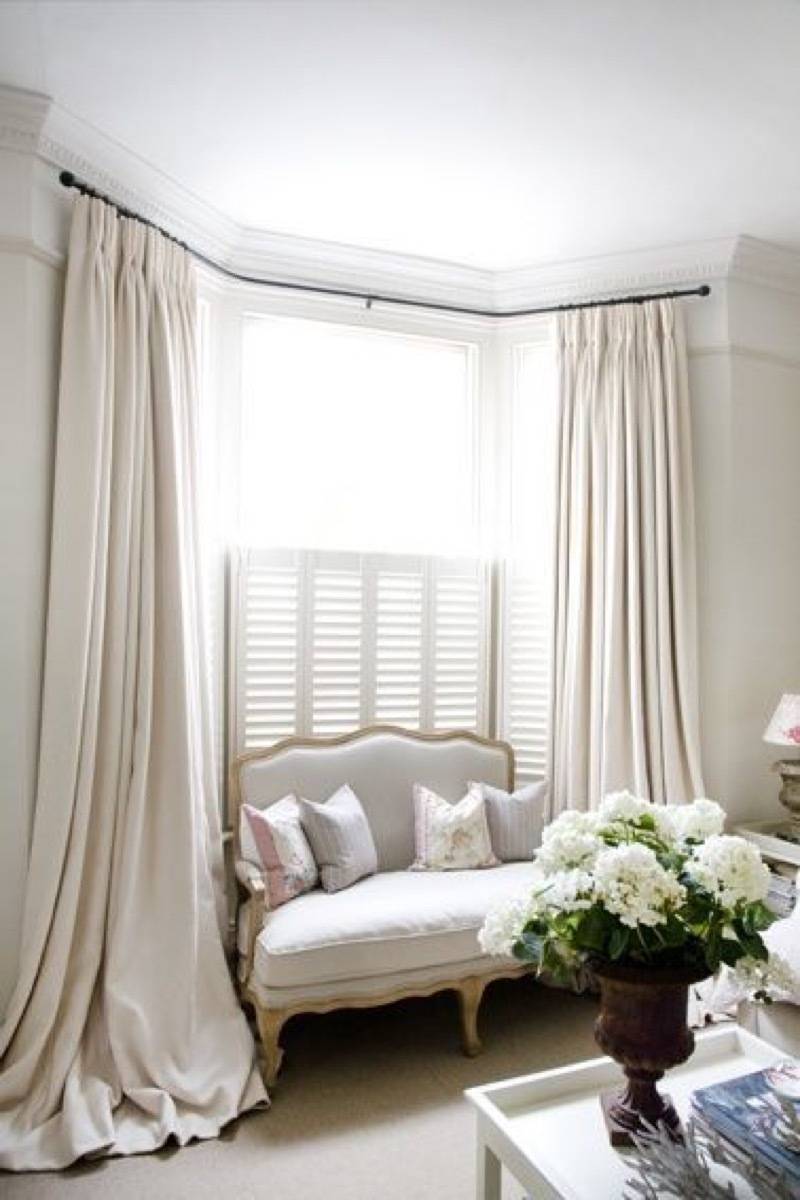
Last, there’s the most extreme curtain length: puddled. This is a typical French look (think the Rococo period) and is most successful with high ceilings and, usually, expensive fabric. Silks or velvet are typically going to billow the best, being both lightweight and natural fibers. Obviously, this look adds a lot of glam to even the simplest decor. But you really need the right architecture to pull it off. 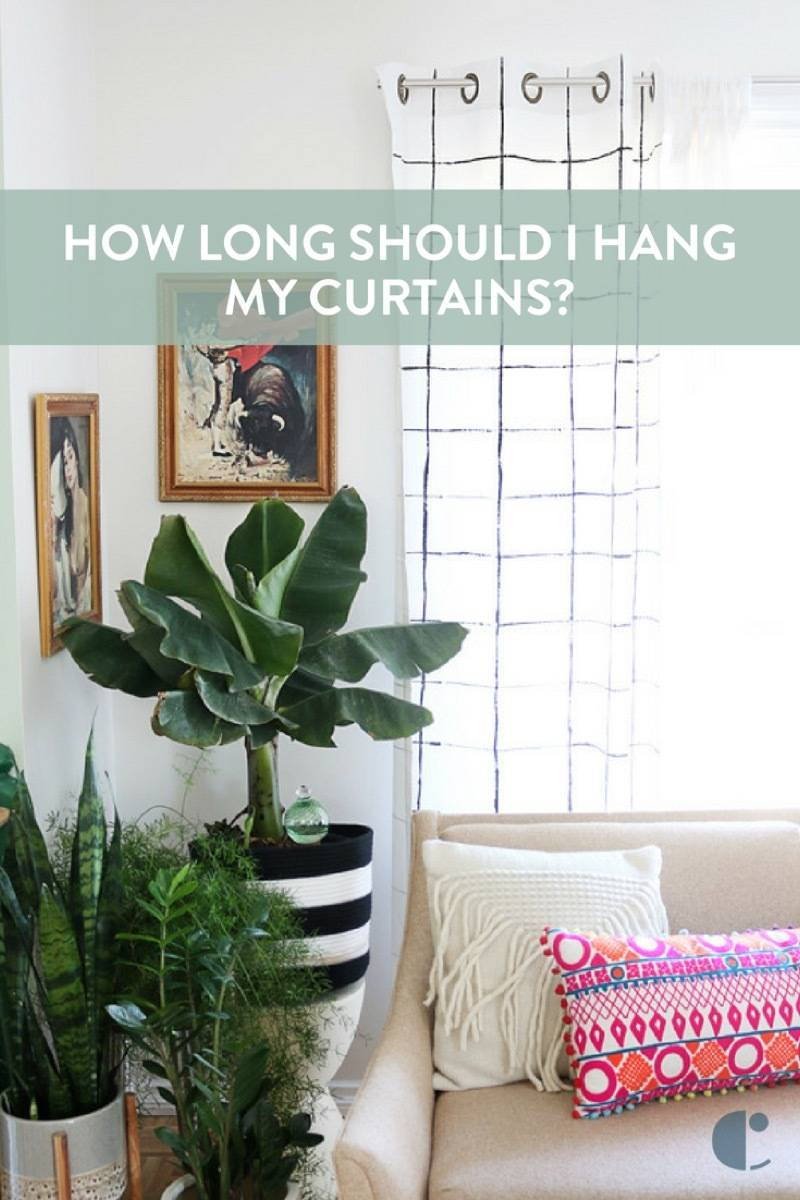
So, how long should curtains be?The answer is up to you, your style, and your needs. The Case for Long CurtainsLong curtains hold a special place in creating interiors that exude elegance and sophistication. Imagine walking into a living room where the curtains cascade gracefully to the floor – it’s an immediate signal of luxury and attention to detail. For me, long curtains are not just decorative elements; they are transformative. They have the unique ability to make ceilings appear higher, adding a visual lift to the room that can be breathtaking. Utilizing long curtains can also significantly affect how light filters into a room, offering a soft, diffused glow that can change the entire ambiance. Moreover, the fluidity of long curtains introduces a sense of movement and depth, creating dynamic spaces that feel alive and inviting. Opting for long curtains is a choice that tends toward creating spaces that feel grand and intimately connected to the nuances of light and space. Embracing the Charm of Short CurtainsThere is a distinct beauty in the use of short curtains that cannot be overlooked. They bring a unique flair to a room, offering a casual yet stylish ambiance that long curtains sometimes can’t achieve. I’ve seen short curtains work wonders in spaces where the vibe is meant to be unfussy and welcoming—think of a sunlit kitchen with linen curtains, where every morning feels like the beginning of something wonderful or a cozy reading nook that invites you to curl up with a good book. Shorter lengths have a way of making these spaces feel more accessible and lived-in. Short curtains are particularly suited for areas where long drapes might seem too bulky or out of place, like a bustling kitchen or a compact bathroom where simplicity is key. Moreover, they can be a savvy choice for showcasing beautiful window trim or when you have a radiator, a deep sill for plants, or furniture that would conflict with longer curtains. In these instances, the charm of short curtains shines through. They blend functionality with a laid-back style that can instantly make a room feel more inviting and homely. Making the Decision: Style Versus PracticalityChoosing between long or short curtains has always felt to me like deciding between two distinct fashion statements for your home. It’s a reflection of your personal style intertwined with the practical needs of your space. In my own journey of decorating, I’ve realized that this choice isn’t just black and white. It’s about finding a balance that speaks to you. Long curtains were my go-to for those spaces where I dreamt of injecting a touch of drama and sophistication. They added an undeniable elegance that felt right for the setting. On the other hand, in areas where daily activities buzzed with energy, like in the kitchen or a child’s playroom, I leaned towards short curtains for their practicality and ease of maintenance. My advice? Consider the room’s function and your desired ambiance. Ask yourself if the space calls for the sweeping elegance of long curtains or the approachable charm of short ones. It’s about marrying the practical aspects of your life with the stylistic expressions of your personality. This harmony between style and practicality has guided me through many decorating dilemmas, leading to beautifully designed, wonderfully livable spaces. Tips for Customizing Your Curtain LengthWhen it comes to choosing the perfect curtain length for each room, I’ve discovered a few strategies that might help you tailor your choices to your unique spaces. Personally, I love using floor-length curtains to infuse a room with a sense of formality and elegance. For a more relaxed vibe, curtains that just kiss or hover an inch above the window sill have never failed me. It’s fascinating to experiment with these lengths in various rooms and observe how they influence the rooms’ character. Mixing long and short curtains within your home isn’t just allowed; it’s encouraged to forge a distinct and personalized aesthetic. Remember, experimenting is key to unlocking the perfect curtain length that harmonizes with your style and your living space’s usefulness.
So, what are the best curtain lengths for your space? Are you Team Shortie? Puddler? Somewhere in between? Leave us a comment and let us know!
The post Curtain Lengths: How Long Should Your Curtains Be? appeared first on Curbly. Via https://www.curbly.com/curtain-lengths 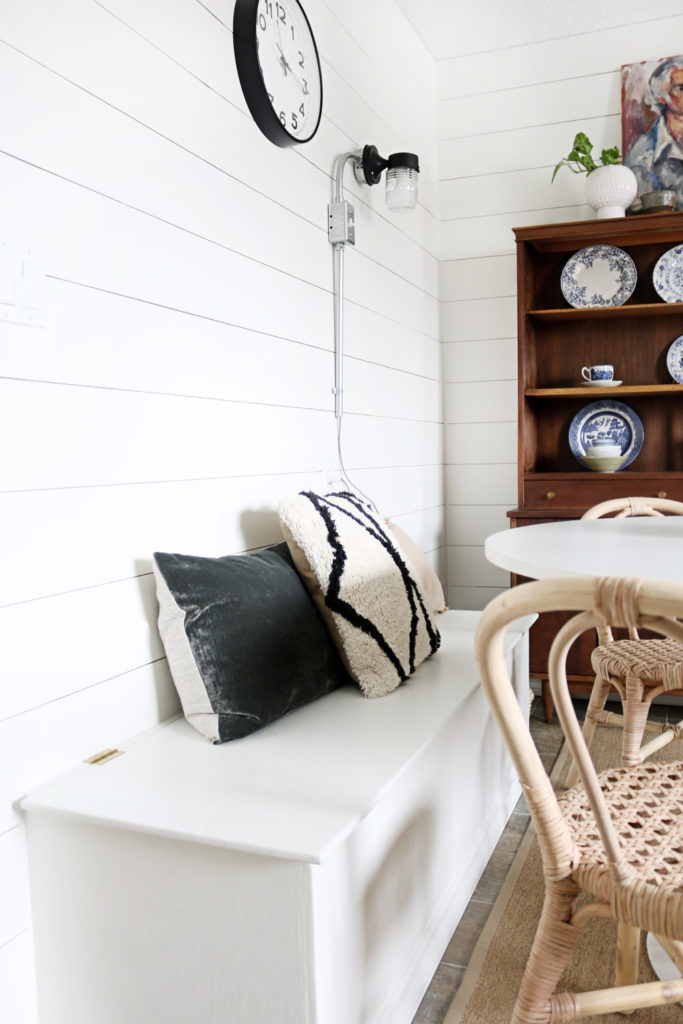
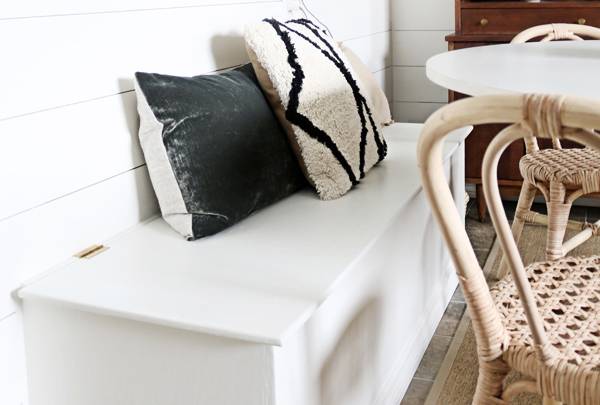
We’d had enough of our dated kitchen, so we decided to give it a full-on facelift, while staying on a budget. Follow along with our whole series: Lidy’s Kitchen Makeover. 
One of the more practical issues we faced with our current kitchen was inadequate storage. Because installing more cabinets was a bit out of our budget, we decided to make a simple built-in bench for a two-for-one punch: a place to sit AND a place to put things. Bonus! materials
A note before we begin: The finished dimensions of the bench were 18”X18”X60”, since the 2×4 frame needed to be slightly shorter due to the 1/2” plywood on the sides, front, and top (actual dimensions of a 2X4 are 1.5X3.5”). Step 1
First, using your miter saw, cut the 2x4s to length. You will need:
Step 2
Using a Kreg pocket hole jig, drill holes for assembly. 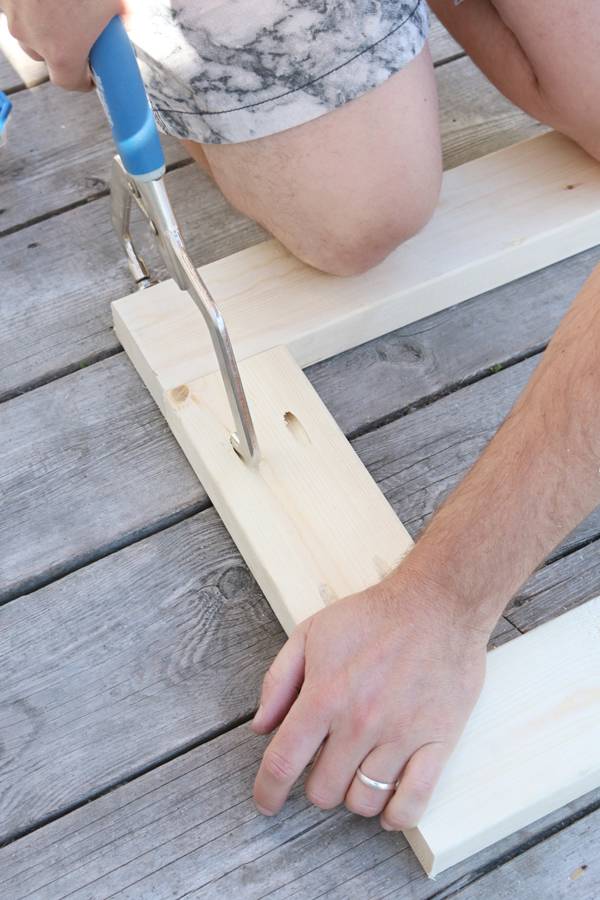
Use a kreg right angle clamp to stabilize the 2×4. 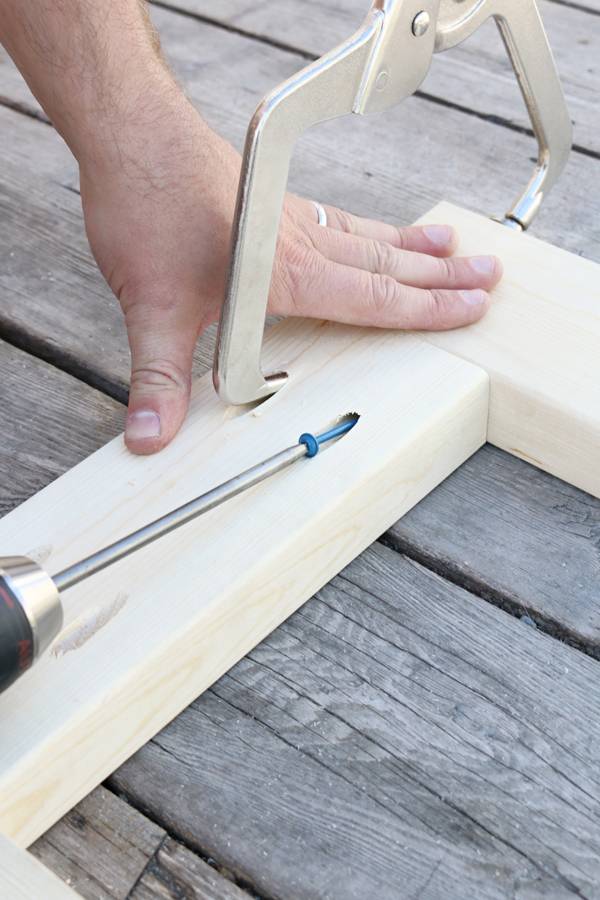
Attach with pocket hole screws to construct the frame of the bench (refer to picture below). 
Repeat until complete. Step 3
Using 1/2” Plywood for the walls of the bench, cut with table saw accordingly: Sides: 2 X 17.5X17.5″ Front: 1 X 17.5X60” Top: 1 X 62X19” (1” overhang on sides and front) Step 4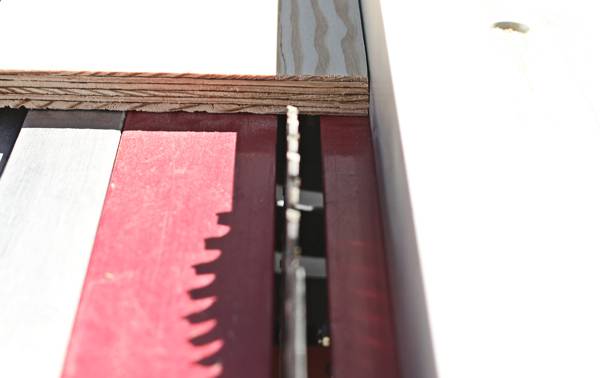
Cut a 3/4” strip off the top with table saw to accommodate hinges. We chose 3/4” hinges so that both sides of the joint are supported by the 2X4 underneath. Trim the overhang off of this thin strip so that the ends are flush to sides of the bench (60”). Step 5
Use wood glue and a brad nailer to attach the plywood front, sides, and 3/4” hinge strip. 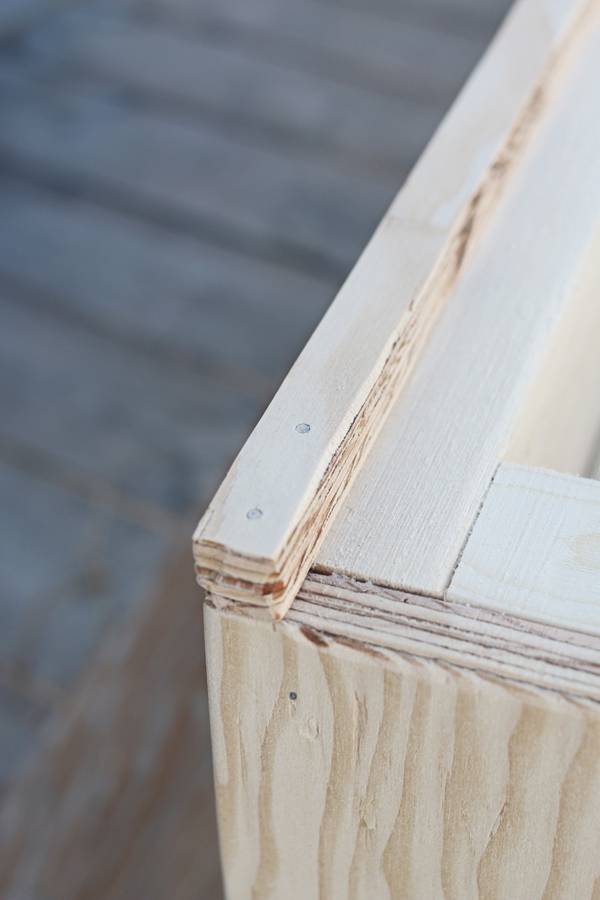
Step 6
Use a round-over router bit and rout all edges of the bench and lid to prevent splintering. Step 7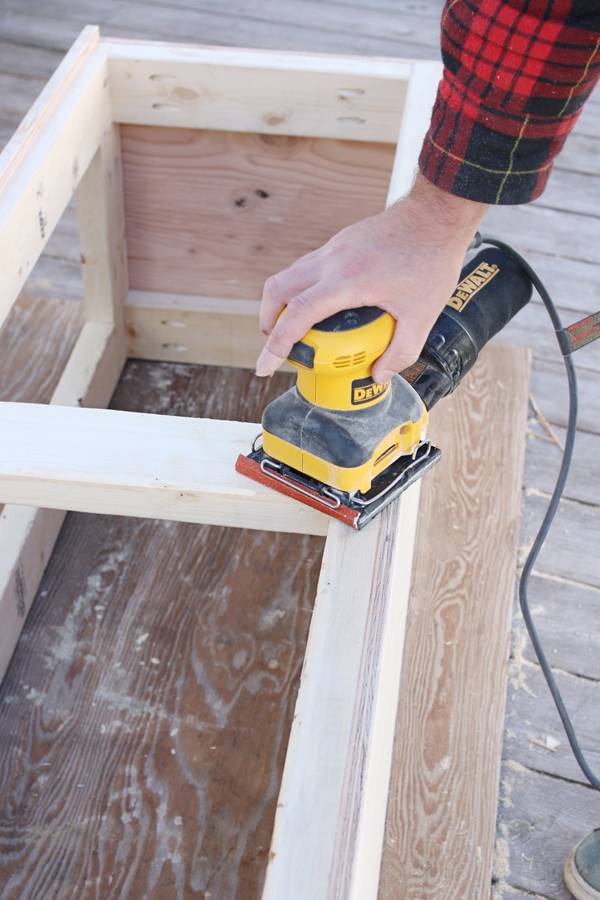
Use a palm sander to sand entire project. Medium grit first, then fine grit. Wipe down with tack cloth. Step 8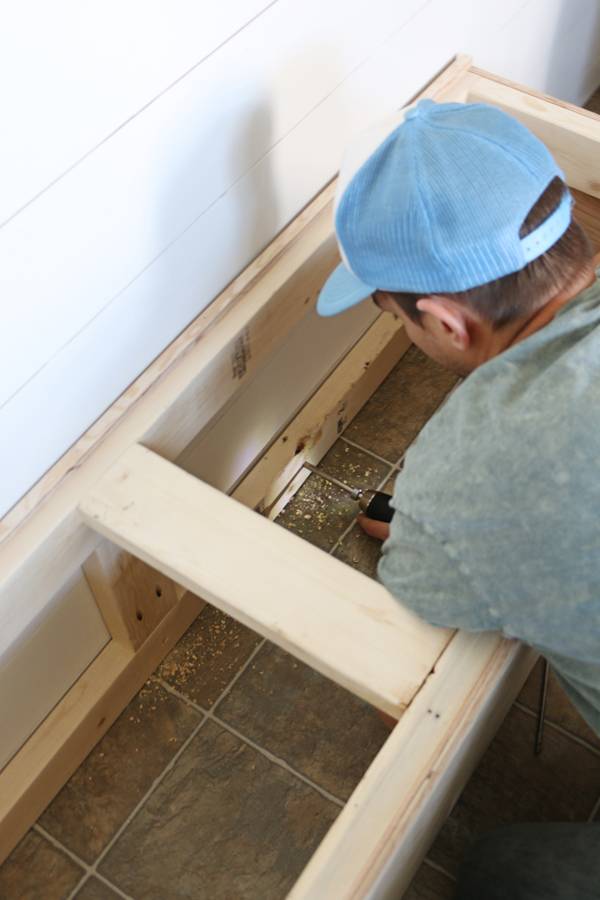
Use a stud finder to mark studs in the walls. Place the bench where it belongs and mark and drill pilot holes for the screws to anchor the bench to the wall studs and the sub-floor. We used 2.5” wood screws and the pocket hole drill bit for pilot holes. Step 9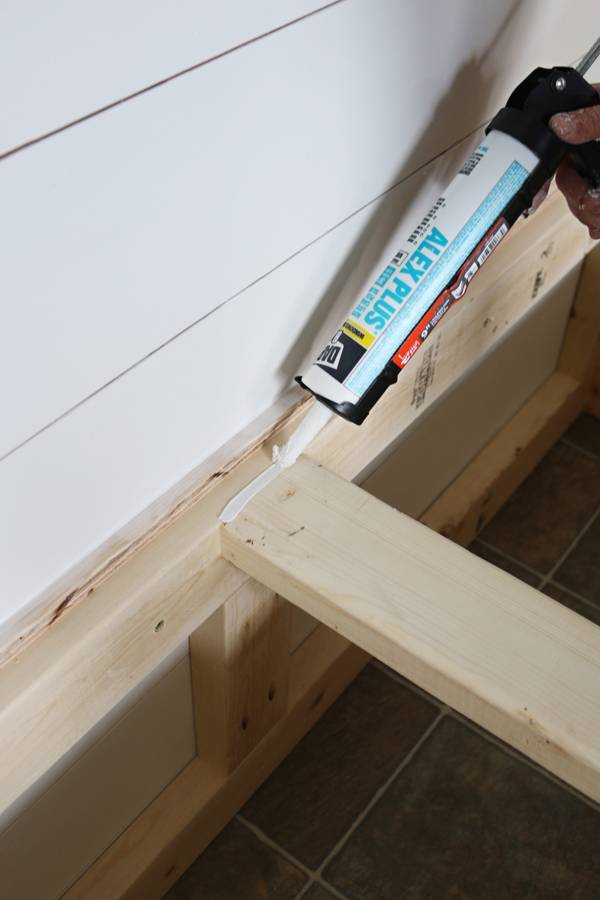
Caulk seams and nail holes and wipe clean with a damp cloth. Allow to dry. Step 10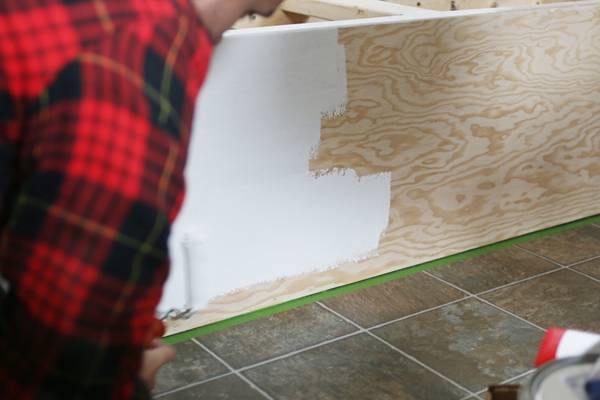
Paint bench and lid separately, allowing to fully dry between coats. Step 11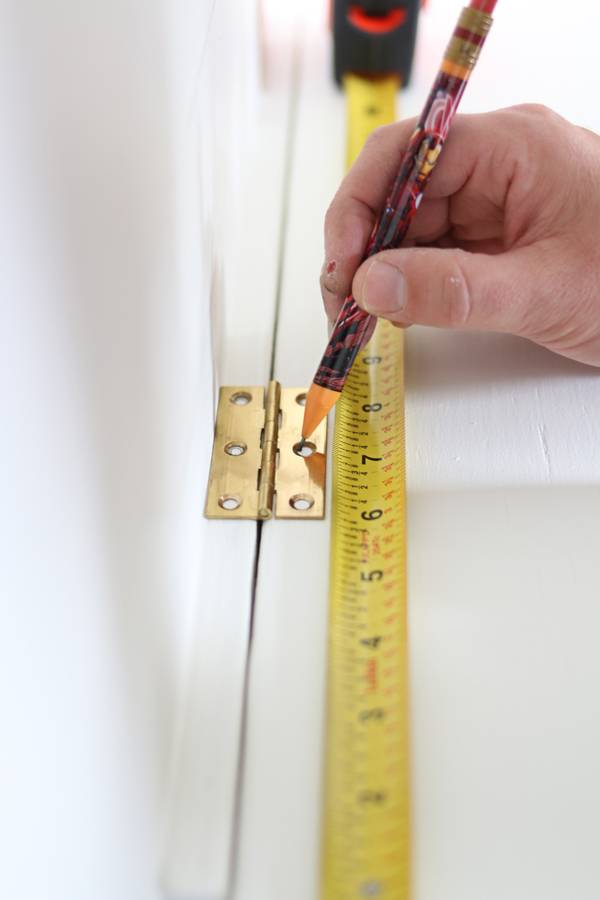
Mark holes for attaching hinges to bench and lid. Step 12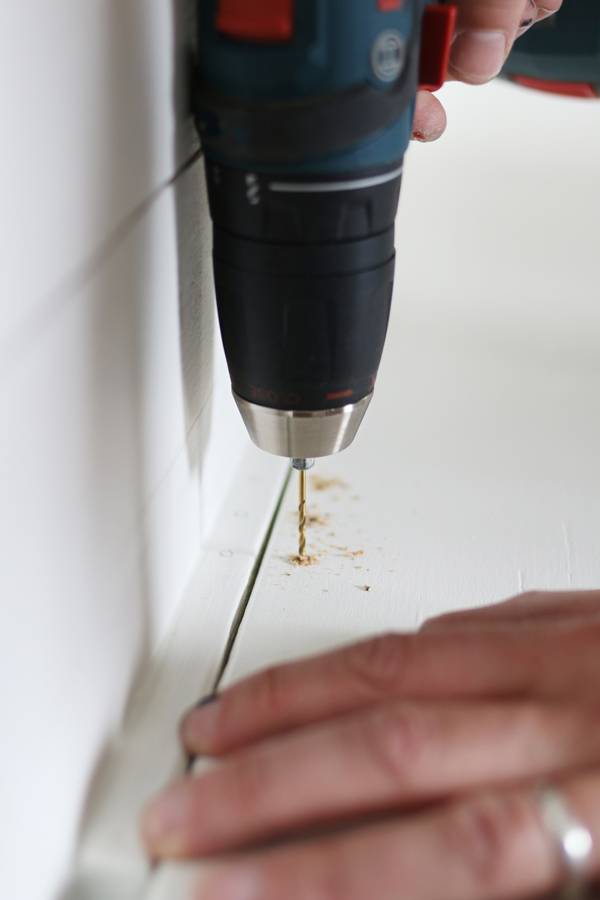
Drill pilot holes. Step 13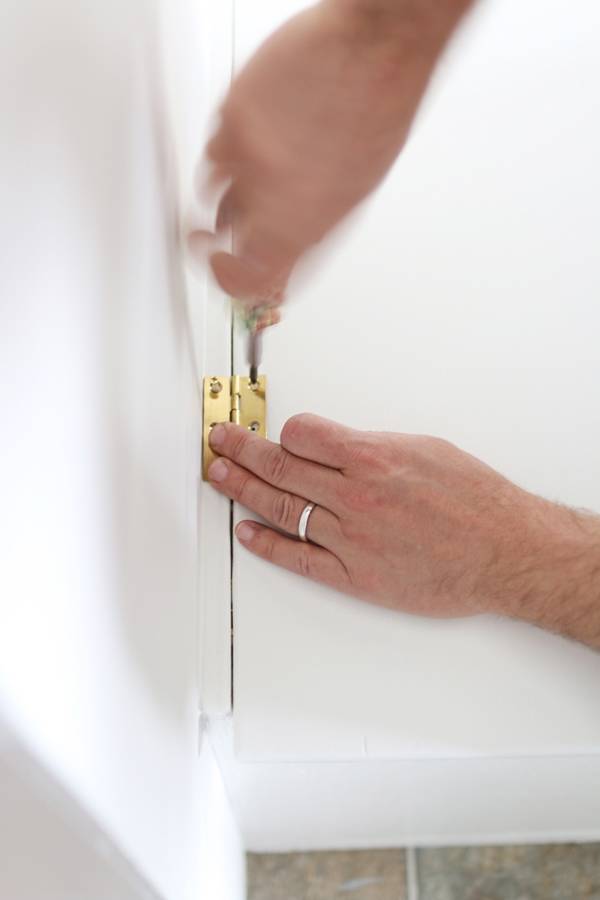
Use screwdriver to fasten (avoid stripping, tear-out). Step 14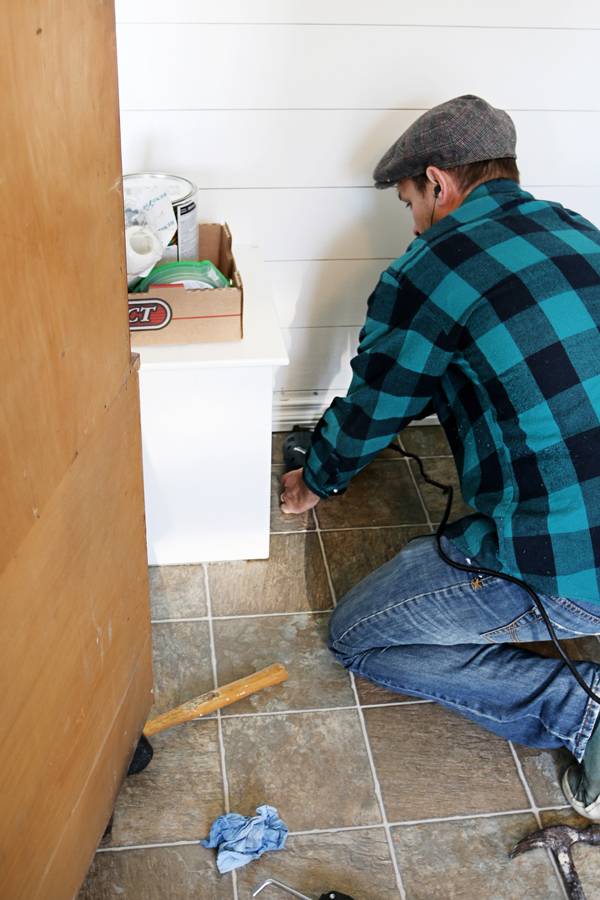
Finish off bottom of bench with painted baseboards in conjunction to the rest of the wall using a brad nailer. Caulk seams and nail holes and touch up with paint. 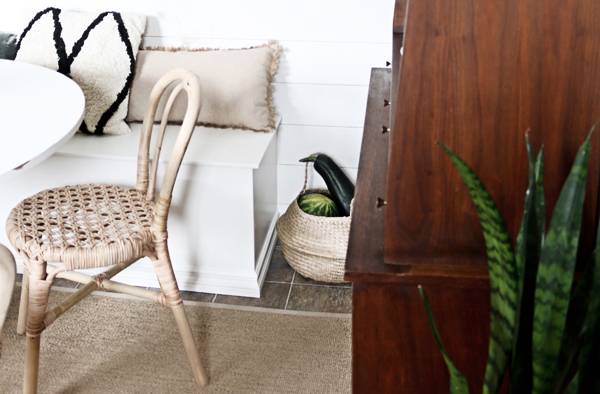
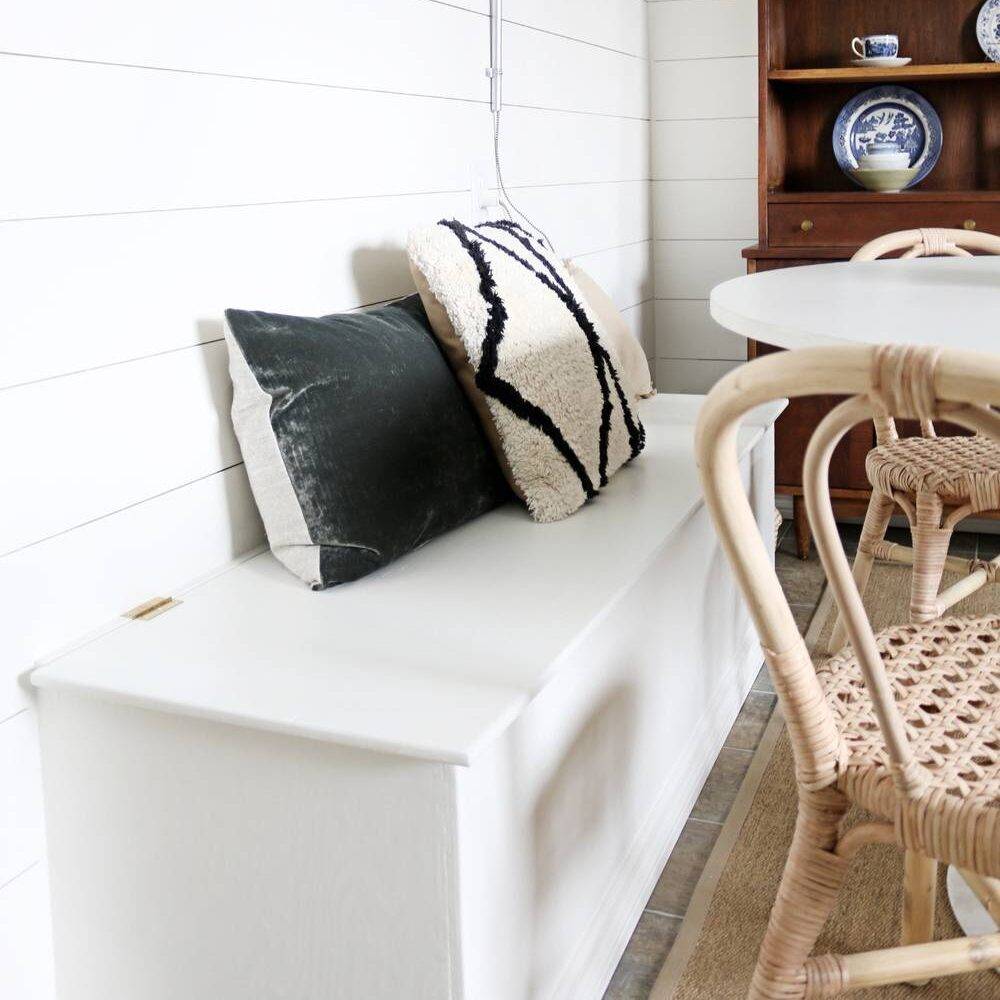
Having a built-in bench is a game changer for our little kitchen nook. It provides enough extra seating for 2-3 people and plenty of storage for all our many pots, pans and more. Just one more little DIY that you don’t want to miss before the big reveal, so stick around!
Follow along with our whole series: Lidy’s Kitchen Makeover.
The post How to Make a Simple Built-In Bench for Extra Storage appeared first on Curbly. Via https://www.curbly.com/18300-how-to-make-a-simple-built-in-bench-for-extra-storage The IKEA TROFAST storage units are where organizing magic and fun meet! These units are great for transforming an ordinary space into an extraordinary place for creativity and organization. If you aren’t familiar with all the cool things you can do with your TROFAST (or you’re deciding on whether you want to get one as your next storage solution), we’ve got you covered. Table of contentsIKEA TROFAST Magic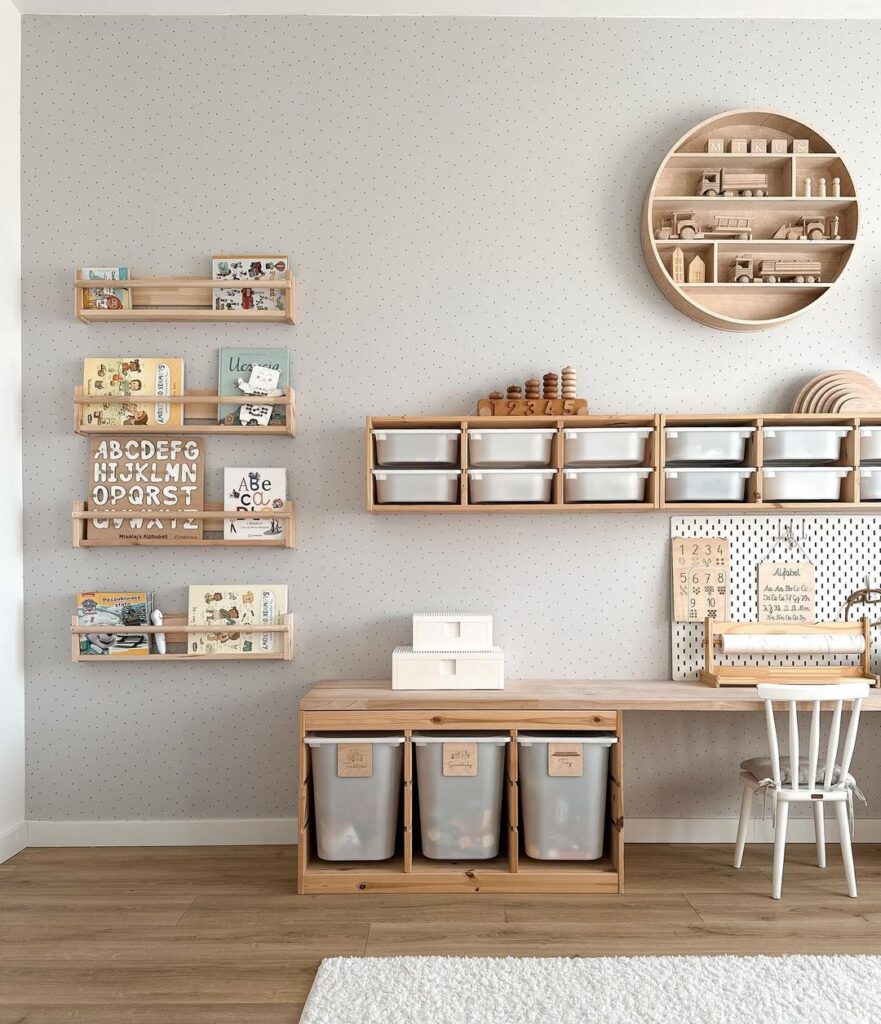
So what exactly is a TROFAST? It’s a customizable storage system that’s as adaptable as it is stylish. TROFAST units, created by the innovative minds at IKEA, feature a modular design to accommodate the ever-changing needs of your home. We love them because of their sturdy frames and array of bins, shelves, and accessories to choose from. TROFAST units offer a world of possibilities for organizing everything from toys to clothes to crafting supplies. Their modular design is what makes TROFAST special. Because of its ability to transcend basic storage, it’s a hub of creativity and play. From building the ultimate toy station to creating a cute and cozy reading nook, these units can be repurposed and customized for any need or aesthetic. Now that you know what a TROFAST is, let’s look at 15 of the best hacks to take your IKEA organizing game to a new level! TROFAST Hacks for Kids1. Toy Storage Solved: Create a clutter-free space for your kids to play by transforming TROFAST units into toy storage shelves. Use different-sized bins to categorize toys by type, making cleanup a breeze. 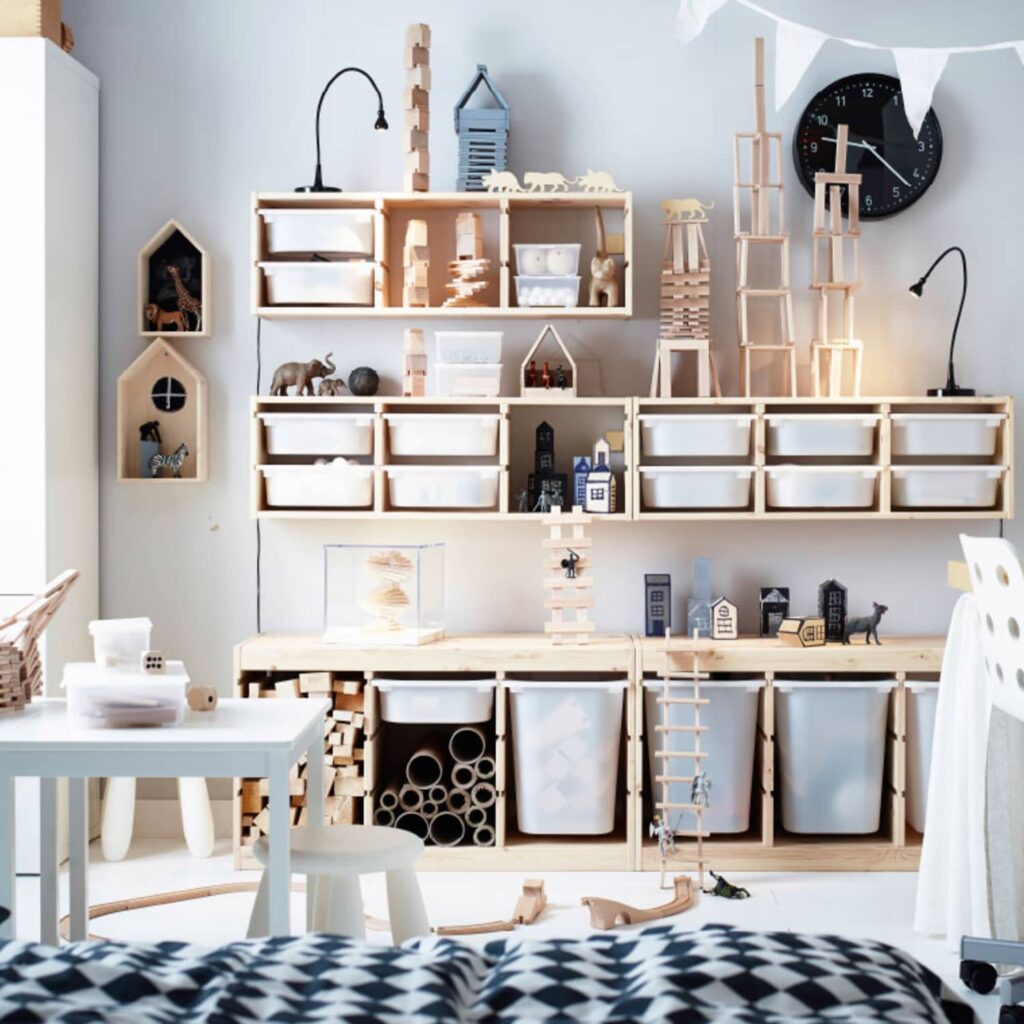
2. Playroom Paradise: Transform your child’s playroom into a haven of creativity and fun with TROFAST units as the central feature. Try colorful bins and shelves to store toys, books, and art supplies while leaving plenty of space for imagination and play. 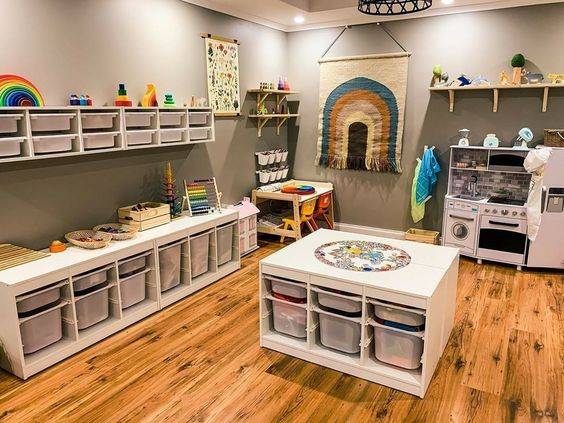
3. Kid’s Room Bliss: Maximize space and minimize clutter in your child’s bedroom with TROFAST units seamlessly integrated into the decor. Use bins to store clothes, shoes, and accessories while adding shelves for books or toys. 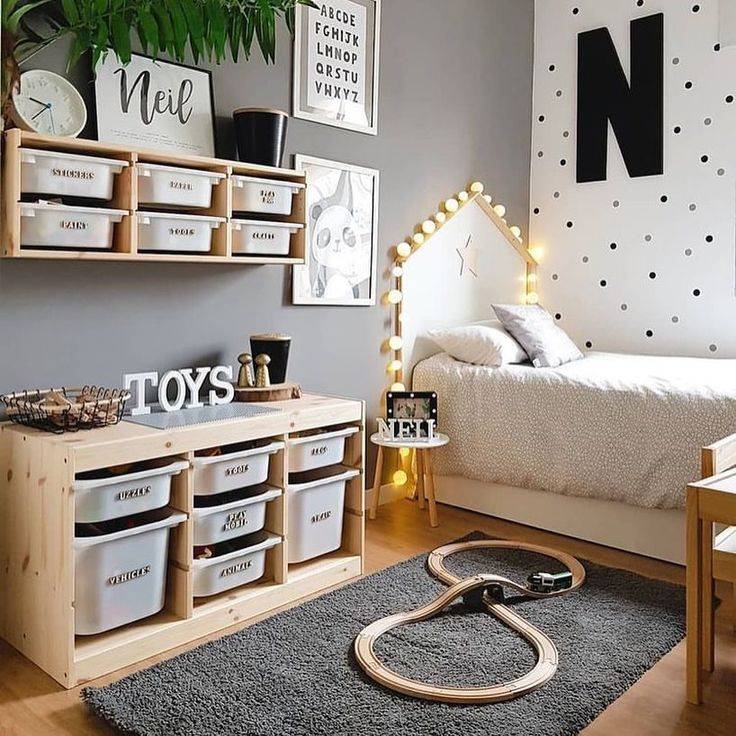
4. Decal Delight: Personalize TROFAST units with playful decals that speak to your child’s interests and personality. Whether it’s dinosaurs, unicorns, or outer space, use decals to add a touch of whimsy. 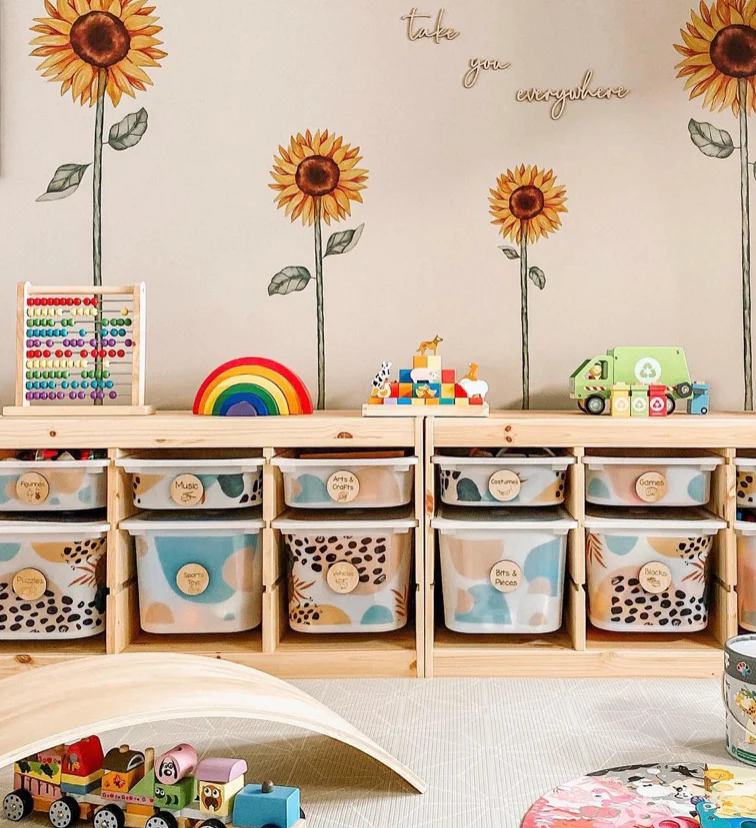
5. Activate Activity: Create a versatile activity table by repurposing a TROFAST unit and adding a custom-built tabletop. Positioning storage bins underneath will allow easy access to art supplies, puzzles, and games. 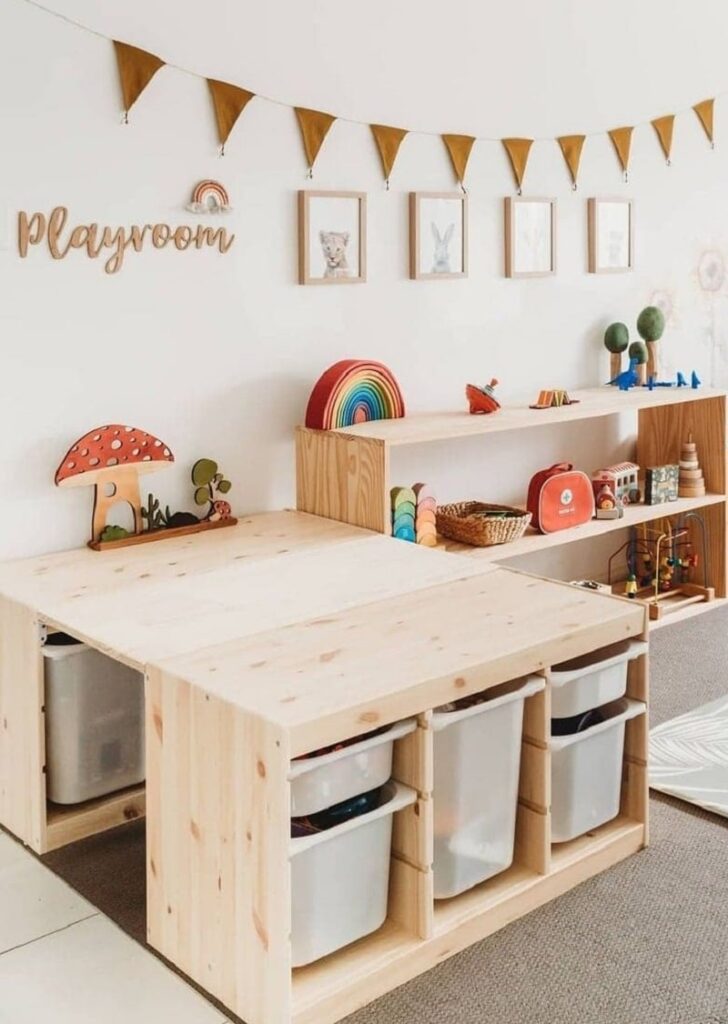
6. Reading Nook Nirvana: Create cozy reading or play nooks with TROFAST units as the base for custom seating. Add cushions, pillows, and blankets for comfort, and use bins to store books, toys, and games within arm’s reach. 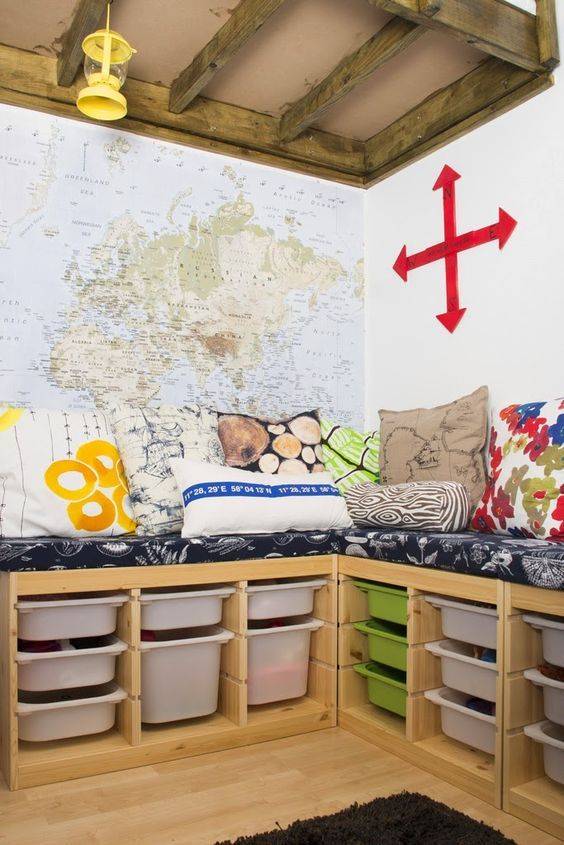
7. Lego Love: If your kids love Legos, you can conquer the chaos with TROFAST storage. Turn your TROFAST into the coolest Lego storage and building station. Consider using shallow bins to sort bricks by color or size – you can also add a custom Lego tabletop for building and play. 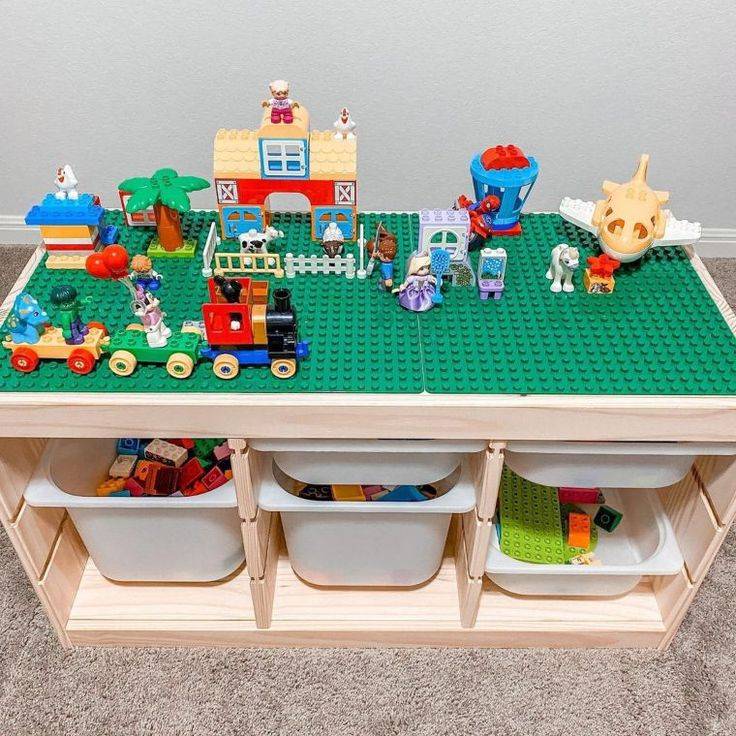
8. Bed Frame It Up: Elevate their bedroom storage with a DIY platform bed built around TROFAST units. Use the space underneath to store bedding, clothes, and shoes, adding a stylish and functional touch to bedroom decor. 
9. Perfect Plywood: Reinforce TROFAST units with plywood for added stability and durability to withstand wild play sessions. You can use screws and wood glue to secure the plywood to the frame to create a solid foundation. 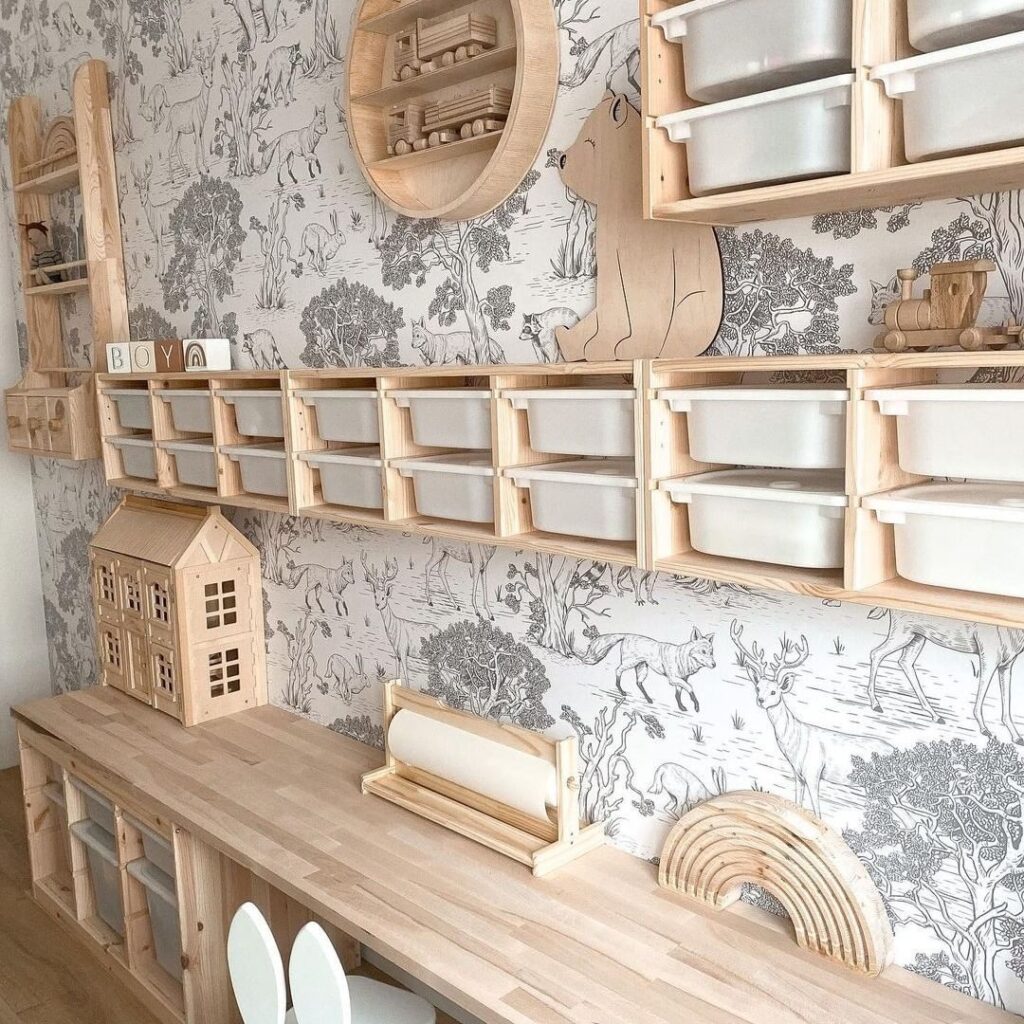
10. Stair Sensation: Spruce up your child’s bunkbed space with extra storage. By adding a TROFAST unit to customized bunkbed stairs, you’re not only offering your kids more places to store their toys or clothes, you’re also maximizing the space. This hack is great for smaller bedrooms! 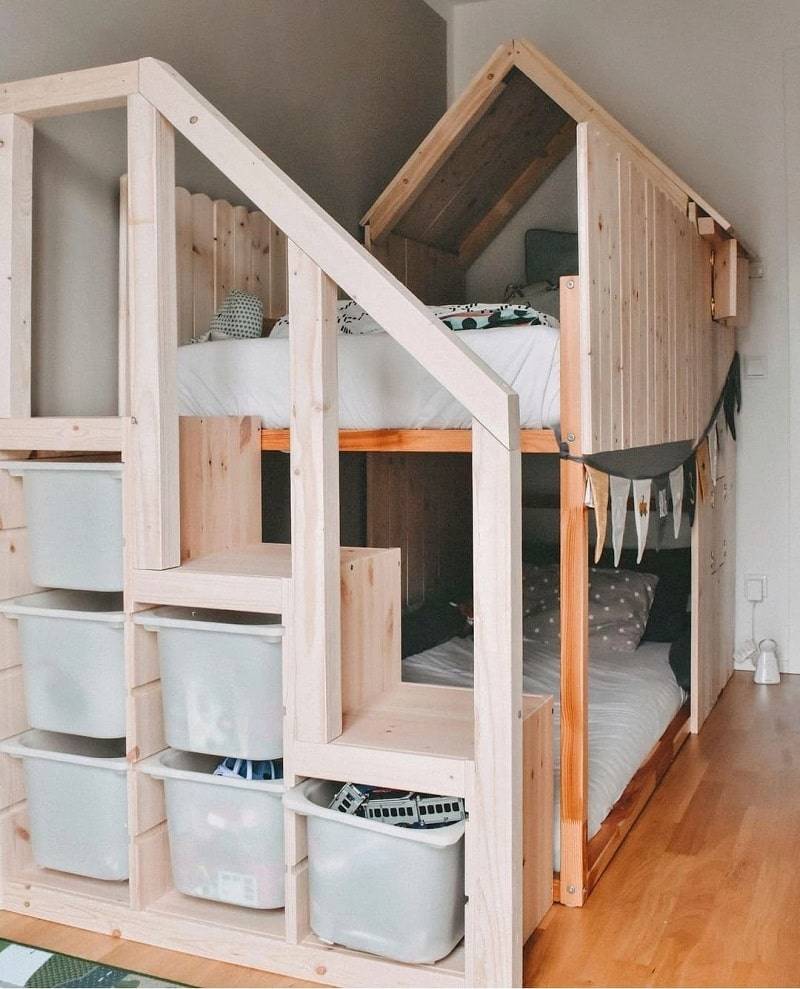
11. Stained Superstar: Give your TROFAST unit a stylish makeover with a fresh coat of stain, instantly transforming it into statement pieces of furniture for your child’s bedroom. Choose a stain color that complements your home decor and apply it evenly for a professional-looking finish. 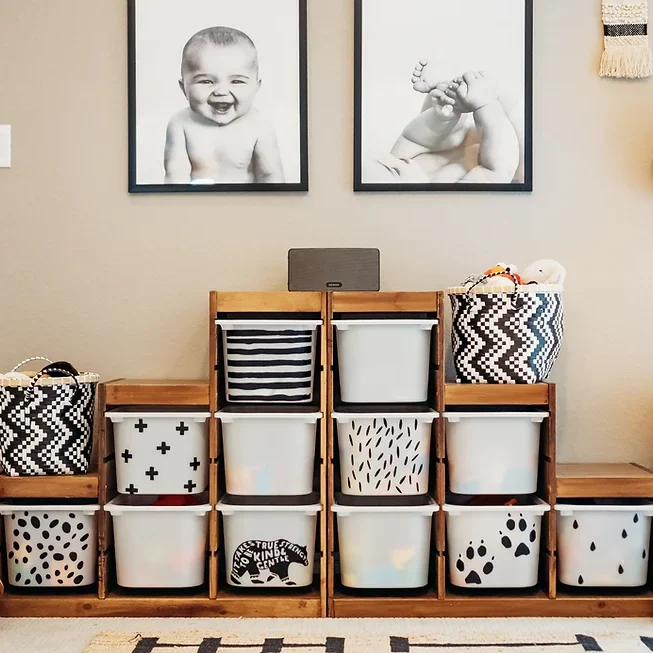
TROFAST Hacks for General Storage12. Dine Don’t Dash: Transform a TROFAST unit into stylish storage for kitchen or dining area supplies. Add doors or shelves to create a streamlined look that complements your home decor. 13. Cozy Closet: Ready to say goodbye to your chaotic closet? Try using TROFAST units as your secret weapon. You can install shelves and bins to maximize vertical space and keep clothes, shoes, and accessories neatly organized. 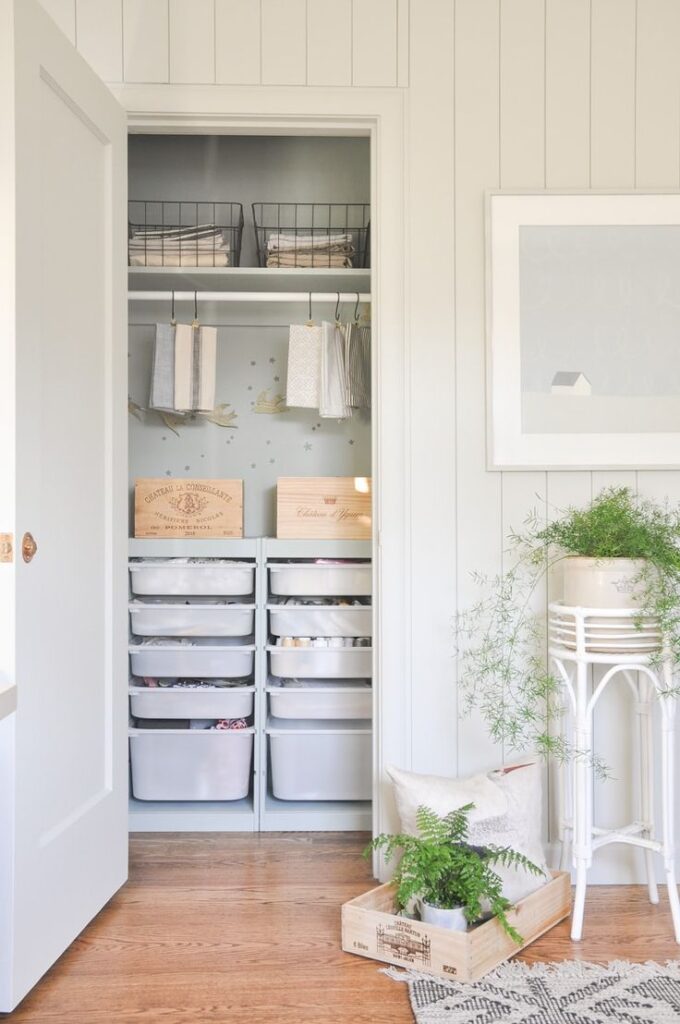
14. Makeup Maven: Your new chic makeup storage solution? A TROFAST! Customize shallow bins and shelves to accommodate your makeup collection and organize it by category or color for easy access. You can also add a tabletop mirror and a comfy stool to complete your makeup vanity fit for a queen. 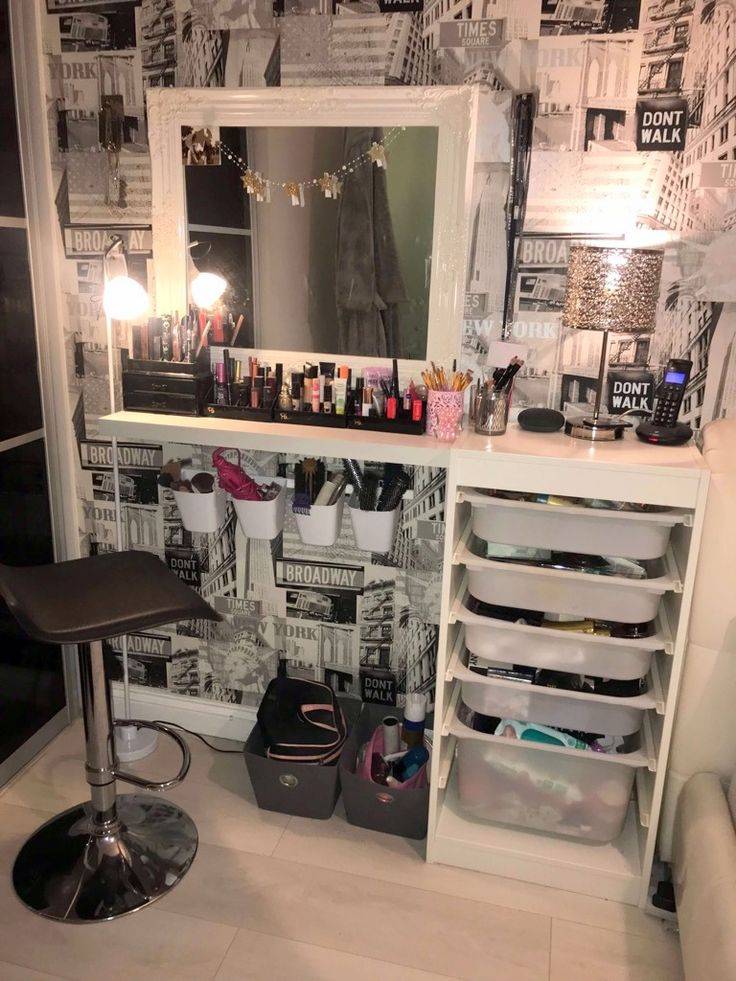
15. Cabinet Cover Craze: Give your TROFAST unit a new look with a customized cover. Simply attach a door to the front of your existing unit using screws to create a seamless and modern facade. Customize the design with paint, fabric, or trim to add a touch of personality to your space. 
IKEA TROFAST storage units are more than just organization solutions; they’re decor essentials! These versatile pieces can be transformed into anything from play tables to closet shelves, making them a must-have for any home. So, whether you’re looking to revamp your child’s playroom or finally conquer the chaos of your closet, TROFAST units are here to help. With a little imagination and creativity, you can turn basic furniture into personalized masterpieces that both kids and adults will love. So, grab your toolbox, and let’s get organized – the TROFAST way! Need more IKEA ideas?30+ of the Coziest IKEA KURA Hacks 20+ IKEA Kallax Hacks for Every Room The post 15 Best IKEA TROFAST Hacks: Storage, Play, And More appeared first on Curbly. Via https://www.curbly.com/ikea-trofast-hacks As the weather warms up, thoughts of a beautiful spring garden can take hold. Whether you are new to gardening or a seasoned pro, this guide to planning a stunning spring garden will provide you with plenty of ideas, considerations, and inspiration. From selecting the right plants to designing your layout, this blog post will help you create a vibrant spring garden that you can enjoy all season long. So let’s get started by discussing the basics of creating a stunning spring garden! 
Table of contentsDefine your gardening goalsSpring is the perfect time for a “spring cleaning” of your garden and a great time to plan any changes or updates. To help you pace yourself and tackle each task as it comes up, create a checklist of all the tasks you want to complete before the season begins. The checklist should include any spring bulbs you need to plant, checking for any empty spots in your garden where you might want to add a few new plants, and any maintenance chores that need to be done. Taking care of these tasks early will give you more time to relax and enjoy your landscape throughout the summer. Additionally, take note of any existing spring plants that are beginning to flower — this is a great indication of what you might want to add to your garden in future seasons. Planning your garden goals now will ensure that your garden looks stunning this spring! Choose the right plantsWhen planning your spring garden, you want to make sure you choose the right plants for the season. If you pick plants that aren’t well-suited for the springtime, you won’t get the best results. There are a few things to consider when selecting your plants, including the region where you live, the amount of light your garden will receive, and the growing season. The best plants to start in spring depend on where you live and the climate conditions. Generally speaking, vegetables and flowers that thrive in cooler temperatures are best for starting in the spring. Some popular spring vegetables include lettuce, spinach, carrots, radishes, and beets. Flowers such as pansies, snapdragons, and petunias are also great choices. In addition to vegetables and flowers, you’ll also want to think about selecting spring plants that are low-maintenance. Plants like roses and azaleas require more care than something like lavender or daisies. Choose plants that you can easily care for throughout the growing season. Spring garden maintenance is also important when selecting your plants. To ensure the health of your garden, make sure to water regularly and provide ample sun or shade depending on the needs of each plant. Be sure to fertilize periodically, remove weeds, and protect your plants from pests. With some careful planning and a bit of research, you can create a beautiful spring garden full of lush flowers and delicious vegetables! Spring garden maintenanceSurveying the yard and assessing the trees, mid-level, and ground plane of your garden is key to beginning your spring garden maintenance. You will want to check for any damage sustained over the winter months, and decide if any pruning or trimming needs to be done. You can also choose to add new spring plants to your garden in order to make it more vibrant. Before getting started, it’s important to have the right tools for the job. Tune up tools such as bypass pruners and wooden handles and make sure you have enough supplies to get the job done. Once you’ve checked your tools, you’ll want to give your lawn some attention. Refresh the lawn by sending the mower and leaf blower for servicing, clearing the lawn of winter debris, and looking for areas that need reseeding before mowing. Prune shrubs by removing dead, damaged, and diseased branches, thinning and trimming summer-blooming shrubs, and pruning cold-damaged wood after plants resume spring growth. If you don’t have a garden bed established yet, then you can prepare one by creating a new planting bed. Once your spring garden maintenance is complete, all that’s left is to enjoy your hard work! Sit back, relax, and watch the beauty of nature come alive. Consider the layout of your gardenWhen you plan your spring garden, consider the long-term goals for your yard. Not only do you need to decide what you want to plant this season, but also the overall look and feel of your garden for future years. Make sure that the plants you choose are suitable for the amount of water and sunlight available in your area, as well as able to withstand your local climate. Adding pops of color is a great way to bring your garden to life! Incorporate flowering spring plants such as pansies, daffodils, and tulips, or bright colored foliage such as purple fountain grass and coleus. If your yard has shadier areas, look for plants that thrive in less sun like ferns and hostas. Consider other features such as pathways, benches, bird baths, or sculptures to complete your design. Finally, don’t forget to include some native plants to attract beneficial wildlife like butterflies, bees, and birds. By considering the layout of your garden and adding colorful accents, you will be able to create an inviting and thriving oasis. With some thoughtful planning, you can turn your garden into a stunning space for the entire family to enjoy! Get inspired by other gardensOne of the most fun parts of planning a spring garden is getting inspiration from other gardens. From traditional cottage-style plantings to lush and luxurious botanical gardens, there are plenty of ideas to draw from. Look for commonalities in garden designs that appeal to you and think about ways to incorporate them into your own garden. Look for ideas on different ways to feature spring plants, like beautiful flowering shrubs, showy trees, and seasonal annuals. Consider color schemes, form and texture, and unique accents like structures and water features. By taking some cues from these stunning examples, you can create a spring garden that reflects your personal style and is perfectly tailored to your needs. 


Have fun planning your spring garden!Gardening is a wonderful way to express your creativity and make your home look beautiful. With the right combination of spring plants, you can create a stunning spring garden that adds color and life to your outdoor space. Whether you’re planting an herb garden or creating a vibrant flower bed, planning your spring garden can be an exciting and rewarding experience. Be sure to take the time to plan out your garden in detail, so that you can enjoy a lush and blooming paradise for the warmer months. And don’t forget to keep your plants well watered, fertilized, and pruned – your spring garden will thank you for it! Learn more about How To Get Your Yard Ready This Spring. Looking for more garden inspiration and ideas?
The post Your Guide to Planning a Stunning Spring Garden appeared first on Curbly. Via https://www.curbly.com/sprouting-ideas-your-guide-to-planning-a-stunning-spring-garden |