|
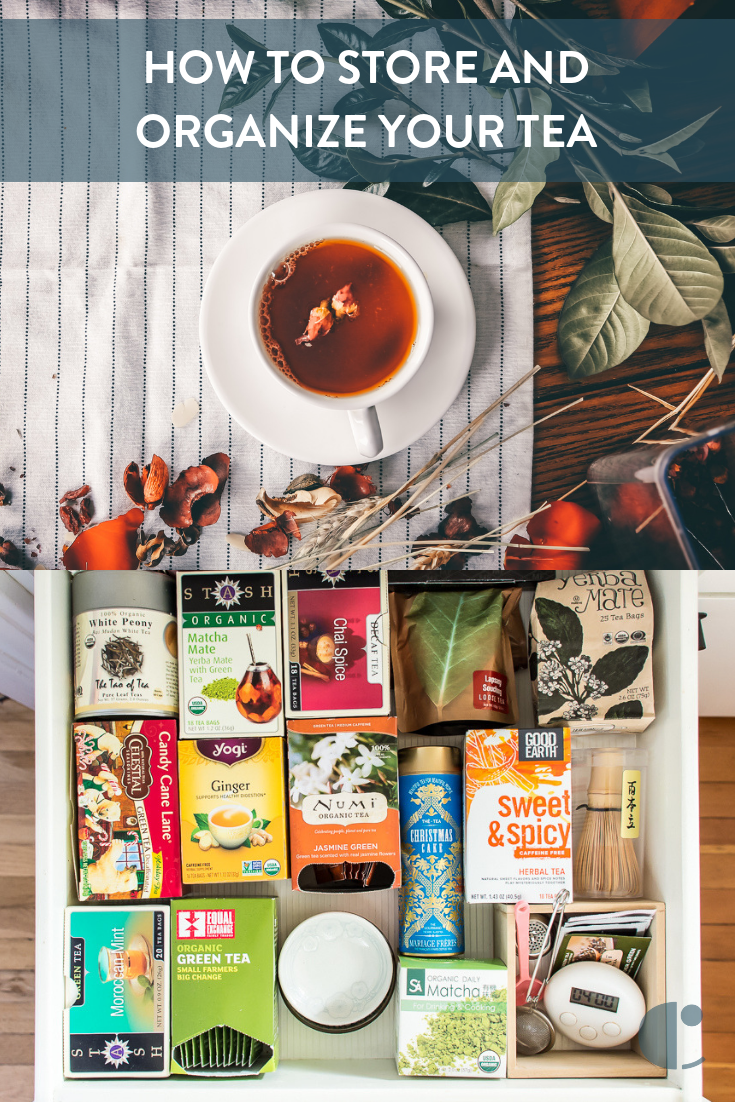
There are a lot of fall activities and flavors that I can take or leave, but one thing I get excited about when the summer heat subsides is tea. On a cool, rainy afternoon, drinking a hot cup of tea is wonderfully cozy. (I think I just realized why tea is so popular in the British Isles.) My growing tea collection was a mess until I figured out the best way to store tea. If you’re a fellow tea-lover with an unruly stack of boxes and tins of tea, here are some guidelines and ideas for how to keep your tea organized.
Tea Storage GuidelinesFirst, let’s go over the basics of how to store tea. The enemies of tea are light, heat, moisture, and oxygen. So that means the best place to store your tea is cool, dry, dark, and airtight. The airtight part might not be a concern if your teabags are individually-sealed, but it’s important for loose-leaf tea. Fortunately many teas come in their own airtight tins or resealable bags. Even if you aren’t storing your bagged tea in an airtight container, you at least want to try to keep it away from strong smells. Nothing would ruin a good cup of tea than having it taste like the garlic and onions you cooked up last night for dinner. Also, it won’t keep forever. Tea does degrade in quality over time, so if you haven’t touched that tea you don’t especially enjoy in months or years, it is unlikely to have improved in flavor. Go ahead and toss it out! Tea OrganizationI have to admit that while I love a nice cup of tea, I’m not a tea snob, and I like to try different kinds. Before I figured out my tea storage, I had a large collection of boxes of tea stacked on top and in front of one another in a cabinet, and I had to shuffle them around to get to the ones in the back. My life improved when I discovered that the best way to store tea is in a drawer! With a drawer, there’s no perilous stacking, shuffling, or reaching on tip-toes to get to that tin on the top shelf in the back. Everything is flat in front of you, easy to see and access. And maybe I’m the only weirdo who feels this way, but there’s something strangely satisfying about neatly fitting all of your tea and tea-making accessories in a drawer. Once you have a drawer picked out, the first choice you need to make is whether you want to keep your teas in their boxes, or take them out and only store the packets. If you’re taking the tea out of the boxes, you’ll need drawer organizers. Cutlery/silverware organizers often fit tea bags perfectly, or you can use something like these adjustable slotted drawer organizers to make custom-sized tea compartments in your drawer. 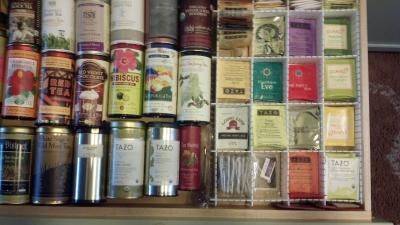
The other option, and the one I chose, involves Tetris-ing your boxes and tins into a drawer. You can also combine the two approaches, keeping some teas in the containers they came in, and sorting individual tea bags. 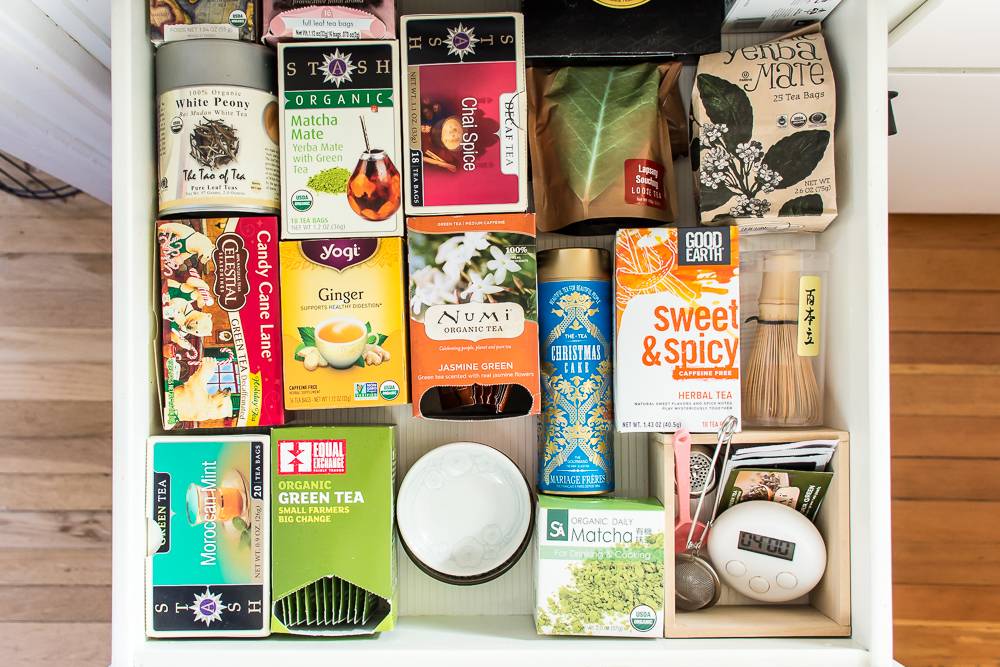
I also like to keep my tea-making tools and accessories in my tea drawer, so mine contains a matcha whisk, timer, strainers, a measuring spoon, and soy sauce dishes, which make perfect tiny plates for spent tea bags. My electric kettle is on the countertop above the drawer, and my mugs in the cupboard above, so everything I need for a cup of tea is all in one place. In general I consider myself “organizationally-challenged,” so my organized tea drawer makes my daily cups of tea even more satisfying. Fellow tea-fans, how do you organize your tea?
The post Tea Time: The Best Ways to Store and Organize Tea appeared first on Curbly. Via https://www.curbly.com/store-tea
0 Comments
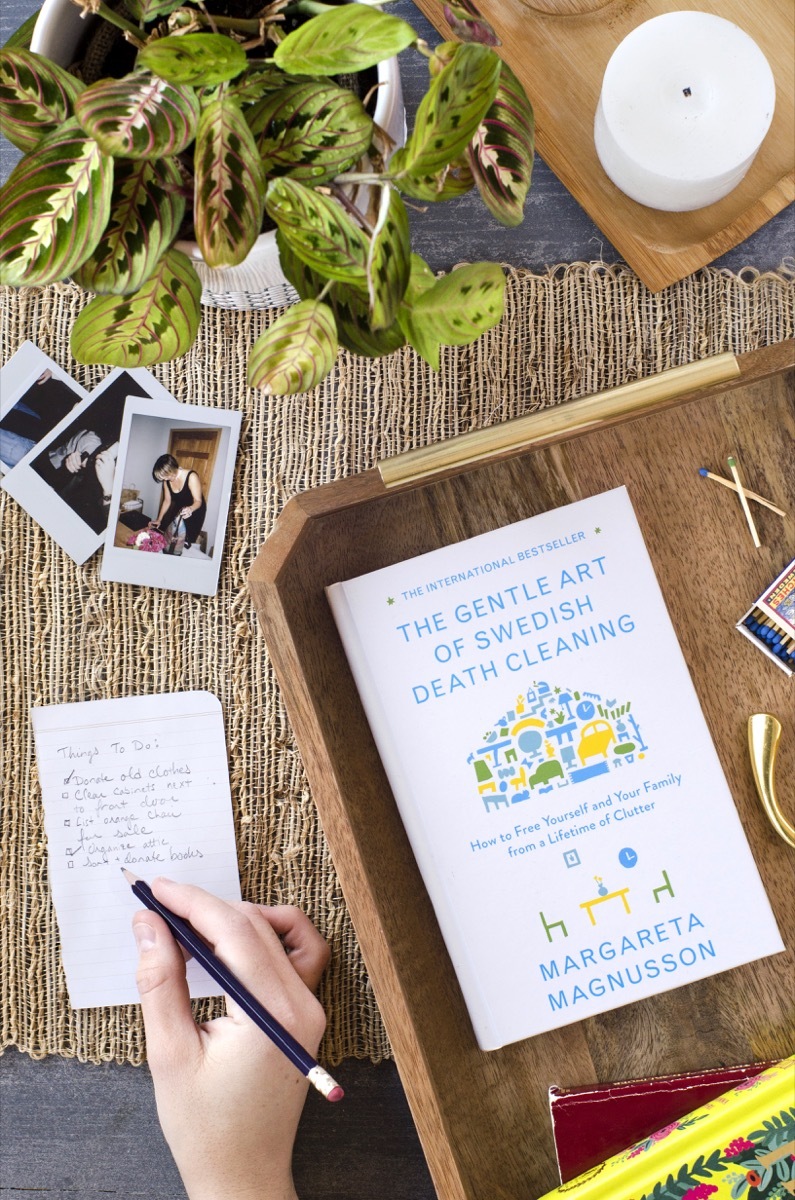
I got a text the other day from my mom. She was asking me if I wanted a collection of magazines that she had held onto from my childhood (if you’re curious, it was a collection of Cricket magazines from the late 70s). Then I got another text — my mom had found an old photo that she wanted to share with me. Then four more texts came my way, each containing a picture or memory of something from the past. It was clear that she was doing some deep cleaning. When I asked her what she was up to, she replied, “Have you heard of Swedish Death Cleaning?” Um, excuse me??
When I read the words Swedish Death Cleaning, my first thought was, “How morbid!” If you’re found this article, you might be thinking along the same lines as me. No, Swedish Death Cleaning has nothing to do with zombies who enjoy dusting, and no, this trending topic has nothing to do with the similarly-sounding genre of music, Swedish death metal. In spite of its name, this Nordic tradition is actually more happy and wholesome than it is hardcore. What is Swedish Death Cleaning?In Sweden, it’s called Döstädning. Dö meaning “death,” and städning meaning “cleaning.” It’s the process of sorting and preparing your belongings in a way that those who come after you will appreciate. This can include everything from shrinking down your wardrobe and cleaning out the attic, to making plans for who gets the dining table and writing up a will. Swedish Death Cleaning is the process of paring down what you own, so that at the end of your life, your children, spouse, or caregiver is not burdened with an overabundance of stuff and junk to sort through and deal with. This process also benefits the now. Consequently, by thinning out your personal possessions, you have more time to focus on the parts of your life that your really care about, and you spend less time minding all your stuff. This gentle minimalism also means embracing and cherishing those of your physical possessions that you actually love. And you don’t have to wait until the end of your life to adopt the practice. In fact, it’s better if you get to it sooner rather than later. The Gentle Art of Swedish Death CleaningAfter my mom piqued my curiosity about the Swedish death cleanse practice, I decided to do a little reading myself. I picked up a copy of The Gentle Art of Swedish Death Cleaning by Margareta Magnusson. It’s currently the only book on the topic, as far as I could find. It’s a lovely little read that explores the concept of döstädning, and how to apply it to the different areas of your home and life. I’m pretty lucky that my mom reached out to me first about Swedish Death Cleaning, and that she is already a fairly organized person. Often, the topic of what-to-do-with-all-the-stuff is a hard one to bring up with parents, especially those who have a tendency to be pack-rats. Maybe you’re in a similar situation with parents or in-laws. If so, there are sections in this book that specifically speak to how to approach this delicate topic, from someone who has had to deal with the topic of death more than once. The Author: Margareta MagnussonMargareta Magnusson, döstädning expert, ages herself somewhere between eighty and one hundred years old (adorable). Born in Sweden, Magnusson studied design in Stockholm, and later went on be an artist; her work was exhibited in museums in Hong Kong, Singapore, and Gothenburg, just to name a few. Mother to five and having done several rounds of death cleaning for loved ones she has already lost, Magnusson is quite familiar with the need to pare down and stay organized in order to fully enjoy life. Who is Döstädning for?Swedish Death Cleaning is for everyone. Because, everyone dies. But that fact is not meant to get you down. First of all, coming to terms with the notion that you can’t take your belongings to the grave with you is a good thing! In her book, Magnusson says that those who are too attached to their belongings (also known as pack-rats) are the ones who probably do not a strong grasp on the reality of mortality. They have difficulty with the notion that one day their life will end. So, if the reverse is – if you are open and willing to part with the physical things in your – you open yourself up more to accepting the future, and enjoying the present. A Swedish Death Cleanse does not mean immediately tossing everything in sight. It’s the slow process that makes this method less painful. Rather than toss everything in the trash, Magnusson suggests saying good-bye to your belongings, and appreciating them on their way out. Likewise, it doesn’t mean living with nothing. It means living with just enough. Magnusson recommends that if you are nearing retirement, to start the cleaning process earlier, rather than later, as you are more able-bodied now than ever. But you don’t have to wait until you’re in your 60s to adopt some of the practices of Swedish Death Cleaning. Everyone can benefit from thinning out their personal possessions, opening up their lives to enjoying activities and relationships over stuff and collections. The ProcessIn Magnusson’s book, she lays out a loose and approachable framework for those who want to start the Swedish Death Cleaning process. Even if you are not at the end of your life, this framework works functions for people who feel overwhelmed by or too attached to their stuff, and need to purge. Where to StartIt starts with the attic, basement, or storage near the entryway. Essentially, this purge process begins with things that don’t hold sentimental value. If you can start strong, you’re much more likely to stay in momentum throughout the process. Margareta Magnusson suggests that you tell your friends and family that you’re death cleaning – they might be willing to lend a hand, and they might be interested in taking some of your stuff off your hands! Or, maybe your cleaning will inspire them to do a little purging of their own, and you can encourage each other throughout the process. However, Magnusson warns against friends or family members who may encourage you to hold onto too much. She says that if you can’t make a decision about an item, try reaching out to a third-party. An unbiased source can look at the situation and weigh the facts without getting hung up on the sentimentality. Start with large items first, and finish with the small. Smaller items tend to have a higher emotional value, and will be more time-consuming to sort. Save those old letters and photos until the very end of the process! To get a complete look at the process, I highly recommend picking up a copy of The Gentle Art of Swedish Death Cleaning. It’s a short, sweet read that cuts right to the subject of passing from the viewpoint of someone who has dealt with death many times. If you are the child of a mom or dad who is holding onto too much stuff, get a copy for your parent as well. In SummaryDeath cleaning is as much for you as it is for your loved ones. For those in your life, it means that their final memory of you isn’t one of burdensome sorting, organizing, and dealing with your junk. Thinning and limiting your personal possessions can lead to a happier life, too. With less clutter to distract your time and efforts, you can enjoy the things in life that really matter: relationships and experiences. Swedish Death Cleaning means living with less. It means embracing reality, and most importantly, it means enjoying the now. 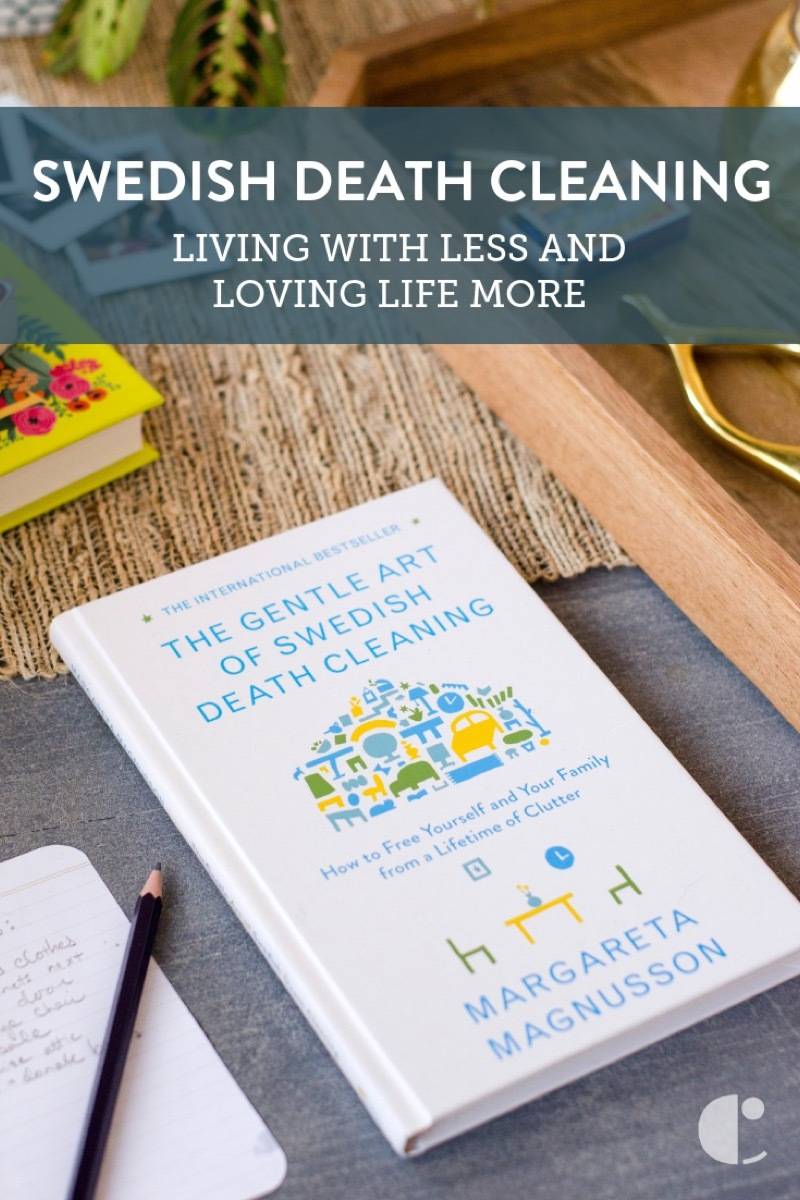
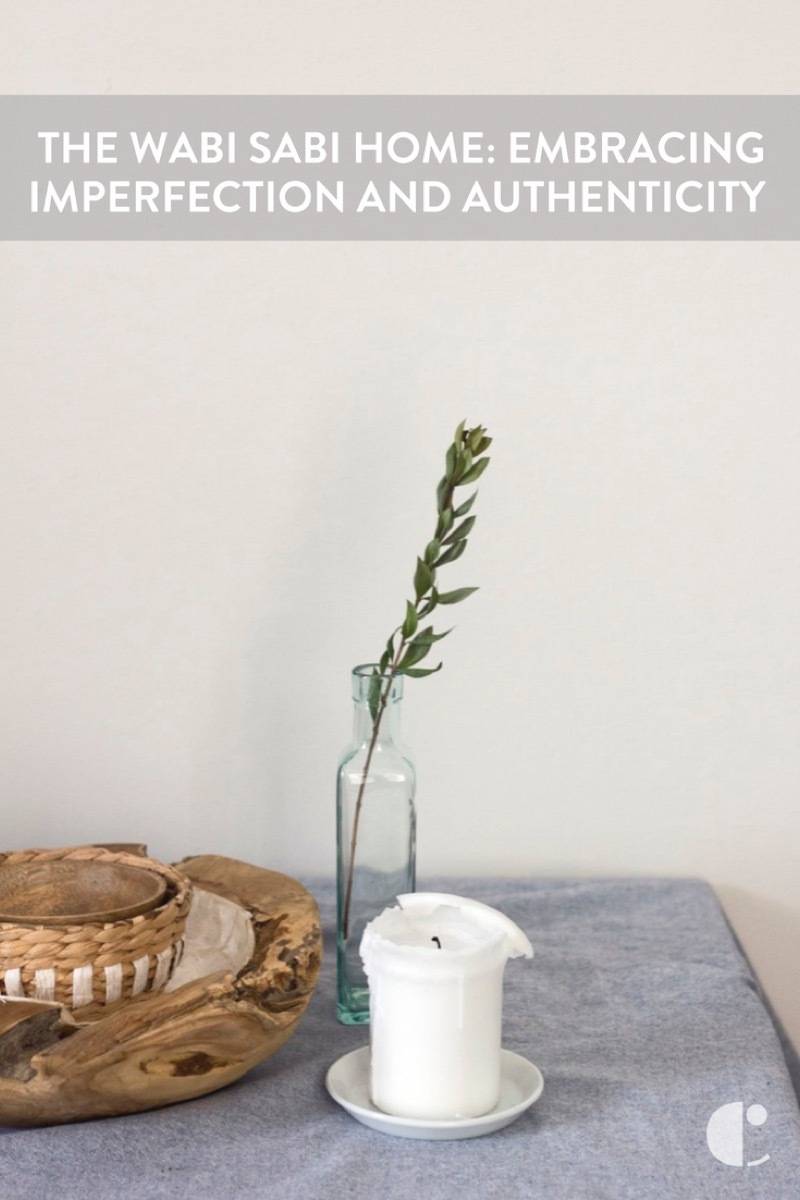
If minimalism intrigues you, you may enjoy learning about the Wabi-Sabi aesthetic – embracing imperfection as a design choice.
The post What is Swedish Death Cleaning? The Art of Mindful Minimalism appeared first on Curbly. Via https://www.curbly.com/swedish-death-cleaning
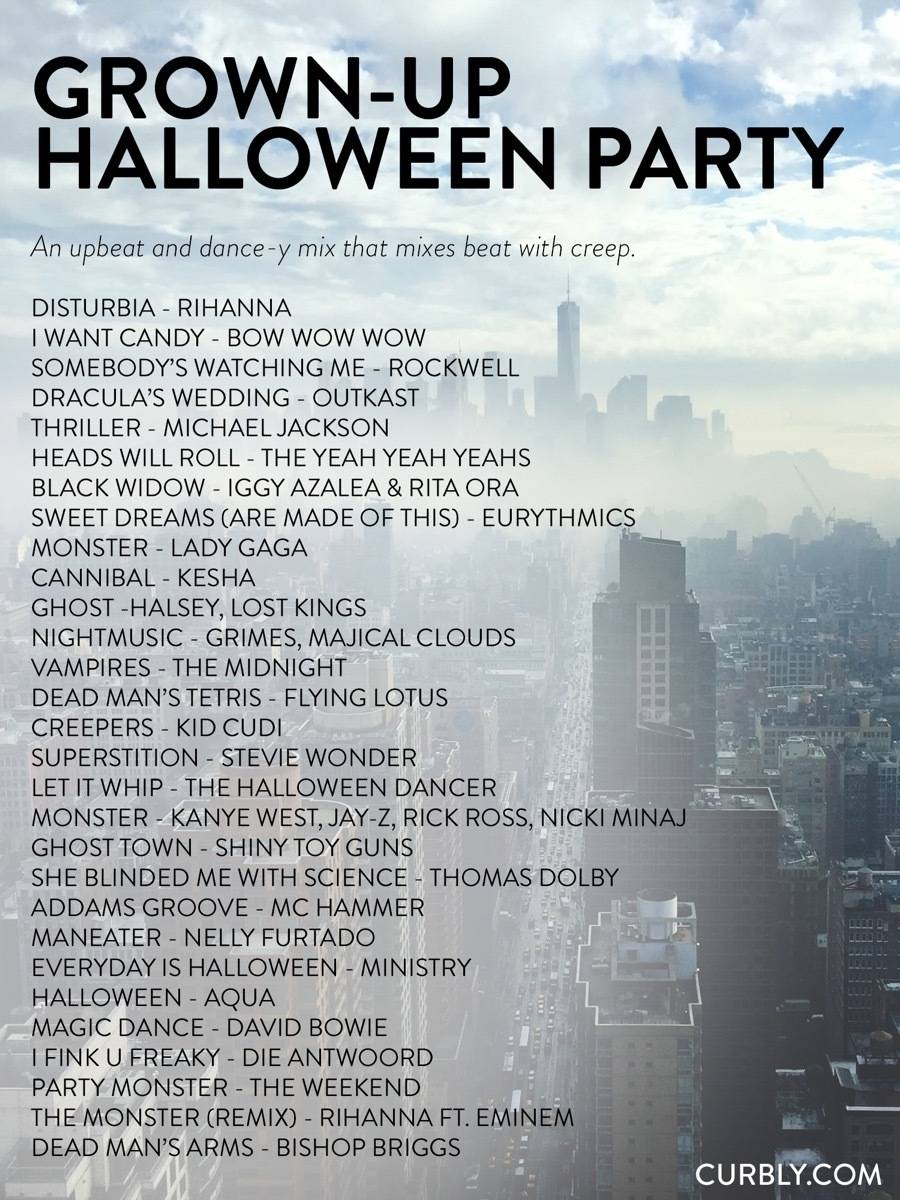
Candy is great, and costumes are fun, but what about the music? Whether you like jammin’ to Monster Mash or prefer to get down to Thriller, music plays a big part in this spookiest of holidays. But there’s more to listen to than just the Ghostbusters theme song (although that is a good one!). Here are 80 songs to get you in the spirit for spirits. From classic haunts to alternative rock, there’s a Halloween playlist here for everyone.
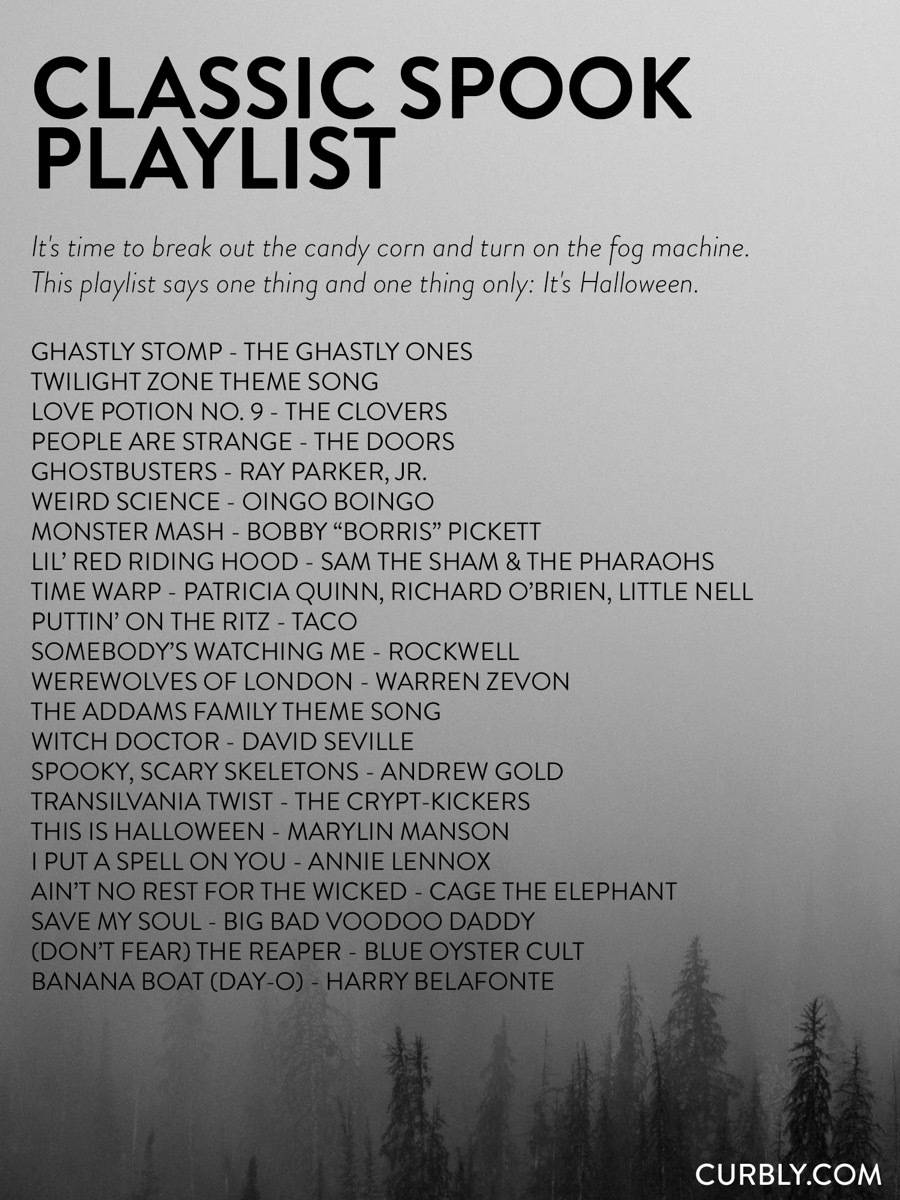
Classic Halloween PlaylistLooking to get immersed in all the classics? We’ve got you, boo. (#ghostjokes?) This list is family friendly!
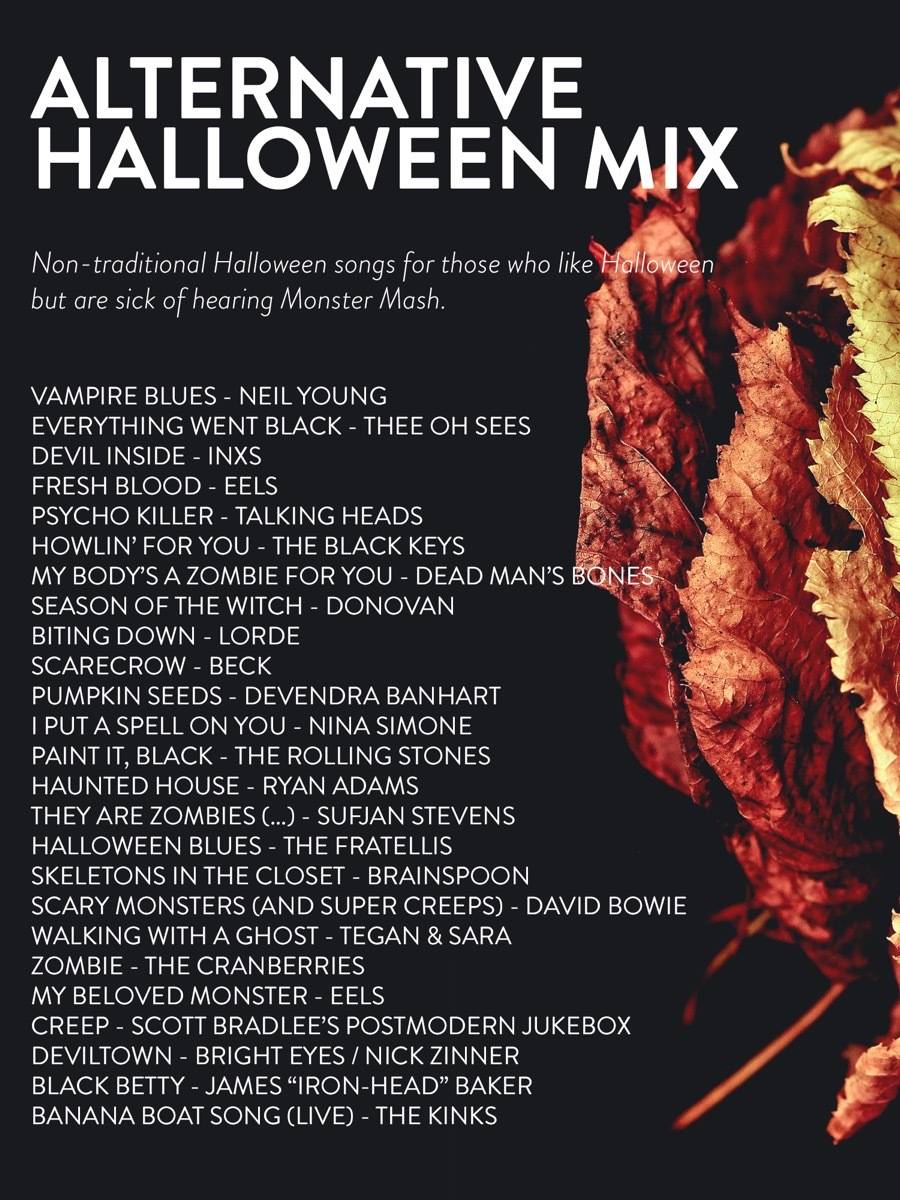
Hipster Halloween PlaylistMaybe you’re in the mood for goblins and ghouls, but want some different music to listen to. Treat your inner hipster with this playlist – it’s like Halloween, but not.
Halloween Party Playlist (Not Kid-Friendly)Throwing a Monster Mash of your own? Here’s a playlist of tunes sure to fill the dance floor. From thematic new hits to classics like Superstition and Somebody’s Watching Me, this Halloween playlist will put you in the mood to party. This list contains explicit language, so it’s not for kids’ parties! So, what you do you think? Were there any songs you felt should’ve been on these playlists but were left out? What’s your favorite spooky song? Let us know in the comments!
If you think of Halloween as being somewhat tacky, you’re not alone! That’s why we’ve put together a list Halloween DIY decor ideas that are sophisticated, not silly.
The post The Ultimate Halloween Music Guide: 80 Tunes For Every Mood appeared first on Curbly. Via https://www.curbly.com/halloween-playlist
Even if the weather where you live is still summer-like, the calendar is telling us that now is the time to transition into an autumn mindset. Use the fresh start of this new season to reset and plan. Make yourself an autumn bucket list and have the best fall ever!
Relishing pumpkin-spiced drinks, wearing plaid, and finding new places to display decorative gourds are important, but your autumn bucket list can be more than a catalog of happy fall activities. It’s a tool to help you be intentional about what is most valuable: the relationships in your life, the beauty around you, new experiences and familiar traditions. Read on for a few suggestions. Play Pumpkin Fairy
This time of year, pumpkins and gourds are for sale at every turn. Take the opportunity to buy one for a neighbor, co-worker, or friend. It is a low-key and unexpected way to do something nice. Every time they see it on their porch or desk, the reminder will brighten their day. Engage your Nose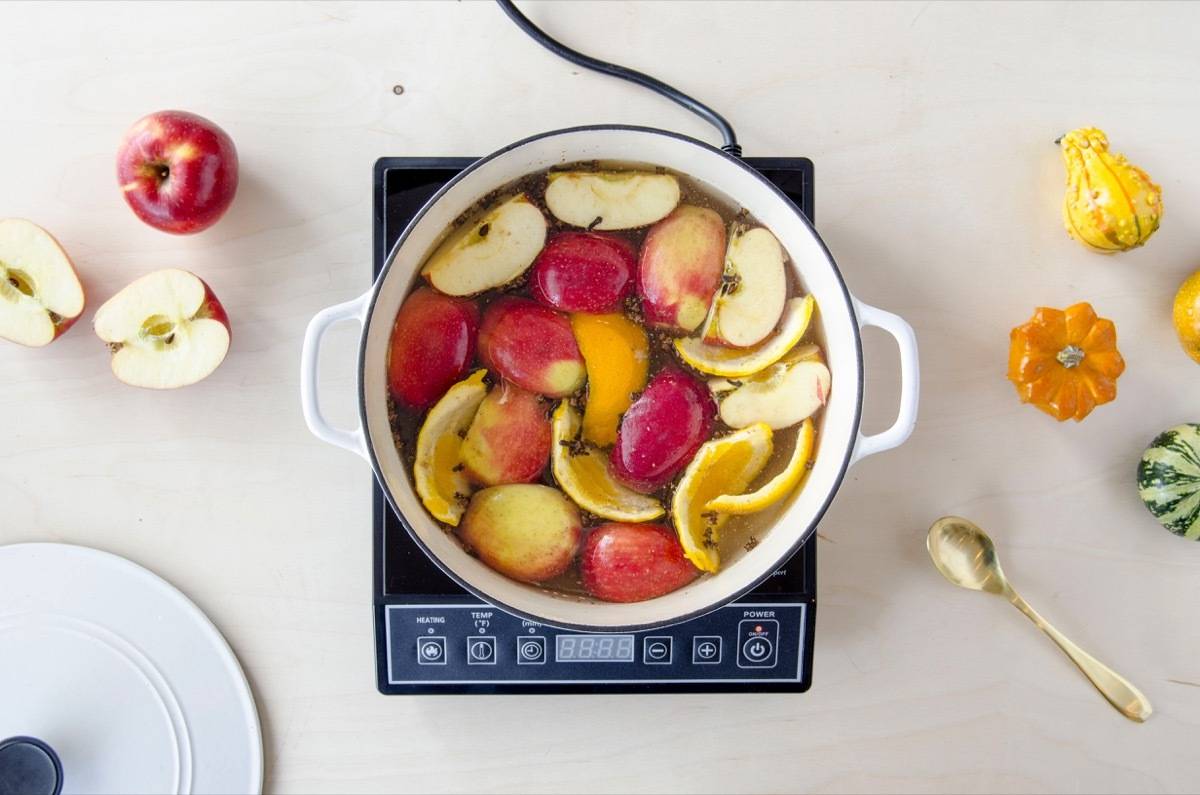
Harness your sense of smell to send a signal of change to your brain. Make stove-top potpourri, buy a new candle, or use a fall essential oil blend around your home. Visit an Apple Orchard
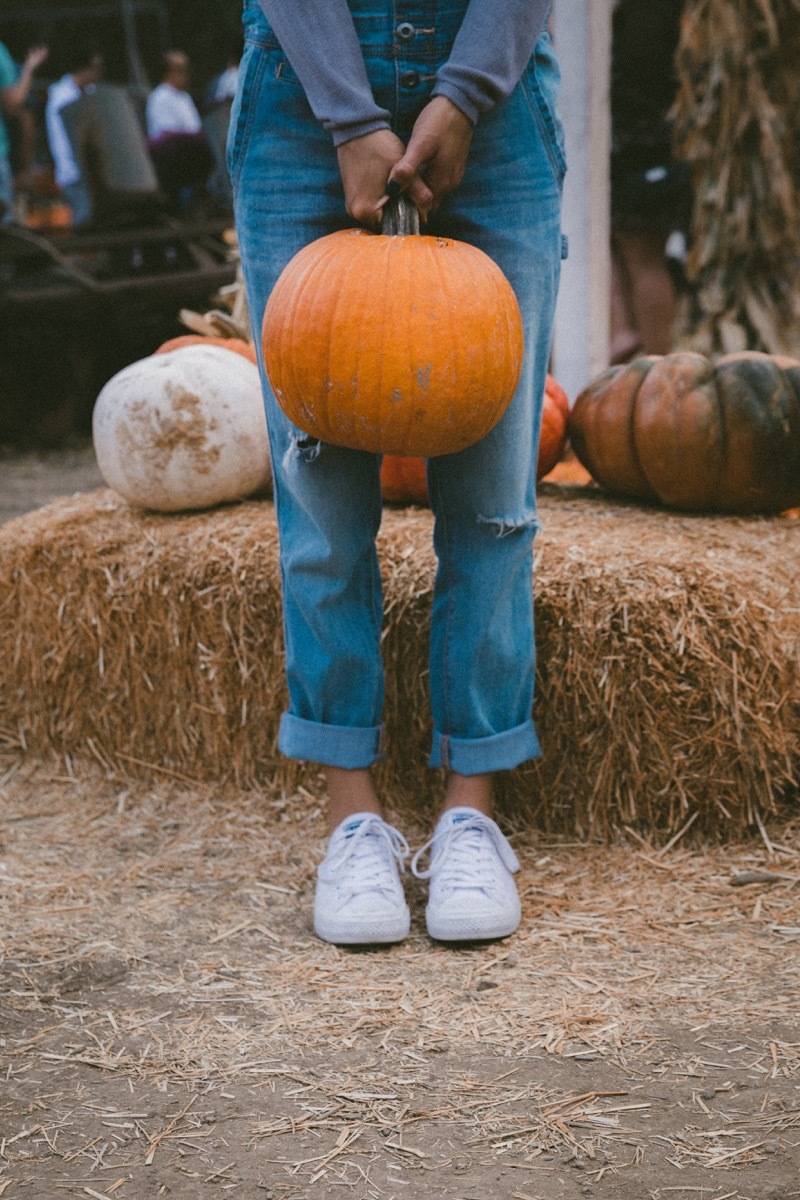
It is a festive outing, for sure, but there is something more to be gained from picking apples than great Instagram pictures. Most of us don’t have much of a connection to harvesting in our everyday lives. There’s something very special about picking your own food, and it’s a great opportunity to make memories with those close to you. Take advantage of this time of year and visit an orchard!
After you’ve collected your harvest of apples, check out these ways you can decorate using fall’s favorite fruit.
Host a Potluck
Don’t let the season pass without making time for the relationships that are important to you! Invite friends, neighbors, and/or family for a potluck dinner. Consider a pumpkin food theme or a flannel dress code. With everyone pitching in, the gathering doesn’t have to be a chore.
Need a theme for your dinner party or potluck? Check out these 8 easy ideas your guests will love.
Cheers to GratefulnessBuy some apple cider and be intentional about making a toast to the abundance in your life. You can do this alone or in a group, at a feast or just a Tuesday dinner of leftovers. Thankfulness is worth cultivating. Be Practical, and Check in on Your Home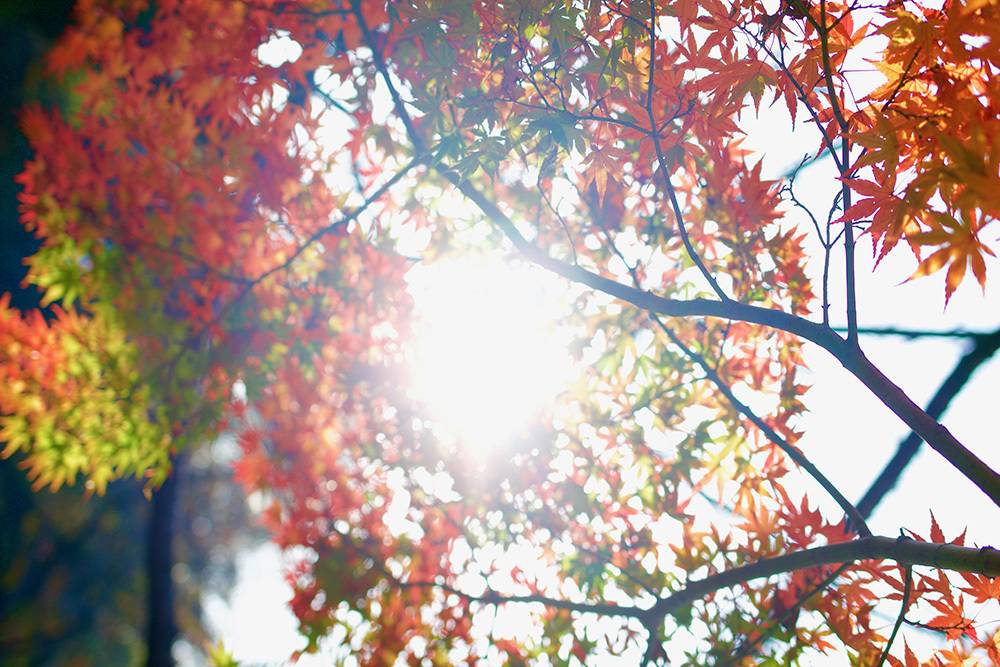
Take some time to change your furnace air filters and schedule a furnace check to avoid the inconvenience of meeting the first cold snap of the season with no heat. Also, think back and if you cannot remember the last time you changed the batteries in your smoke alarm do it today. Start the process of getting your home ready for winter. Once the leaves have fallen, take some time to clean your gutters or schedule someone to do it for you. Come spring, you will be so glad you did. Decorate Pumpkins
This is a classic autumn bucket list activity that needs little explanation. If you’re looking to do something different, a quick internet search will give you plenty of ways to carve or decorate pumpkins. Any effort you expend is worth it. Let your creativity shine! Get Lost
Make plans with your most entertaining friends to meet at a corn maze. There is not a clear explanation why wandering around in a corn field generates hilarity, but it does. It always does. Make Apple Butter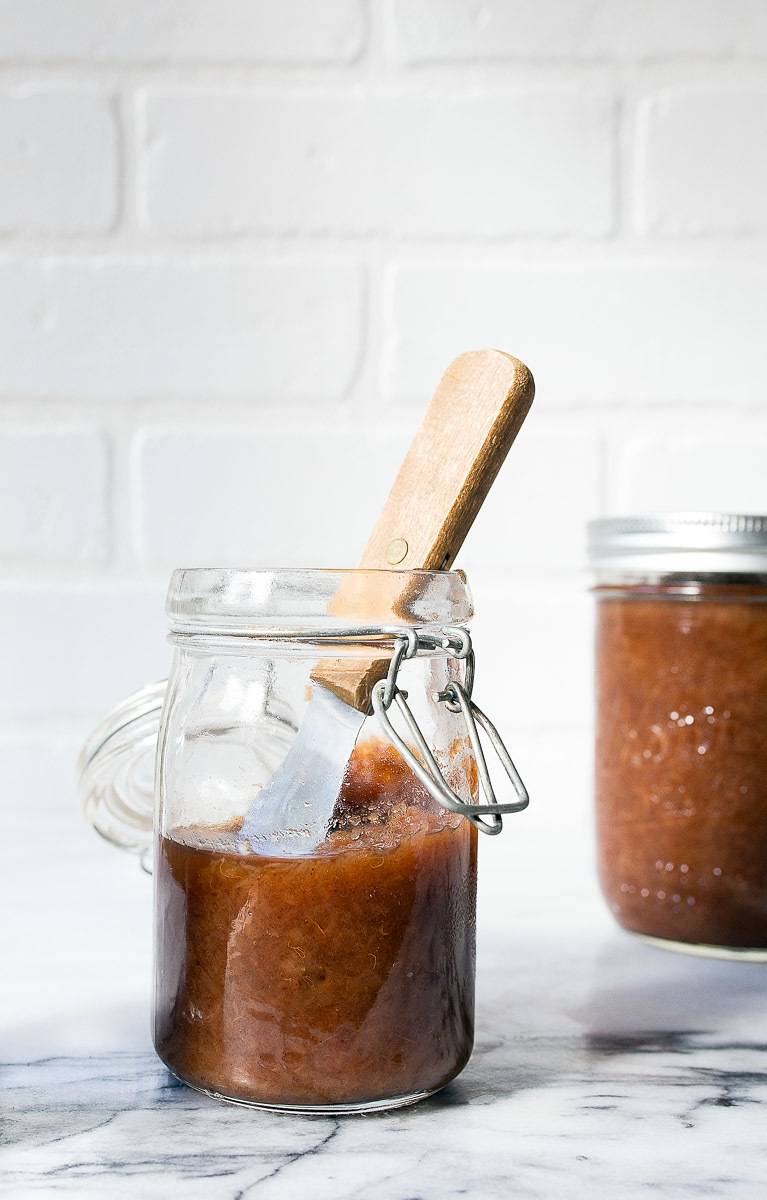
Now that you have harvested your crop of apples, turn some of them into apple butter. This is the easiest of recipes and nearly impossible to mess up. If you haven’t tried it yet, homemade apple butter will elevate your oatmeal, yogurt, toast, or bagel to new heights of enjoyment! Display an Autumn MementoGo into your photo archives and find a picture from a past fall that makes you smile. Don’t worry about composition or if it meets the standards for a technically impressive photograph. If the picture brings you a happy feeling, it doesn’t matter if the subjects are squinting or out-of-focus. Print it out and put it somewhere you will see it all season long. 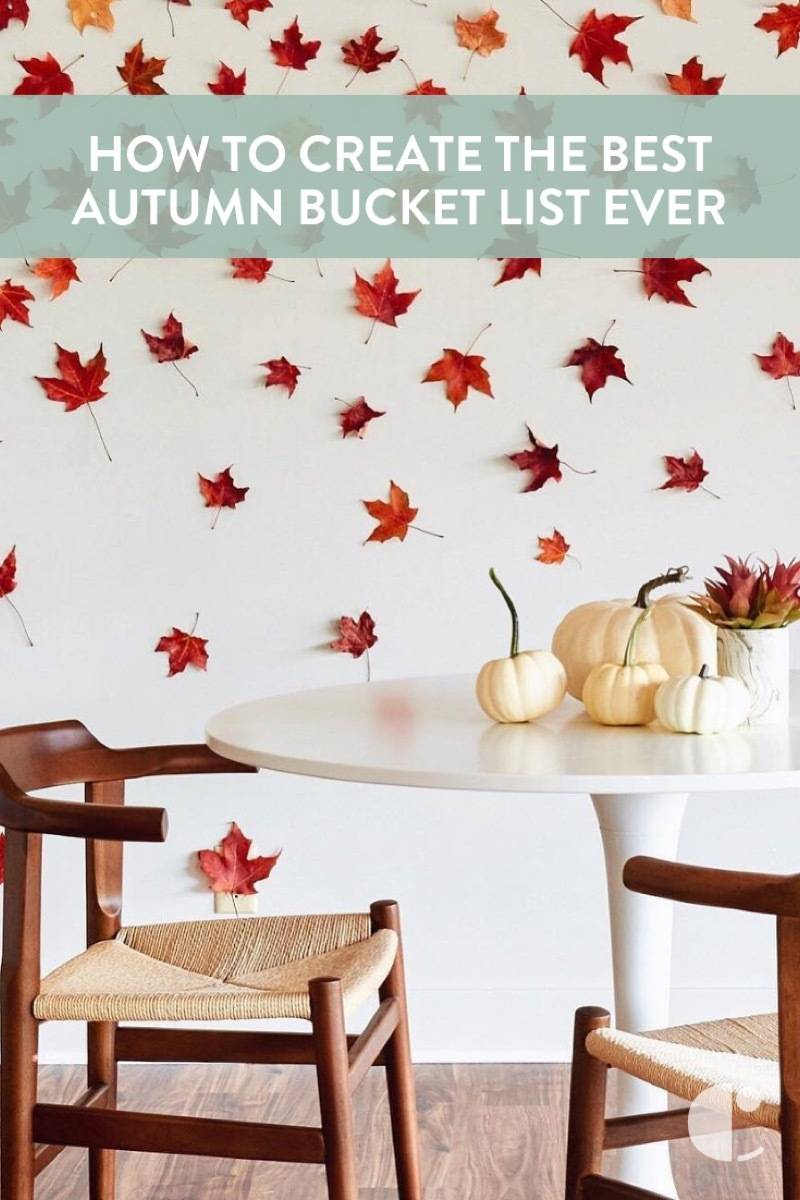
What else will you be adding to your Autumn bucket list? Leave a comment and let us know! Nothing says “autumn” quite like a toasty beverage — check out this list of fall cocktails for more festive fall fun!
The post How to Create the Best Autumn Bucket List Ever appeared first on Curbly. Via https://www.curbly.com/autumn-bucket-list 
Halloween can get cheesy fast. Just look around your local craft stores, and you’ll see ghosts and goblins and witches galore. But there are ways to decorate your home for the holiday in a more sophisticated way… and we set out to find 15 of the very best. Click through to check them out.
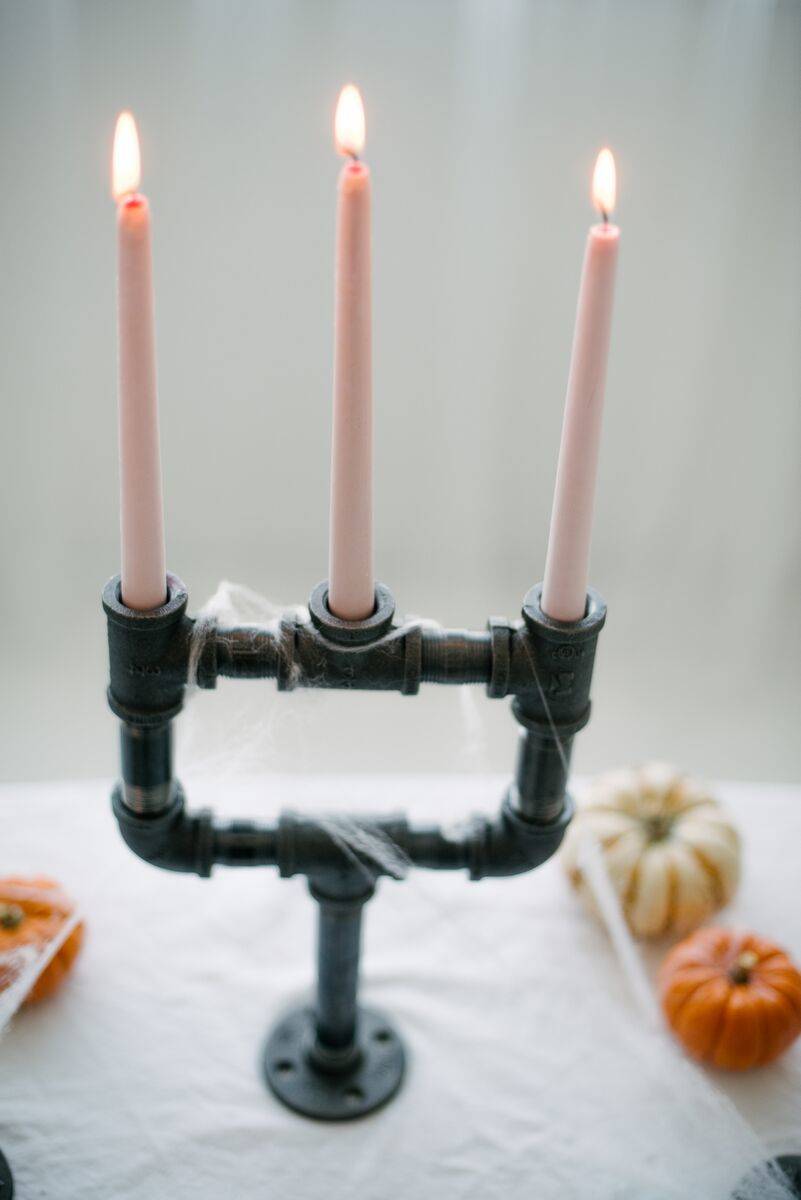
1. This candelabra is one part spooky, one part beautiful… find out how to make it out of pipes here. [Photo: Let’s Mingle] 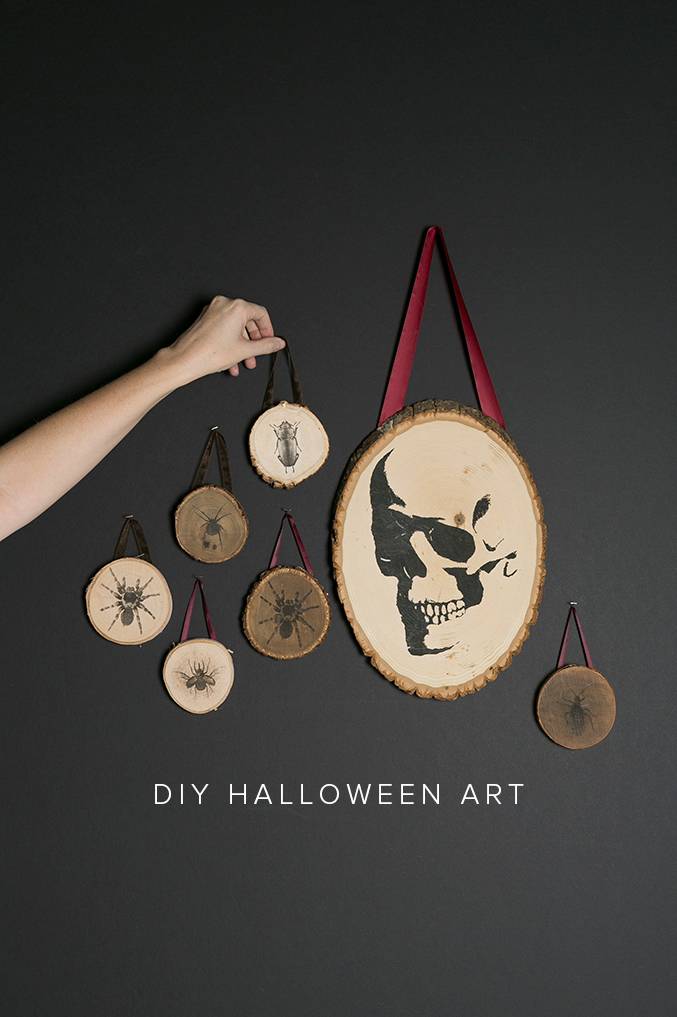
2. These super cool Halloween plaques are made with a simple transfer technique… get all the details here. [Photo: The House That Lars Built] 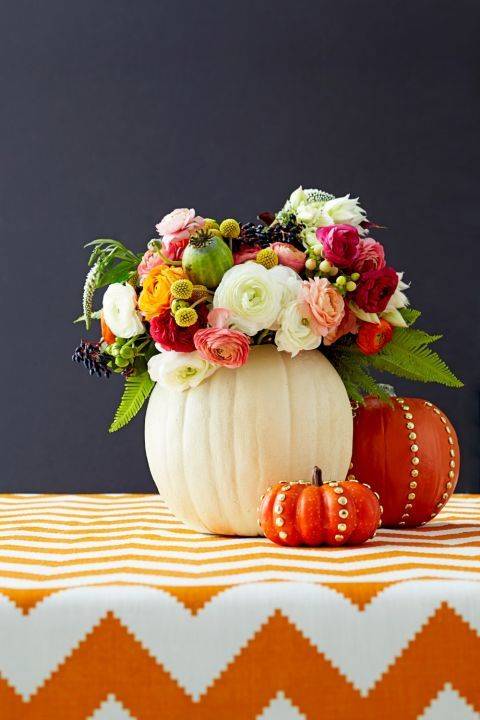
3. Pumpkins make pretty Halloween centerpieces – just add flowers! Find out more here. [Photo: Good Housekeeping] 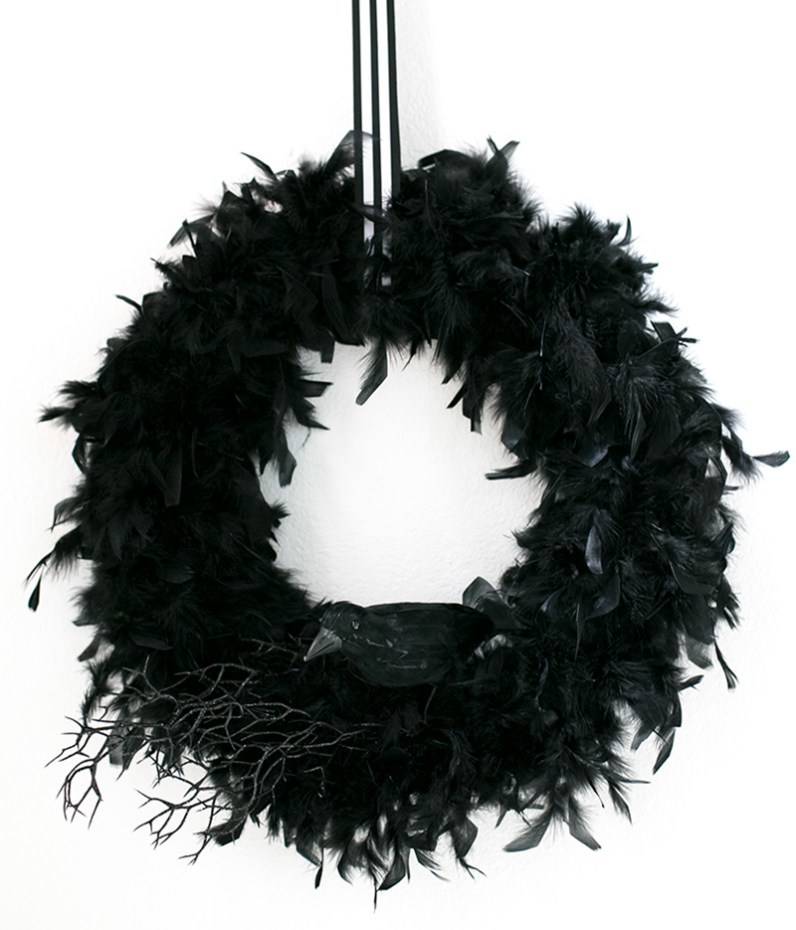
4. This feathered wreath has a sneaky surprise lurking at the bottom… check out the how-to here. [Photo: Warm Hot Chocolate] 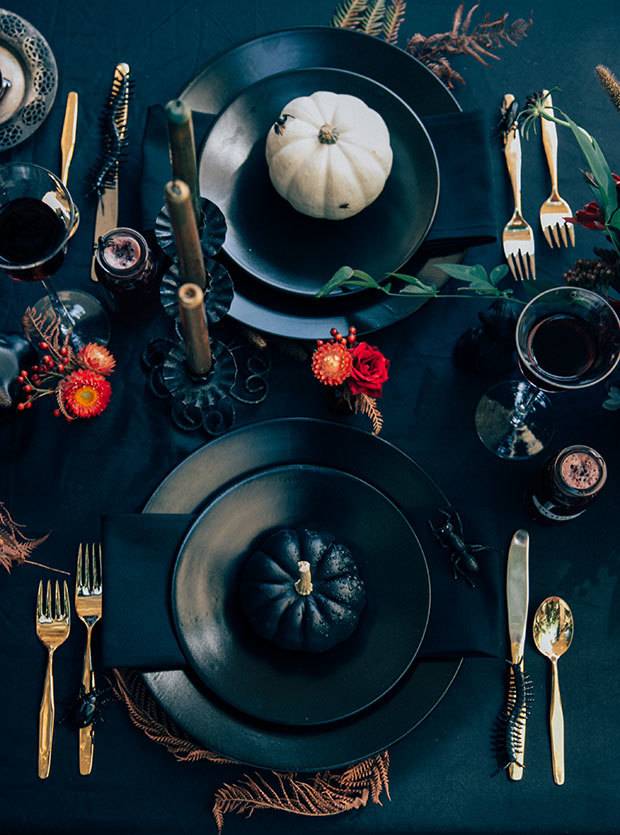
5. For an oh-so-spooky tablescape, use black dishes and a black tablecloth and add a few pops of color in the form of orange flowers. Learn more here. [Photo: The Decorista] 
6. This DIY floral skull centerpiece will have your guests oohing and ahhing for sure. Check out the tutorial here. [Photo: Honestly Yum] 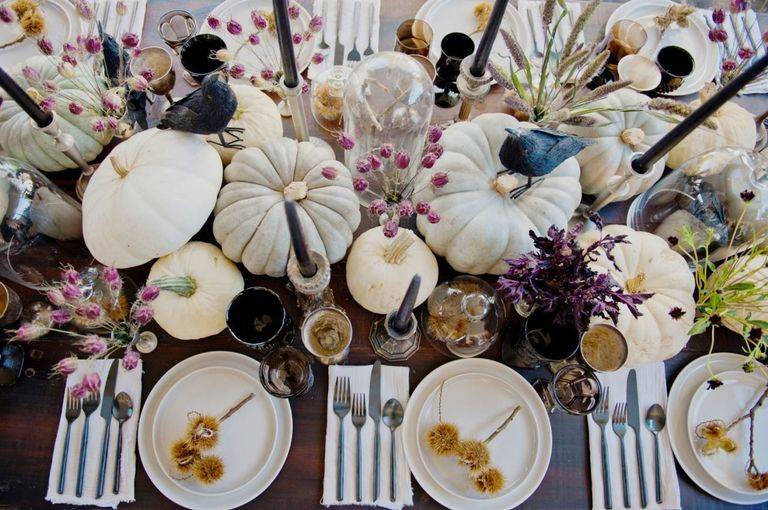
7. While this centerpiece doesn’t use traditional Halloween colors, it still feels perfectly ghostly. Check it out here. [Photo: Elle Decor] 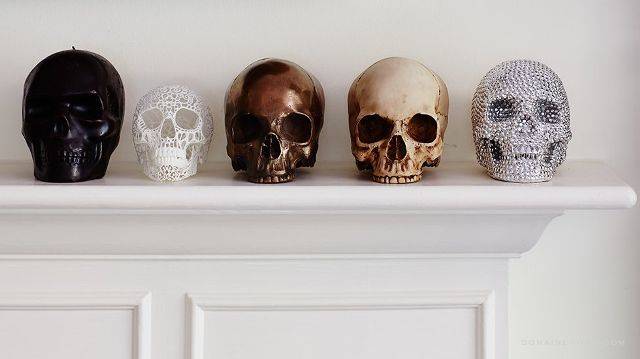
8. Simply collect a few different types of skulls and cluster them on a shelf or mantle for this creepy yet sophisticated display. [Photo: My Domaine] 
9. How about some color? Find out how to make these fun color-blocked pumpkins here. [Photo: A Kailo Chic Life] 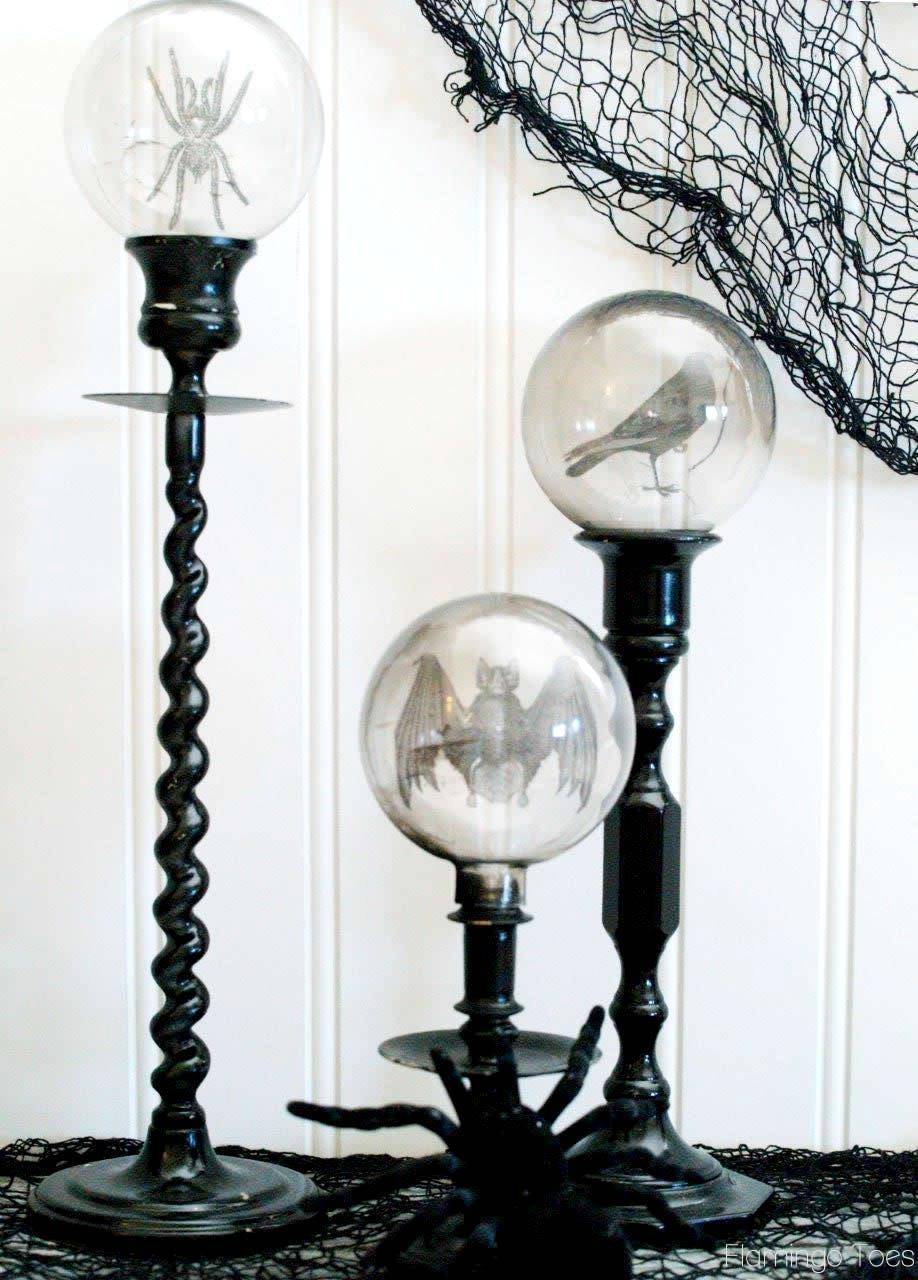
10. Check out the tutorial for these spooky crystal ball candlesticks here. [Photo: Flamingo Toes] 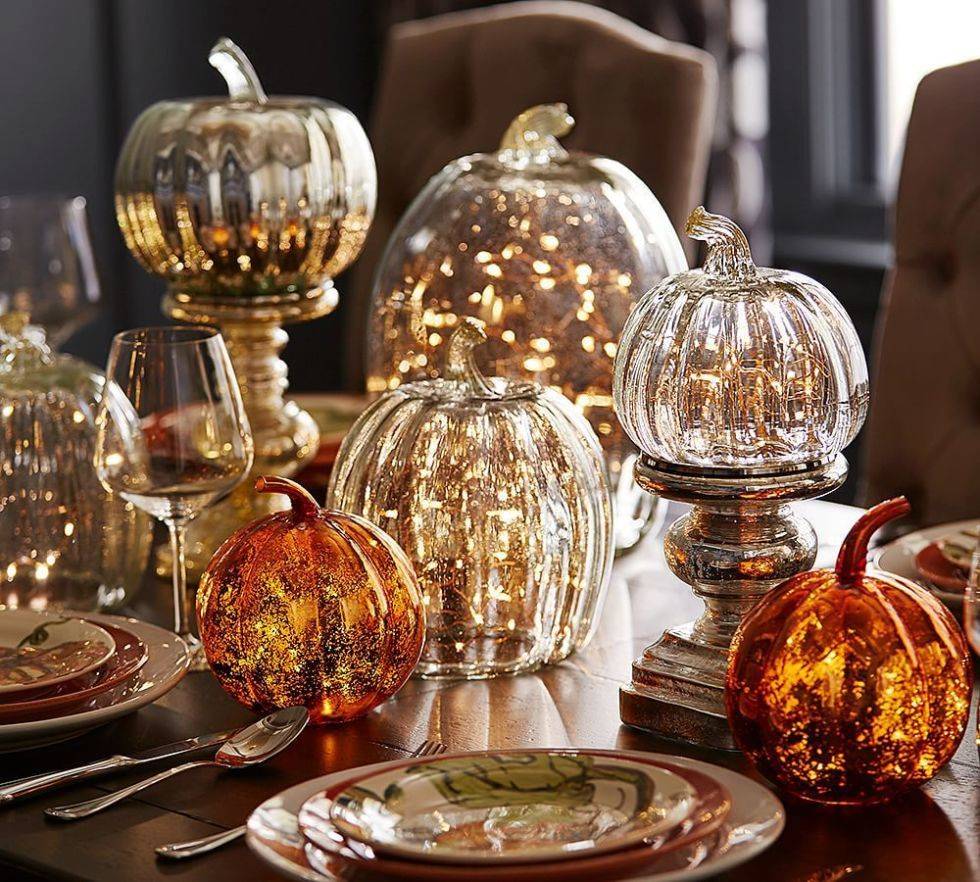
11. Fill clear glass pumpkins with tiny battery operated string lights to create this gorgeous centerpiece. Learn more here. [Photo: House Beautiful] 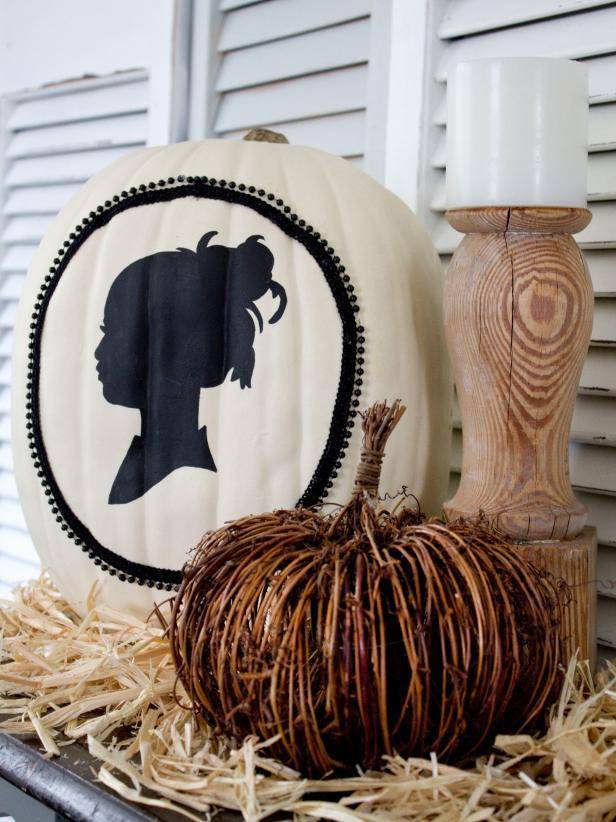
12. Silhouettes are an elegant way to decorate for Halloween. Find out how to recreate this look here. [Photo: HGTV] 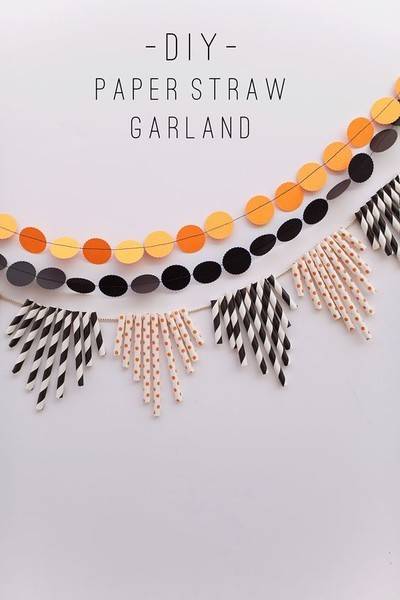
13. A colorful garland is a fun way to decorate with something other than ghosts and goblins… get the how-to here. [Photo: Tell Love & Party] 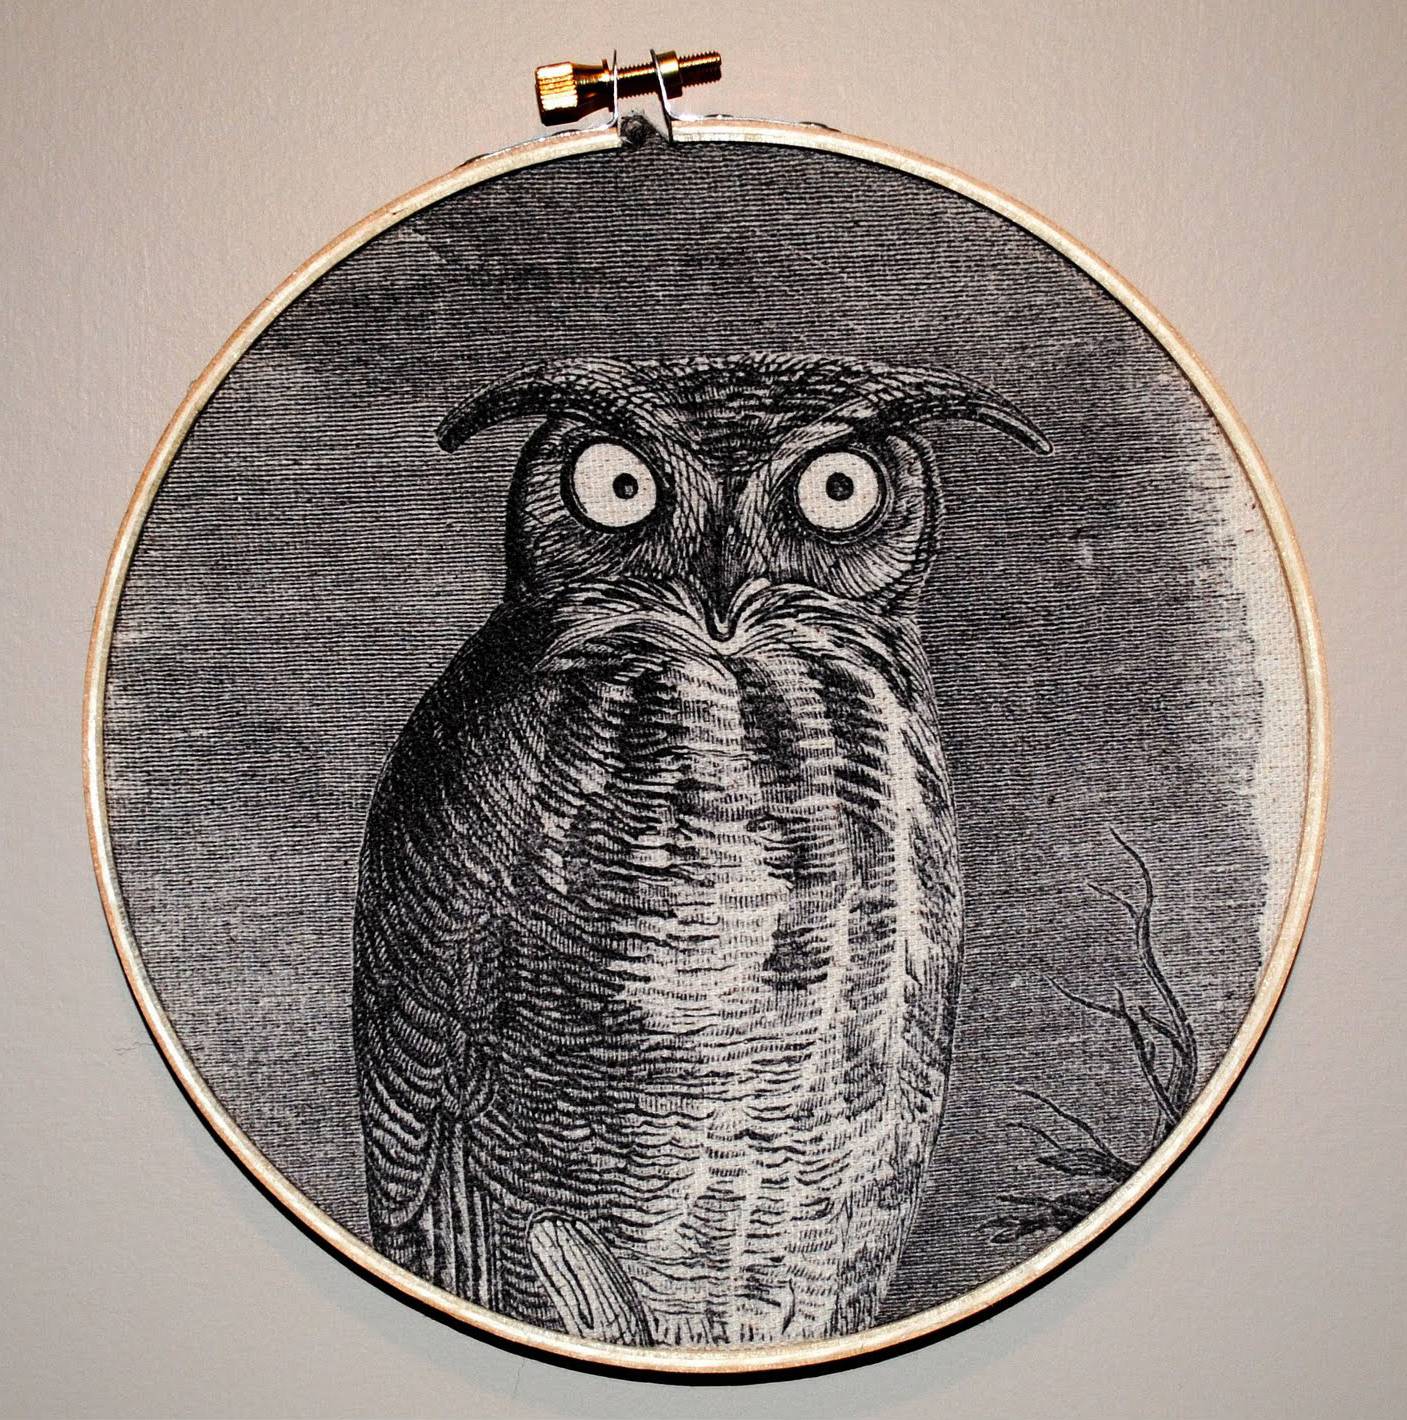
14. This owl embroidery hoop art is the perfect way to decorate your walls this Halloween. Check it out here. [Photo: The Graphics Fairy] 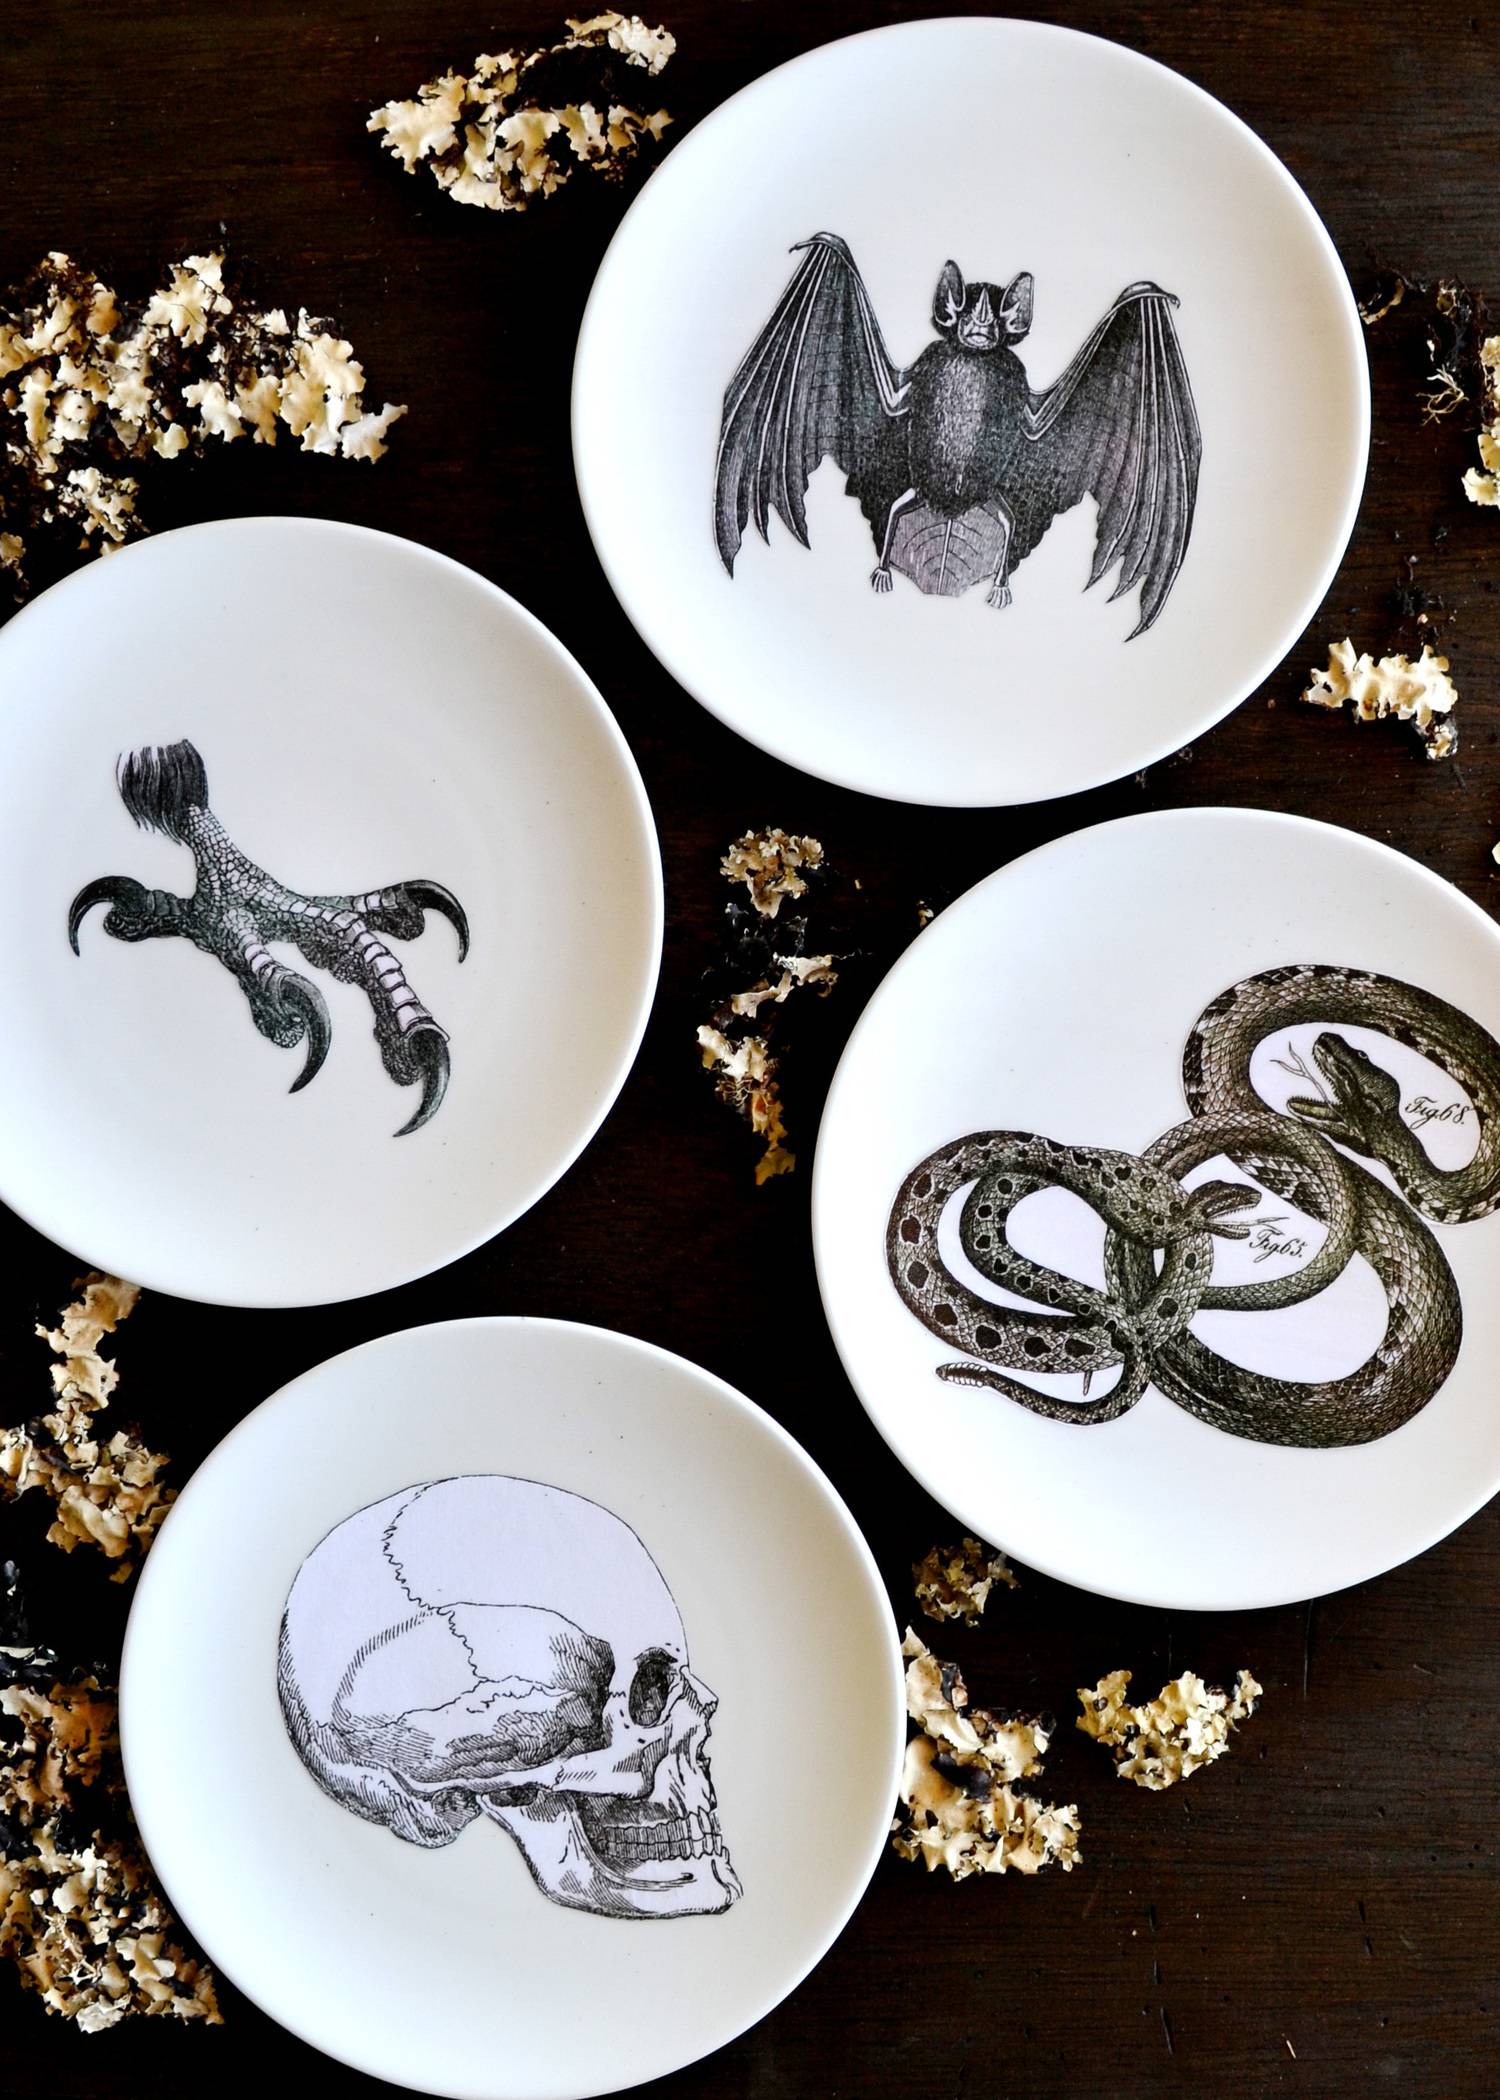
15. These silhouette plates are sophisticated and totally terrifying at the same time. Get the how-to here. [Photo: Boxwood Avenue] 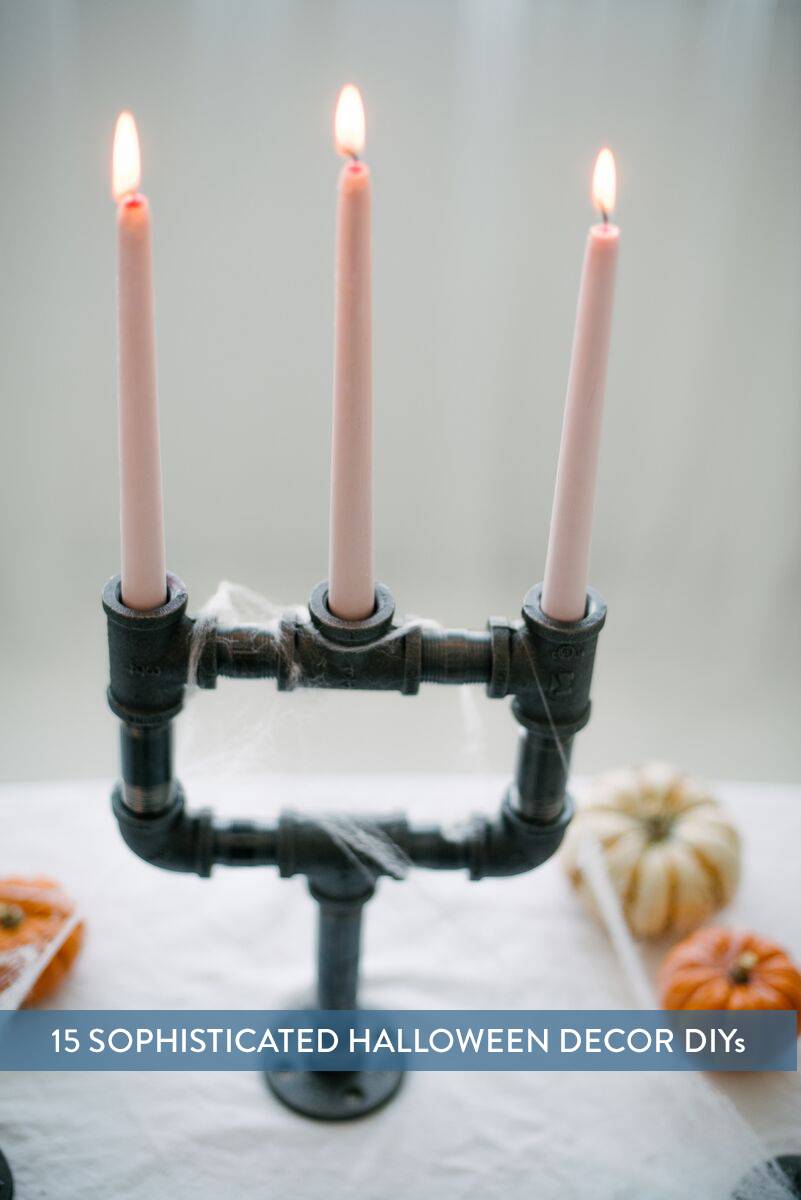
The post 15 Sophisticated Halloween DIY Ideas For Your Home appeared first on Curbly. Via https://www.curbly.com/15-sophisticated-halloween-diy-ideas-for-your-home 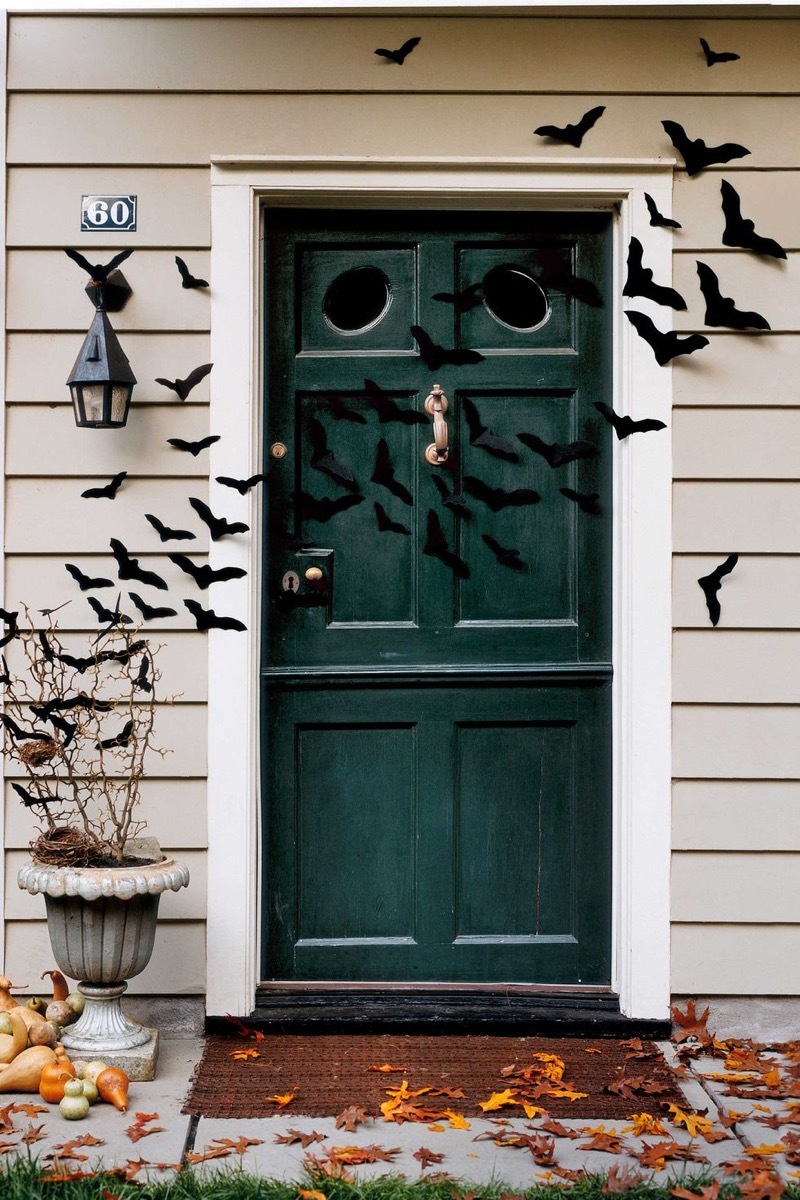
BOO! Did I scare you? If not, this might give you a fright: it’s almost October, which means it’s almost time for Halloween! Now that’s truly terrifying. Halloween is one of the most fun holidays to decorate for, and there are so many ways you can celebrate. Whether you prefer creepy crawlies, or more glitz and glam, there’s no end to the DIY Halloween decorations you can make to adorn you home – inside and out! Here are a few of our favorites. Prepare to be spooked!
SPOOKY WALL DECOR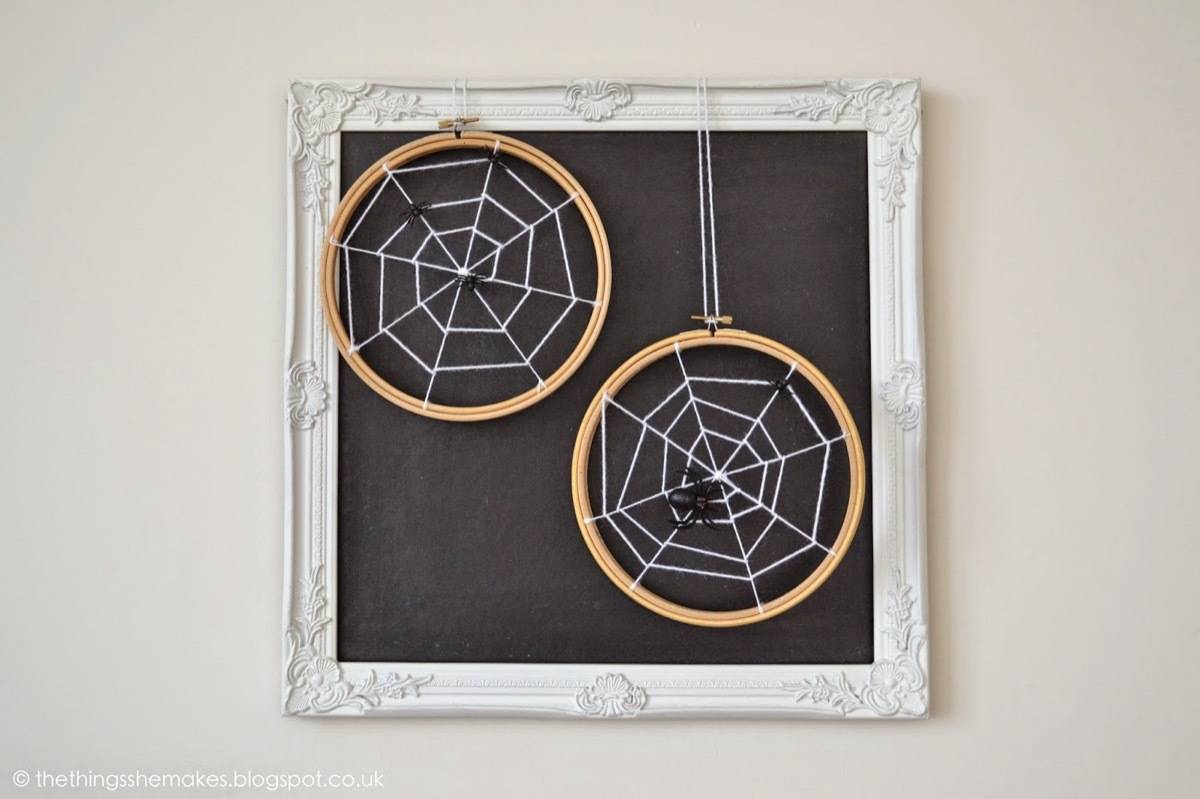
1. Adorable? Or eerie? These spider webs are crafted from embroidery hoops. Find the tutorial here. 
2. An old IKEA picture frame gets frightful – find out how to make this classy “BOO” picture frame here. 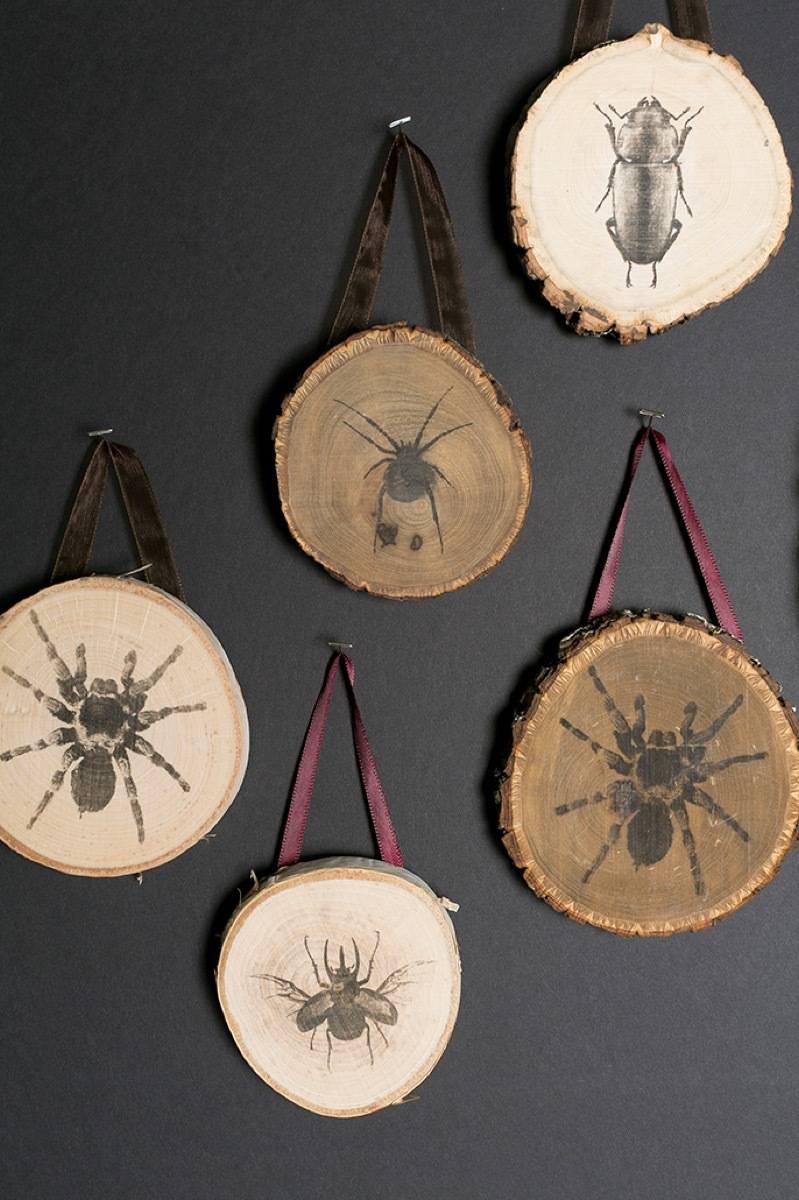
3. These entomological wood rounds found over on The House That Lars Built are beautiful, but they kind of make my skin crawl. 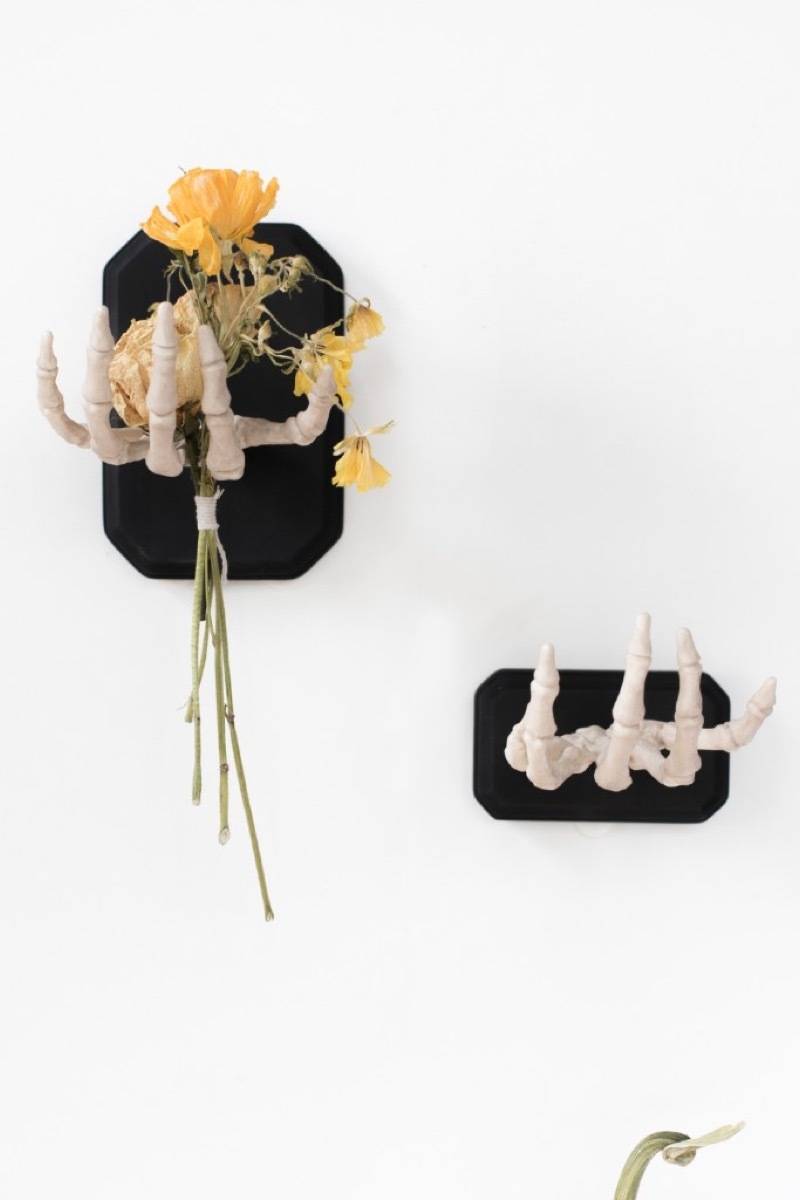
4. Lend us a hand, will ya? Display all kinds of decaying treasures in these wall-mounted skeleton mitts. 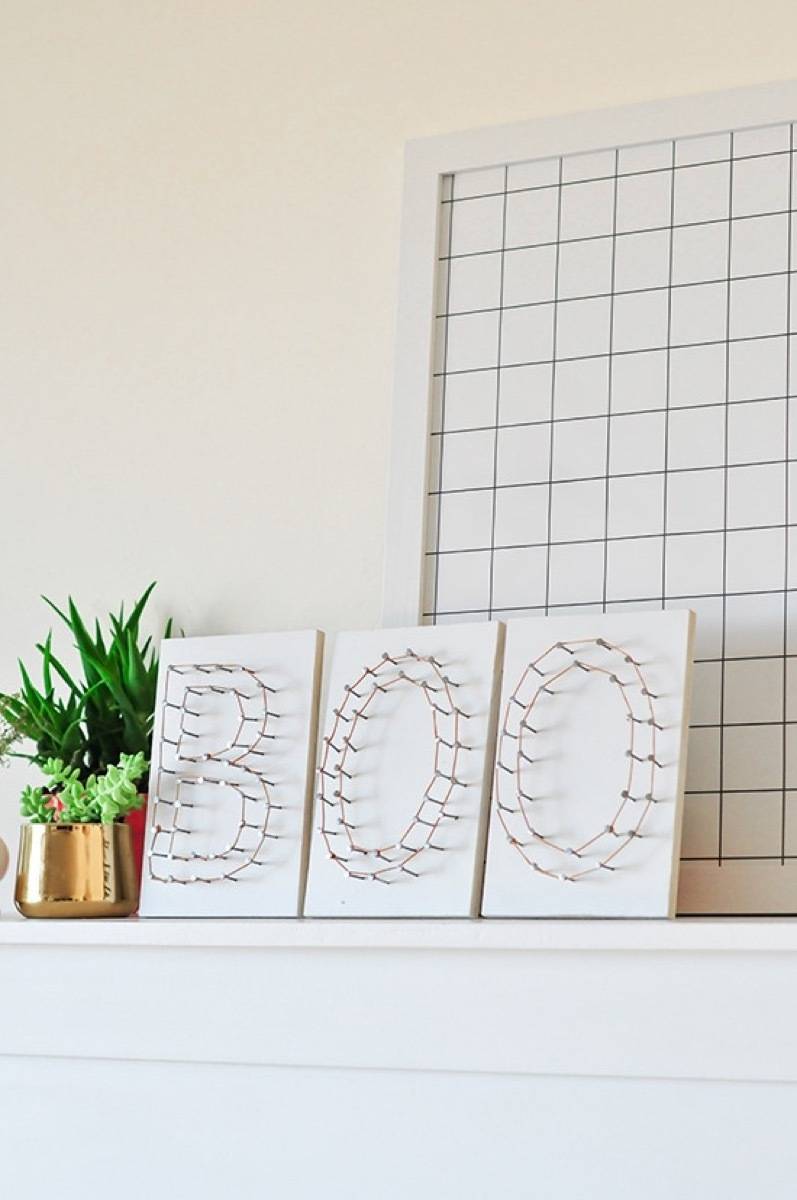
5. Cobwebs don’t have to be the only stringy things this holiday. Craft this clever “BOO” string art from this tutorial. 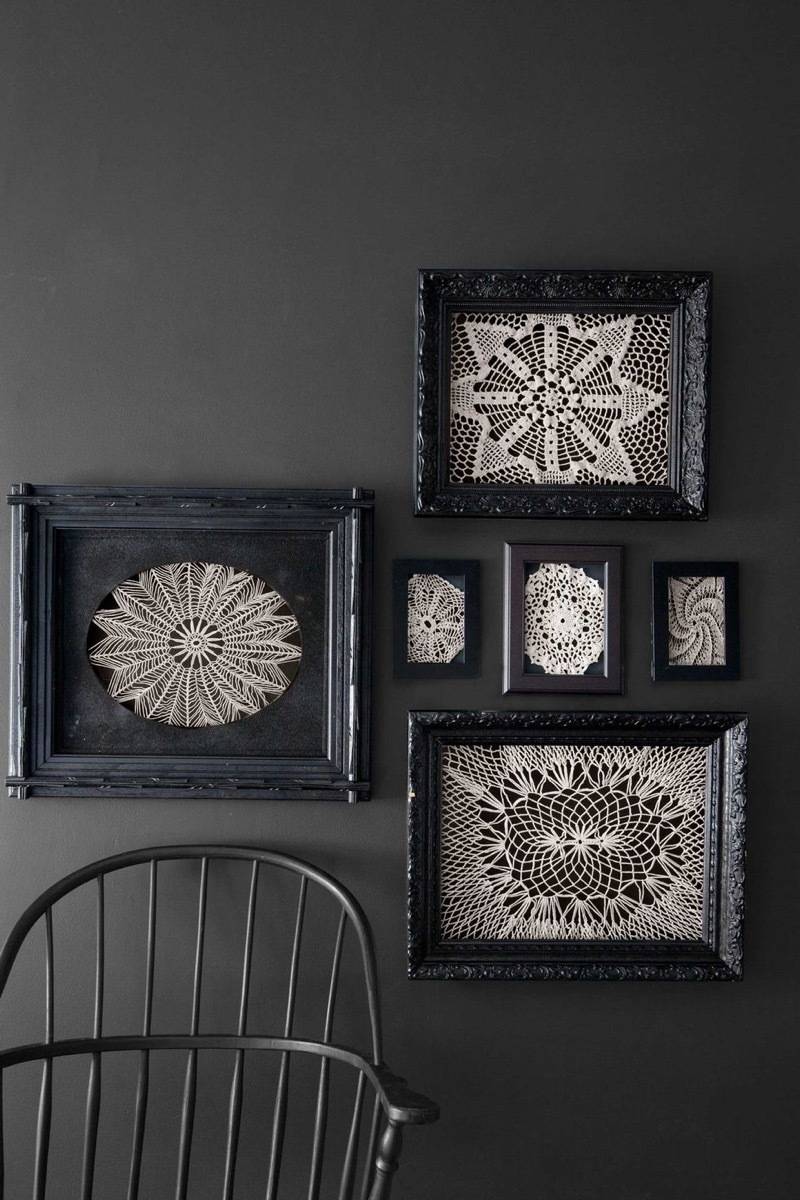
6. Doilies framed in black are particularly somber, yet sophisticated. Perfect if you’re vying for some understated DIY Halloween decoration. 
7. All you need to create this unnerving look is a little bit of construction paper and some double-sided tape, and you can give your existing images a fresh, soul-less look. 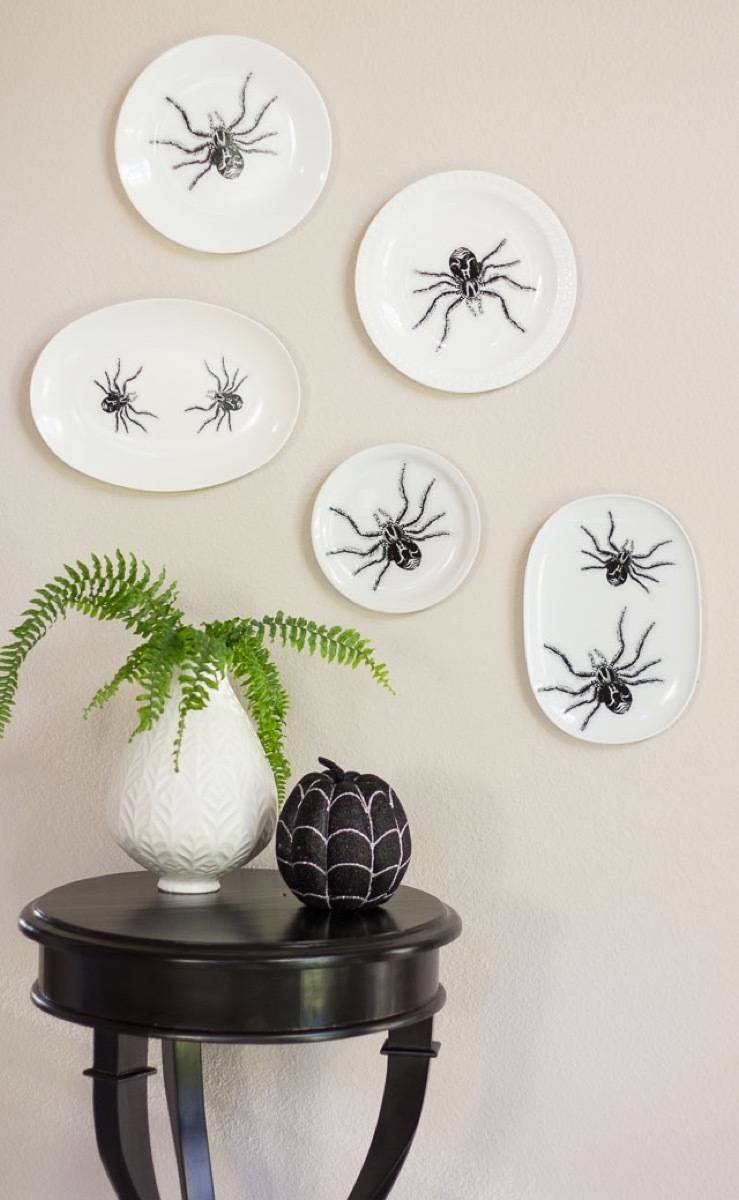
8. Arachnophobes beware! These spider plates make great wall art, but are likely to give you the heebie jeebies as well. 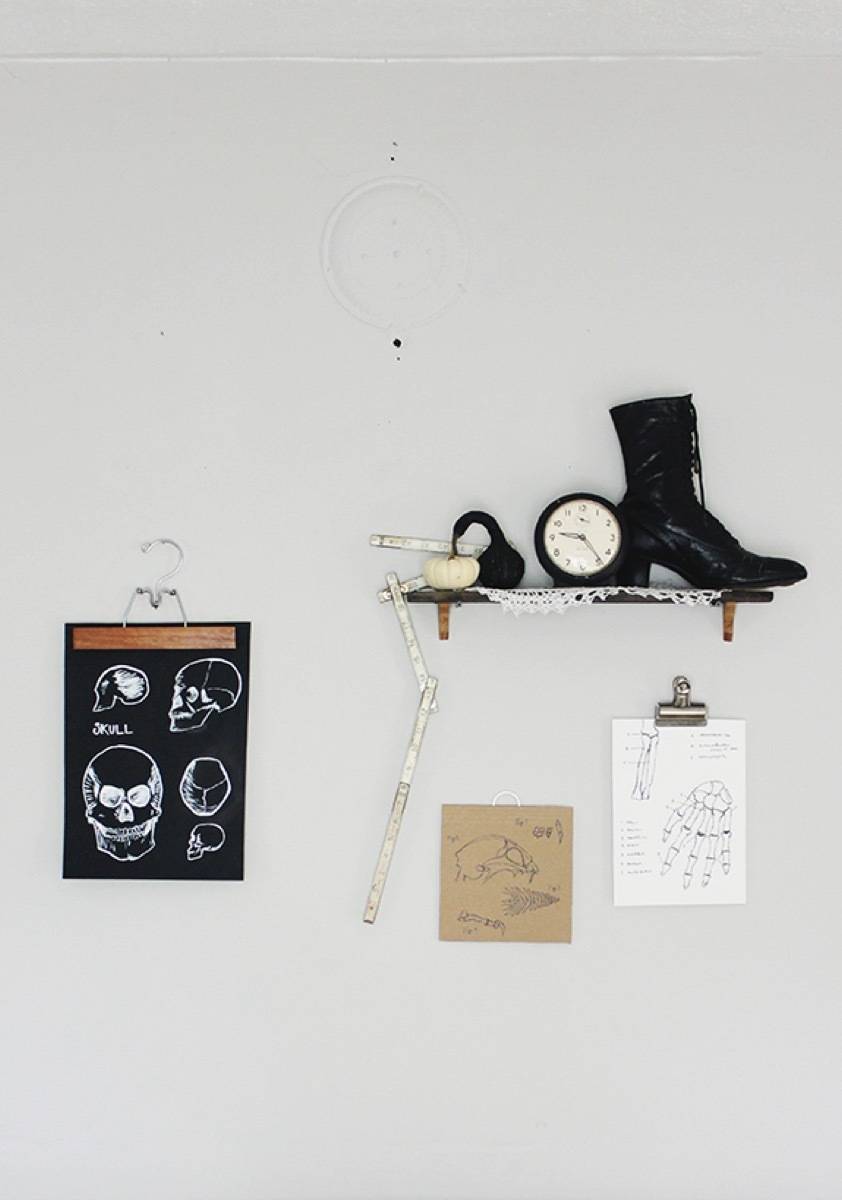
9. A few skeleton sketches can really tie a room together. Head over to Say Yes to learn how to create these minimal DIY Halloween decorations. 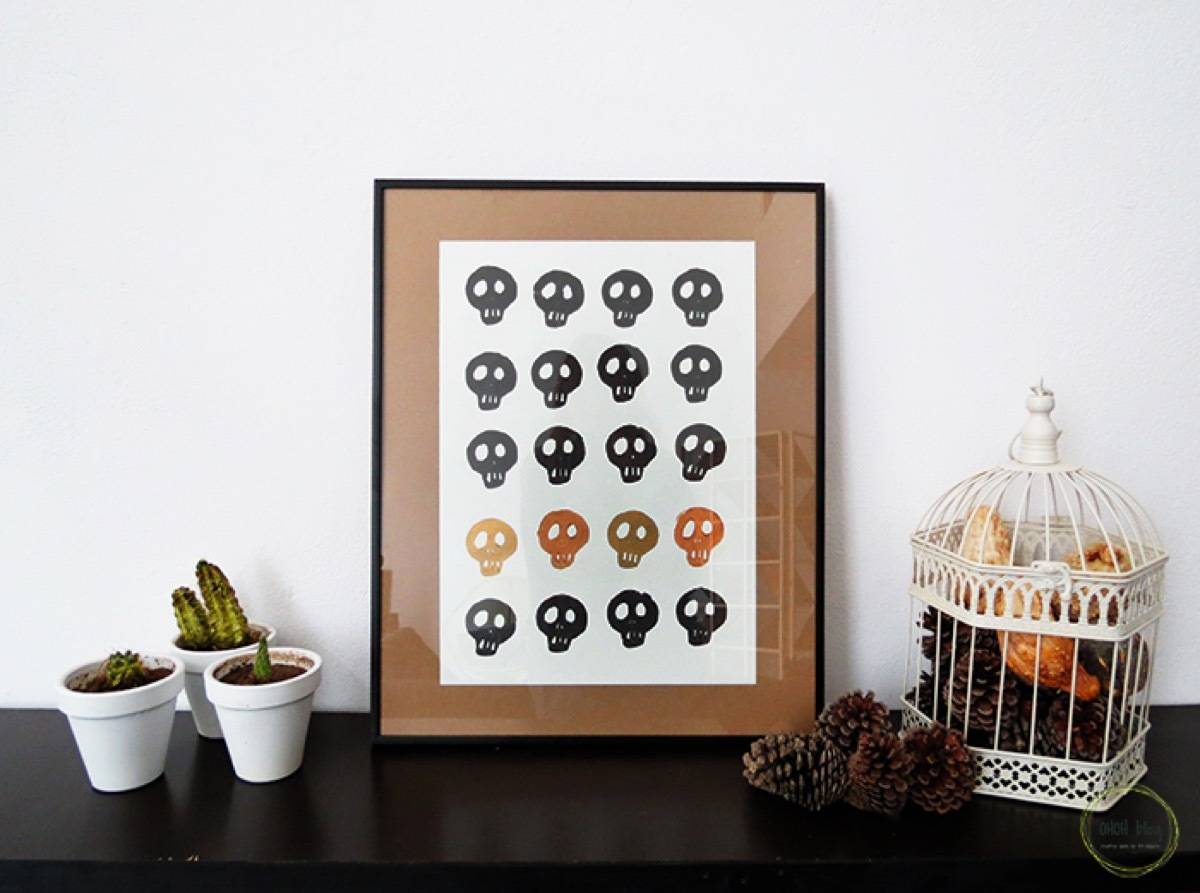
10. Follow this tutorial to learn how to create a stamp shaped like a skull – perfect for creating one-of-a-kind wall art. 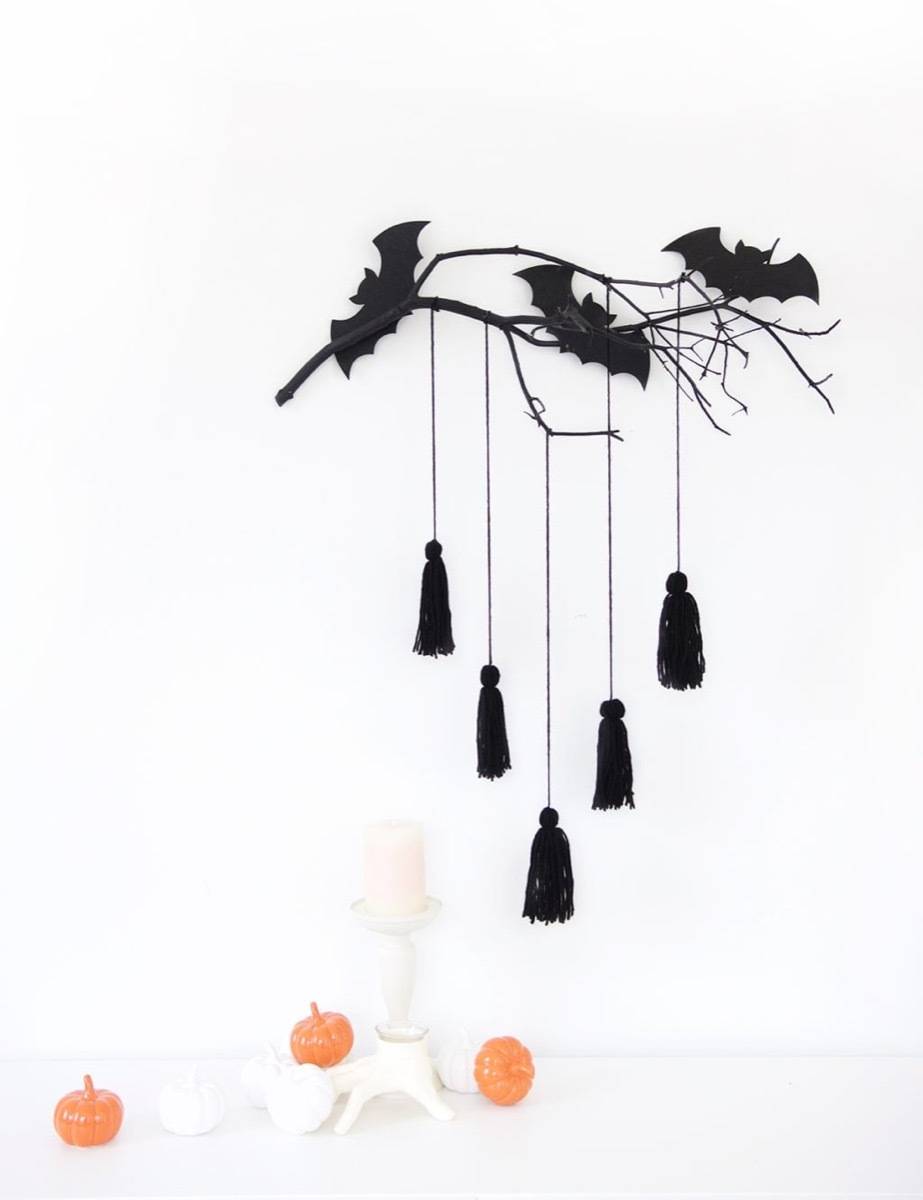
11. This modern wall decor from Damask Love is just the right amount of bare-bone, black, and bats. 
12. Use this tutorial to create your own ode to Screamin’ Jay Hawkins. 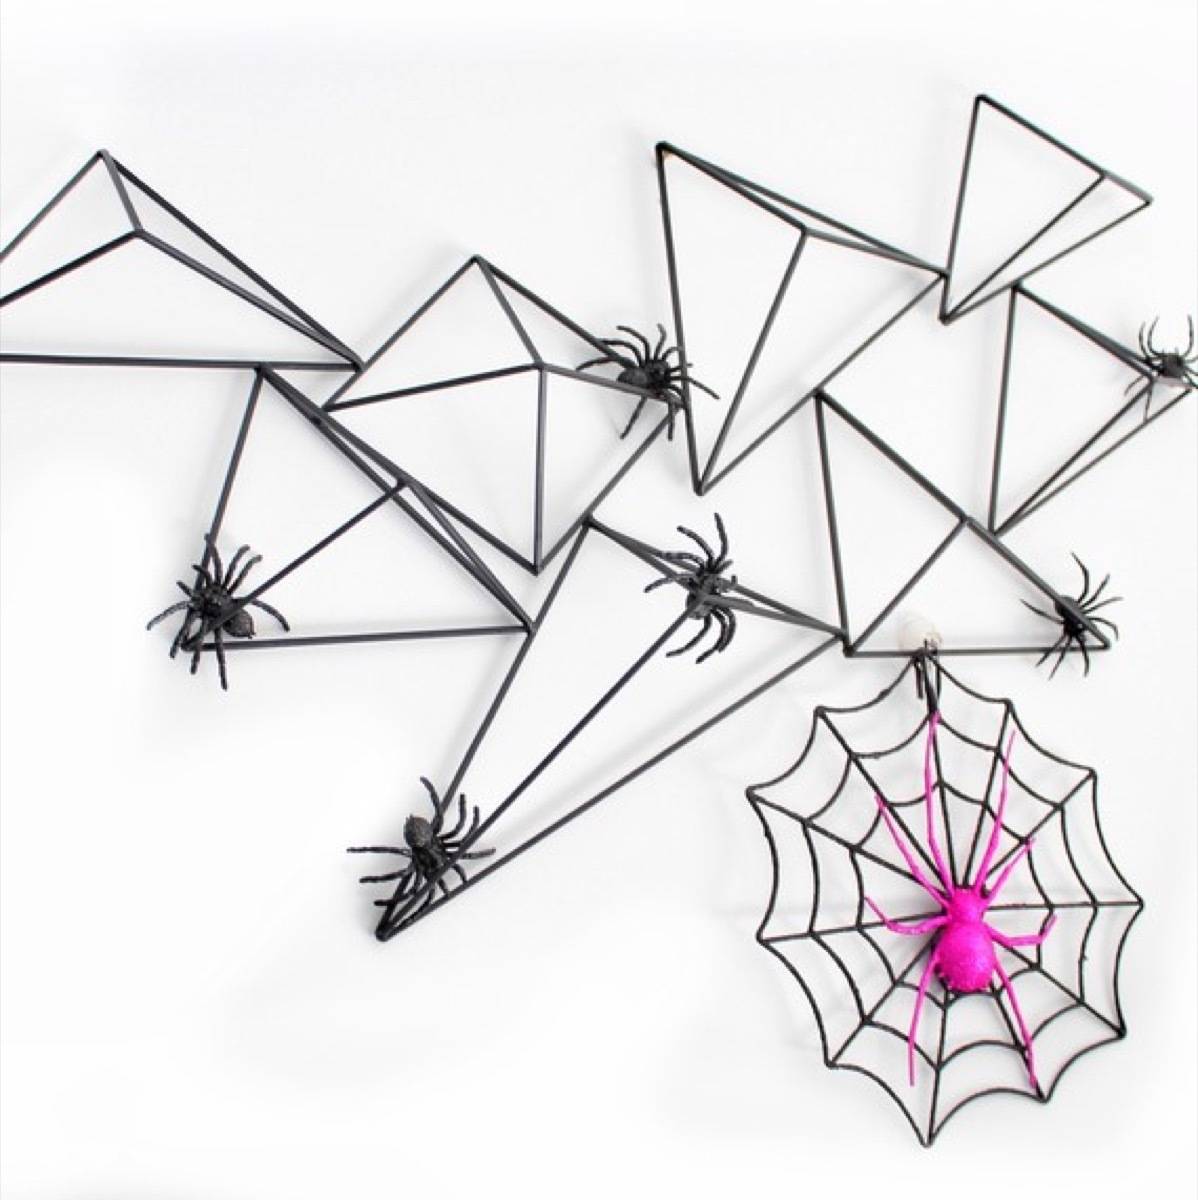
13. Modern wall art transforms into a geometric spider web, thanks to spray paint. Turns out you can create DIY Halloween decorations out of any old thing! TABLETOP DIY HALLOWEEN DECORATIONS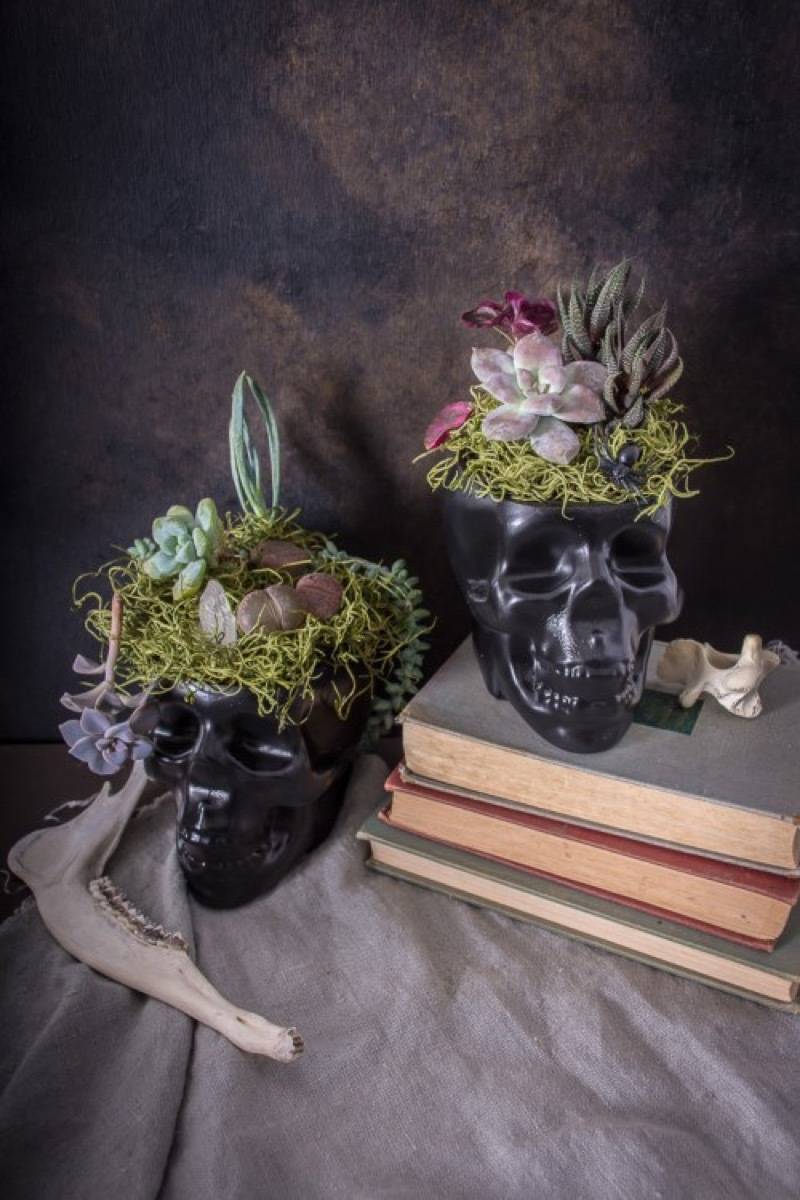
14. If I made these skull planters, I’d want to keep them around all year long! Head over to DIY in PDX for the tutorial. 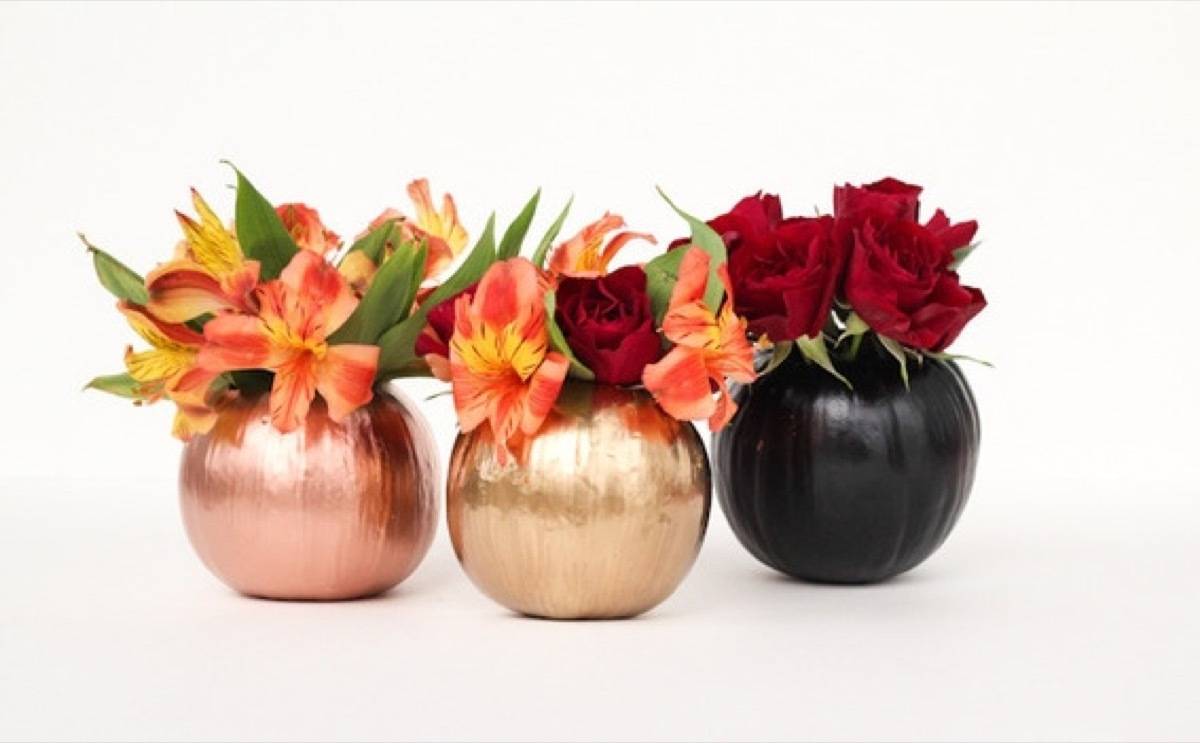
15. How about some quick DIY Halloween decorations? Using spray paint, you can create mini pumpkin vases in minutes. 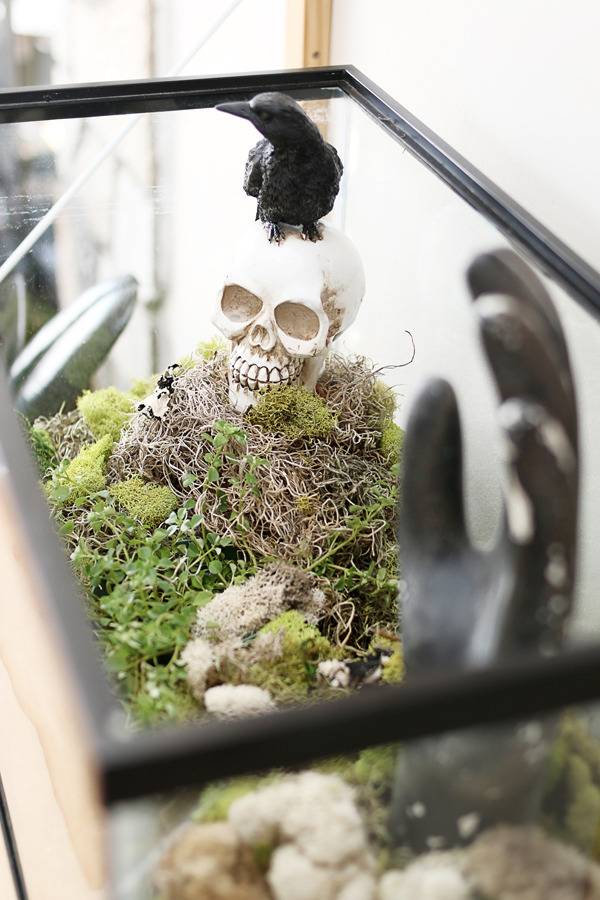
16. Terrariums are usually reserved for reptiles, amphibians, or aquatic creatures. This one, however, houses all things spooky. 
17. Using pipe fittings, this blogger created a spooky candelabra. It’s perfect for lighting up a dark tablescape or mantel. 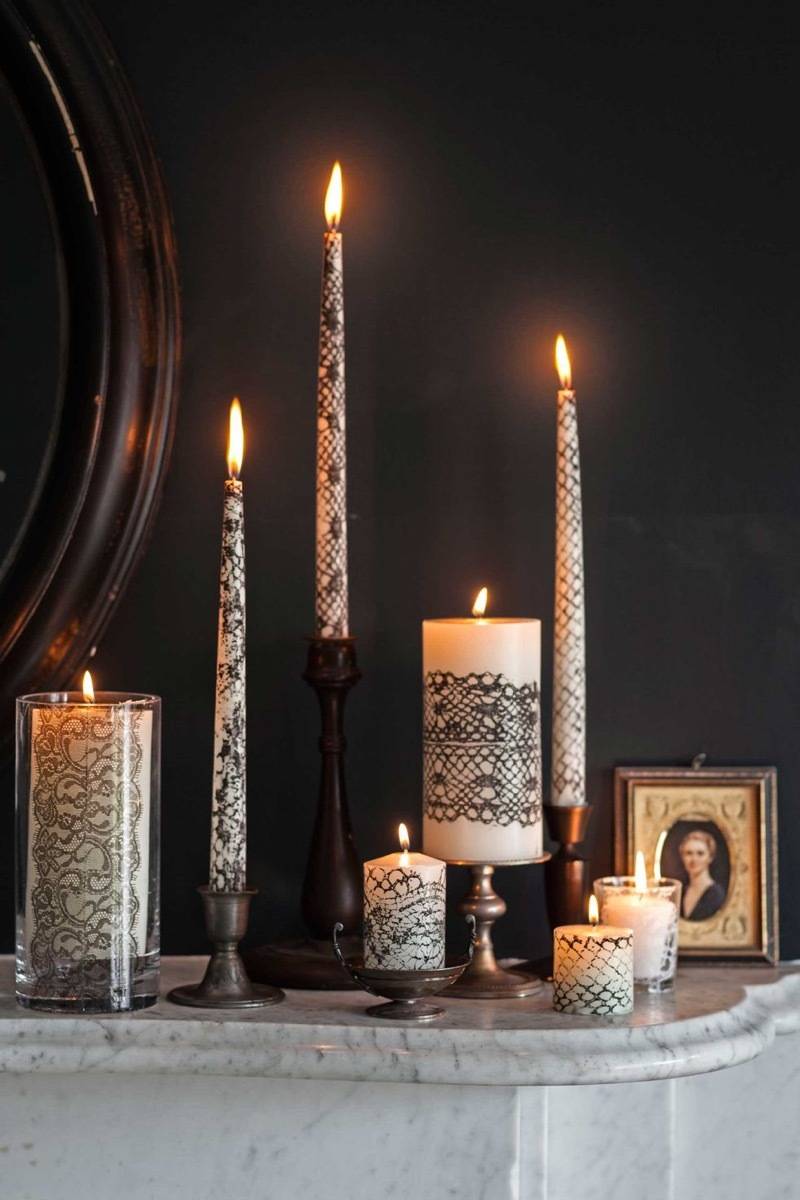
18. These seemingly lace-wrapped candles are safe for burning! Learn more about these elegant DIY Halloween decorations here. 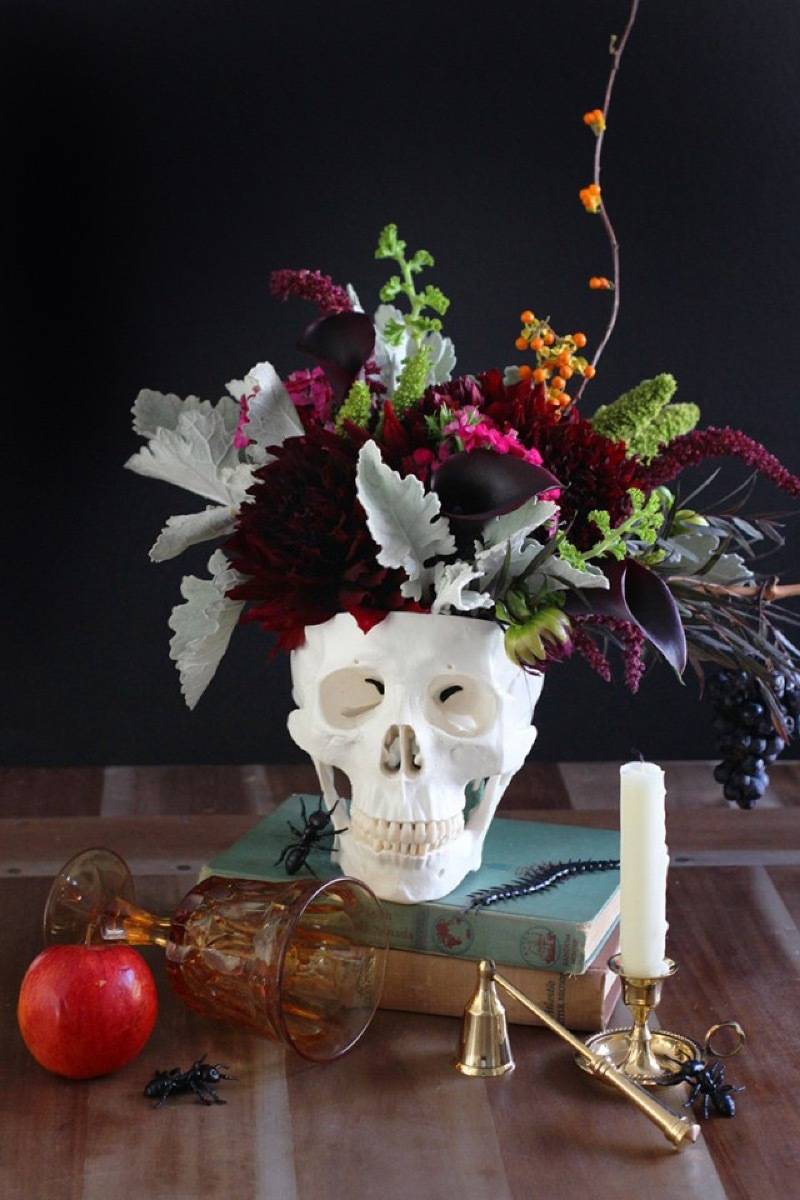
19. An empty dome makes an ideal flower holder for a Halloween centerpiece. But only in October. Otherwise your house guests might not come back. 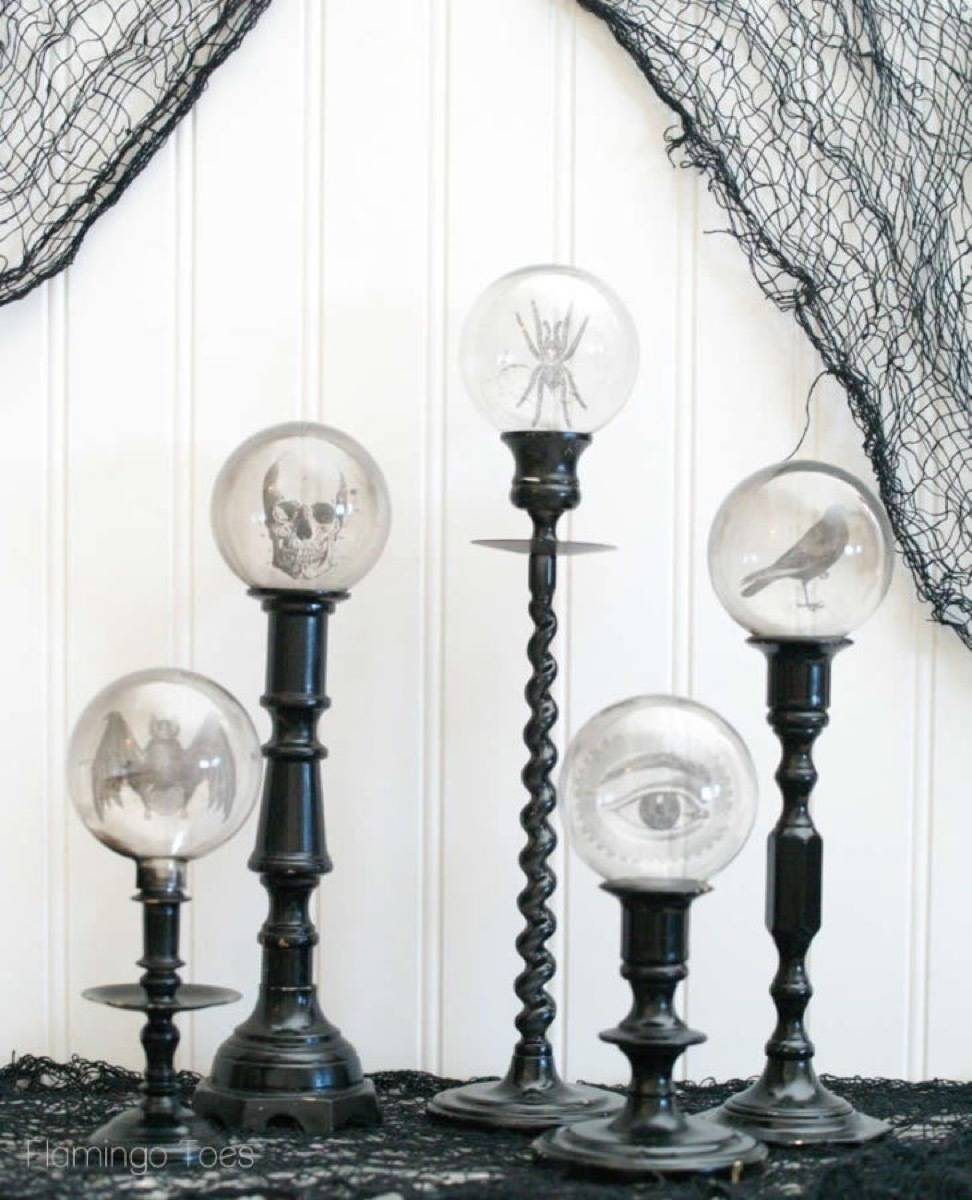
20. These spoooooky crystal balls are made with old light bulbs! 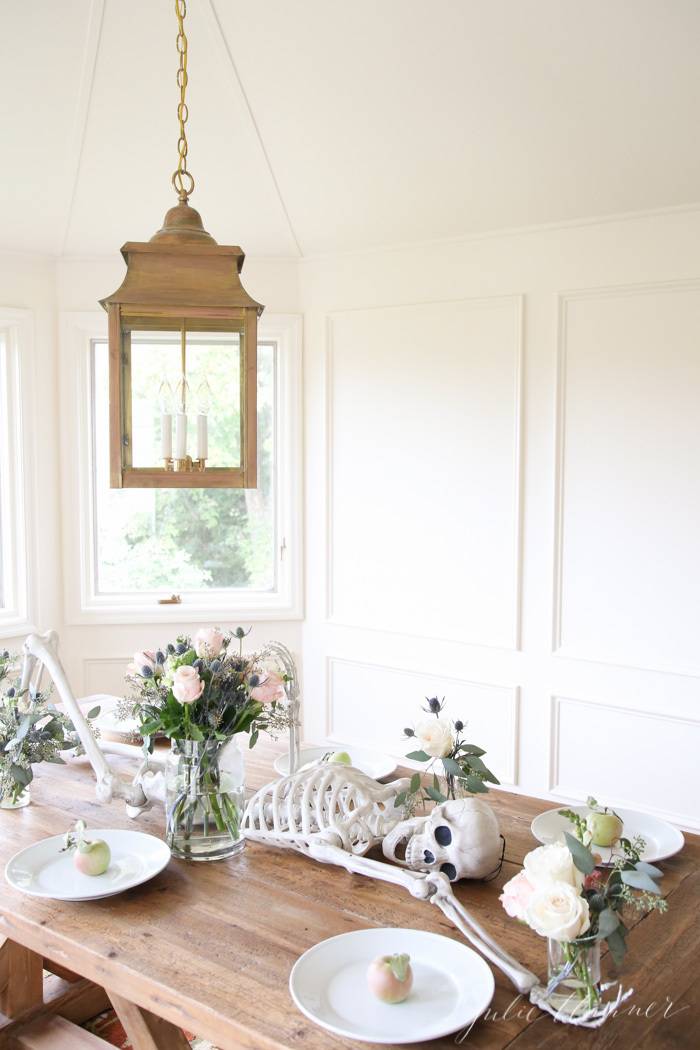
21. Decorate your table with a dramatic skeleton (I have to believe this one is a distant cousin of Skellie). 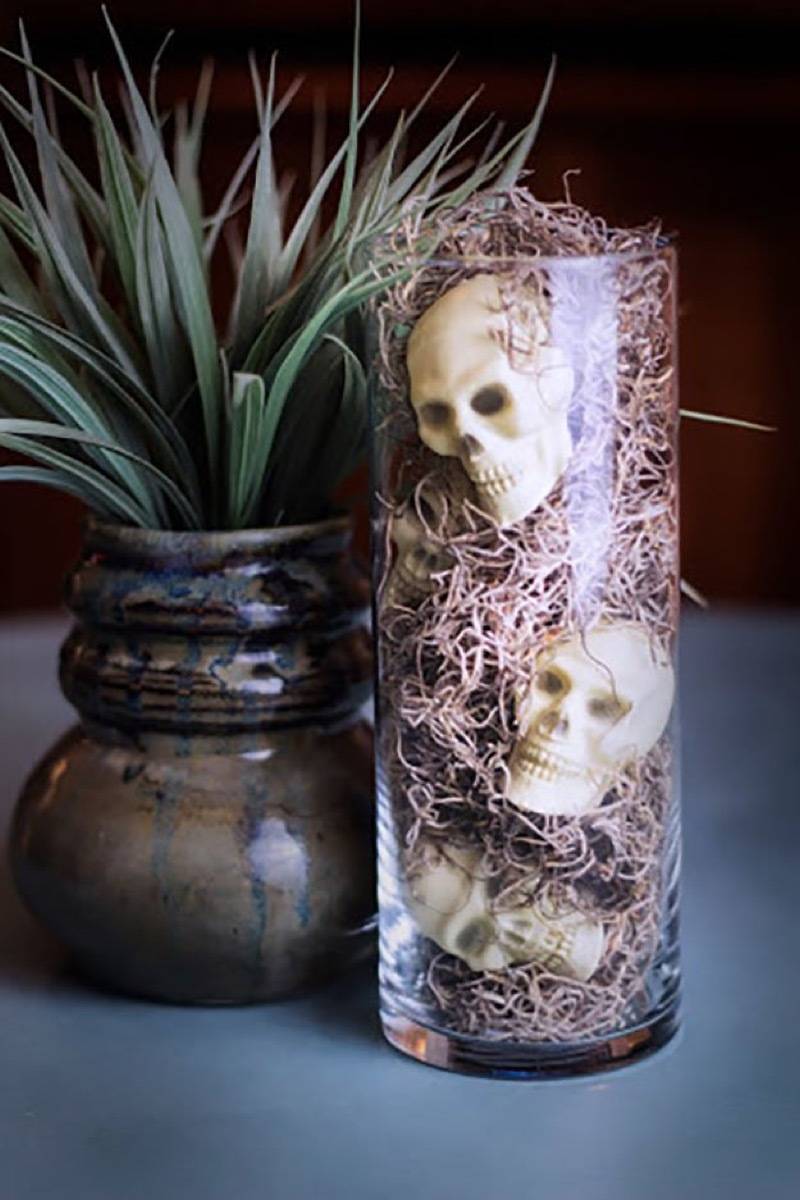
22. Make DIY Halloween decorations using things purchased at the Dollar Store, like this vase of skulls! There are lots of other affordable ideas on this page, too. 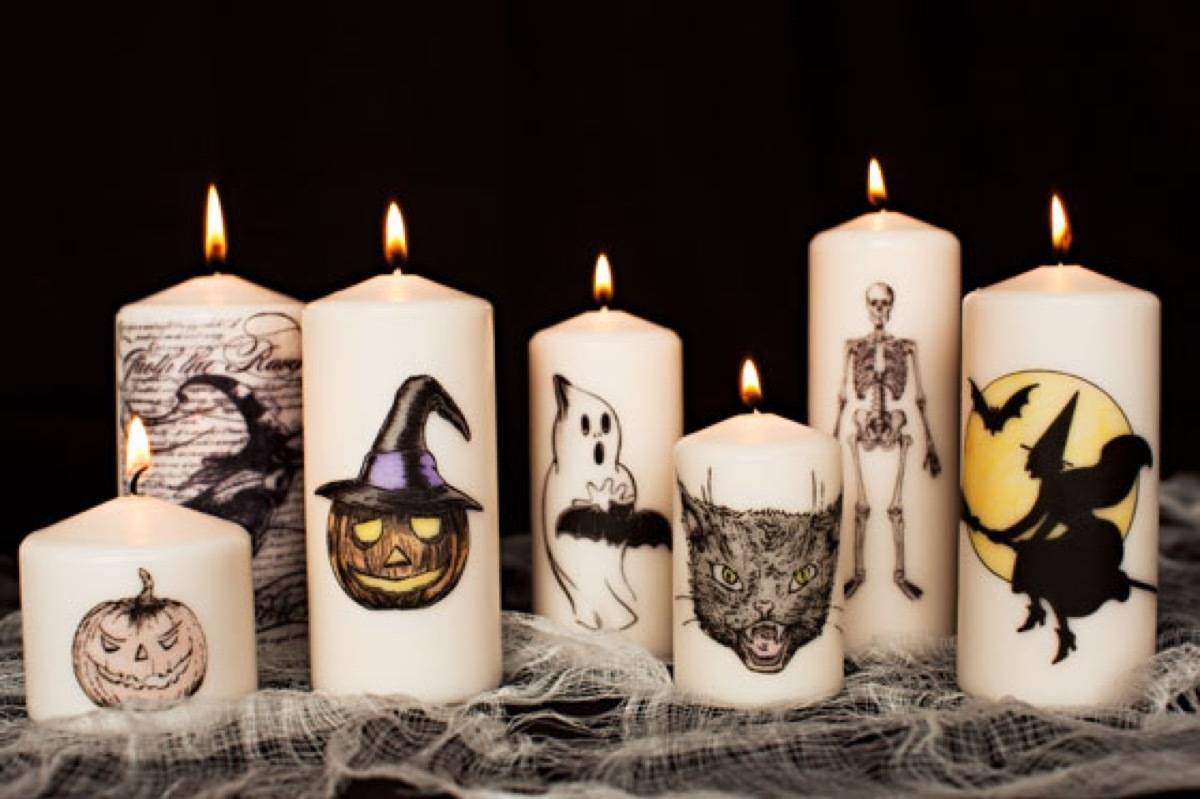
23. Halloween candles made easy, thanks to wax paper. 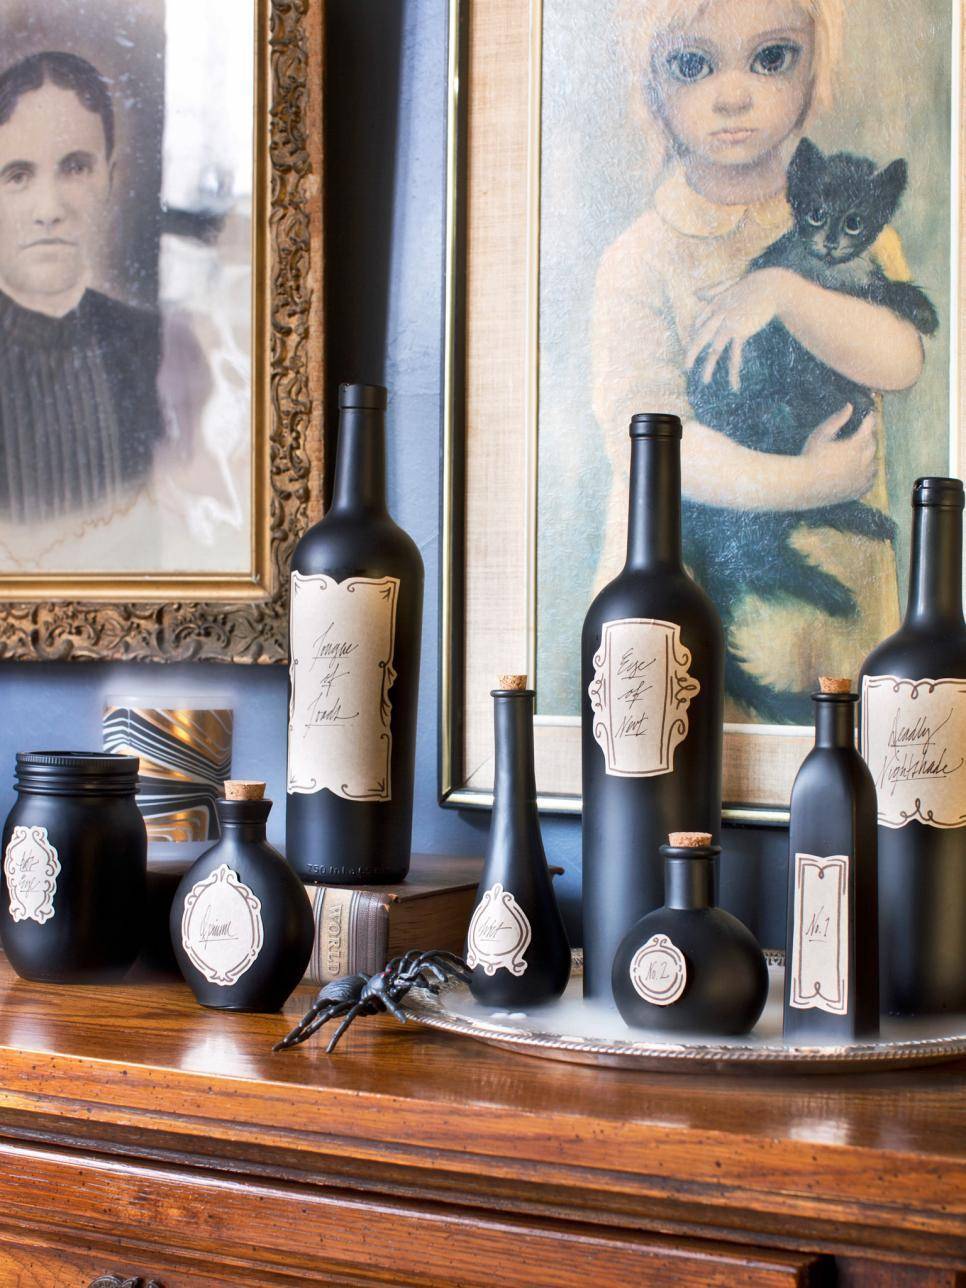
24. Here’s a clever DIY-dea… paint old bottles in matte black, give them mysterious labels, and you’ve got yourself a stockpile of potion bottles. 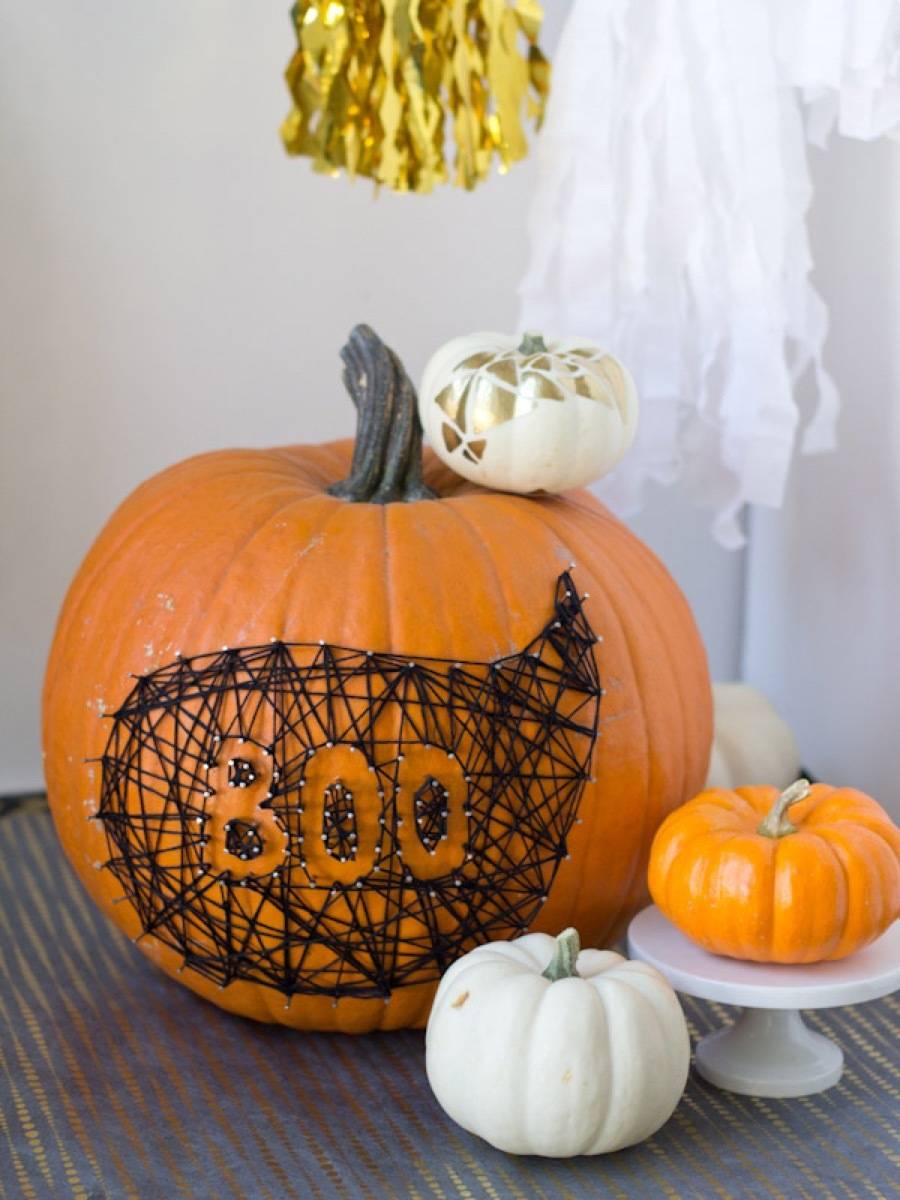
25. Sure, you could decorate your home for Halloween with carved pumpkins – but what if you turned your pumpkin into a work of string art instead? 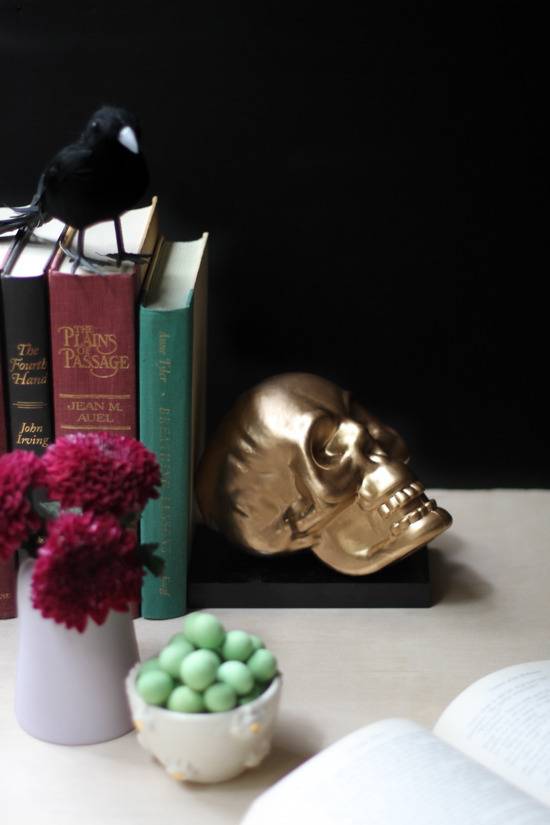
26. A pair of gold skull bookends can organize and haunt a shelf of books. 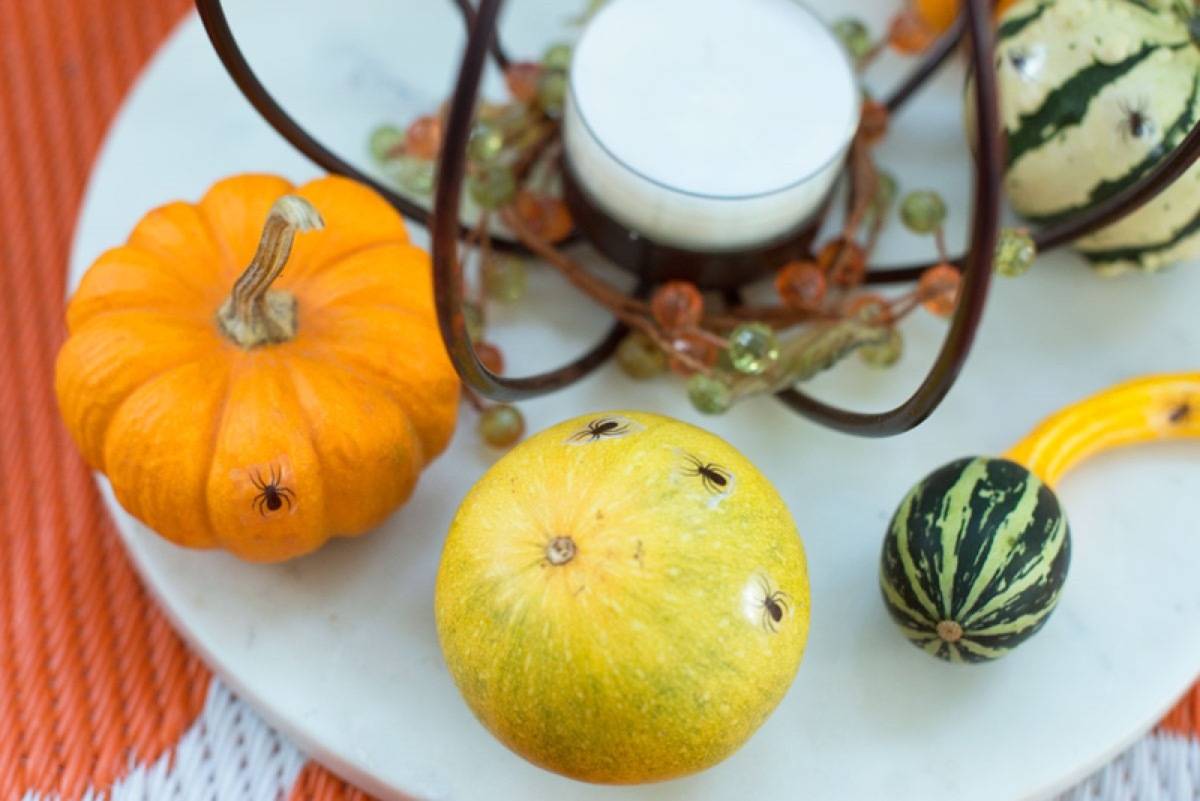
27. This gathering of gourds is sweet at a glance – until you get closer. Eek! Find out how to make a creepy cornucopia here. 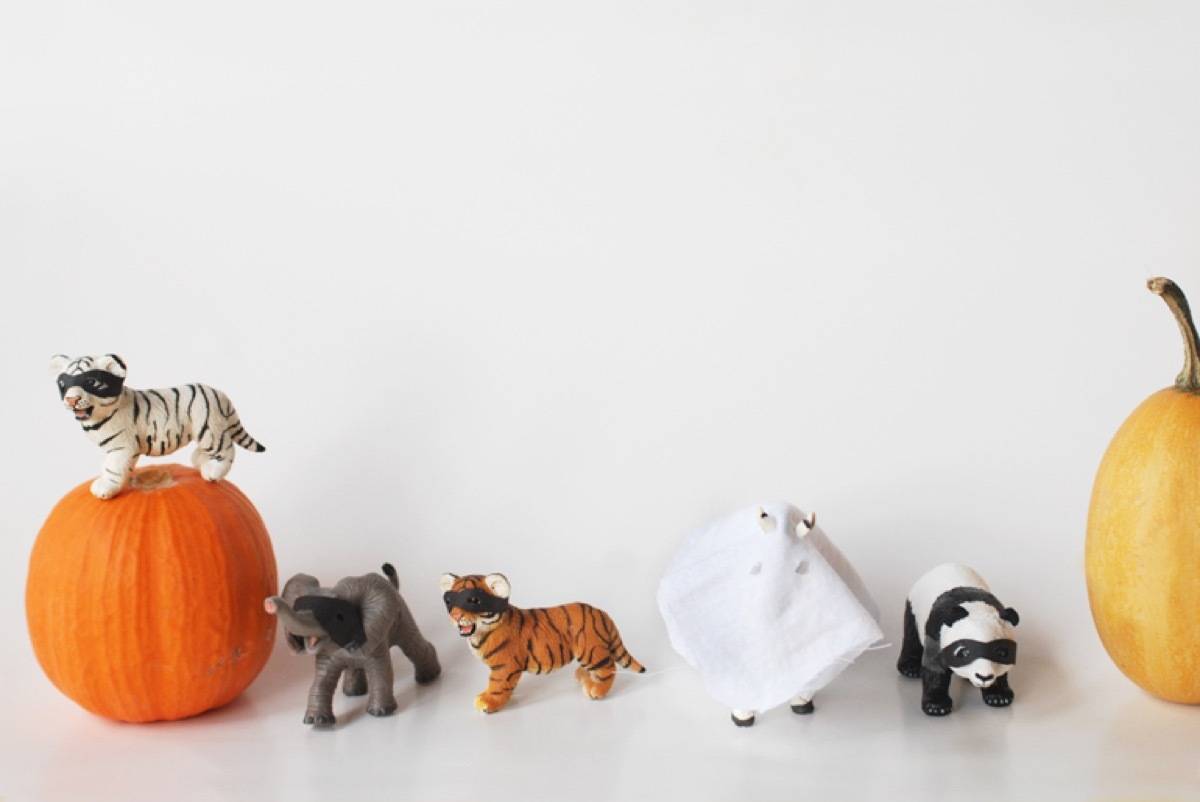
28. Don’t want to go overboard, but still want some small DIY Halloween decorations? Take a look at these mini masked animals. 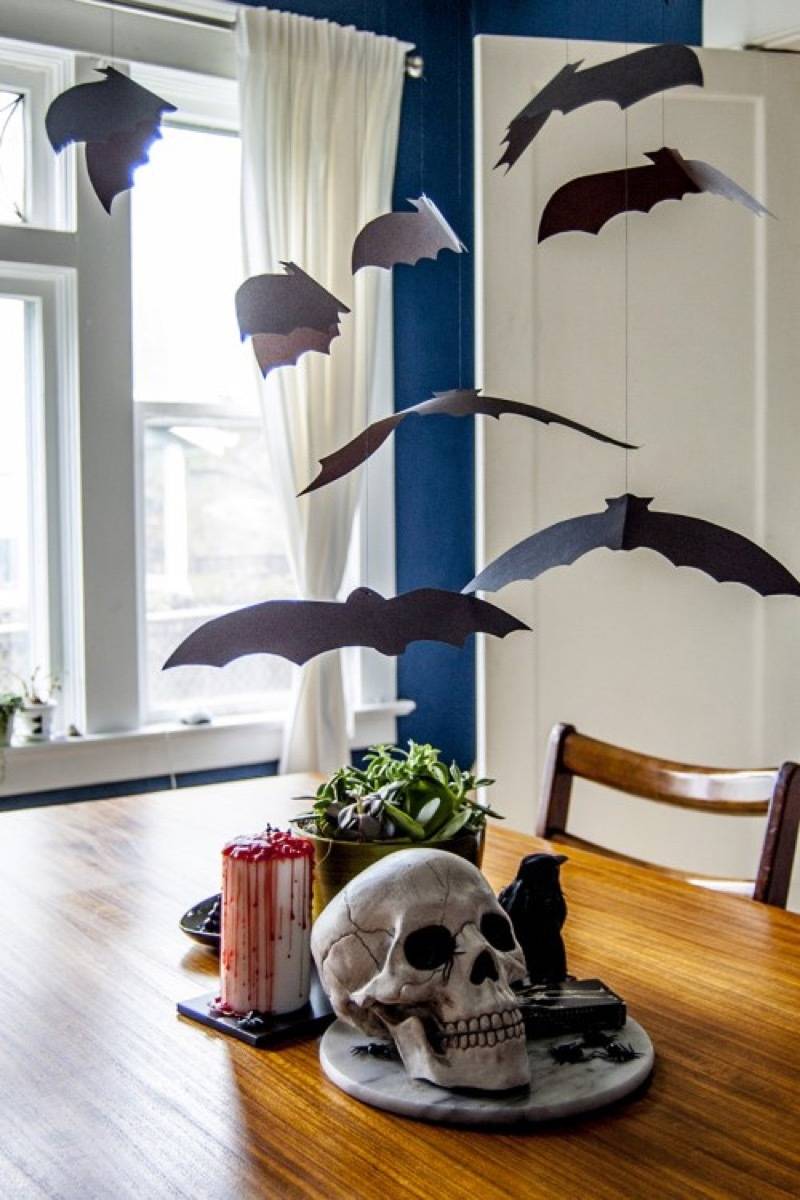
29. It’s a bat mobile! But it’s not the Bat Mobile… Create this fast craft over at DIY in PDX. HALLOWEEN WREATH IDEAS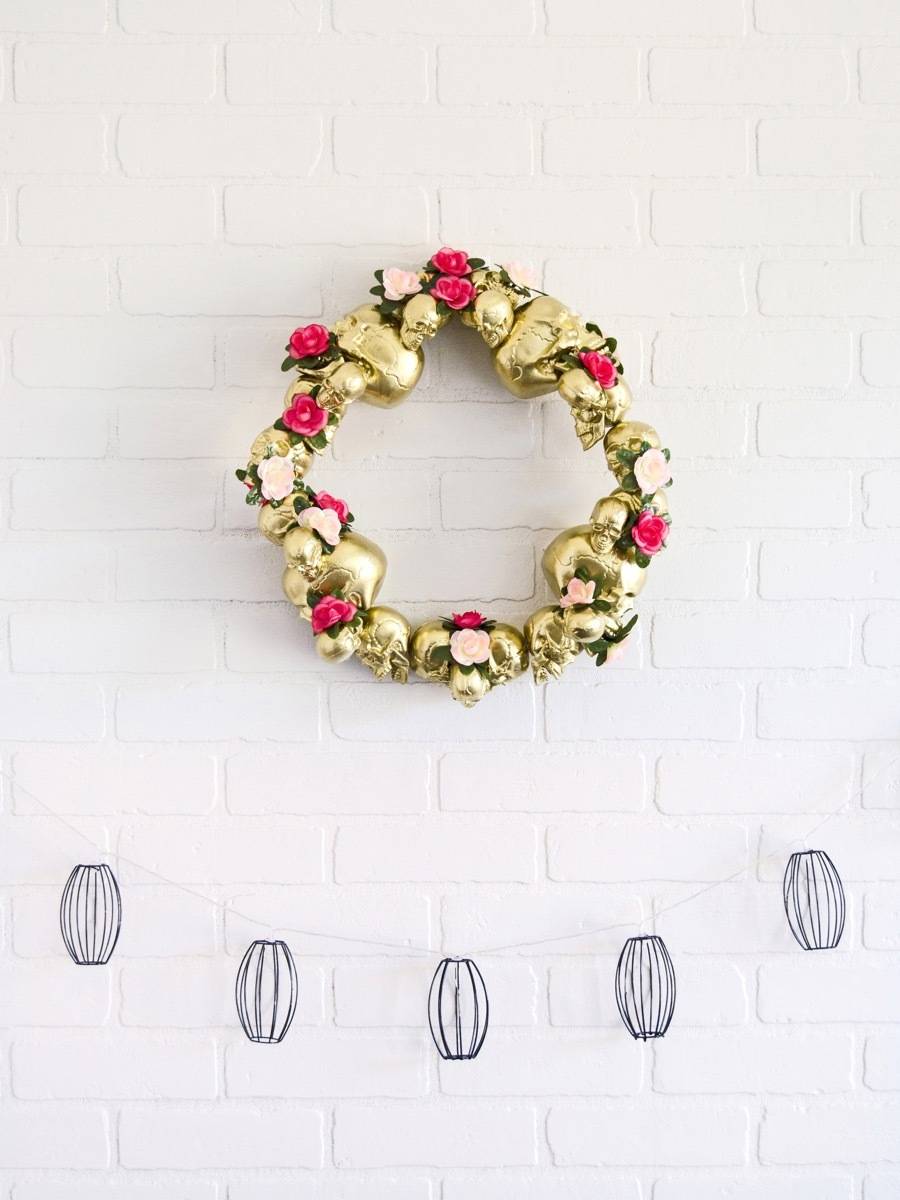
30. Halloween doesn’t mean all black and orange. If gold and glitz are more your style, check out this DIY glam-o-ween wreath made from gold skulls. 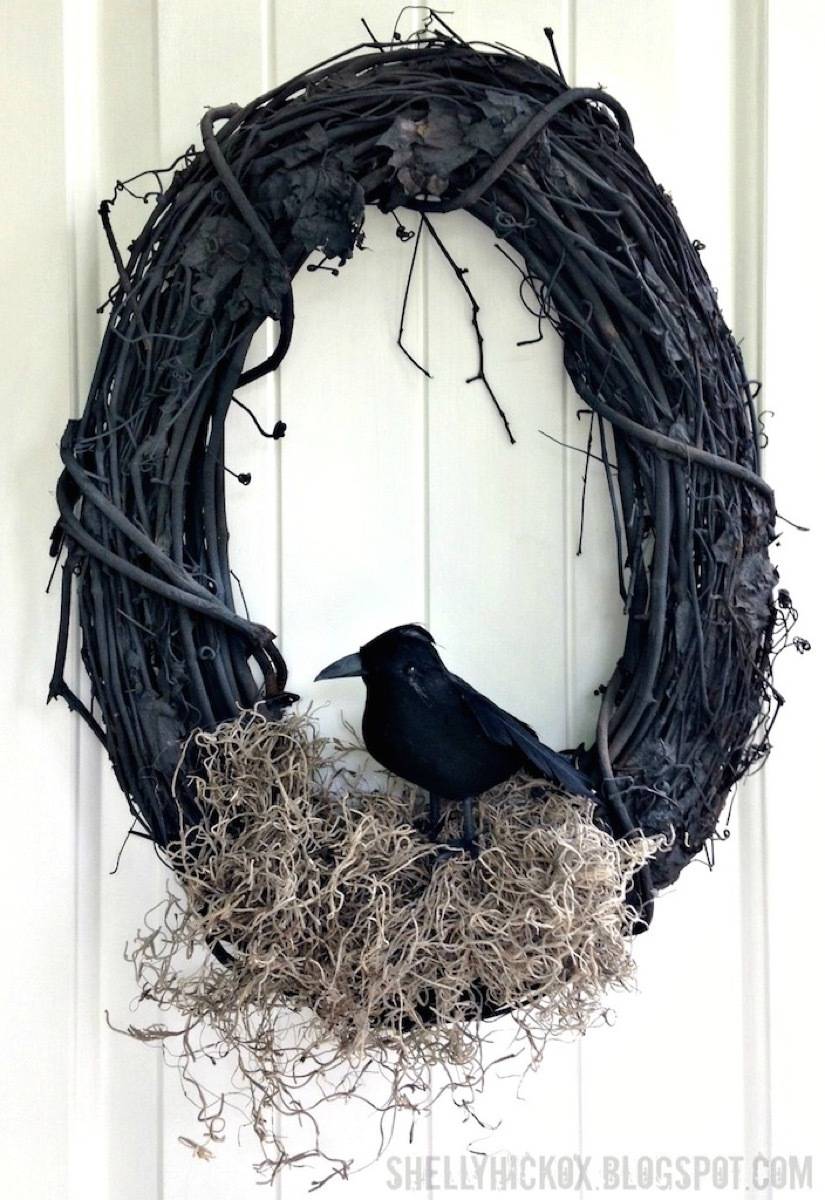
31. Whether you’re a fan of Hitchcock or Poe, this simple raven wreath is elegantly eerie. 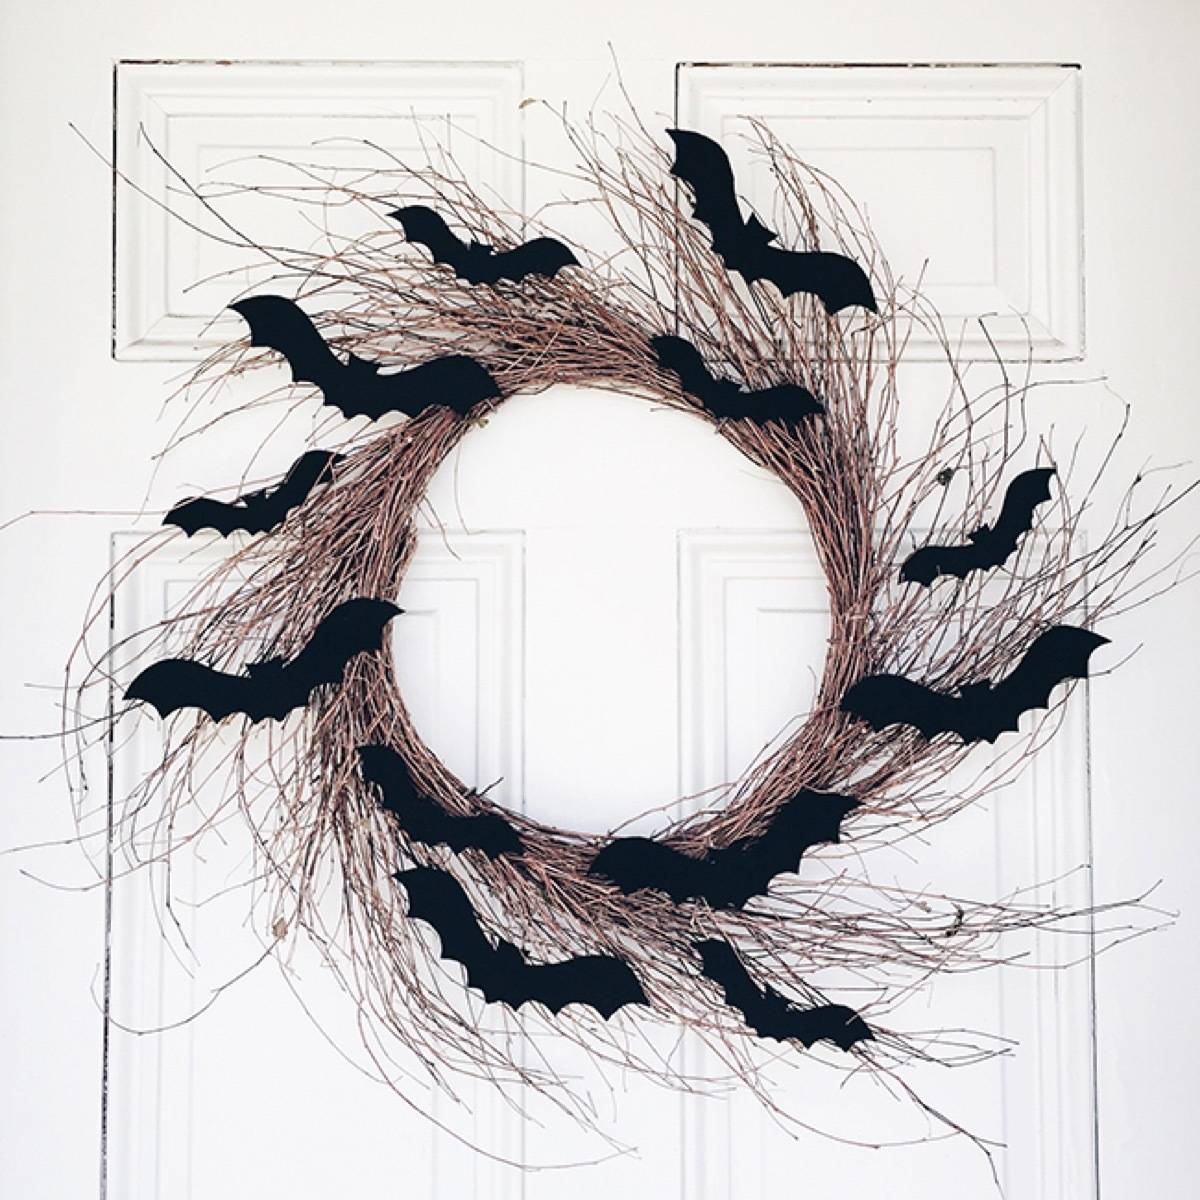
32. A few bats on a simple wreath, and your front door will be trick-or-treater ready. 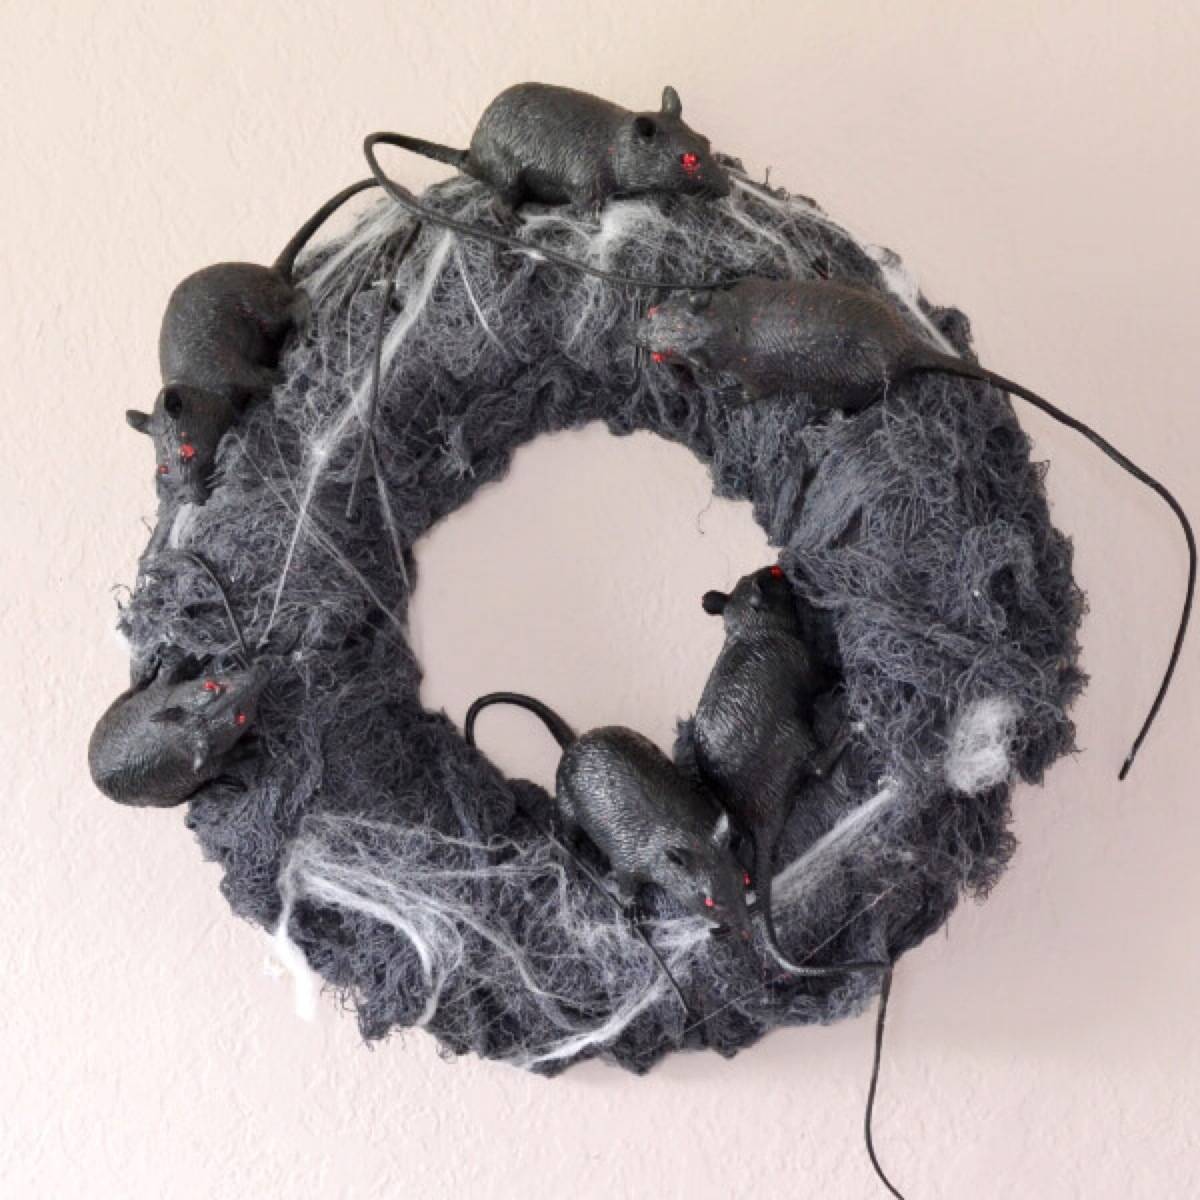
33. Okay, this one honestly freaks me out. If you want to create your own disturbing rat’s nest wreath, check it out here! 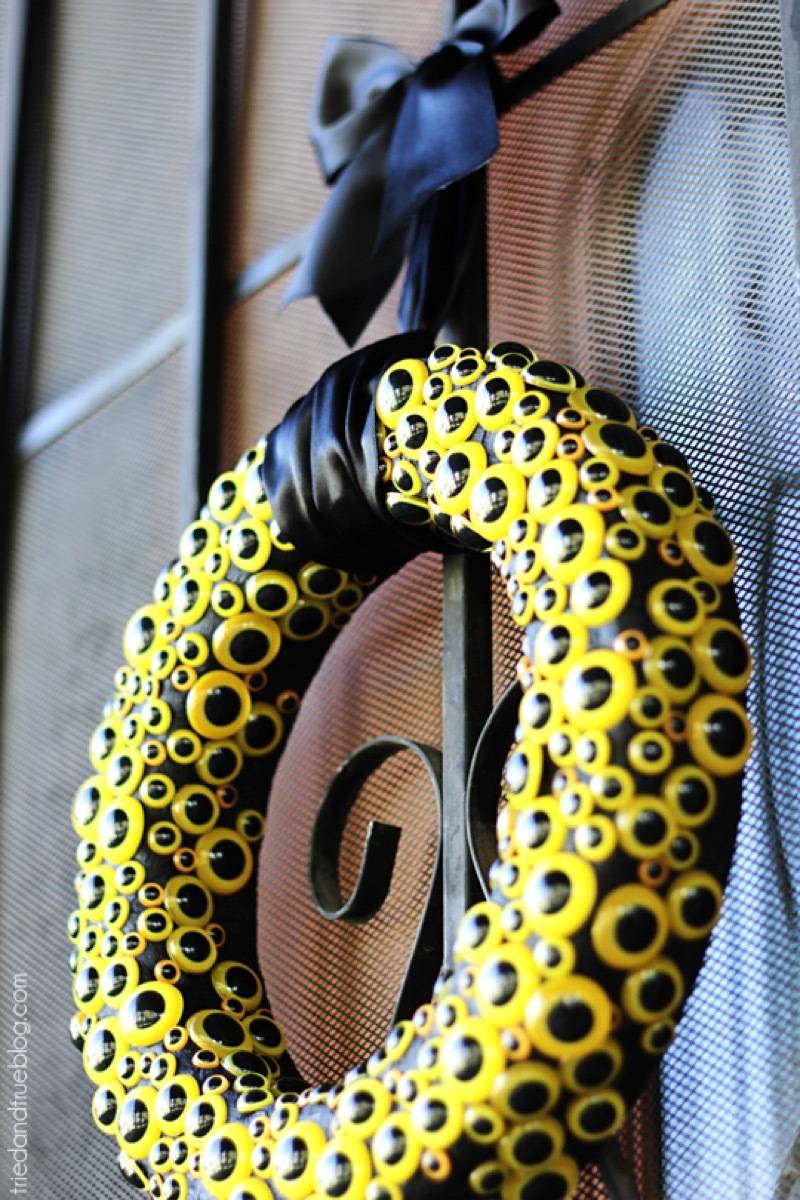
34. Hang this wreath on your front door to keep an eye on things. 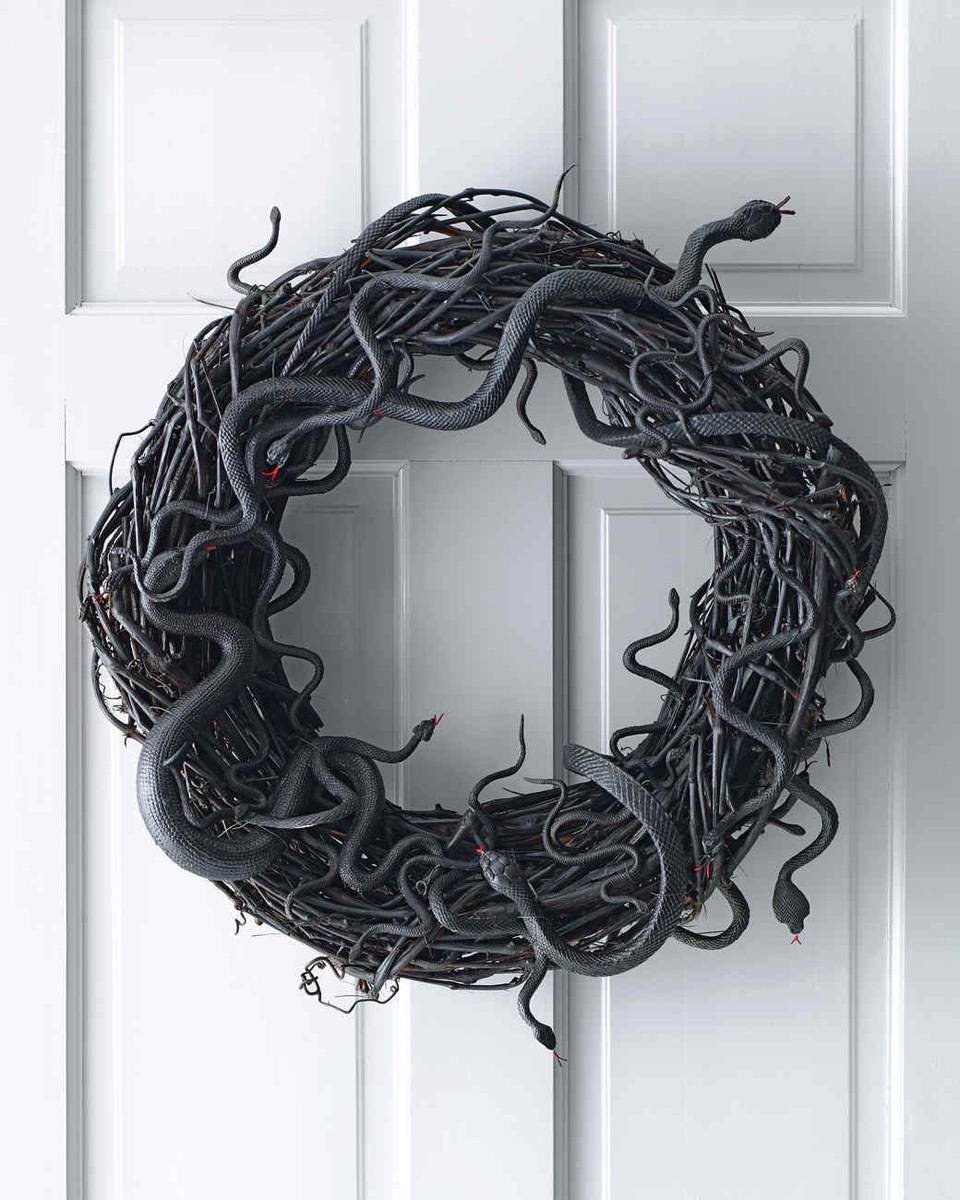
35. Ssssspeaking of the creepsssss…. check out this all-black ssssssnake wreath! 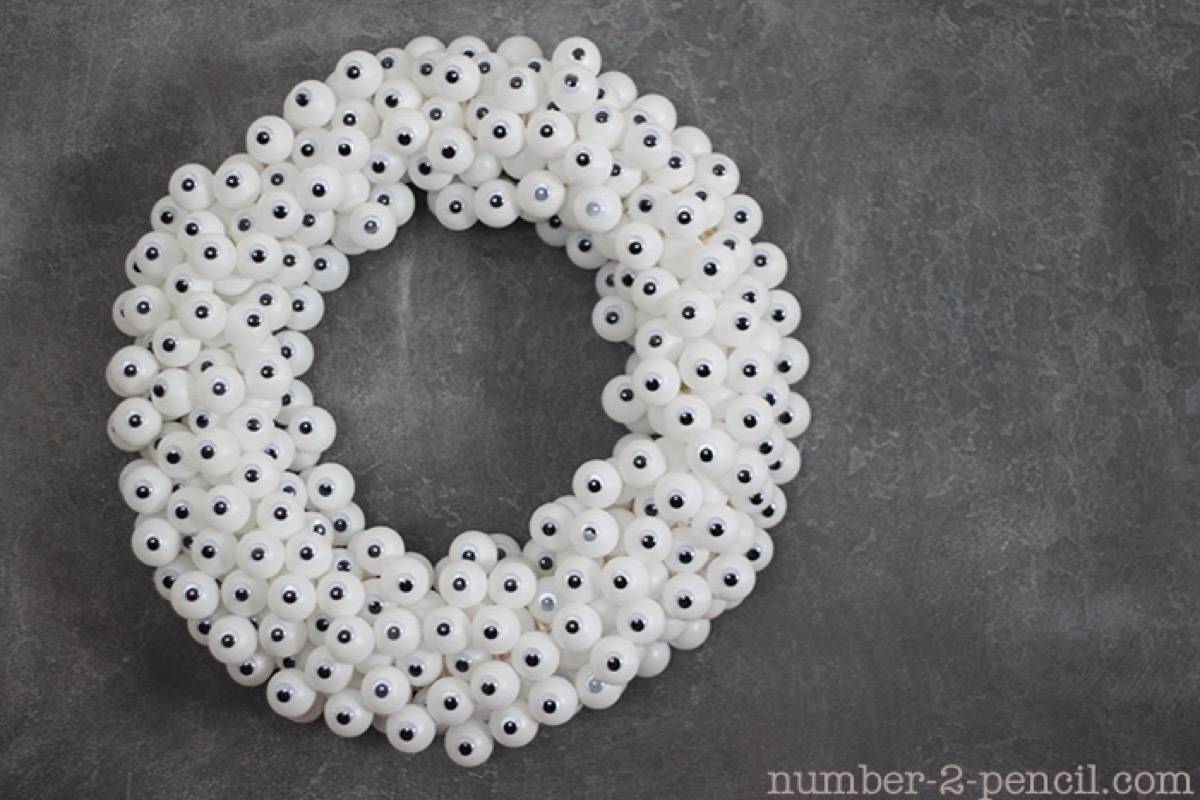
36. At Halloween, you really can’t go wrong with just a million googly eyes. 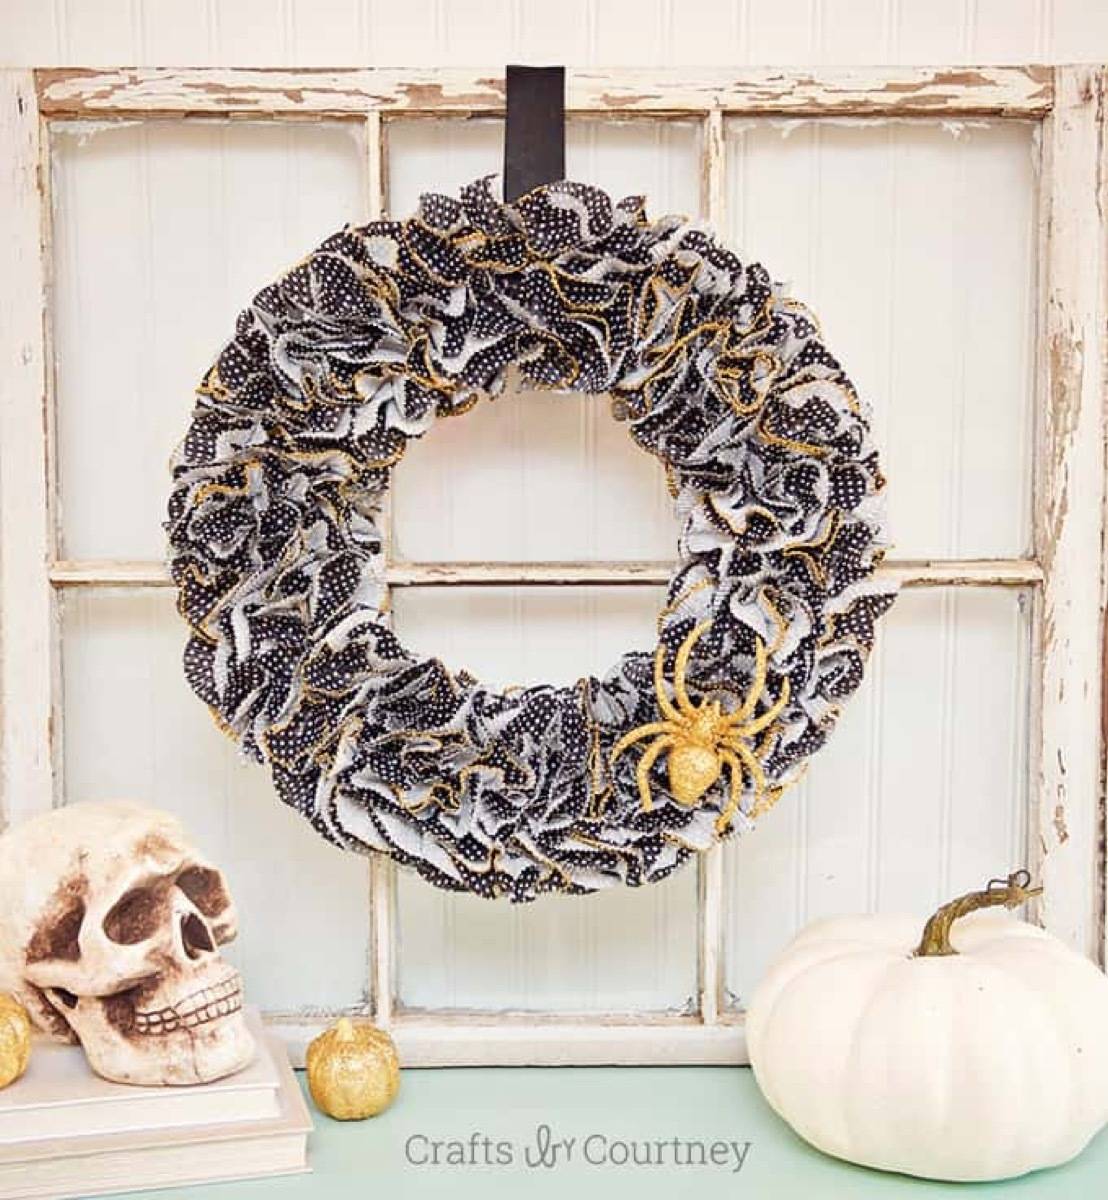
37. This black and gold wreath is made using cupcake liners! How clever! 
38. No bones about it, this skeleton hand wreath would make a great addition to your front door this All Hallow’s Eve. HAUNTING WINDOW DECOR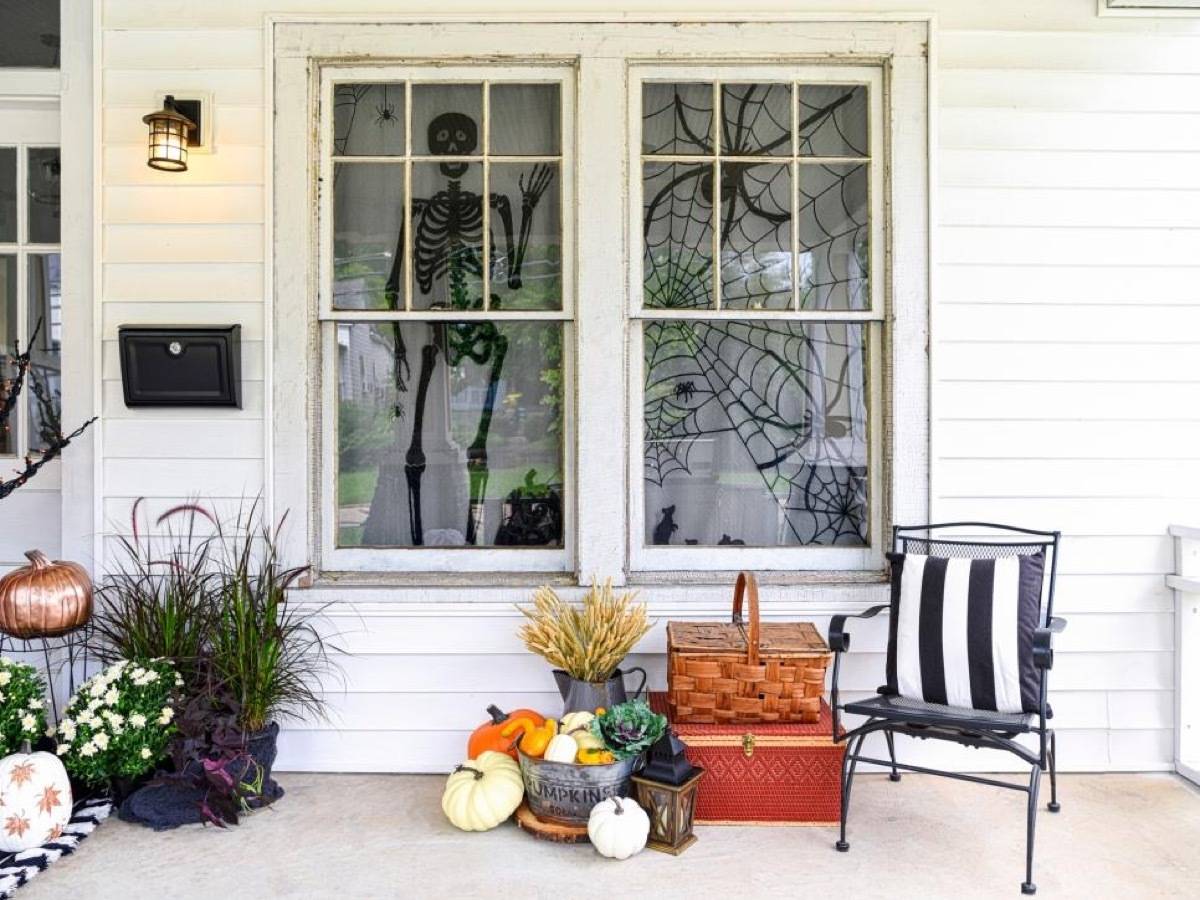
39. A gathering of black shadows in the front windows can really pull a porch together. Learn how to make your own DIY vinyl decals here. 
40. Or, opt for an inexpensive version using construction paper. It’s eerily affordable! Ooooooo! 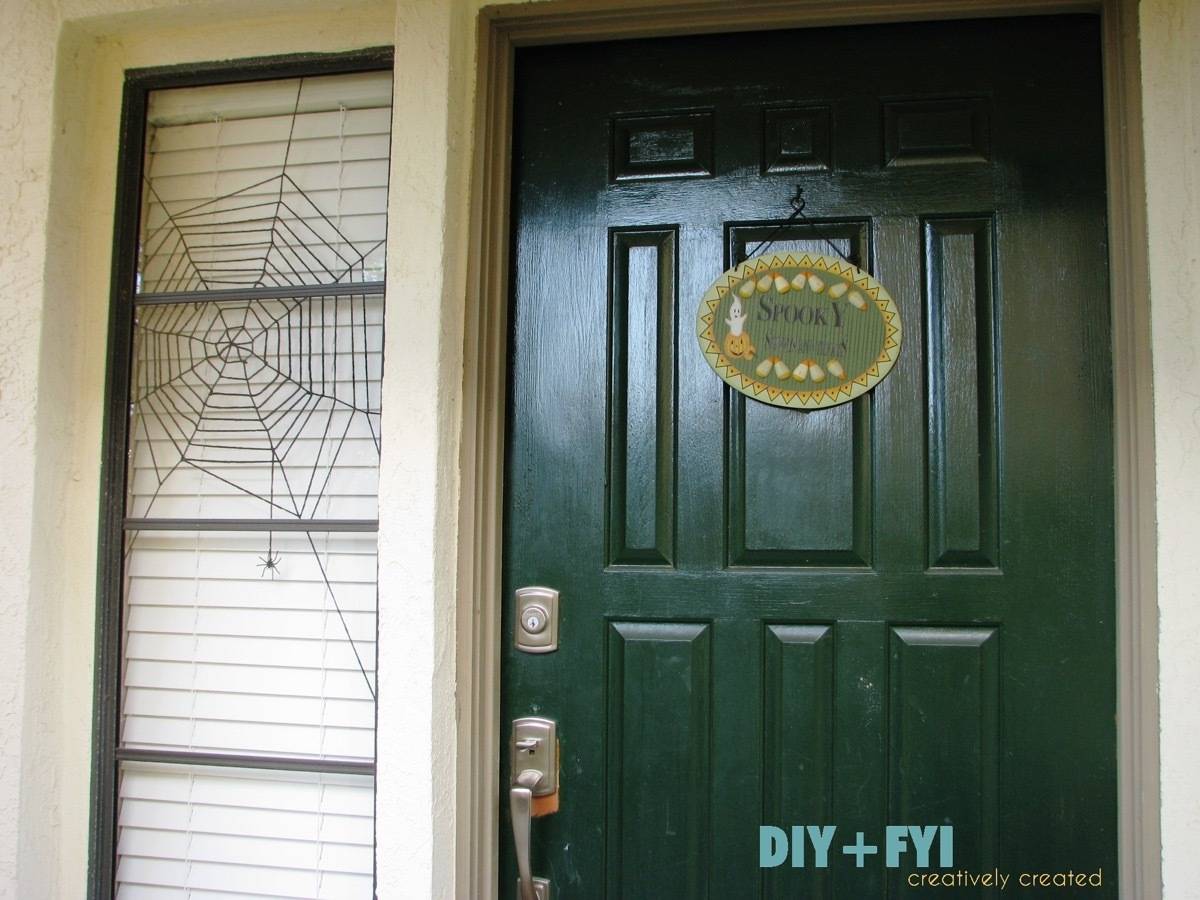
41. Using a little bit of yarn, this crafter created a realistic-looking spider web in her corner window. Gives me the shivers! 
42. Learn how to create gorey window clings using glue and fake blood with this tutorial. 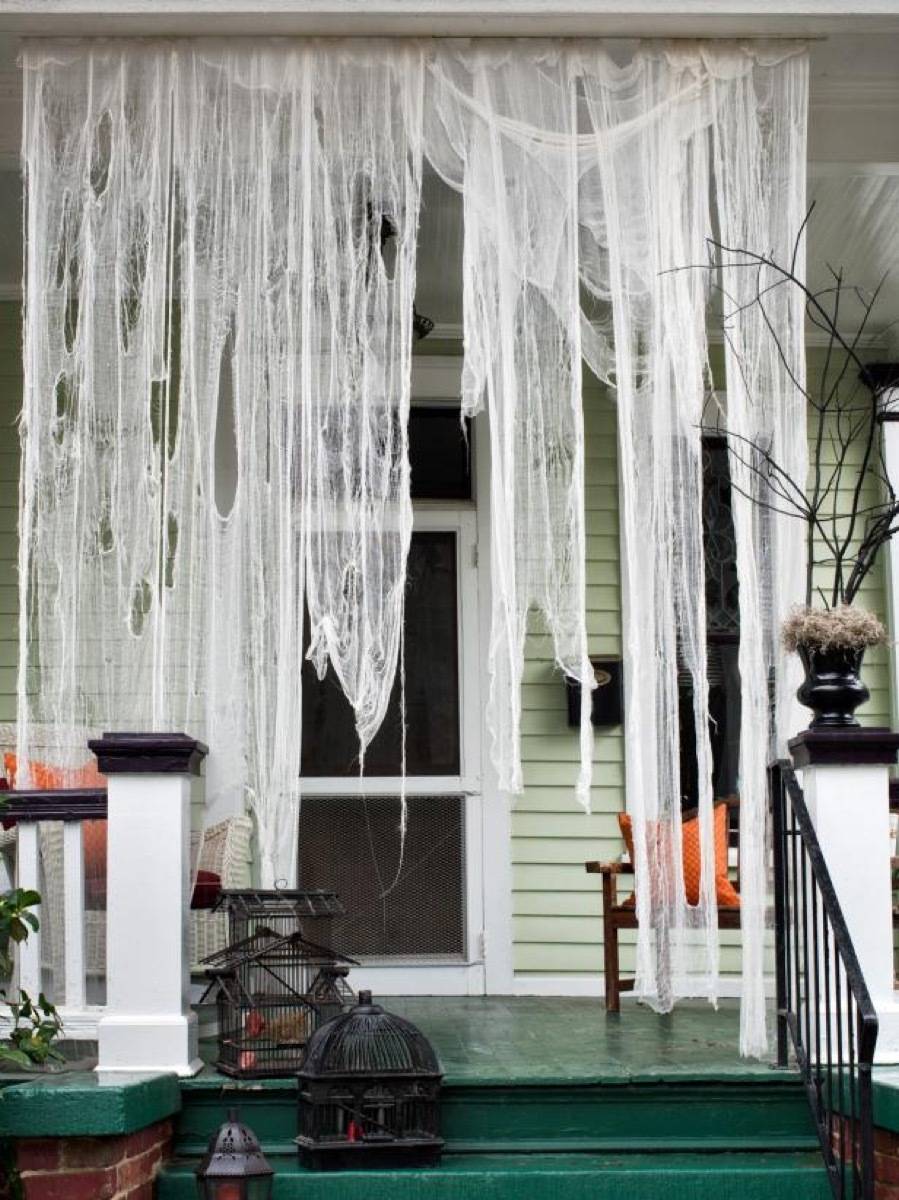
43. Cheesecloth sold by-the-yard at the fabric store is a great, low-budget method for creating ghostly draperies. Hang inside your windows, or from your stoop. OUTDOOR HALLOWEEN DECOR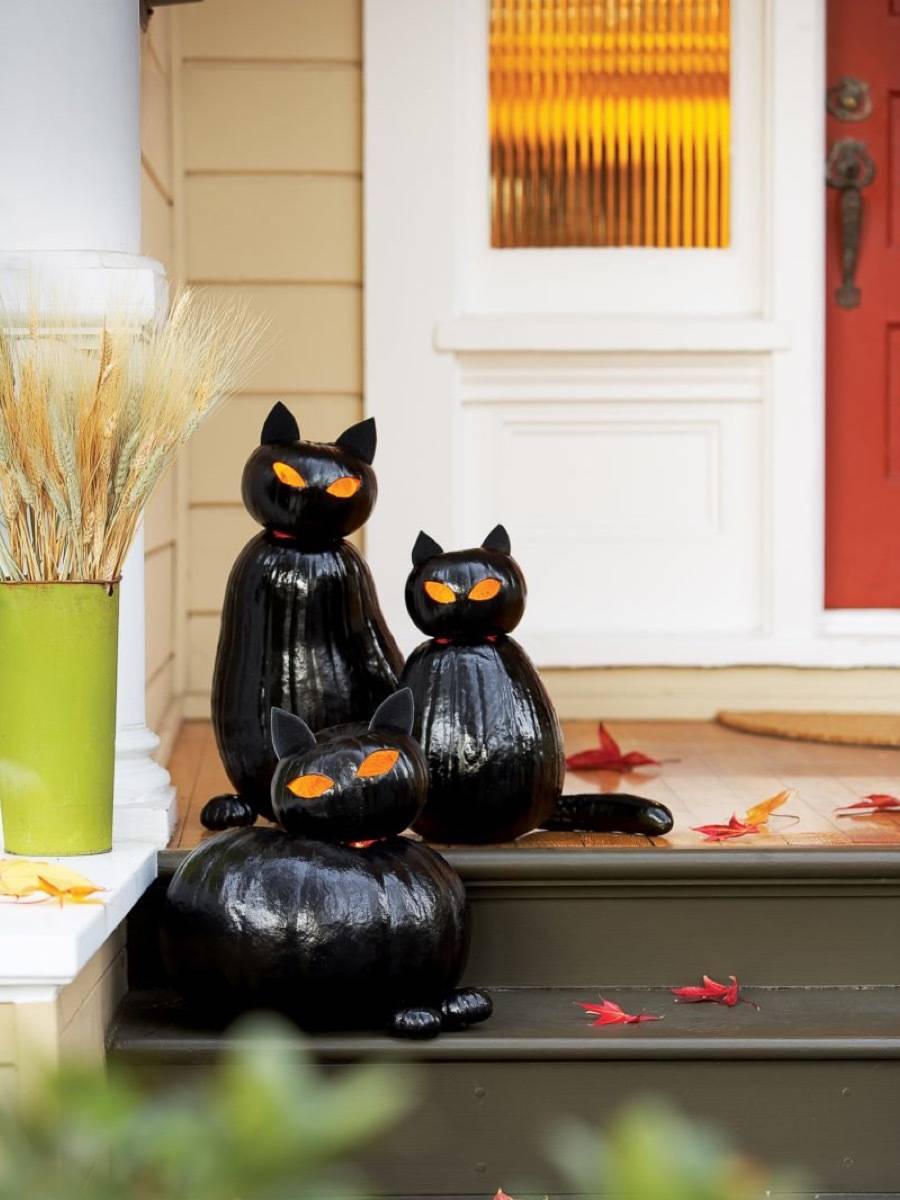
44. These black cat-o-lanterns are made from pumpkins painted glossy black. Is it bad luck to walk past them? 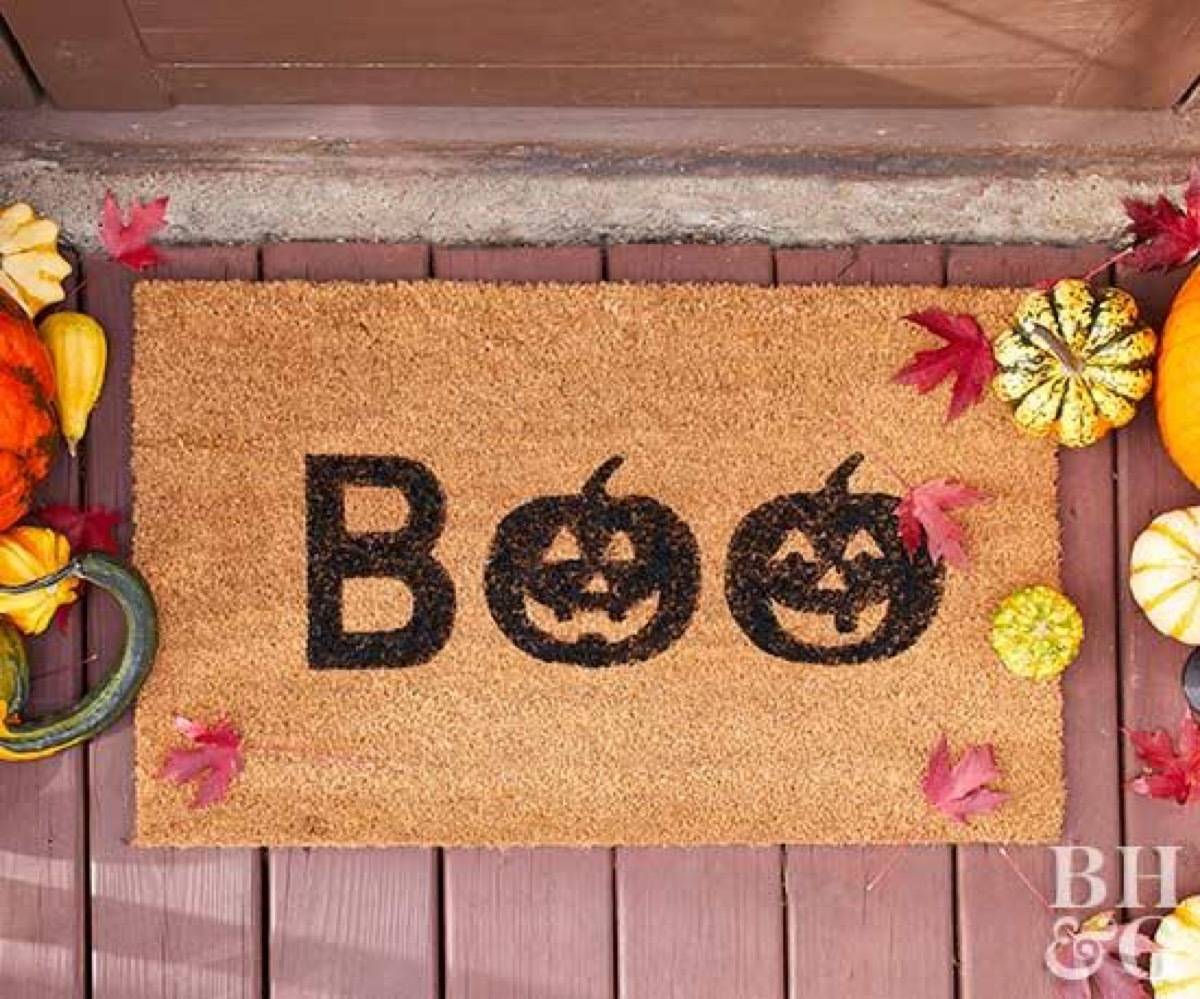
45. Give visitors to your home a happy fright with this easy-to-stencil “Boo!” doormat. 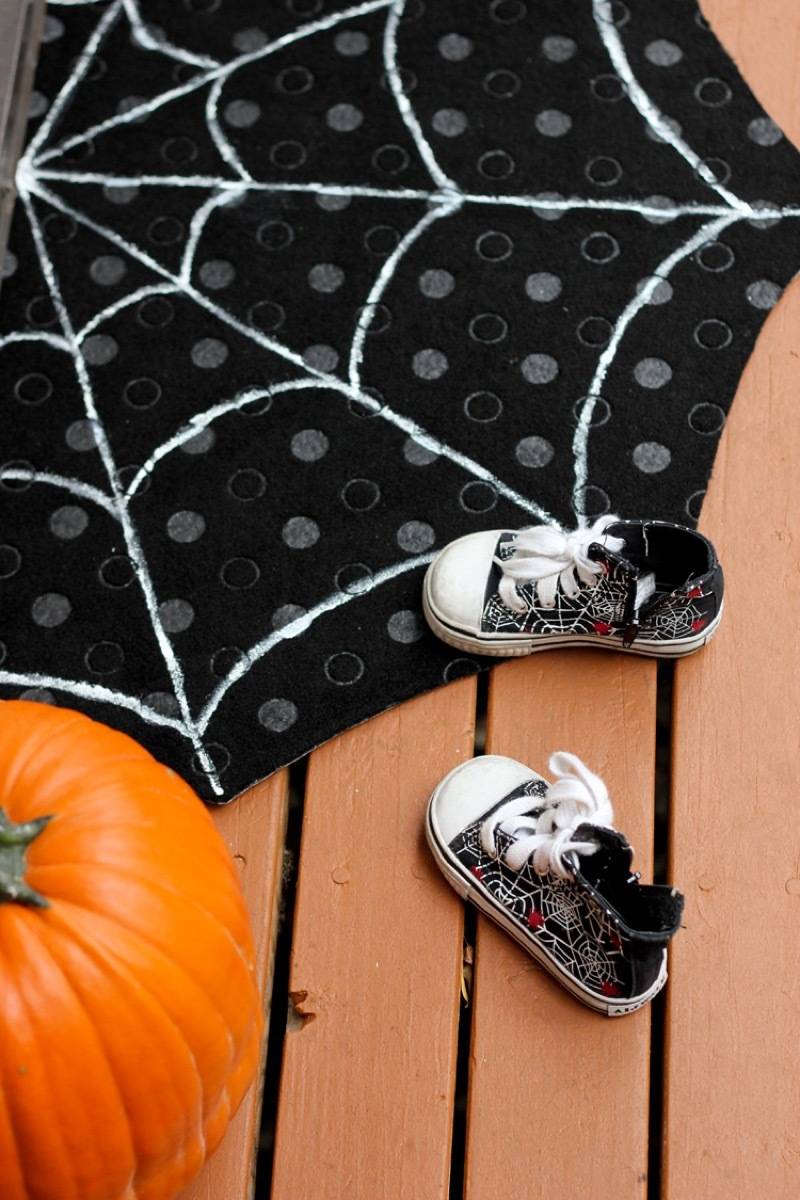
46. A black doormat is transformed into a spider web with a bit of paint and scissor work. Check out the tutorial here. 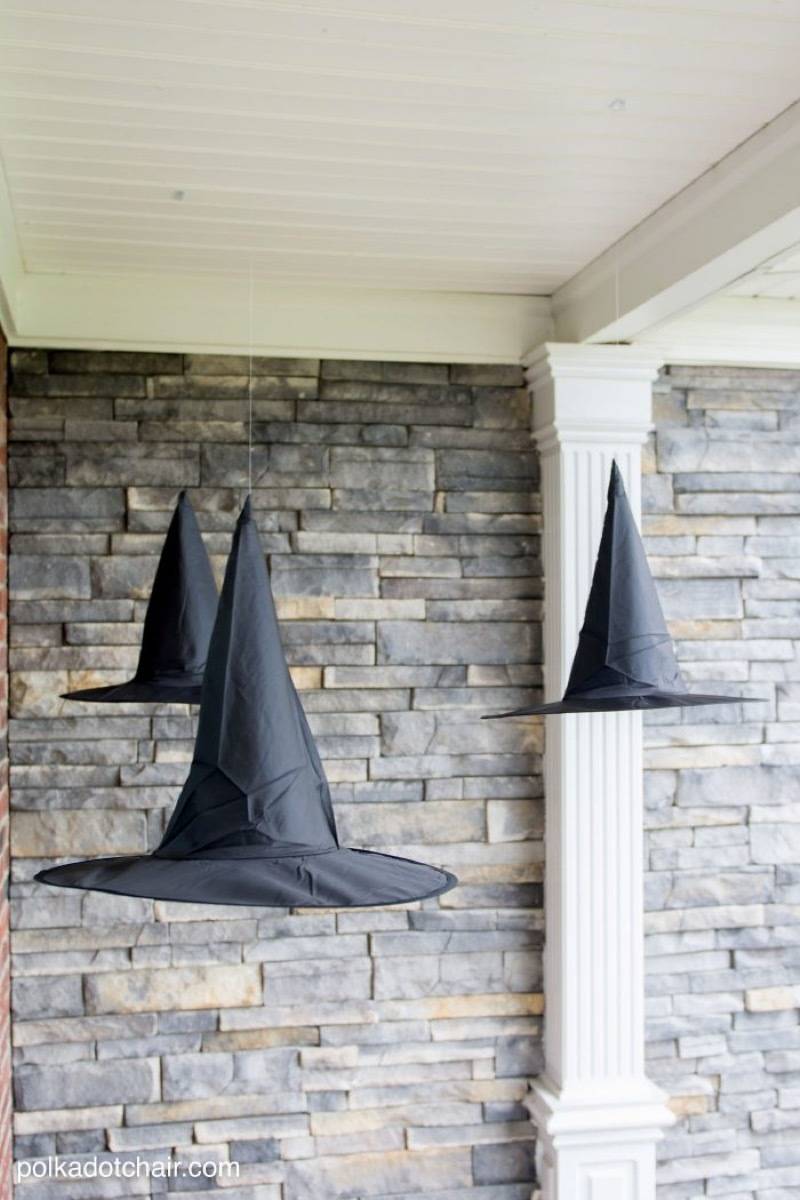
47. We love easy DIY Halloween decorations, and these hanging witch hats fit the bill. When night falls, they light up thanks to LED light sticks hidden inside each hat. 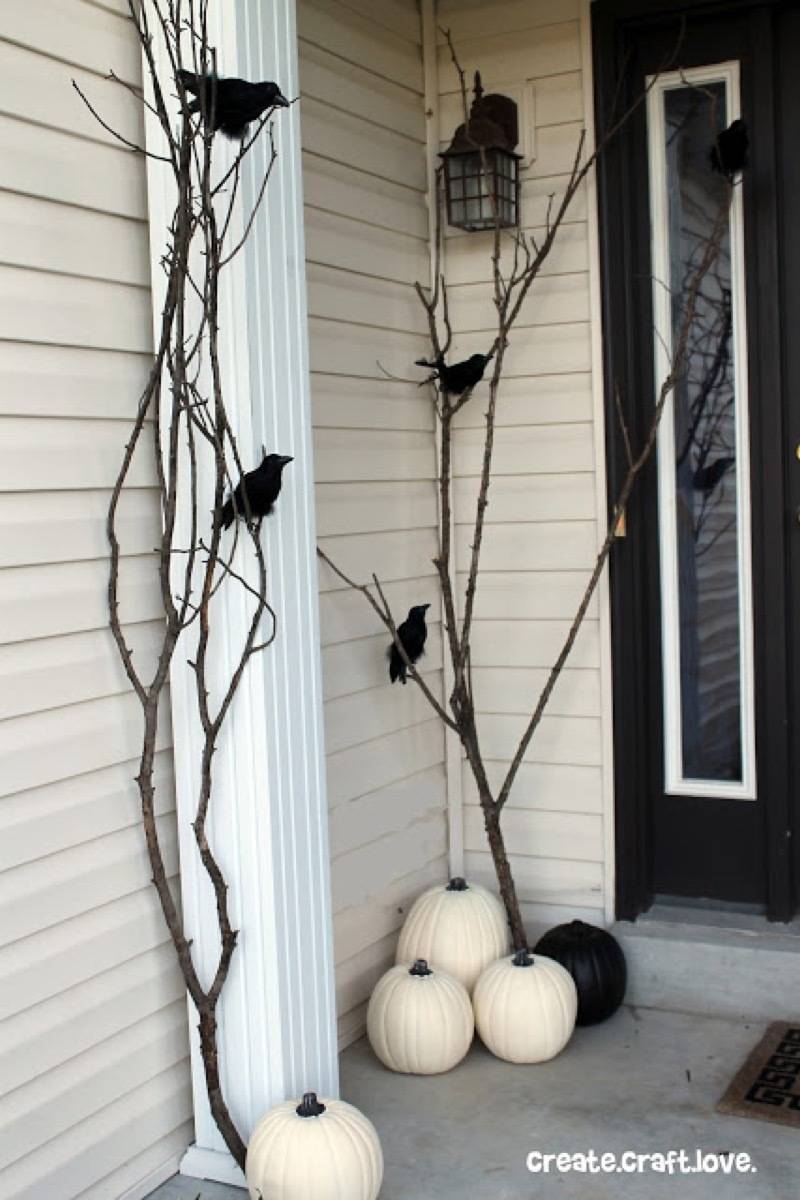
48. Birds are beautiful by nature, but a bunch of them together is just creepy. This blogger gathered sticks from her yard, and paired with some faux birds, a tasteful raven-themed porch was born. 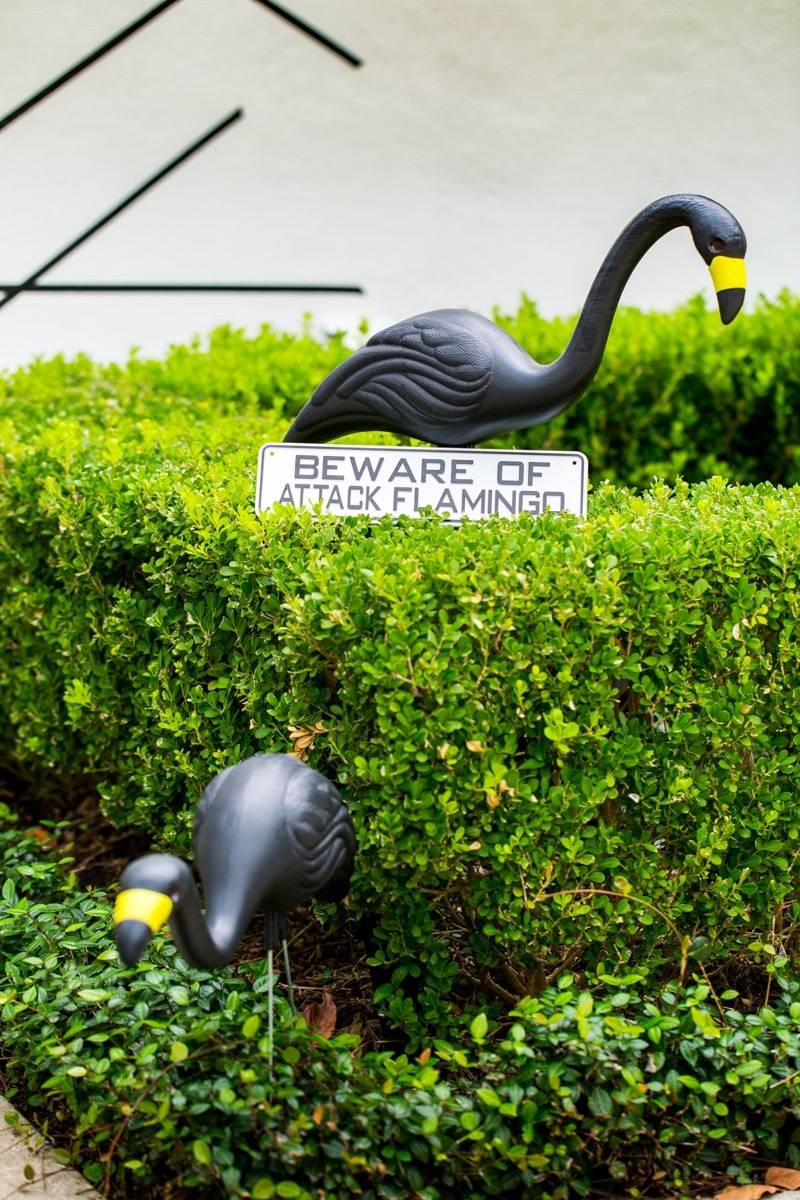
49. With a little spray paint, you can turn any yard ornament into Halloween decor. 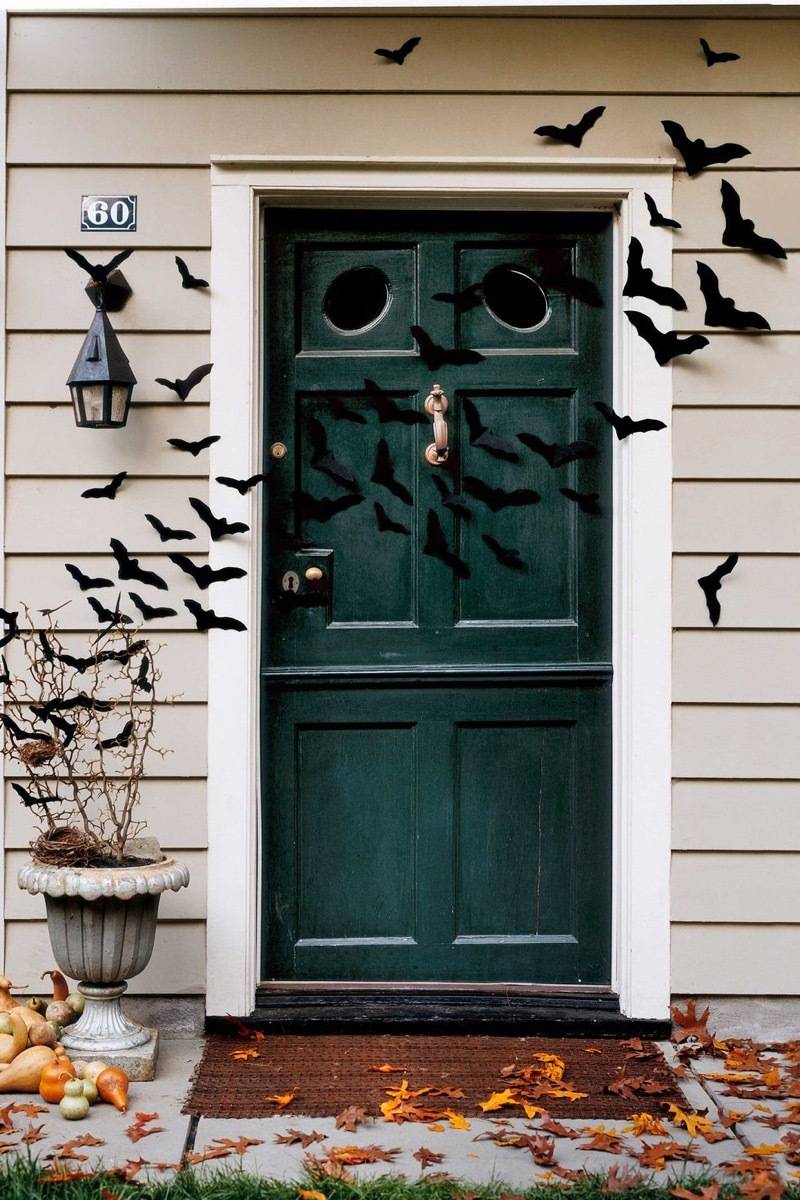
50. A flock of felt bats across your front door is a tasteful way to say Happy Halloween. 
51. Check out this tutorial for making a full Jack-o-latern-looking door cover. 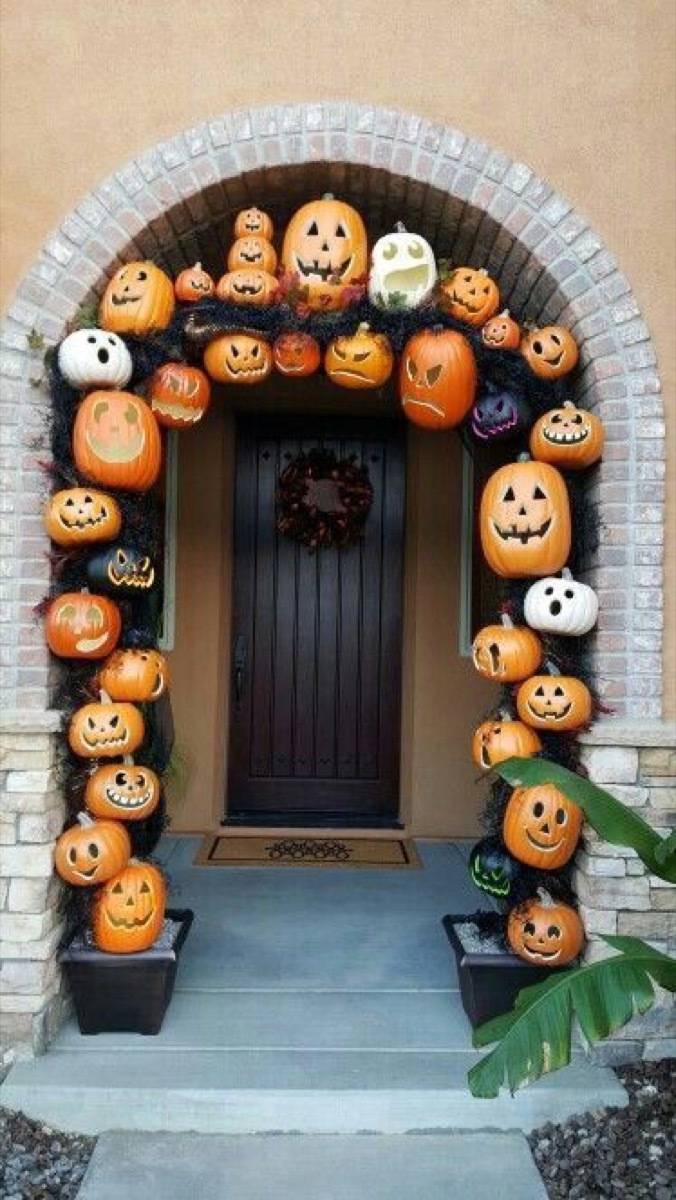
52. Here’s a cute Halloween idea if your front porch has an arch — a cluster of faux pumpkins can happily fill a doorway. Mount pumpkins to a PVC frame. 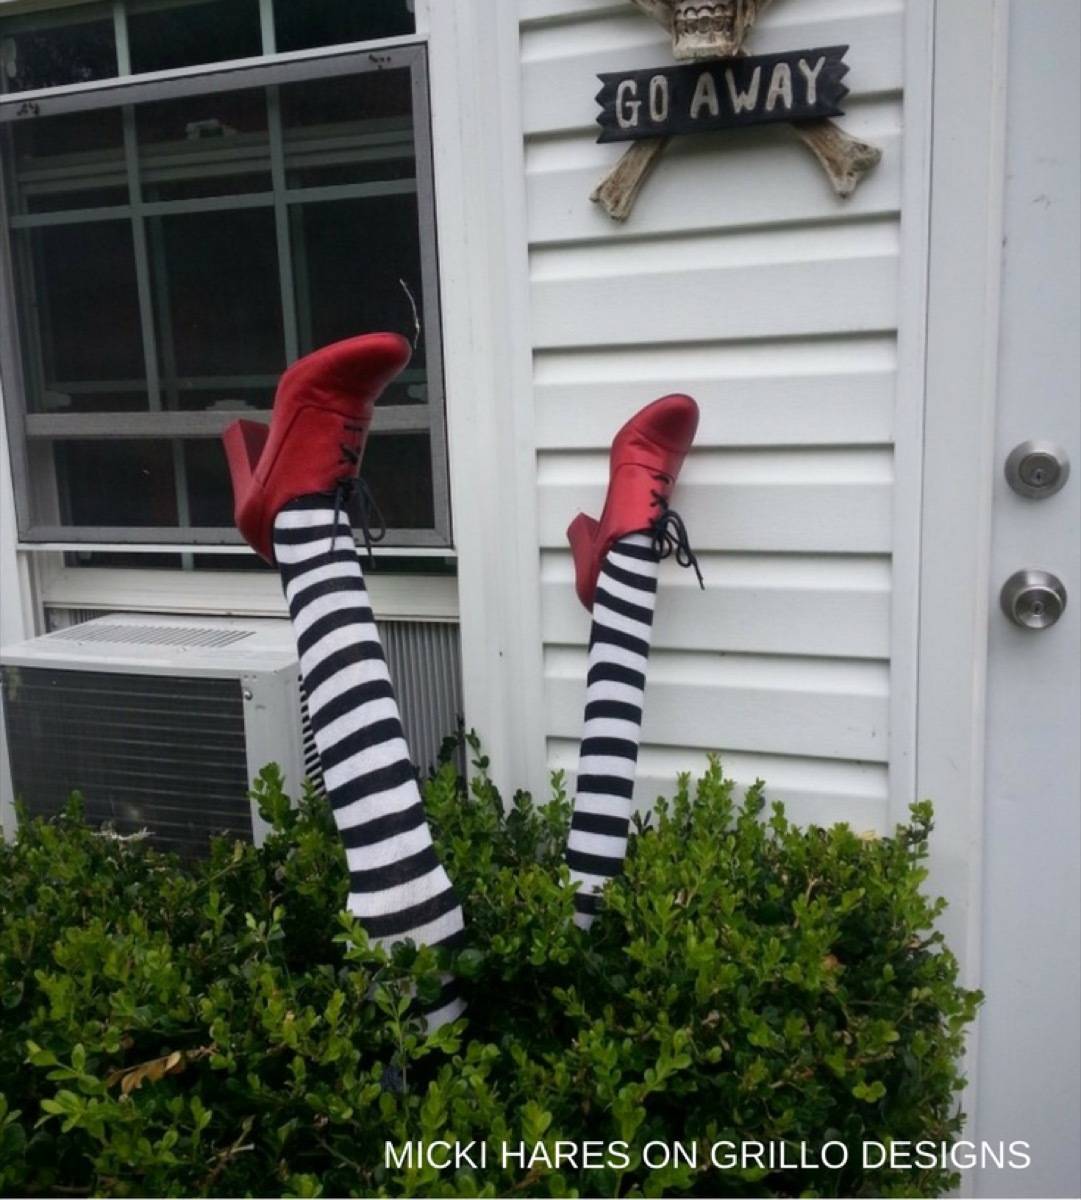
53. We don’t know how this witch ended up in this bush. Did she have a broom accident? Was she drunk-flying? 
54. A haunting man made from wire is an affordable way to scare the crap out of your neighbors. 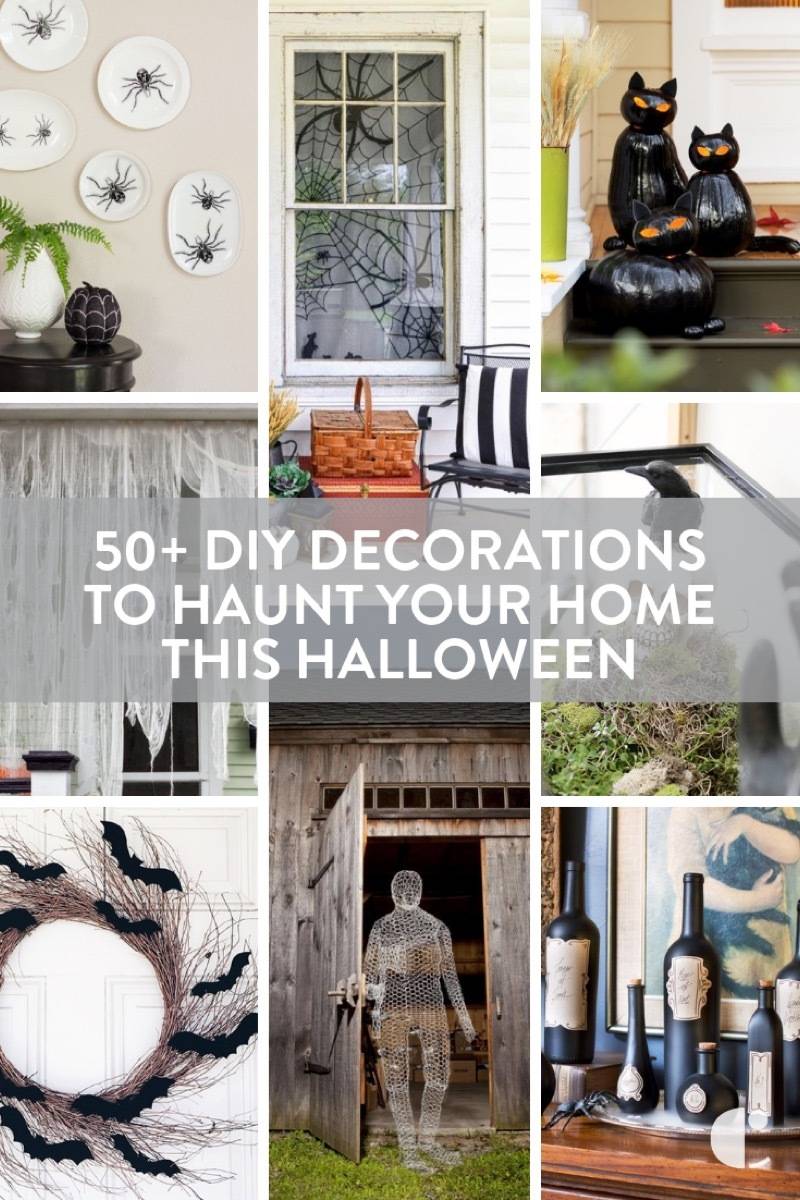
Now that you’ve decorated your home, it’s time to decide what you’re going to dress up as! Check out this list of over 120 ideas.
The post 50+ Frightful and Delightful DIY Ways to Decorate Your Home for Halloween appeared first on Curbly. Via https://www.curbly.com/diy-halloween-decorations 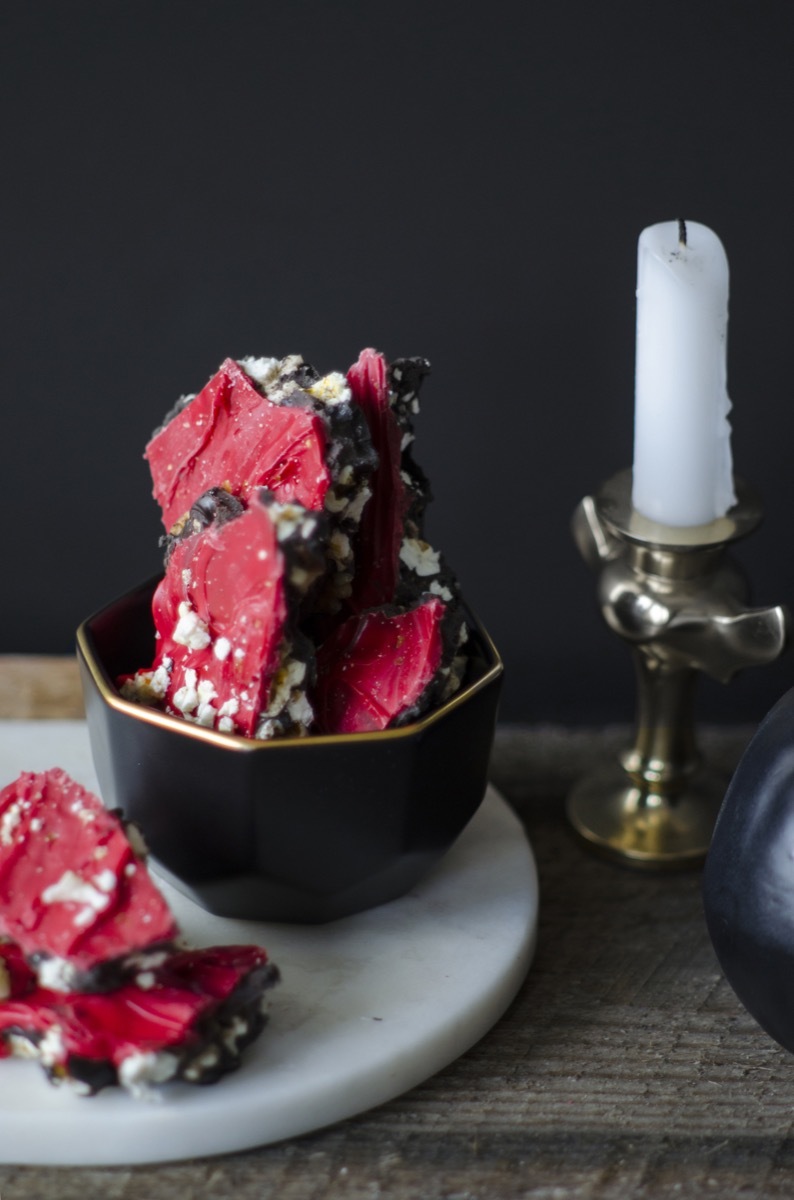
Everyone’s talking about costume parties and thriller flicks, but even as an adult I know Halloween is all about the candy. I wanted to make a spooky treat that was different than the usual mix of fun candies and white chocolate – I wanted something… darker. With bloody red candy melts and dark chocolate chips, this Halloween bark is sure to hit the darkest of spots. 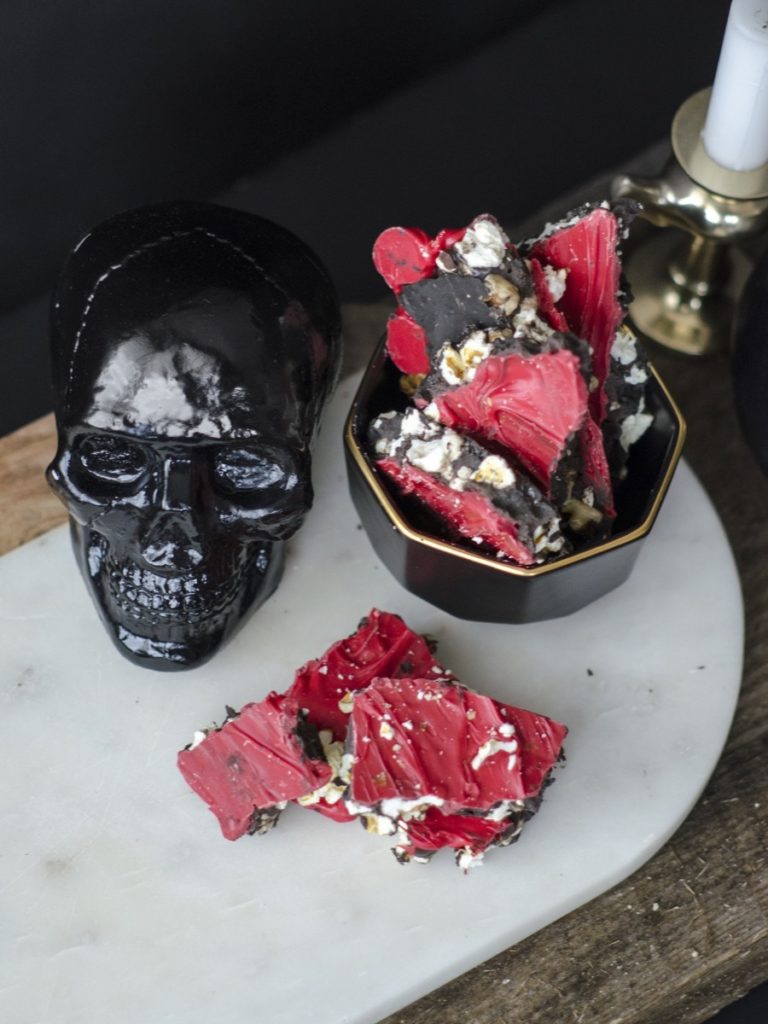
Make This: Bloody Good Halloween BarkSupplies
Tools

Step 1: Prepare your popcorn mixBegin by lining a cookie sheet with parchment paper or waxed paper. Lay out a layer of popcorn on the bottom of the pan. Sprinkle in some nuts. 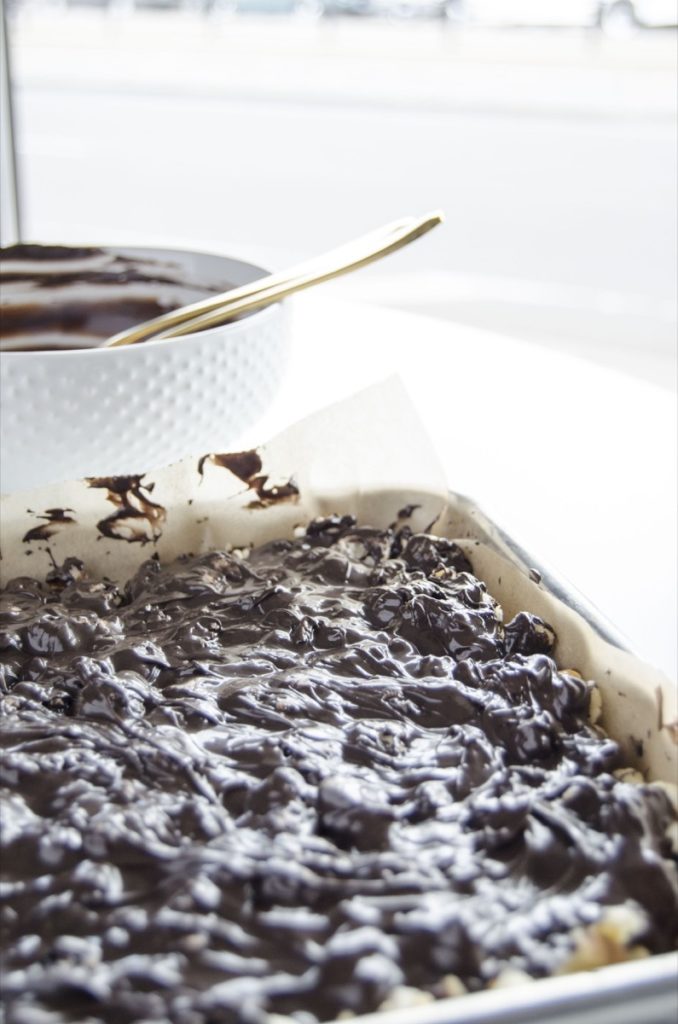
Step 2: Melt the chocolateMelt together the dark chocolate chips and the black candy melts. Put both in a microwave-safe bowl together. Adjust your microwave’s power to 50%, and heat the candies for 60 seconds. Stir, then heat in 30-second increments until melted, stirring between each heating. Make the chocolate darker, add 5-10 drops of black icing dye. Pour the chocolate mixture over the popcorn. Do not add more than a few drops of the icing dye, as the chocolate will seize up if there’s too much liquid in it. Step 3: Chill and finish with the red candy meltsPut the pan in the freezer until it has hardened. In the meantime, heat up the red candy melts the same way you heated the black melts and the chocolate. Pour the red mixture over the hardened bark, and sprinkle popcorn on top. Put the pan back in the freezer to harden immediately, and store in the refrigerator. 
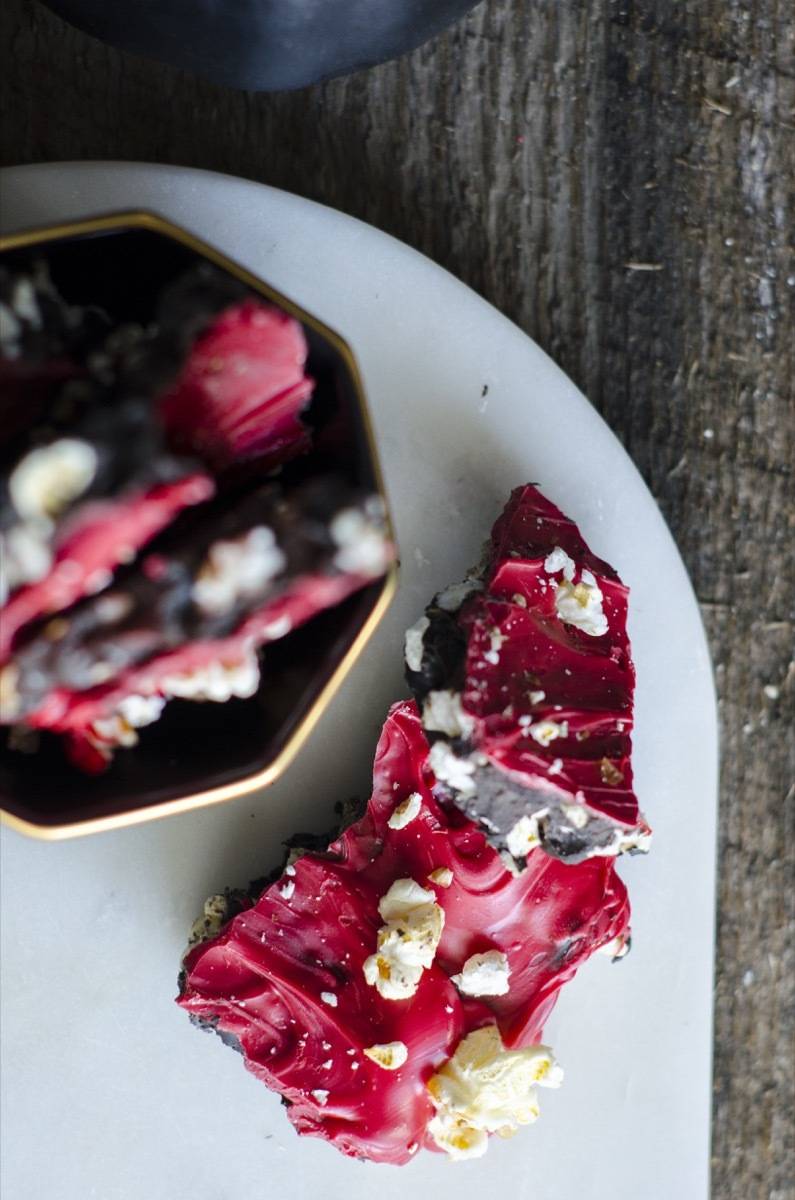
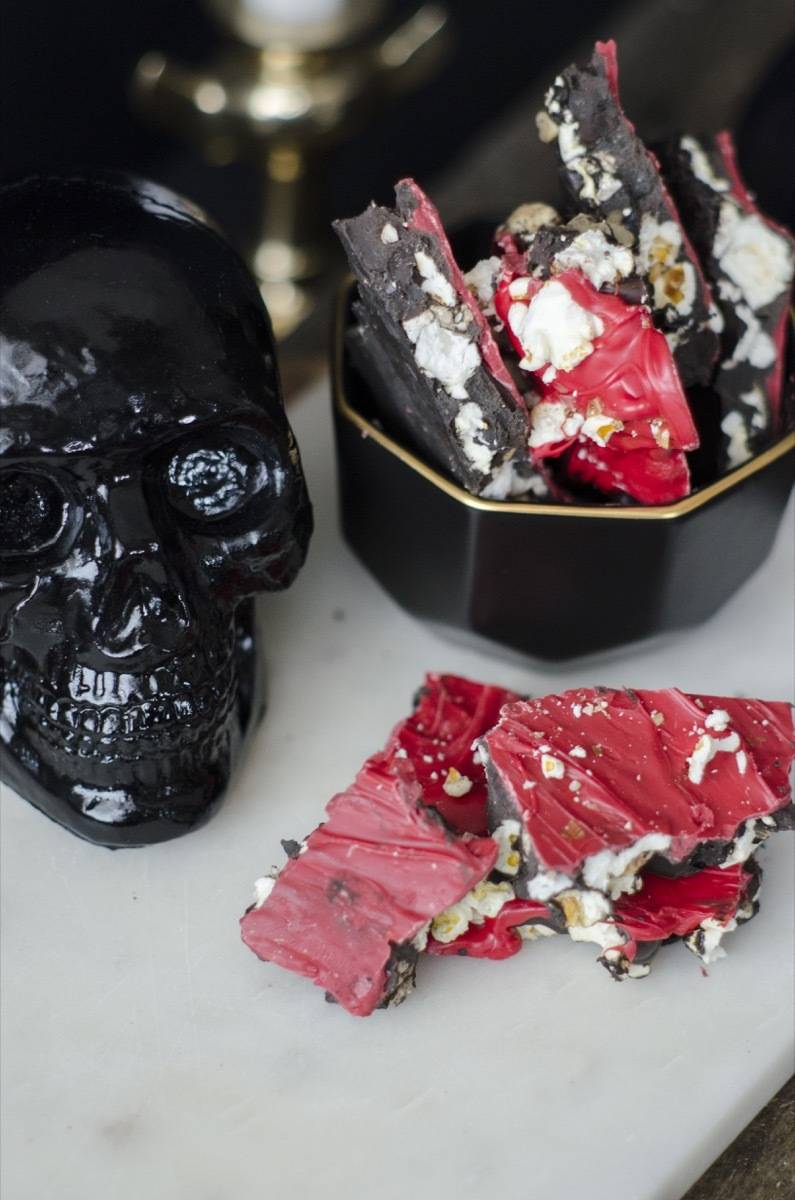
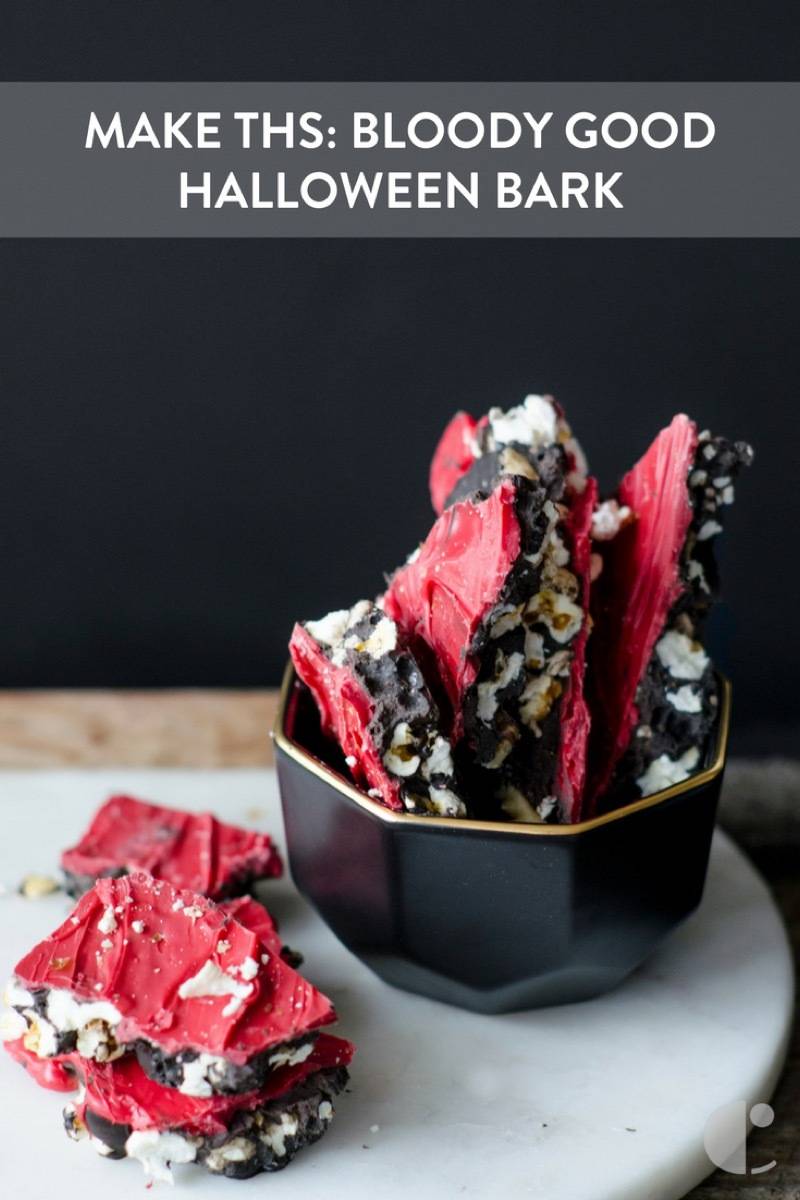
This Halloween bark might be delicious enough to die for, but what I’m really looking forward to this spooky season is mini Reese’s peanut butter cups. They are hands down the best trick-or-treat sweet, with Smarties coming in second place. What’s your favorite Halloween candy? Let me know in the comments! Munch away on your Halloween bark while checking out these 15 sophisticated but spooky DIY ideas for decorating your home.
The post Make This: Bloody Good Halloween Bark appeared first on Curbly. Via https://www.curbly.com/halloween-bark |


