Today, we’re diving into all the latest modern fireplace ideas, gathered for you from the far edges of the internet and complied into this tidy post. Fireplaces have always been a focal point in homes, providing warmth, comfort, and ambiance. Today, modern fireplace design has become an art form, with endless possibilities for creating a unique and personalized space for you and your family and friends to enjoy. From classic and traditional to modern and eclectic, the design options are absolutely endless. In this post, we will explore ten modern fireplace design styles, each design style offering its own unique aesthetic and can be customized to fit any home or living space. Whether you are looking to add a fireplace to your existing home or designing a new space, this post will provide inspiration and ideas for creating a modern fireplace that is both functional and stylish, regardless of your starting point. Here are some of the most popular modern fireplace styles to inspire your next home improvement project: Table of contents
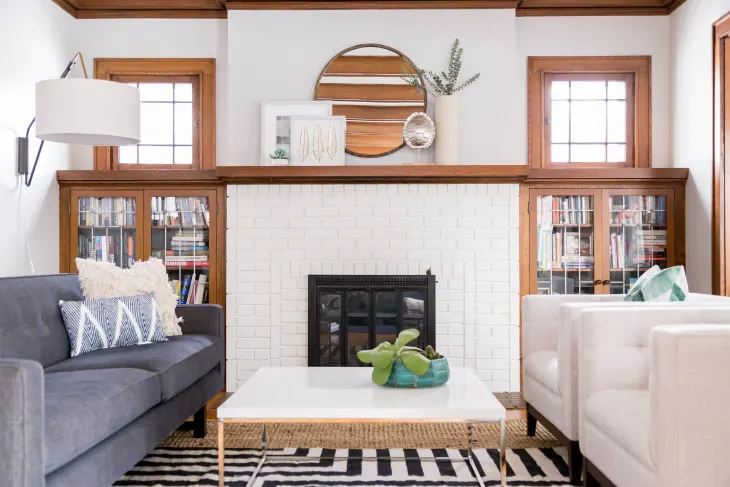
Modern Farmhouse FireplacesModern farmhouse style fireplaces are likely the most popular aesthetics on Pinterest these days, so we’ll start there. These fireplaces typically feature a blend of rustic (farmhouse) and modern elements, with clean lines and natural materials such as wood, stone, or brick. Modern farmhouse fireplaces also frequently incorporate features such as shiplap or reclaimed wood mantels, and may be finished with a neutral color palette that complements the overall aesthetic of the home. It’s an easy style to accomplish whether you have a new or vintage home. 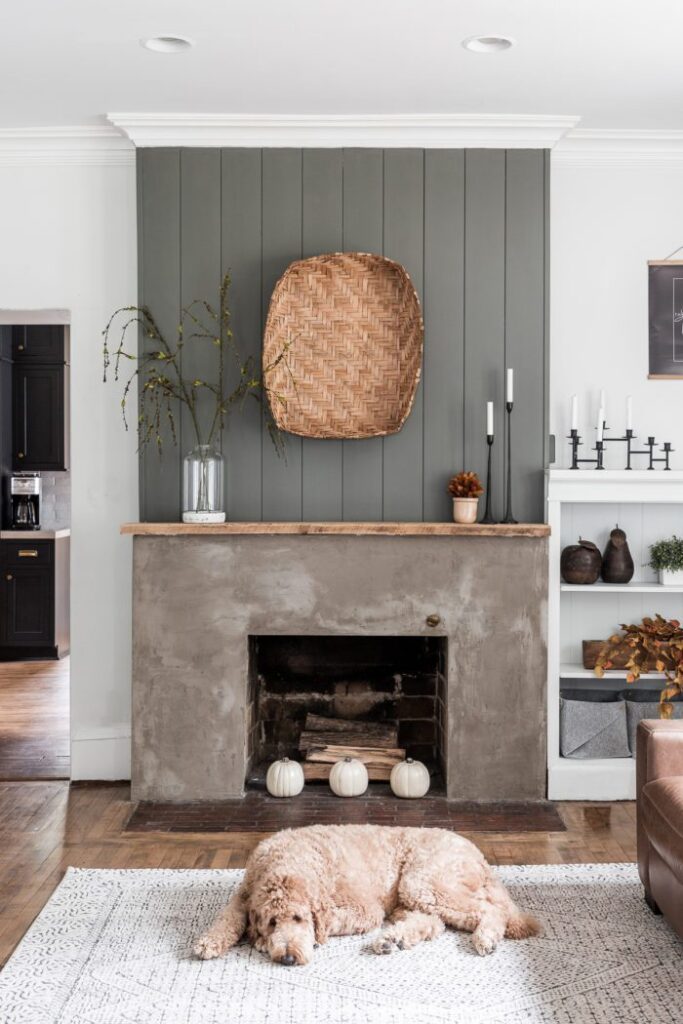
Scandinavian Farmhouse FireplacesThe Scandinavian farmhouse style is a popular design trend that combines the clean lines and minimalism of contemporary design with the rustic warmth of traditional farmhouse style. Fireplaces in this style of home would often feature a sleek and simple design, with minimal ornamentation and a focus on functionality. You’ll also find quite a few wood-burning stoves to make for an almost modern cabin feel. 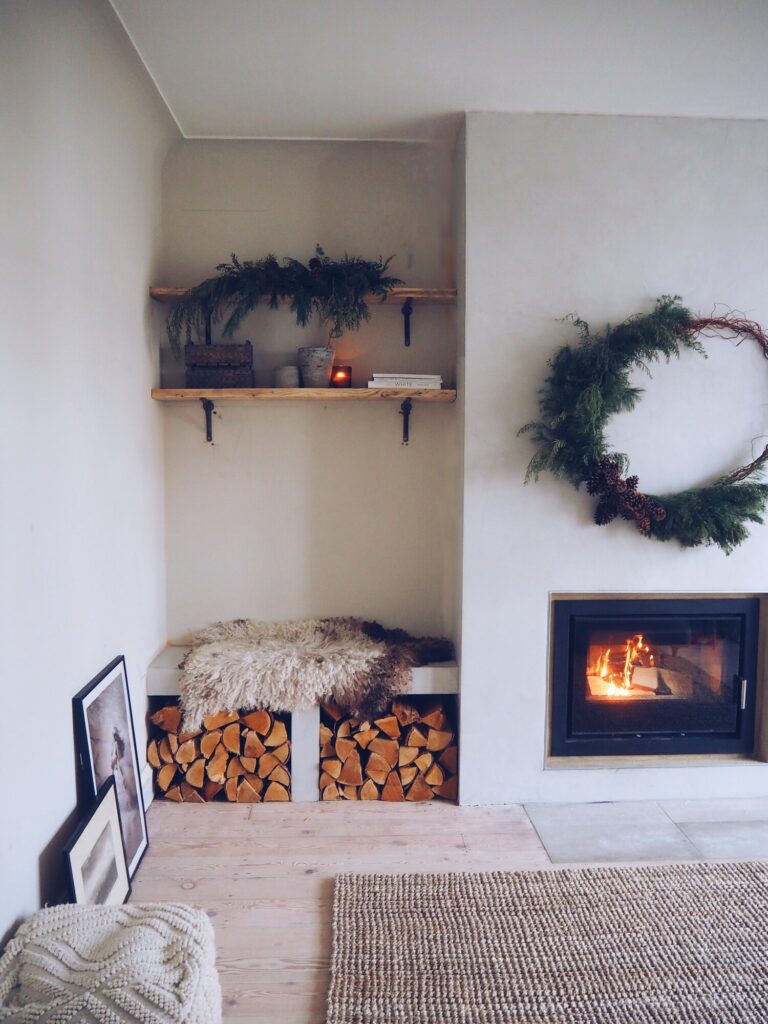
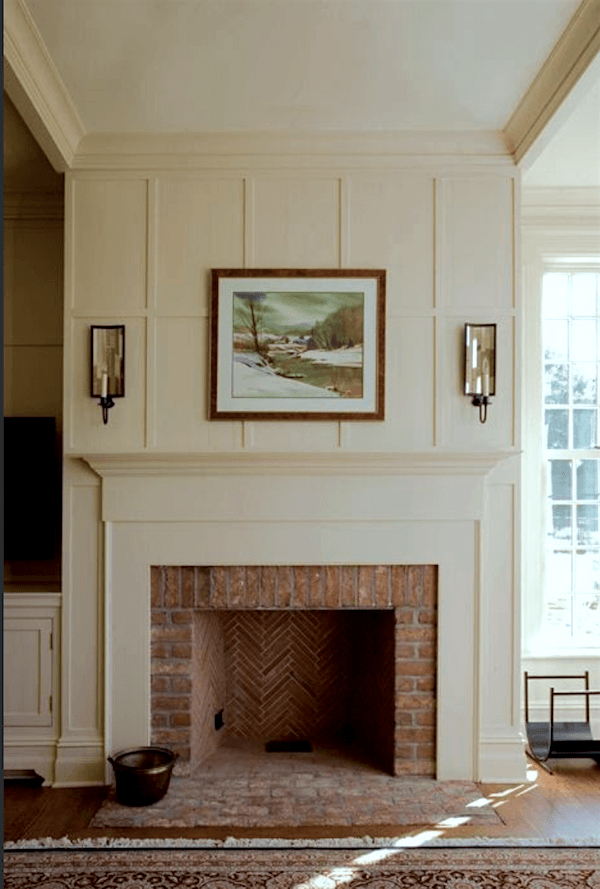
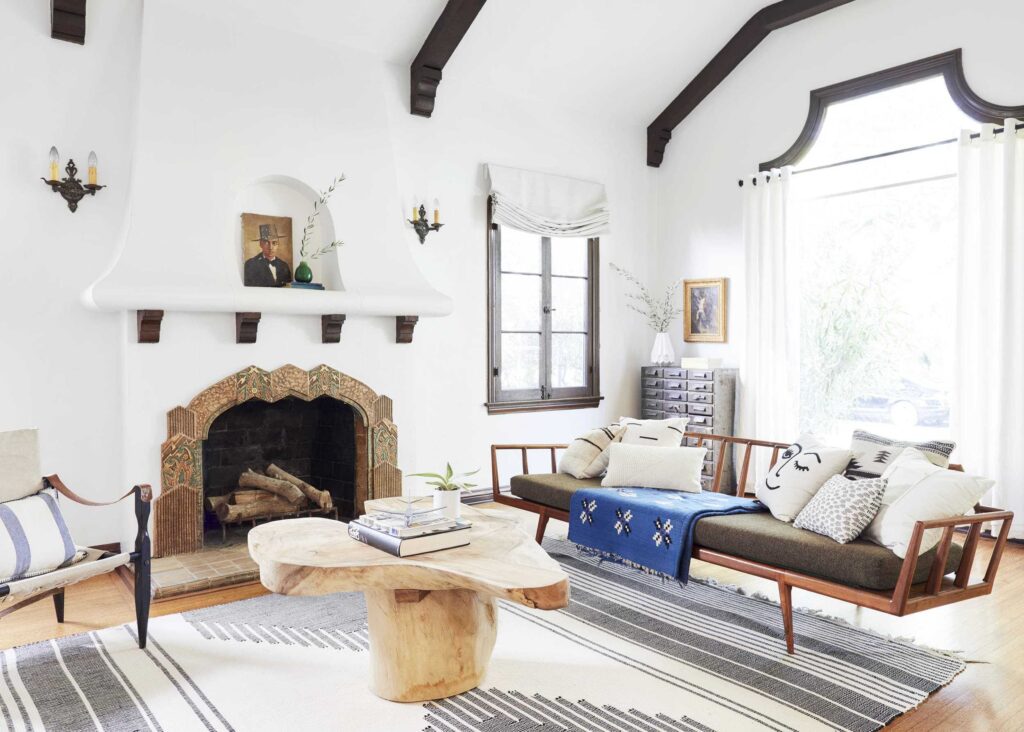
Craftsman FireplacesCraftsman style fireplaces are a hallmark of this classic architectural style, which originated in the late 19th century and was popularized in the early 20th century. These fireplaces typically feature a simple and elegant design, with natural materials such as stone, brick, or tile. The hearth is often elevated, with a wooden mantle and built-in shelves on either side. The focus is on function, with the fireplace often serving as the main source of heat in the home. Craftsman fireplaces may also incorporate decorative details such as decorative tile work or wrought iron grates. 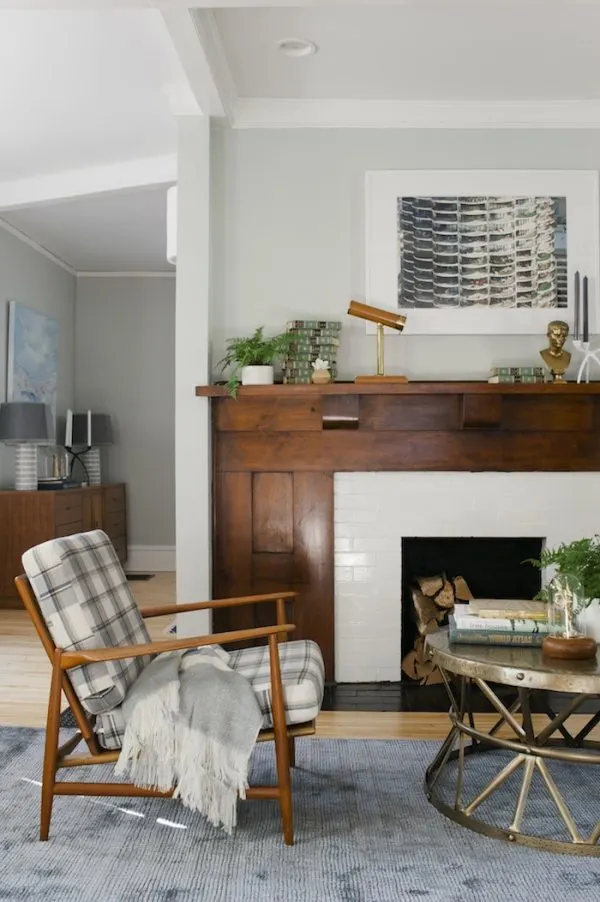
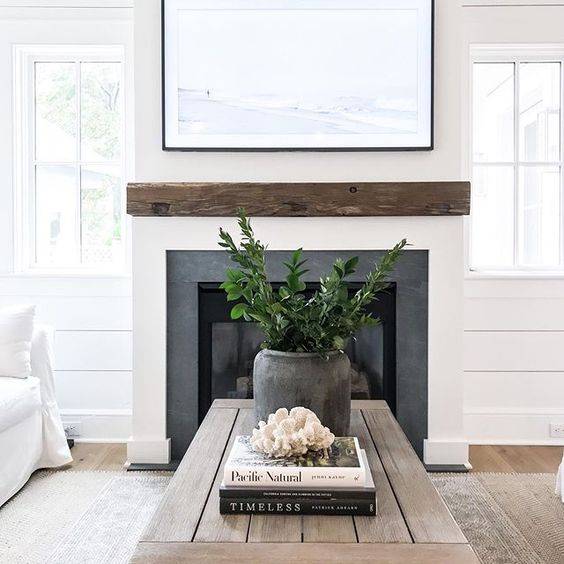
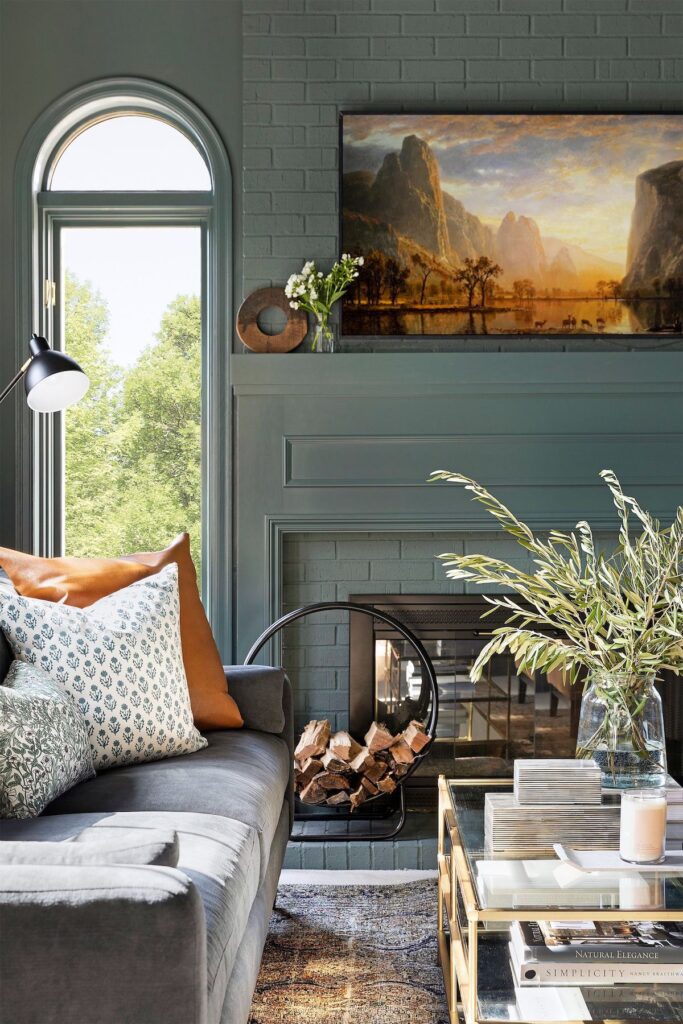
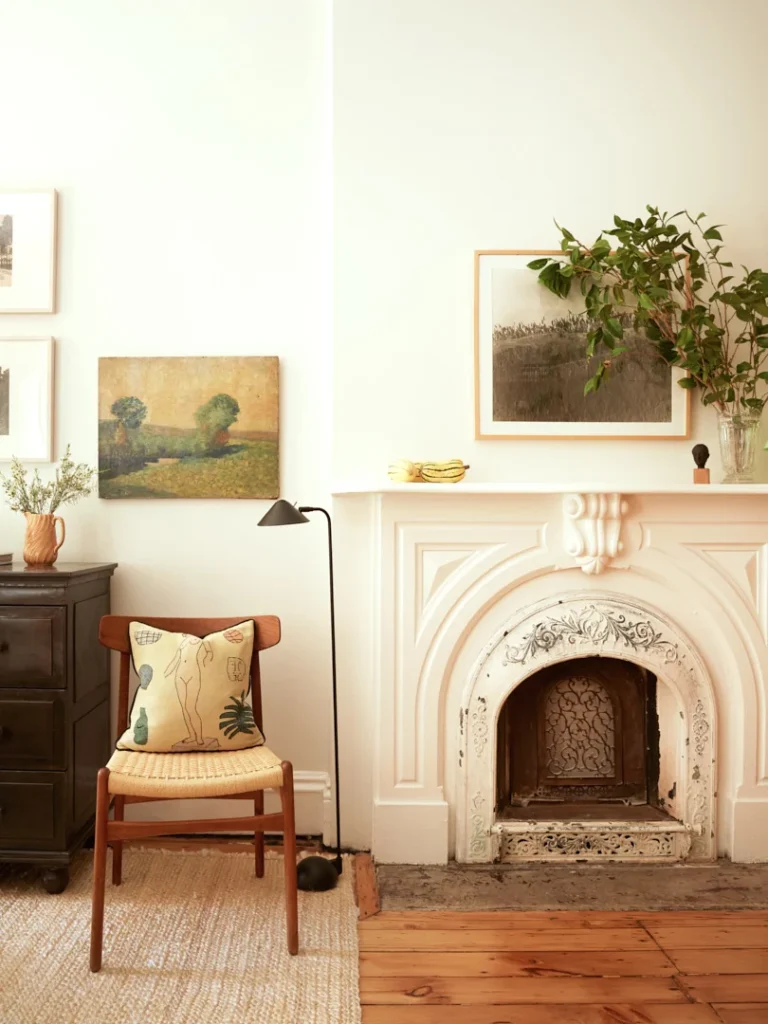
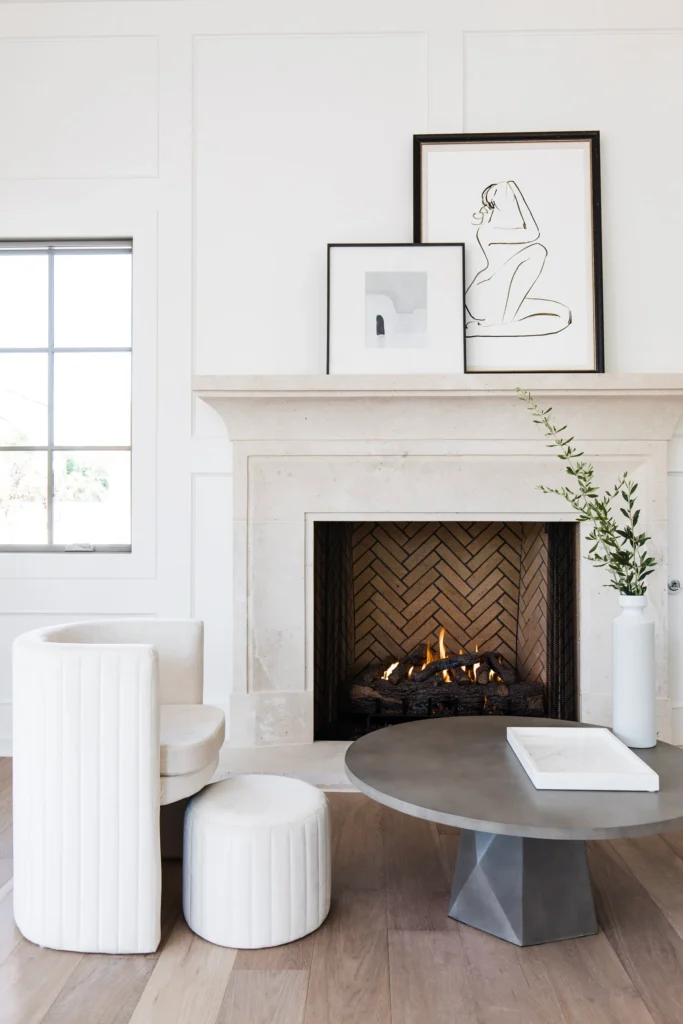
Classic or Traditional FireplacesIn this section we’re exploring options for bringing modern design elements to your classic or traditional fireplace, blending the elegance and charm of classic style fireplaces with modern materials and streamlined aesthetics. Natural materials such as marble, granite, or concrete are often used, with a minimalist mantle and a raised hearth. Modern classic style fireplaces may also incorporate unique features such as hidden storage, built-in seating, or a recessed firebox. The result is a timeless and sophisticated look that seamlessly integrates with both traditional and modern interiors, making the modern classic style fireplace a versatile and enduring design choice and one of our favorite modern fireplace design ideas. 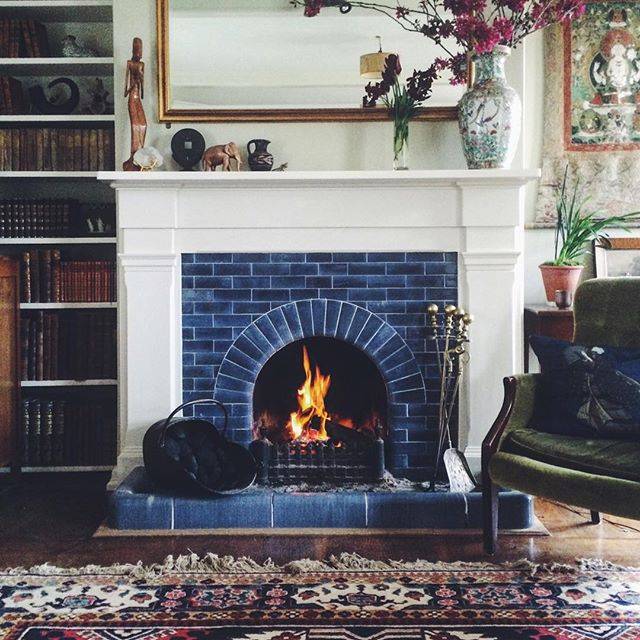
Modern Luxury FireplacesModern luxury style fireplaces are the epitome of high-end design, combining cutting-edge technology, premium materials, and sleek aesthetics for a contemporary fireplace design. These fireplaces often feature a minimalist and linear design, with a focus on clean lines and a bold visual impact. Natural materials such as marble, quartz, or onyx are commonly used, often with custom finishes and intricate detailing. 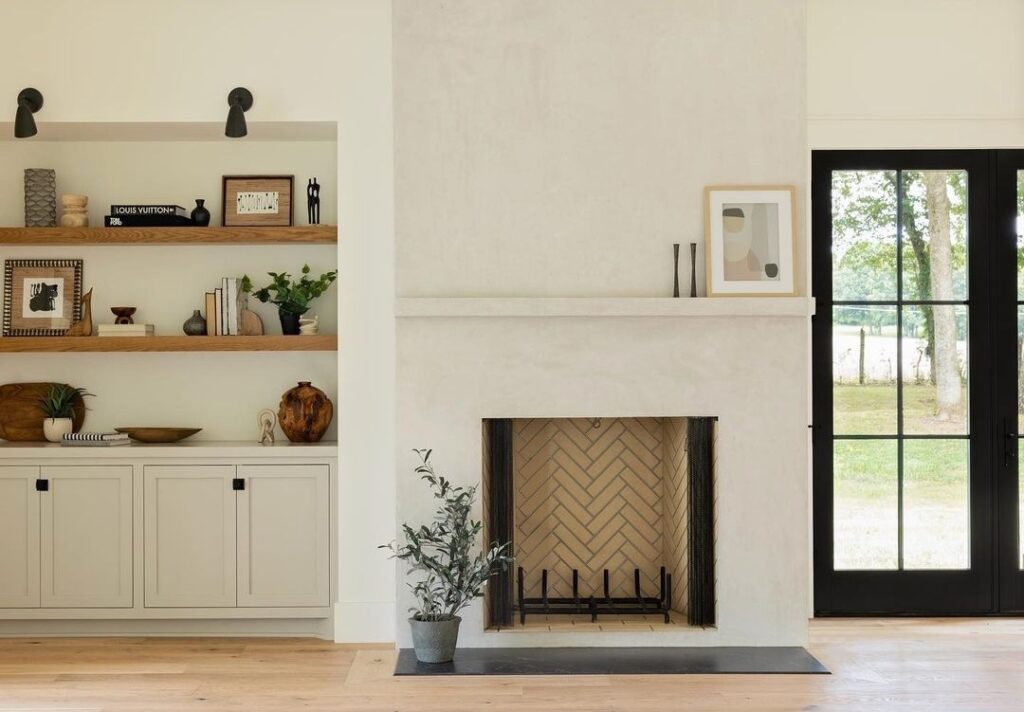
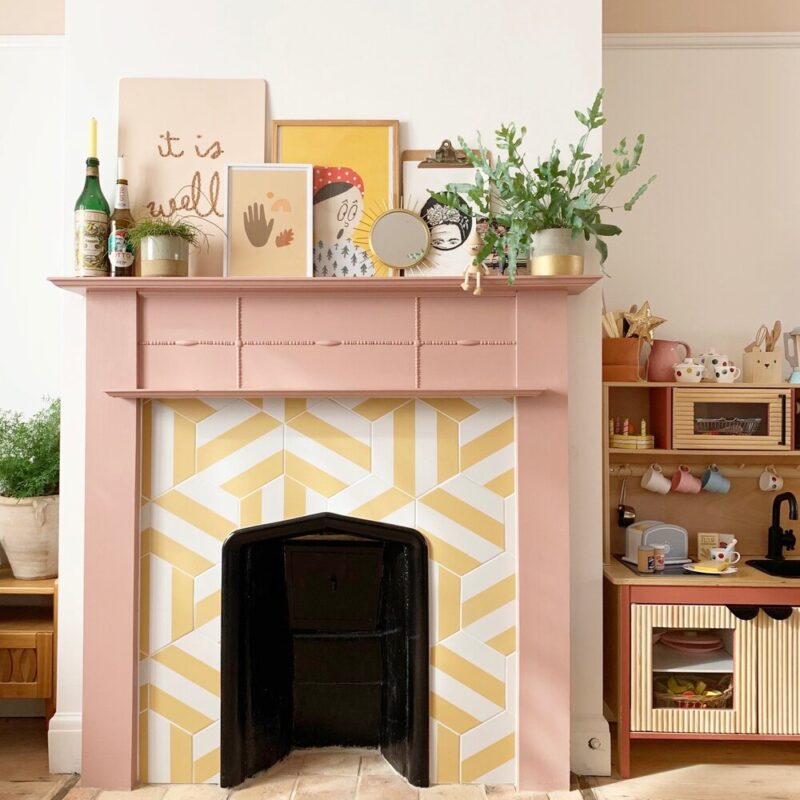
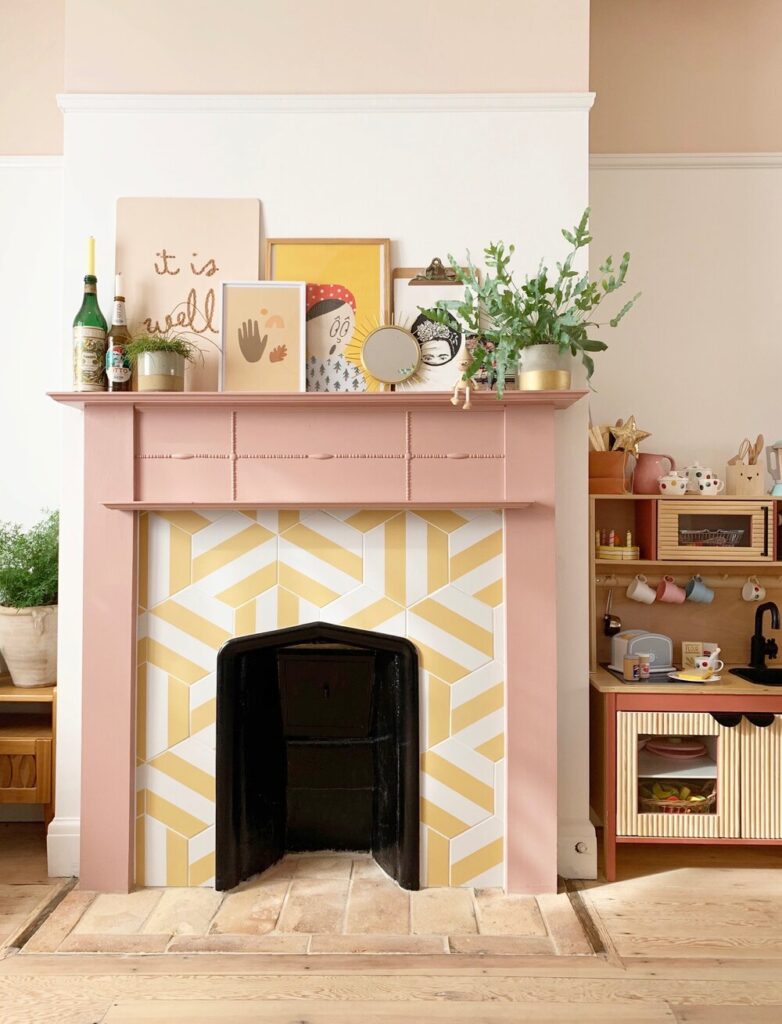
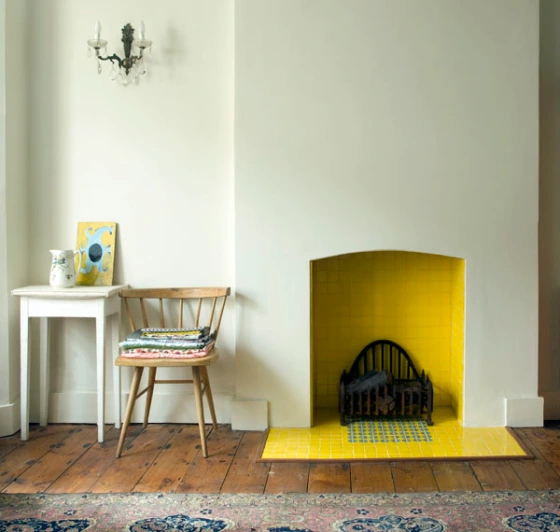
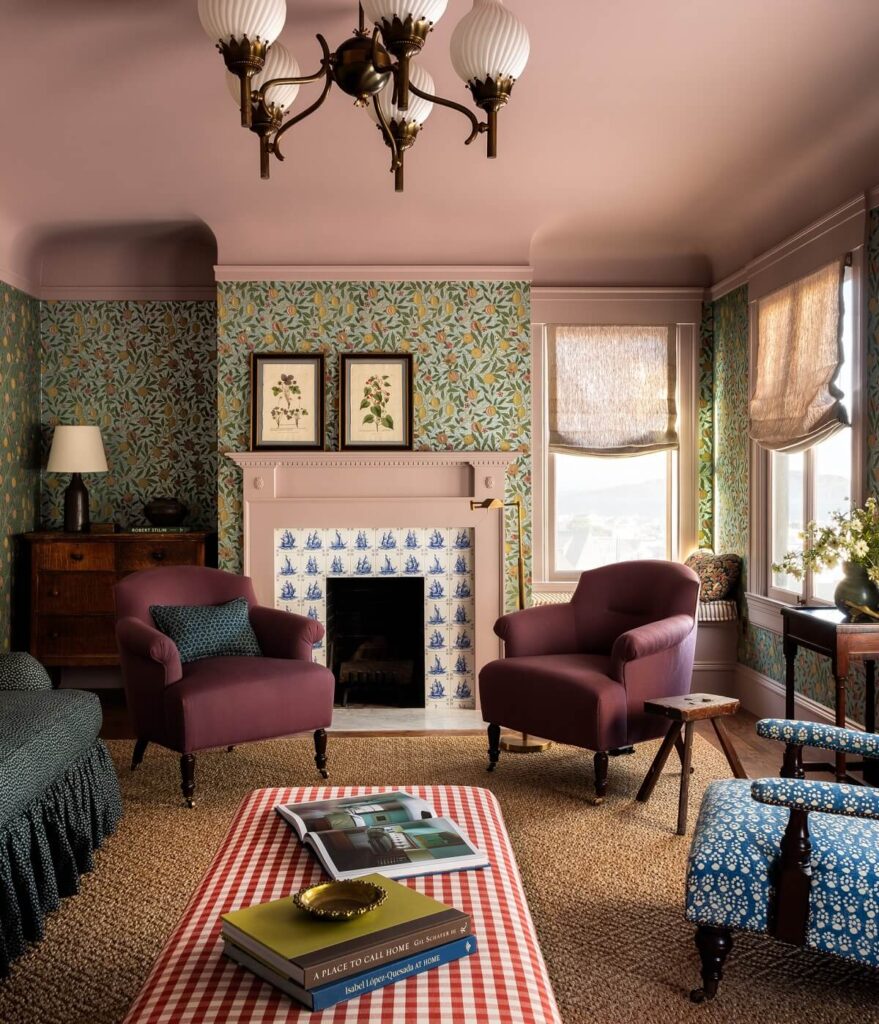
Bright and Colorful FireplacesBright and colorful style fireplaces are a unique and playful approach to fireplace design, infusing a space with personality and vibrancy in any living room. These fireplaces are typically characterized by bold, eye-catching colors, often applied to the fireplace surround, mantle, or even the firebox itself. Materials such as painted wood, glazed tiles, or mosaic patterns are commonly used to achieve a bright and colorful look. These fireplaces may also incorporate other playful features, such as asymmetrical designs, unexpected shapes, or contrasting textures. Bright and colorful style fireplaces are ideal for adding a touch of fun and creativity to any room, and are particularly well-suited for children’s rooms, playrooms, or informal living spaces. They can be customized to suit a variety of design preferences, from bohemian and eclectic to midcentury modern and retro-inspired. 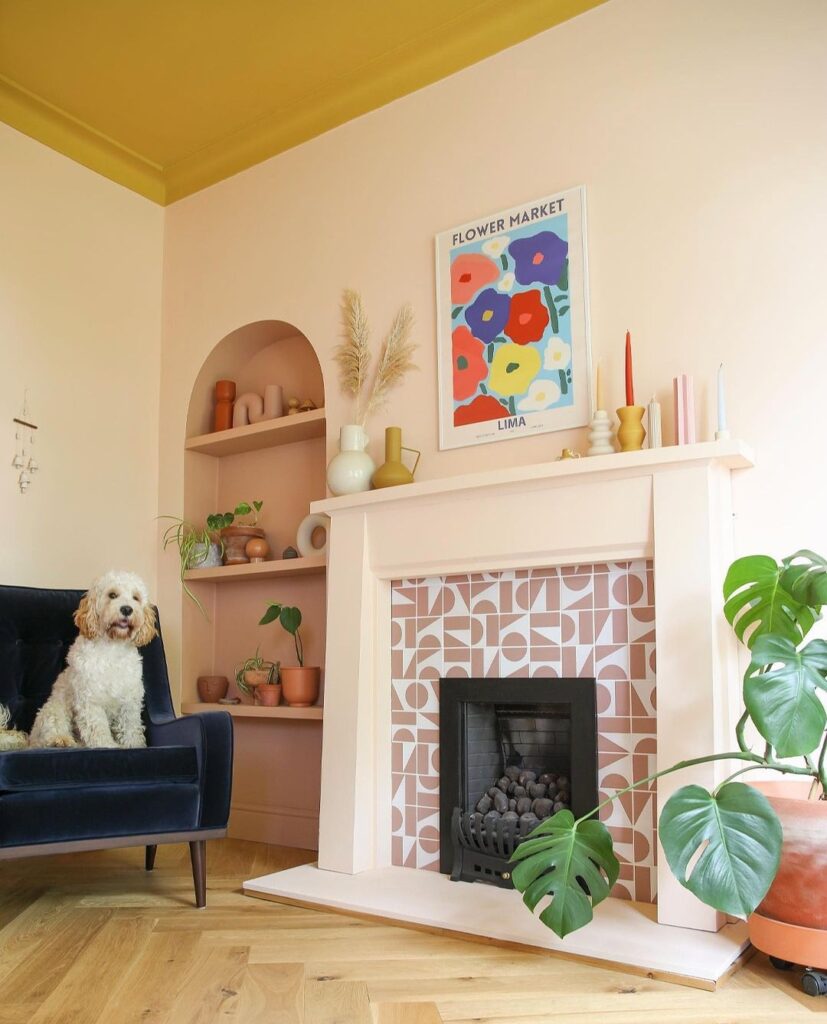
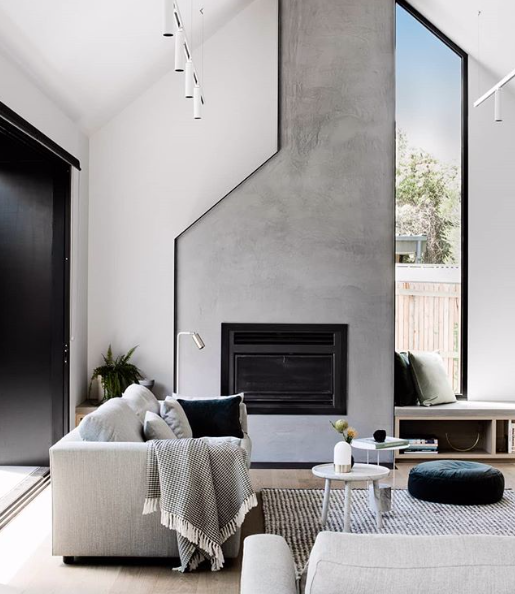
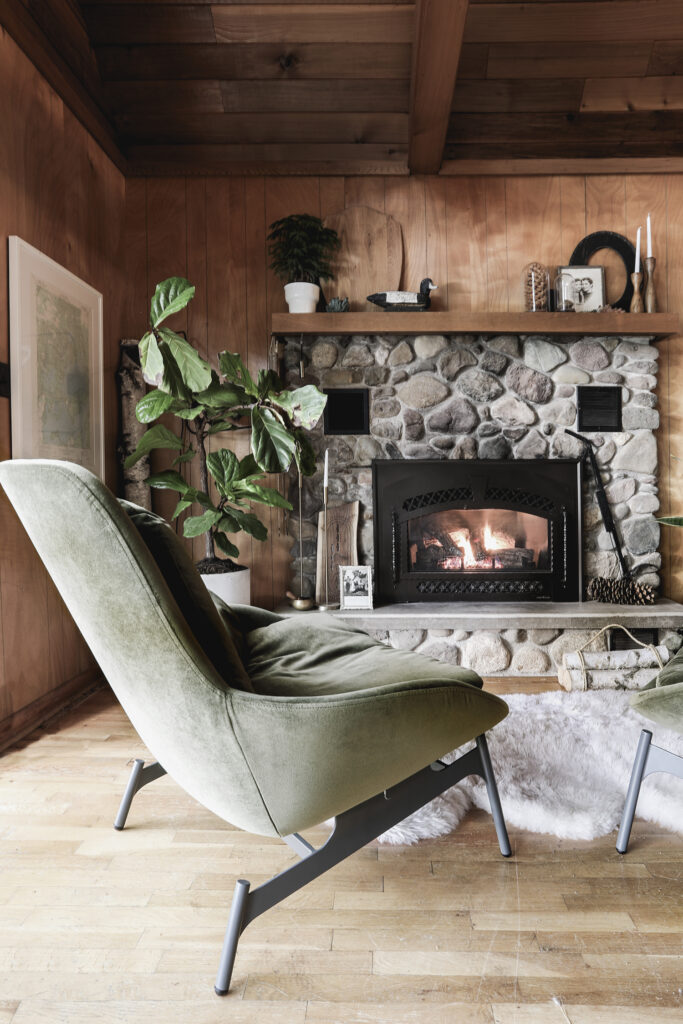
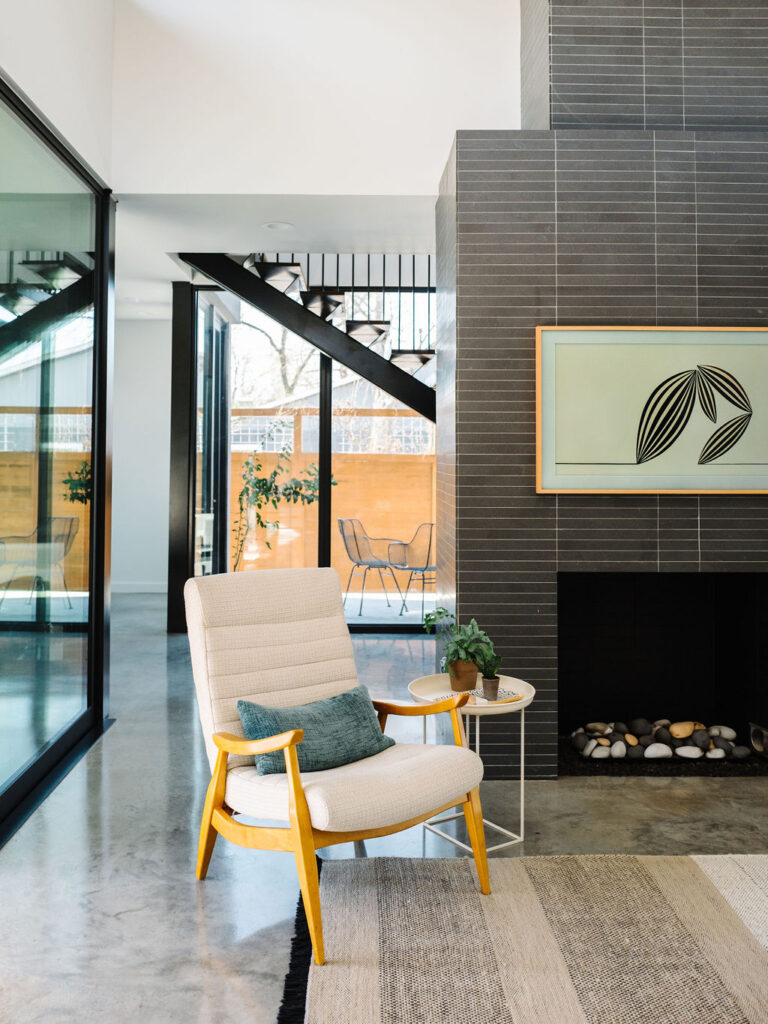
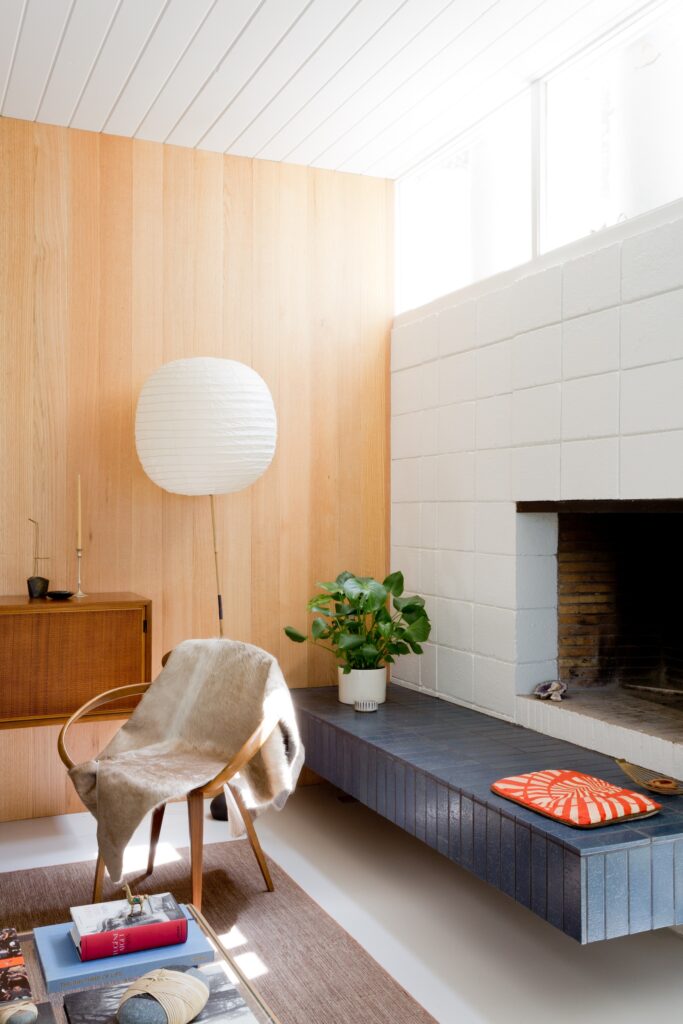
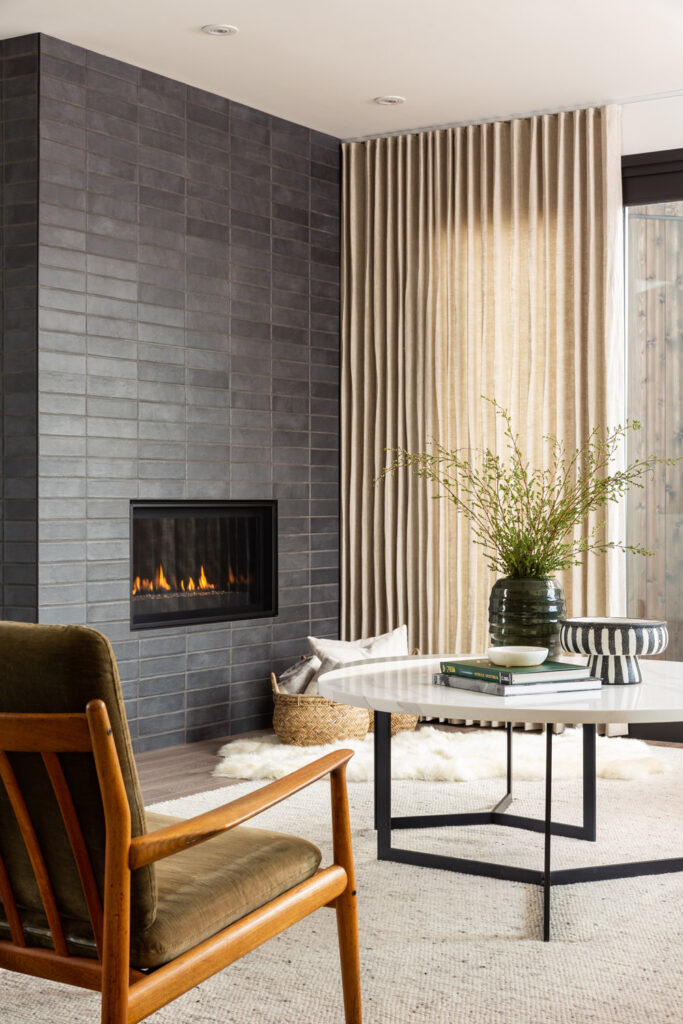
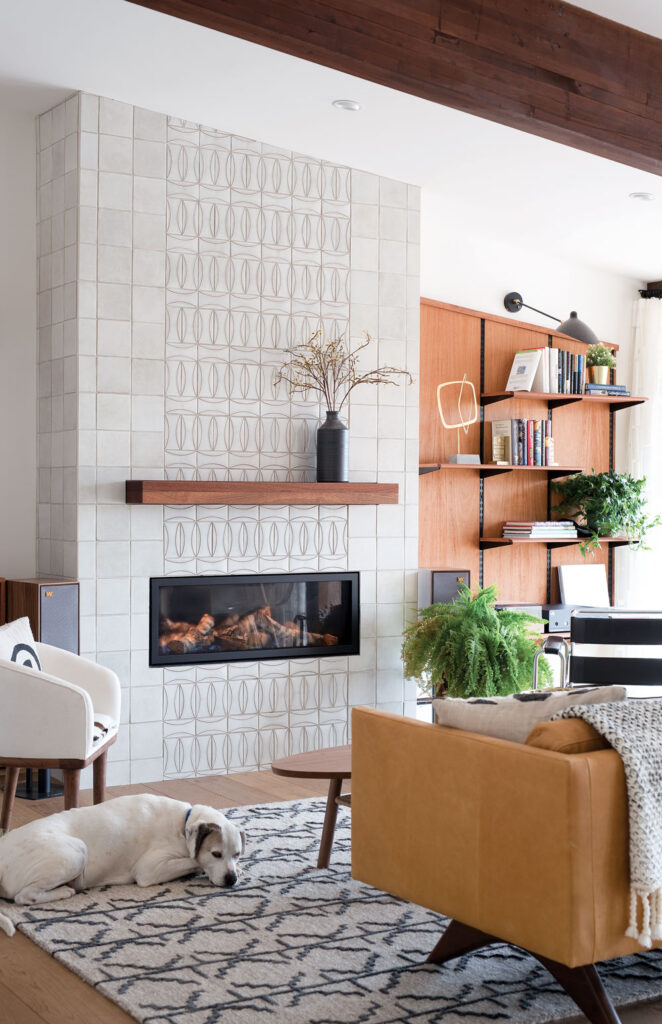
Mid-century Modern FireplacesMidcentury style fireplaces are a key element in the design aesthetic of this era, which spanned the 1940s to the 1960s and probably what comes to mind most often when you think of modern fireplace design. These fireplaces often feature a sleek and minimalist design, with clean lines and geometric shapes. Materials such as concrete, brick, or stone are used in combination with metal, such as brass or chrome, to create a modern look. Some midcentury fireplaces are floor-to-ceiling, while others are built into a wall and feature a raised hearth. In many cases, midcentury style fireplaces were designed to be visually striking, with bold shapes and contrasting materials that make them stand out in a room. Today, midcentury fireplaces remain popular in both original and updated forms, adding a touch of retro-chic to any space. 

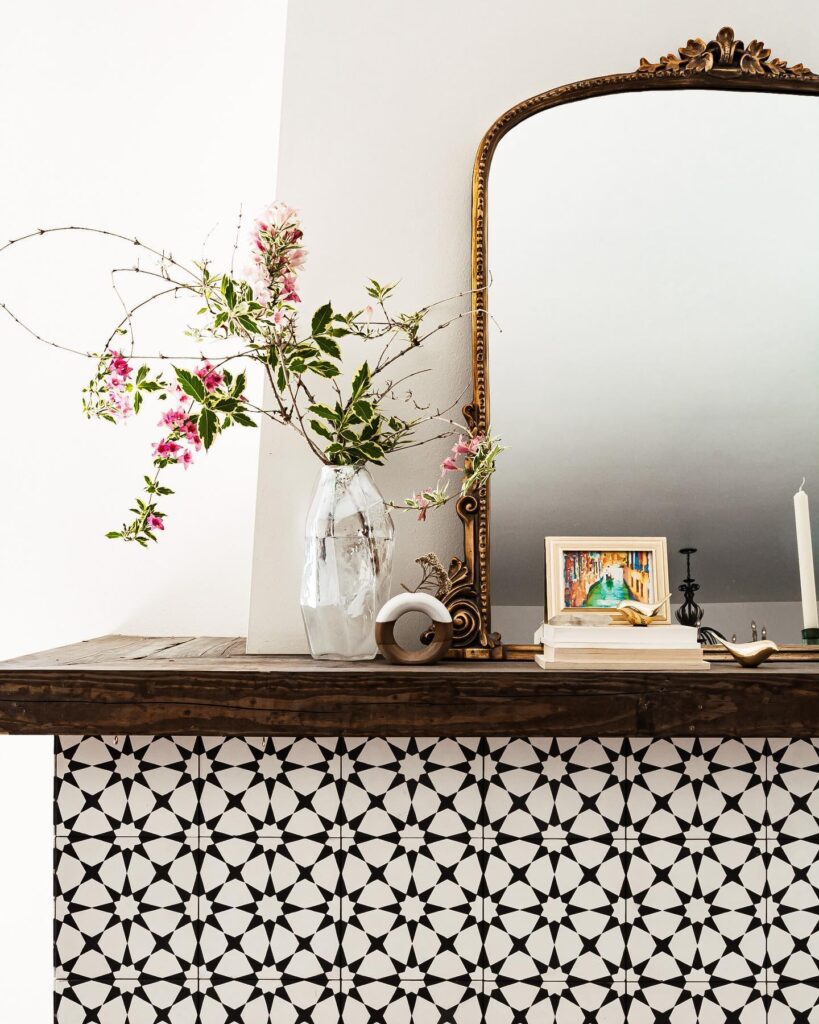
Cottage Core FireplacesThe cottage core style adds charm and whimsy to any home. It’s inspired by the romanticized notion of a rural countryside lifestyle and while it may be a trend, we think it’s here to stay. These fireplaces often feature natural materials such as stone or brick, and may incorporate rustic elements such as exposed wooden beams or vintage reclaimed wood. The design is typically simple and unpretentious, with a focus on functionality and comfort. Cottage core style fireplaces may include a hearth or a mantel, with decorative elements such as dried flowers, woven baskets, or vintage vases adding to the homey and pastoral feel. This style is ideal for creating a warm and inviting atmosphere, with a nod to a simpler and slower way of life. And while it feels a bit old-fashioned, these are definitely modern fireplace ideas. 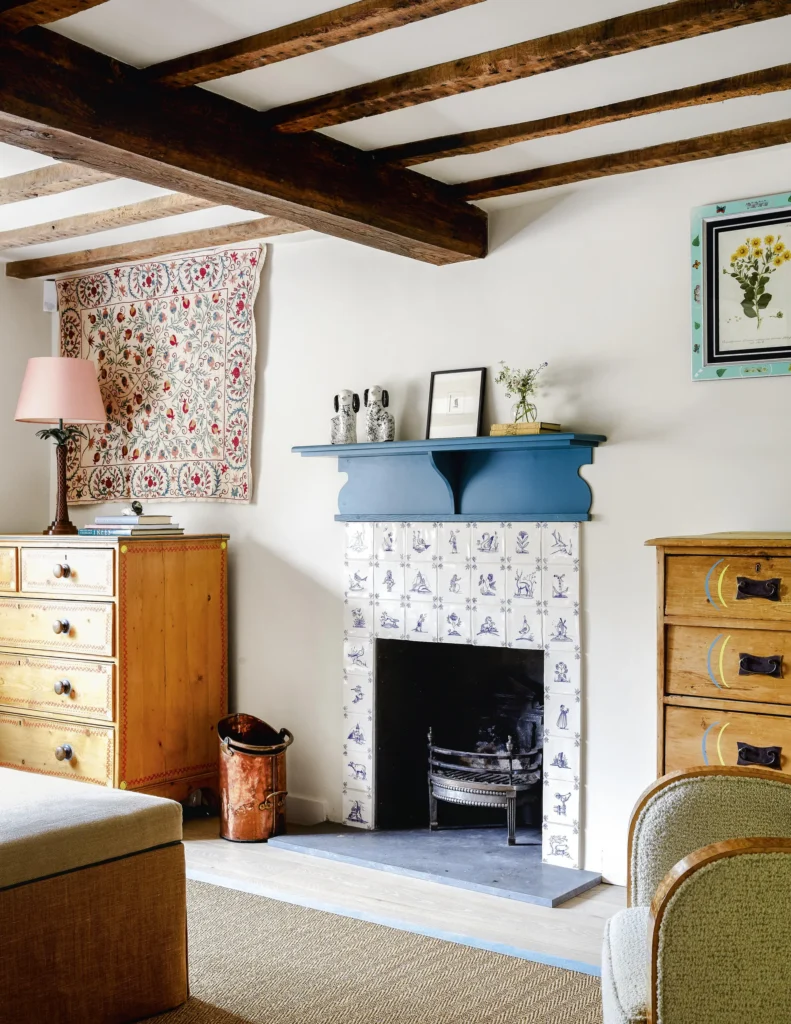
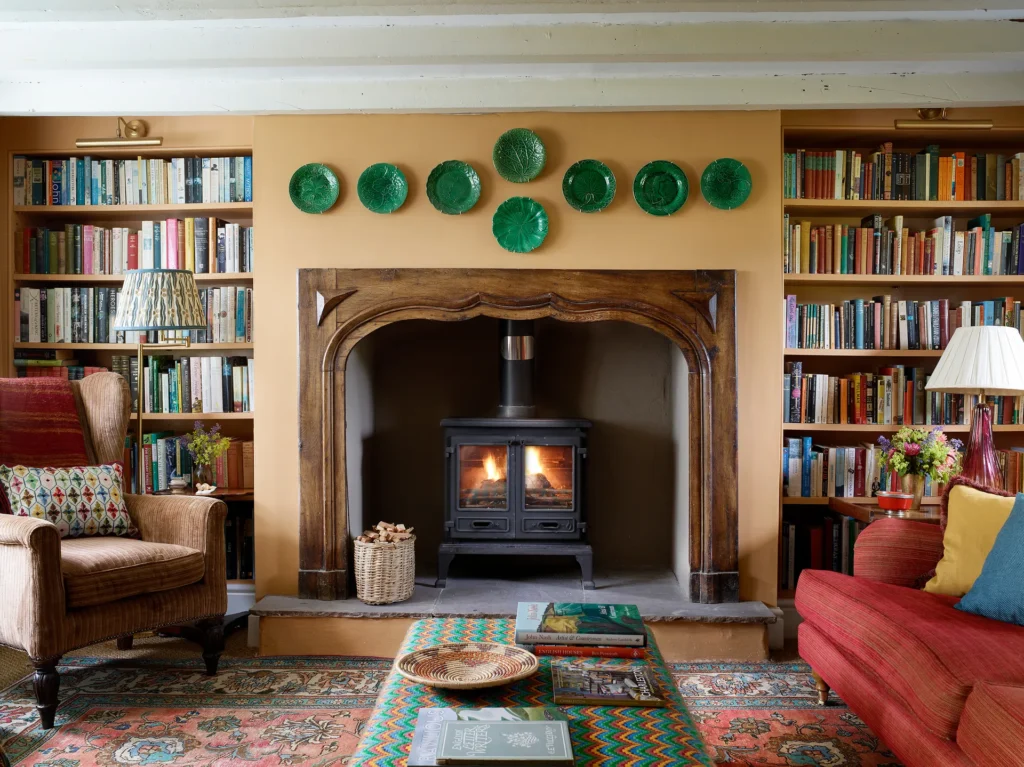
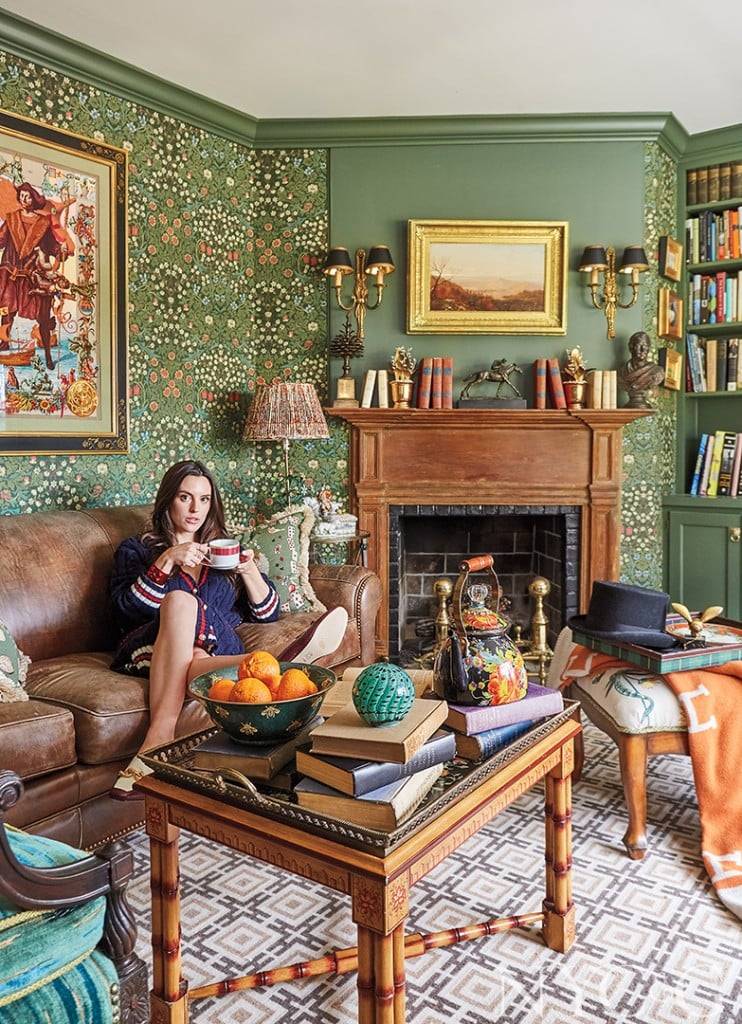
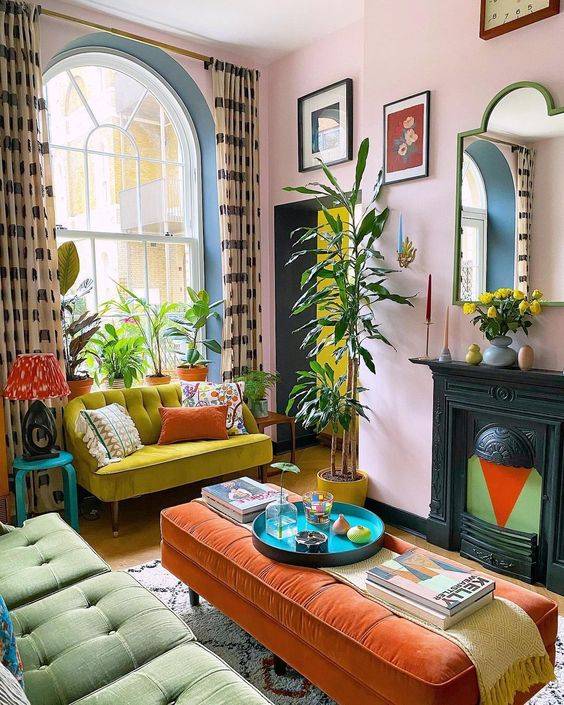
Maximalist FireplacesMaximalist style fireplaces are one of the most modern fireplace ideas with an eclectic and bold approach to fireplace design, making a statement with vibrant colors, elaborate patterns, and unexpected details. These fireplaces often incorporate a variety of materials, such as colorful tiles, ornate metalwork, and bold fabrics, to create a look that is maximalist and visually stimulating. Maximalist style fireplaces are ideal for those who embrace a daring and adventurous design aesthetic, and are looking to make a bold statement in their home. They are well-suited to eclectic interiors, bohemian-inspired spaces, or those with a playful and whimsical style. 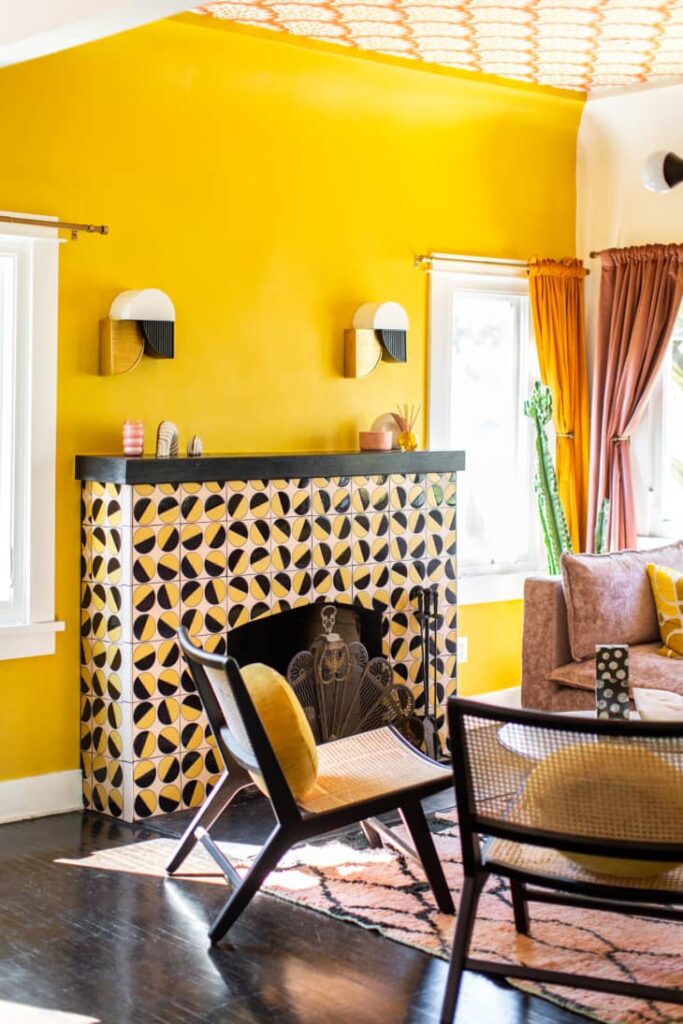
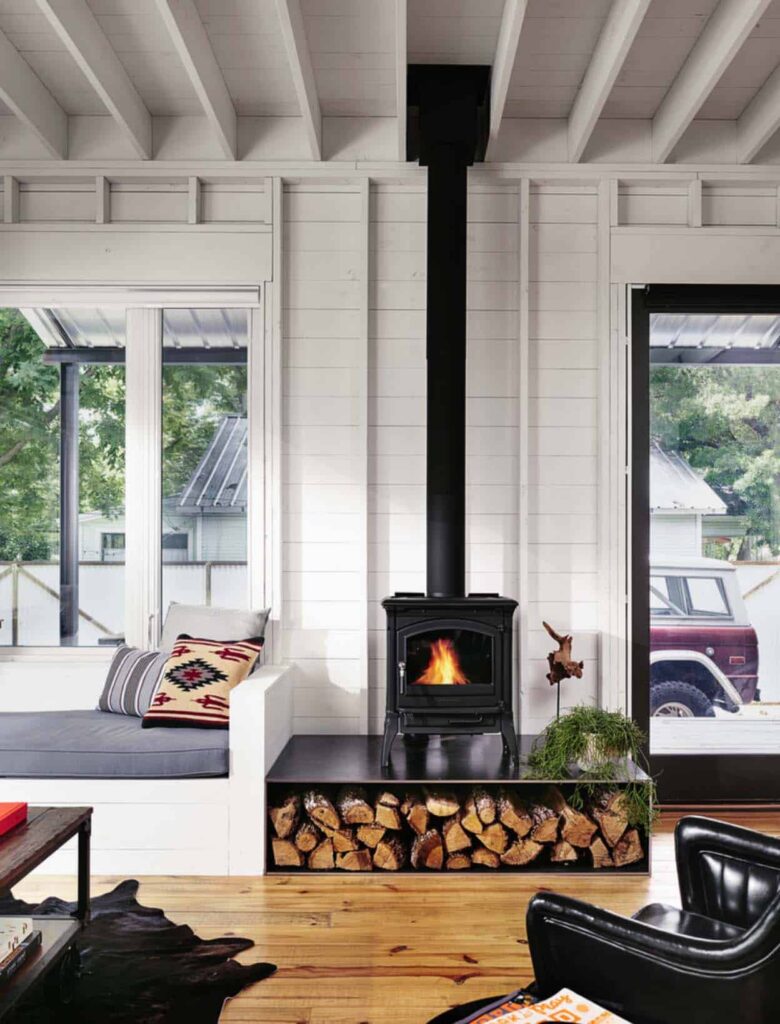
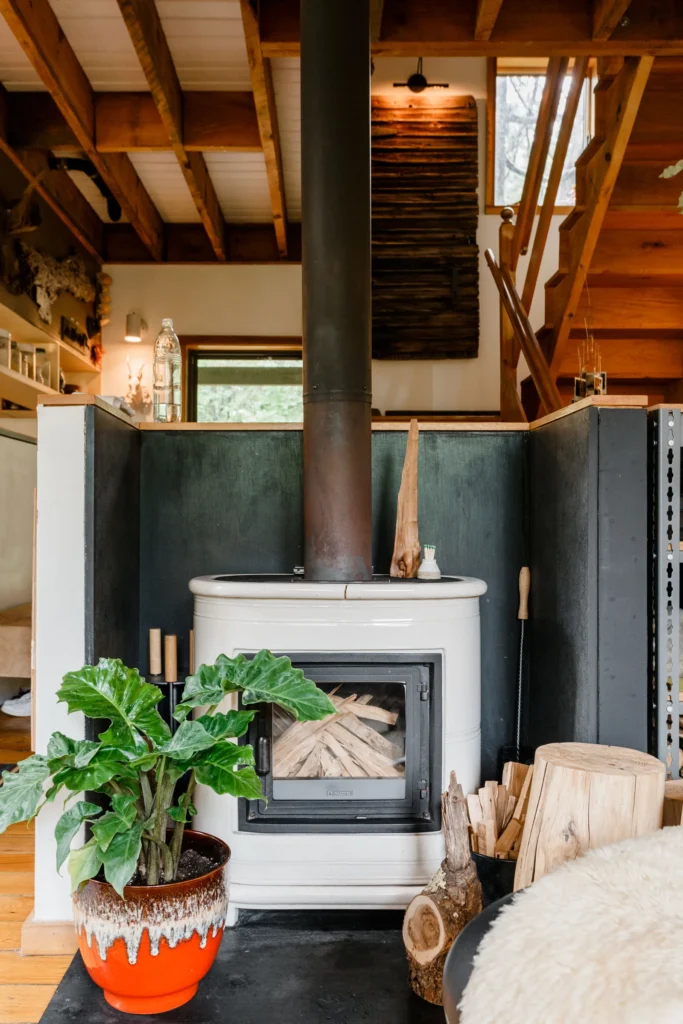
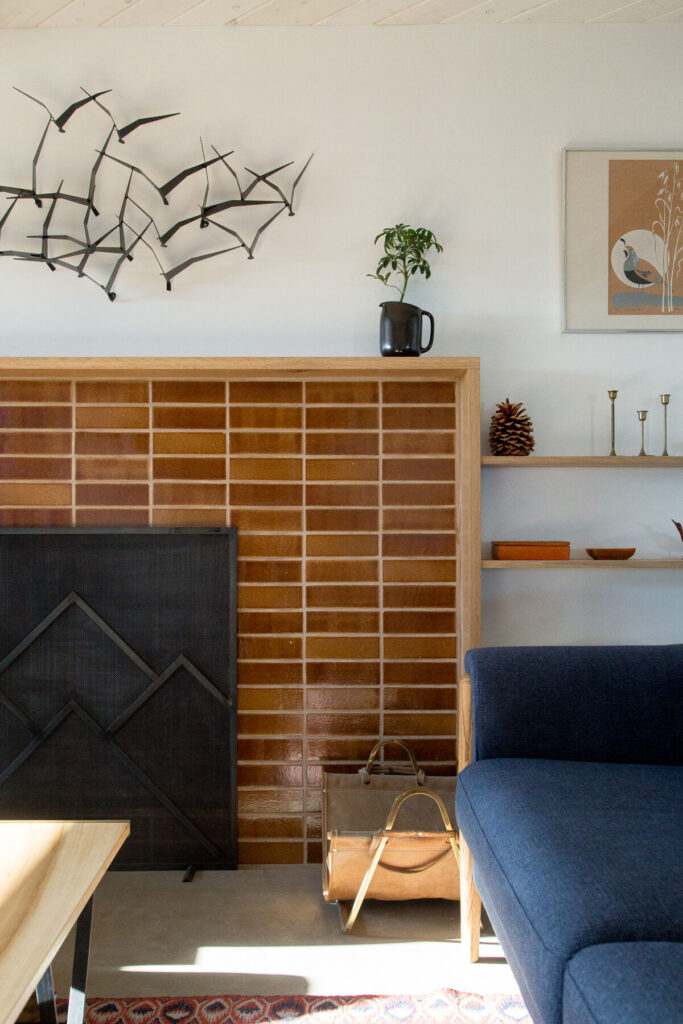
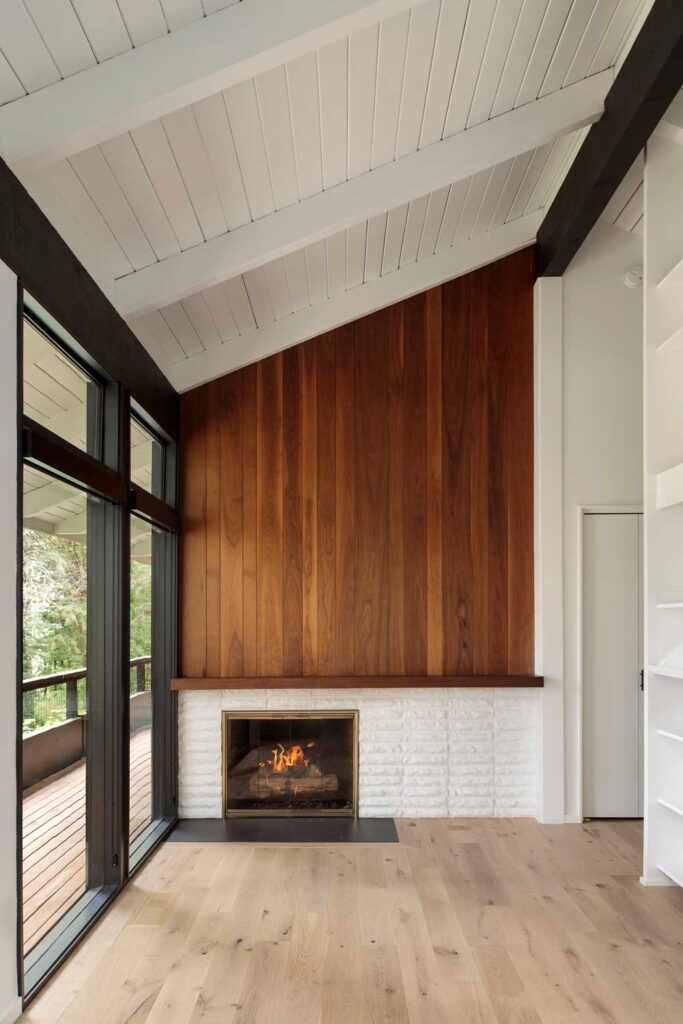
Contemporary Cabin FireplacesContemporary cabin style fireplaces are a modern interpretation of the traditional rustic cabin aesthetic, combining the warmth and coziness of a cabin fireplace with sleek and contemporary design elements. The design may incorporate modern features such as a linear firebox, glass panels, or hidden storage, while still maintaining a rustic feel. The mantle may be rustic and weathered, with exposed wooden beams or reclaimed wood elements adding to the cabin vibe. Contemporary cabin style fireplaces are ideal for those who appreciate the timeless charm of a cozy cabin fireplace, but also value modern design and functionality. They are well-suited to mountain homes or cabins, as well as urban dwellings seeking a touch of rustic charm. 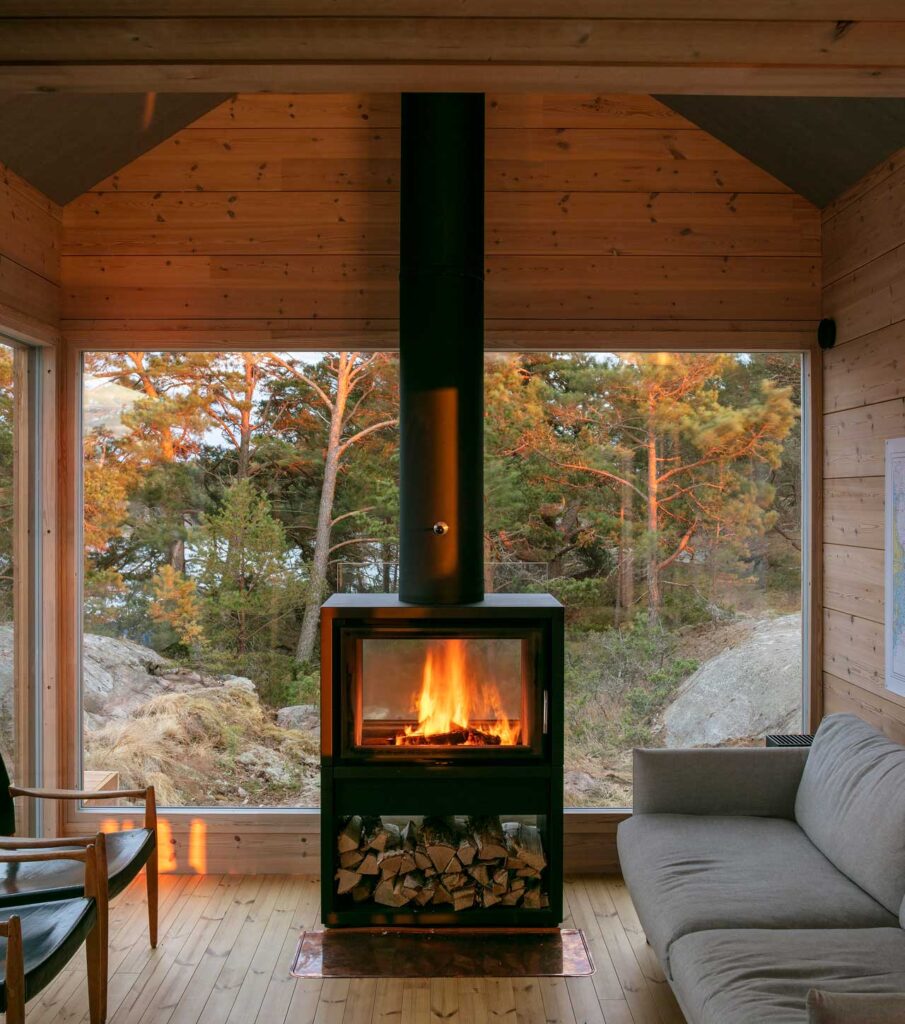
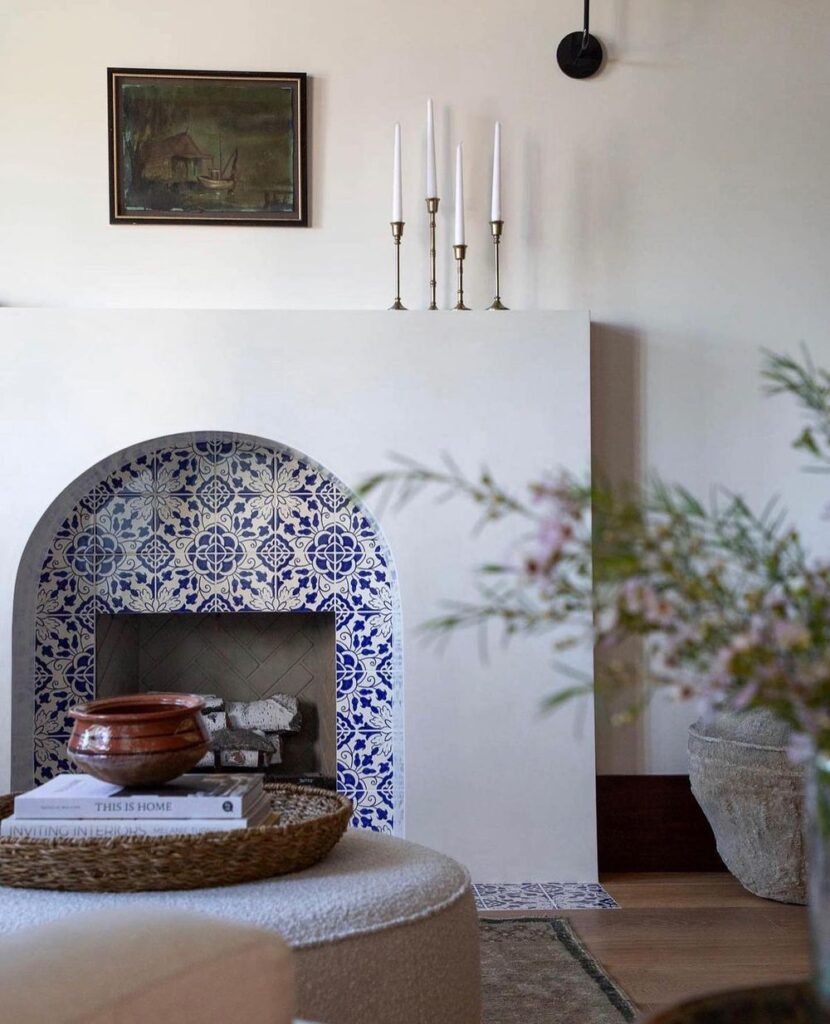
Southwest FireplacesSouthwest style fireplaces are a popular architectural element in homes and buildings throughout the American Southwest. These fireplaces are typically characterized by their adobe or stucco construction, and often feature unique design elements such as decorative tiles, wrought-iron screens, and natural stone hearths. 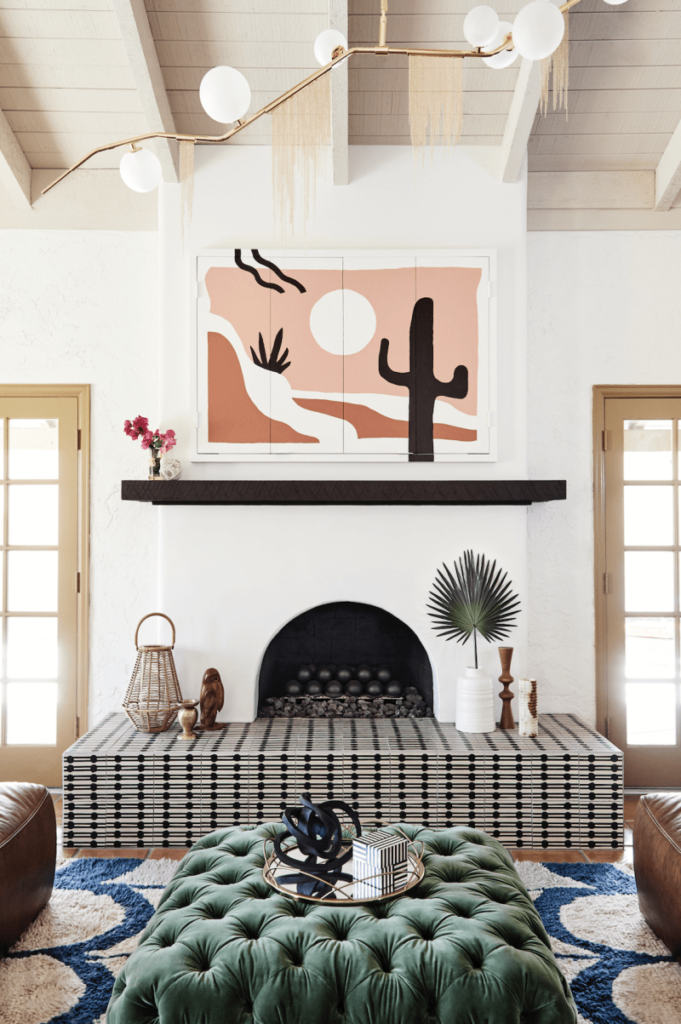
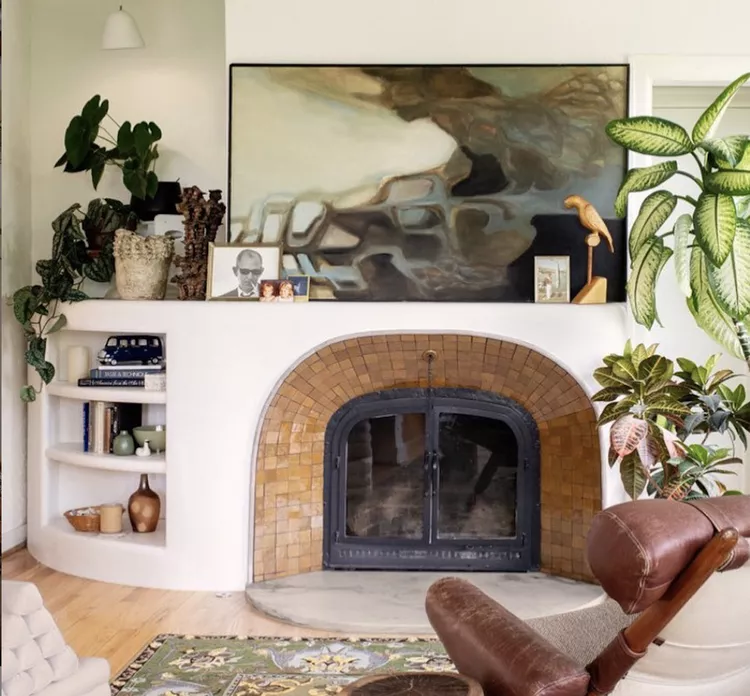
Spanish FireplacesSpanish style fireplaces are a classic design element that never go out of style. These fireplaces often feature intricate detailing, such as ornate tile work, carved stone or wood mantels, and wrought iron screens. They are often constructed from materials such as adobe, stucco, or natural stone, and may incorporate other design elements such as archways, exposed wooden beams, and traditional Spanish lighting fixtures. Whether they are used for heating or simply for decorative purposes, Spanish style fireplaces add a touch of Old World charm and sophistication to any home or building. 
Hopefully you’ve enjoyed this collection of modern fireplace ideas! Fireplace design is an essential element in creating a cozy and comfortable living space. Whether you prefer the classic charm of a wood-burning stove or the convenience of an electric fireplace, there is a design style and fireplace type to complement any interior design style. From the warmth of a wood-burning fireplace to the ease of a gas fireplace, the options are endless. With a little creativity and imagination, you can create a stunning and functional fireplace that will become the centerpiece of your home for years to come. More modern fireplace design ideas:
The post 35+ Modern Fireplace Ideas You’ll Love appeared first on Curbly. Via https://www.curbly.com/35-of-the-best-modern-fireplace-ideas
0 Comments
Are you looking for inspiration to transform your fireplace into a stunning centerpiece of your living space? Look no further than our collection here of fireplace tile design ideas. From classic and timeless white tiles to bold and colorful mid-century modern tiles, there are endless options to choose from. Not only can fireplace tiles enhance the aesthetics of your living space, but they can also add functionality and durability to your fireplace. In this post, we’ll explore some of the latest trends and timeless designs in fireplace tile design to inspire you to create a fireplace that reflects your unique style and personality. Whether you’re looking for a cozy and rustic look or a modern and sleek design, fireplace tile design can help you achieve the perfect look for your home. Table of ContentsMosaic TilesOne of the most popular looks for fireplaces is mosaic tile. By combining intricate patterns, mosaic tiles create an eye-catching look that stands out from other tiling options. With endless combinations of colors and shapes available, you can really make your fireplace stand out. Keep in mind that mosaic tiles may require more maintenance due to their complex designs. 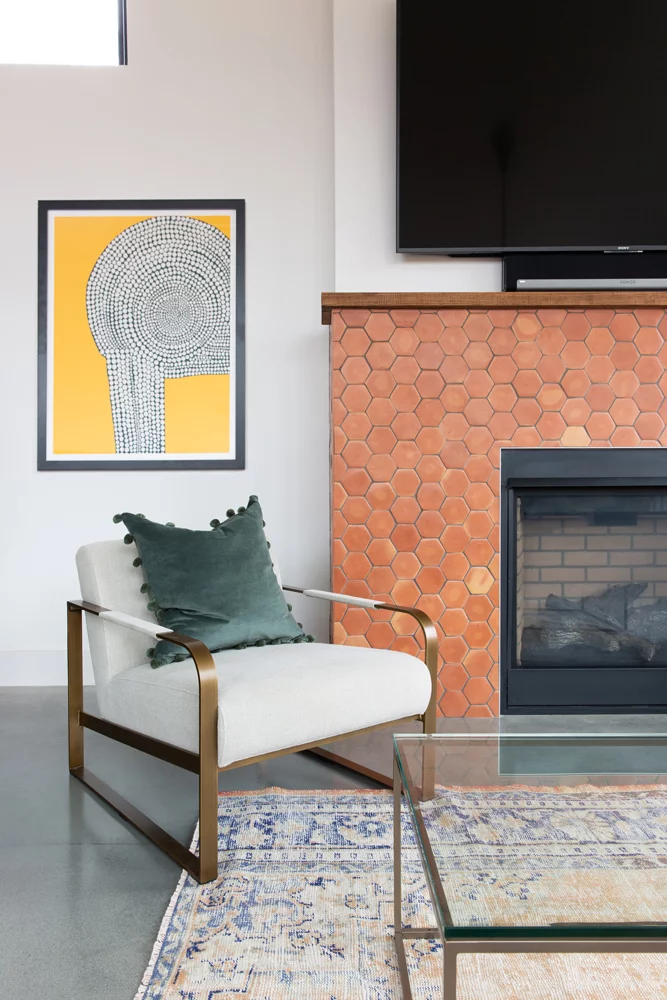
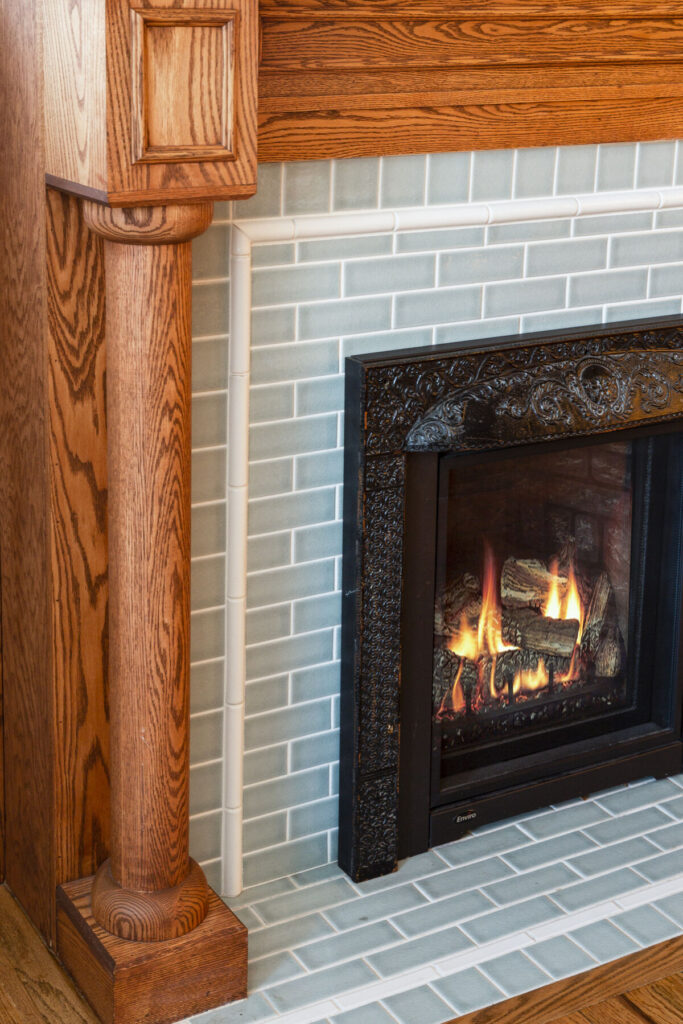
Subway TilesIf you’re looking for something more subtle than mosaic tiles but still want to make a statement in your room, subway tiles are an excellent choice. Even though they’ve been around since the early 1900s, subway tiles remain popular thanks to their timeless look and modern appeal. Subway tiles come in many different colors and sizes as well as glossy or matte finishes so you can customize them however you like. Plus, they’re also very easy to clean—perfect for those busy households! 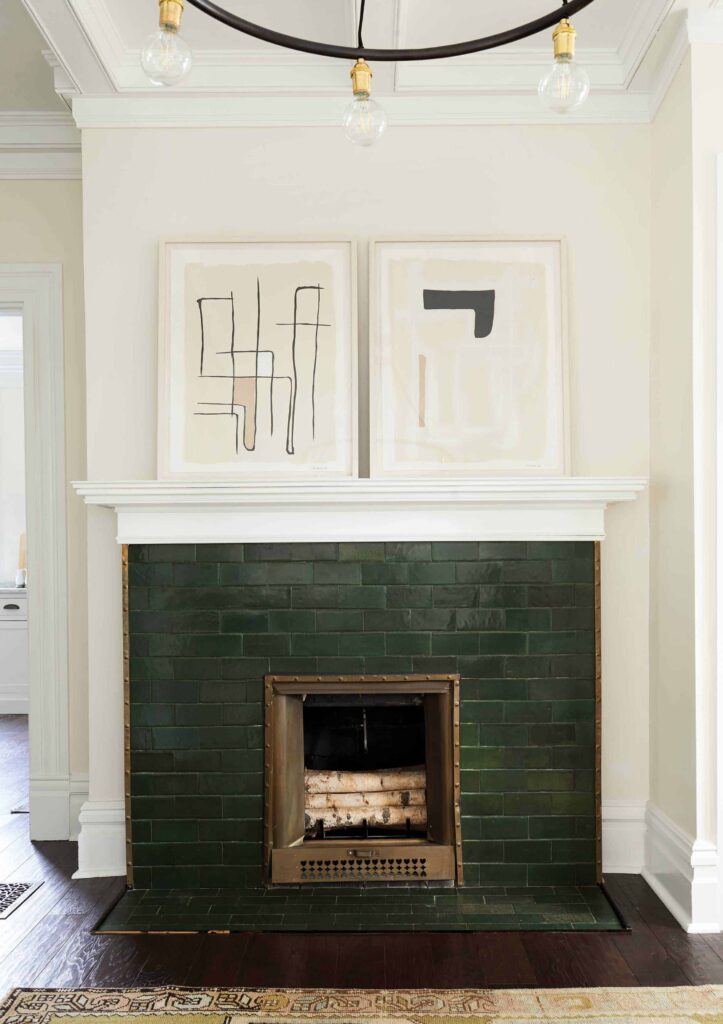
Patterned TilesFor those that don’t want too much fussiness around the fireplace area, patterned tiles are the way to go. Whether it’s geometric shapes or floral prints, patterned tiles can easily transform any space into something special without overwhelming it. 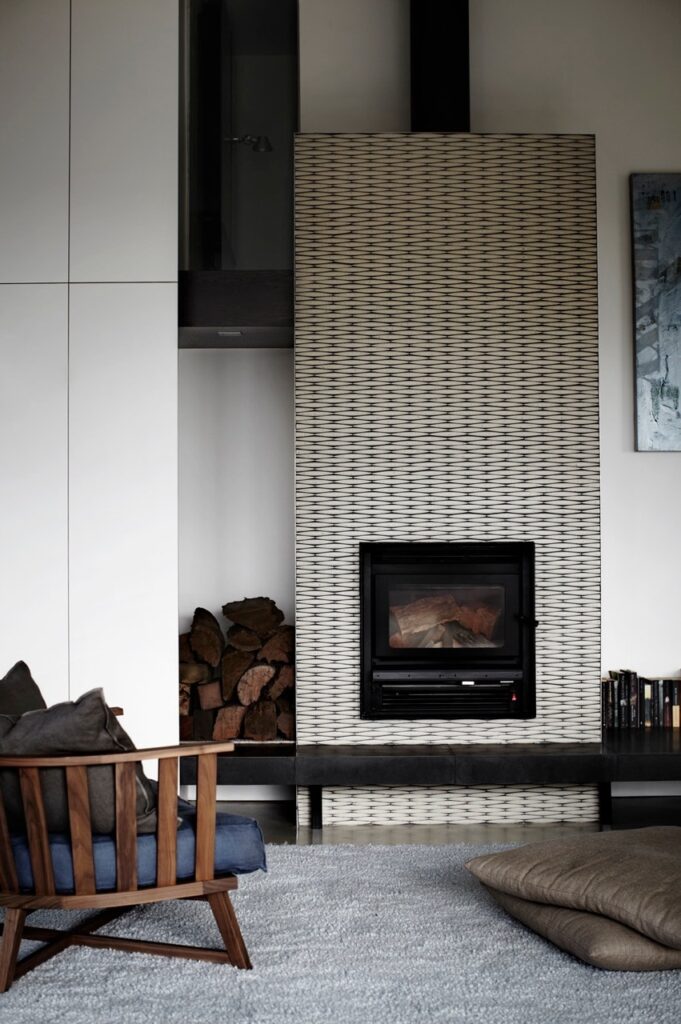
Brick TilesBrick fireplaces are a classic and timeless addition to any home. They can add warmth and character to a room, creating a cozy atmosphere for family gatherings or quiet evenings at home. Brick can be used in a variety of ways to create different looks, from traditional to modern. Brick can also be painted or stained to match the decor of the room or to create a unique, one-of-a-kind design. 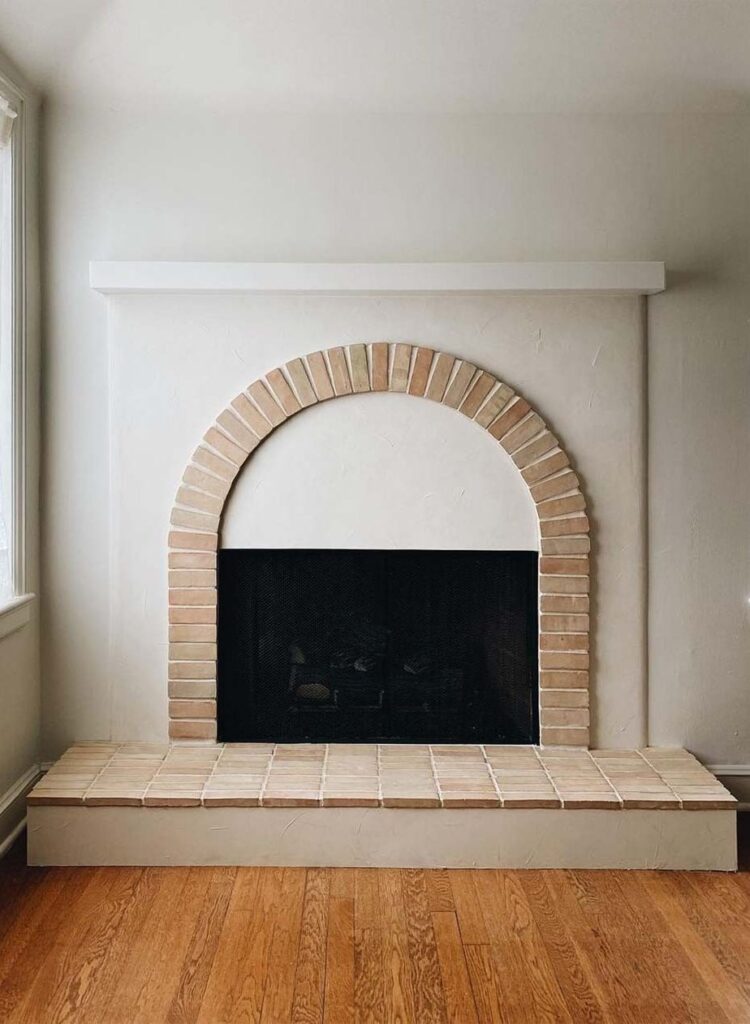
Painted Fireplace TilesPainted fireplace tiles can be a cost-effective and creative way to update an outdated or unappealing fireplace design. Painting fireplace tiles allows for a wide range of color options and finishes, making it easy to customize the look of the fireplace to match any decor style. With proper preparation and use of heat-resistant paint, painted fireplace tiles can hold up well to the high temperatures of a fire and provide a long-lasting finish. However, it is important to note that painting fireplace tiles may not be suitable for all types of tile materials, so it’s always best to consult with a professional before attempting this type of project. 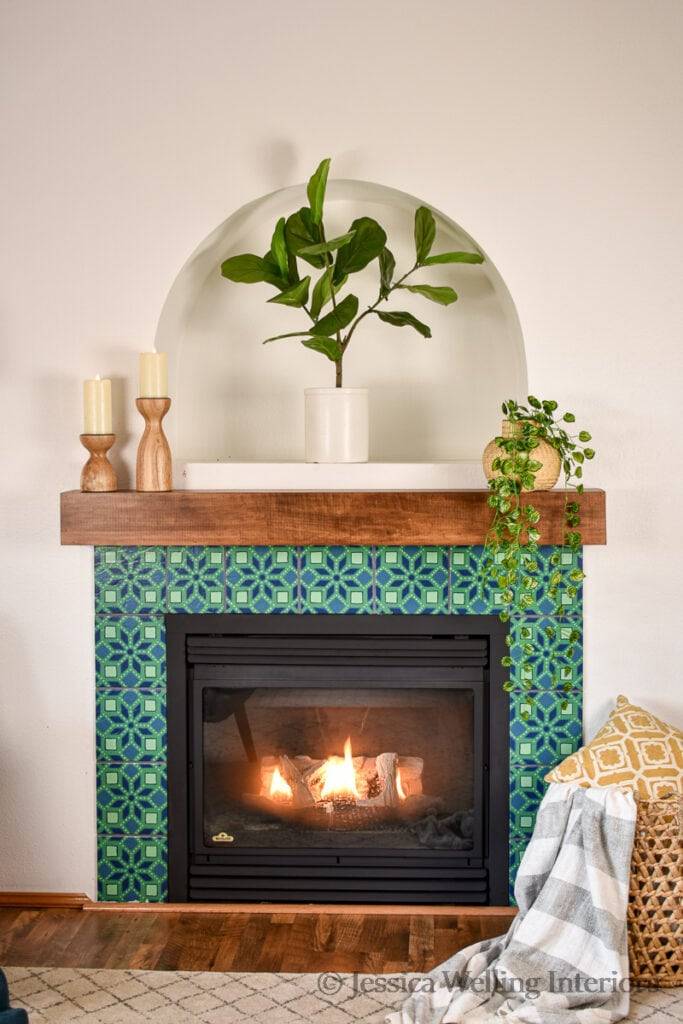
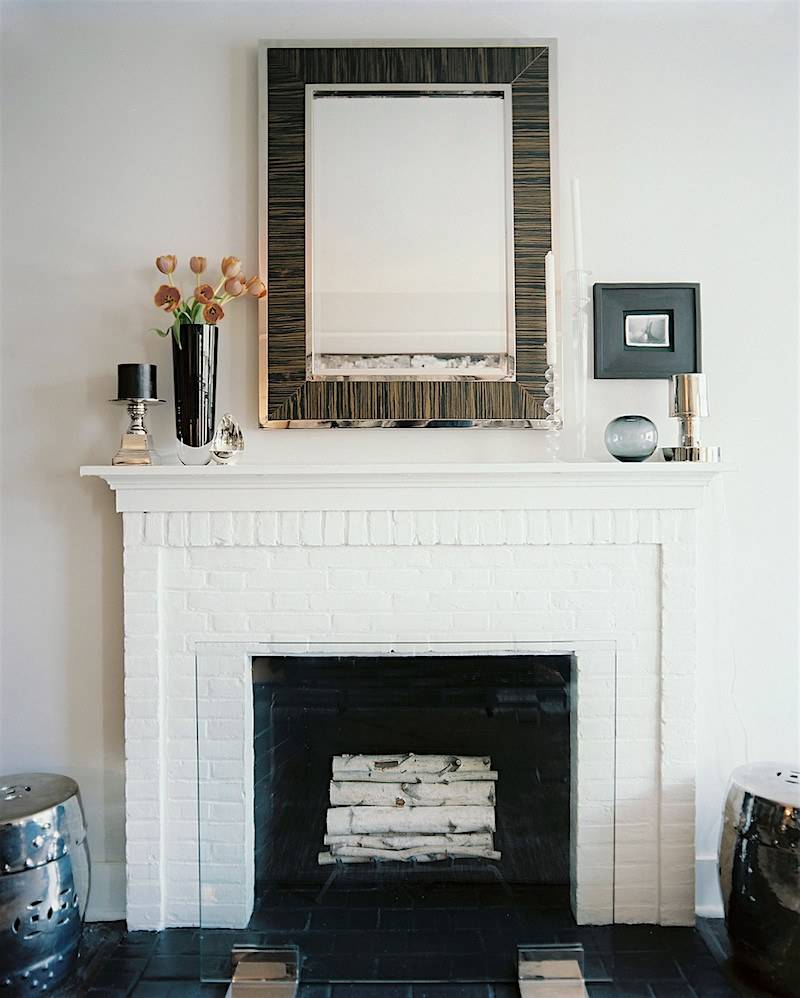
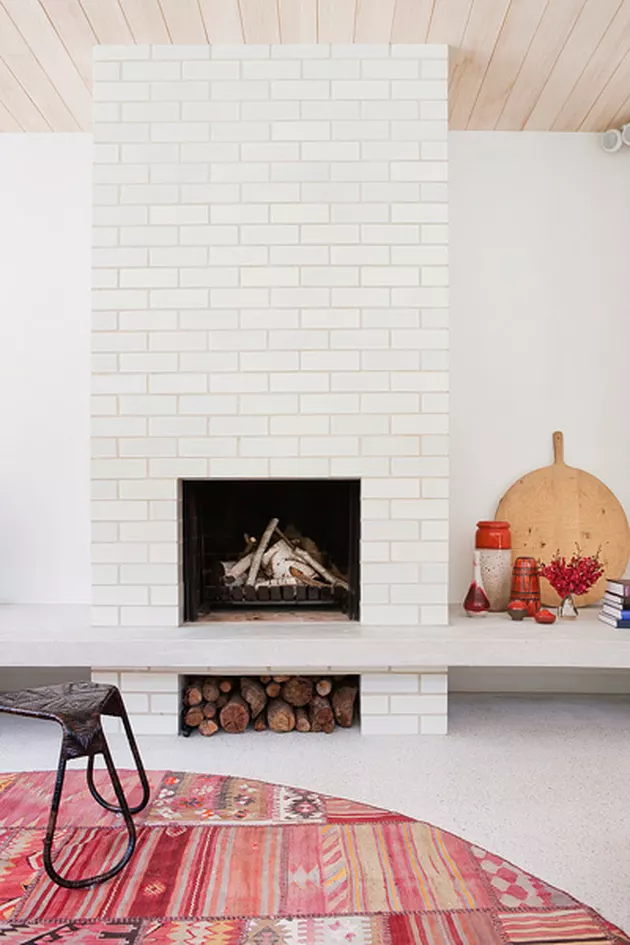
White Fireplace TilesWhite fireplace tiles are a classic and timeless choice that can instantly brighten up any living space. They provide a clean and fresh look that can complement a range of decor styles, from traditional to modern and contemporary. White tiles can be paired with various grout colors and finishes to create a unique and personalized look. Whether used in a traditional brick pattern or in a more intricate design, white fireplace tiles can create a stunning focal point in any room and can enhance the overall ambiance of the space. 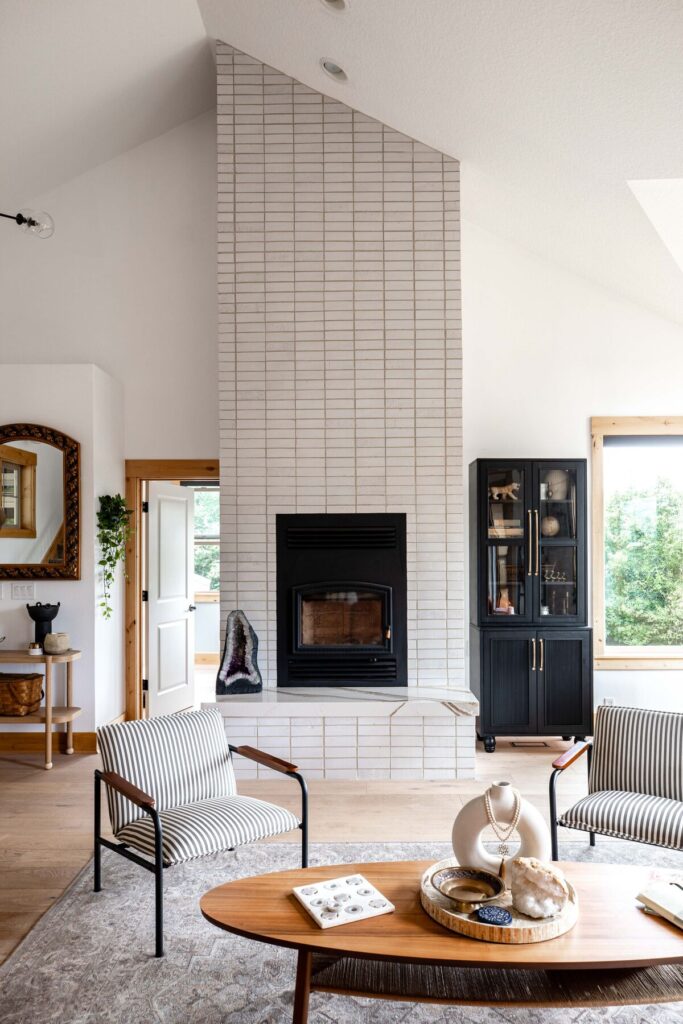
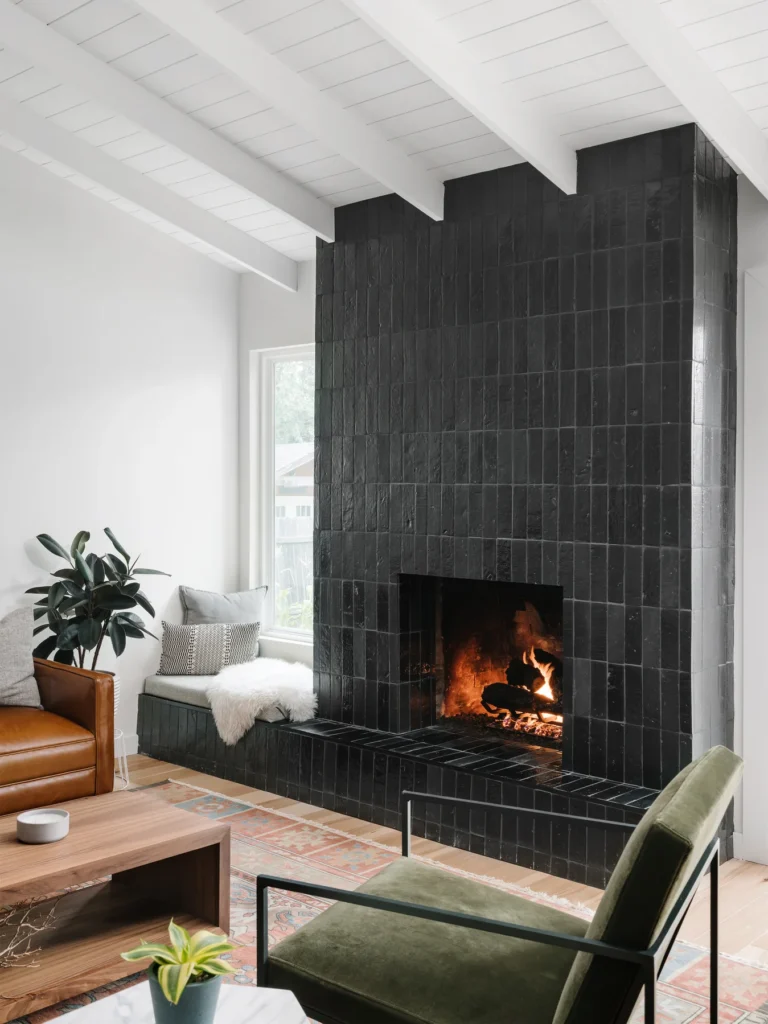
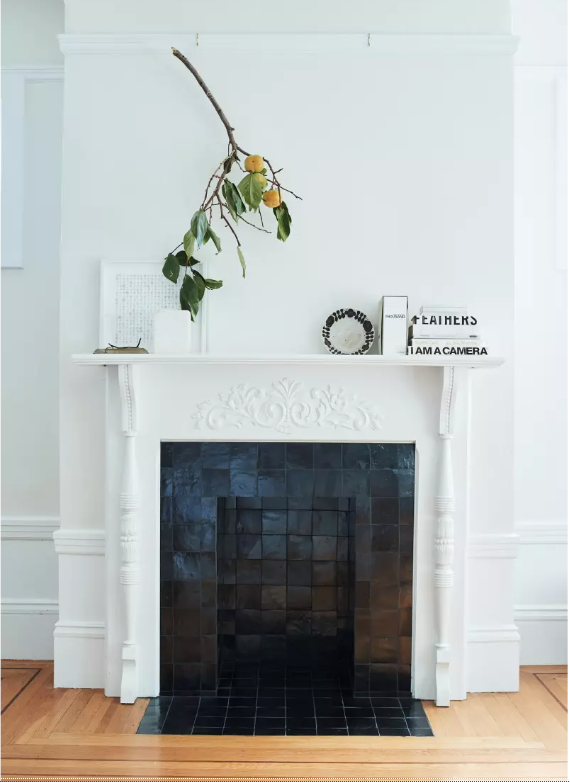
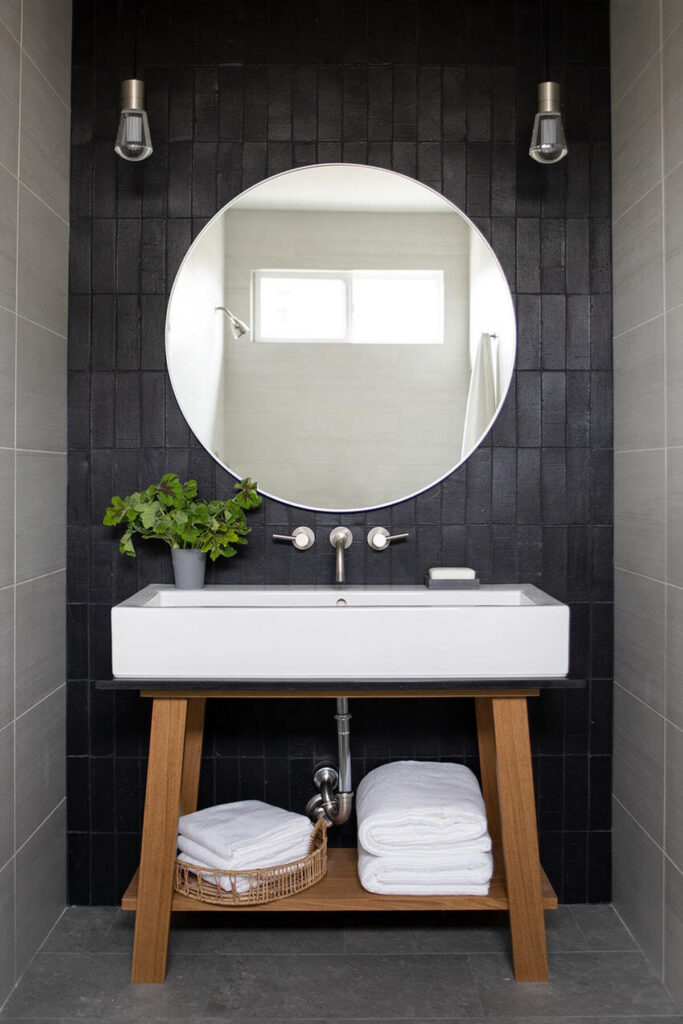
Black Fireplace TilesBlack fireplaces provide a striking contrast against the bright, warm flames of a fire, creating a dramatic focal point in any room. The tiles can be made of various materials, such as black marble, black tile, or black granite, and can be designed in a variety of styles, from minimalist to ornate. A black fireplace can add sophistication and elegance to a living space while also creating a cozy and inviting atmosphere. 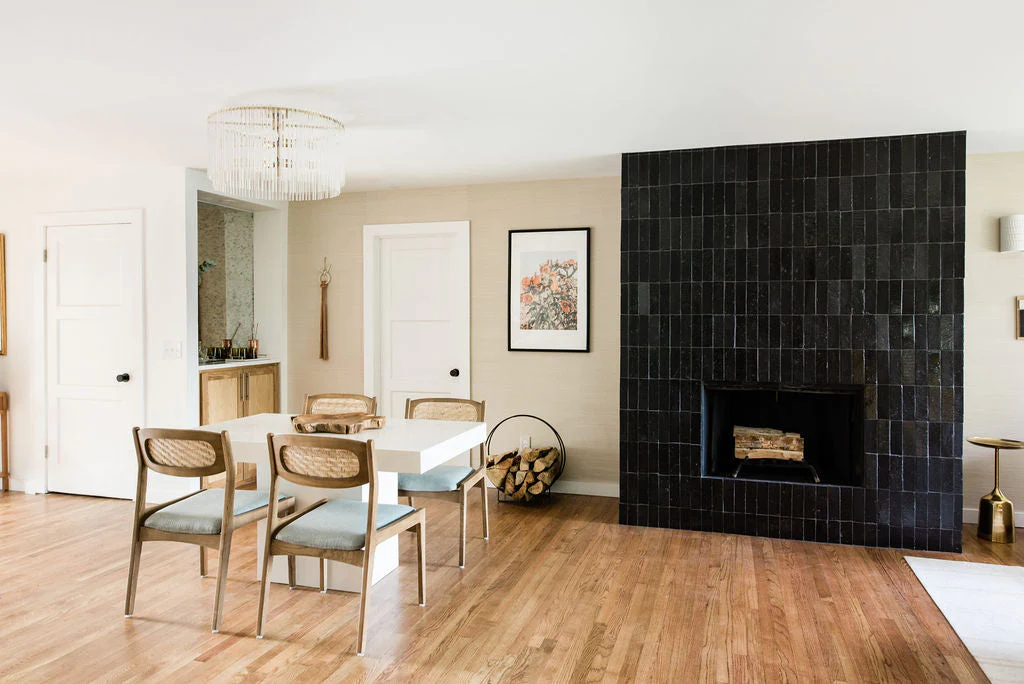
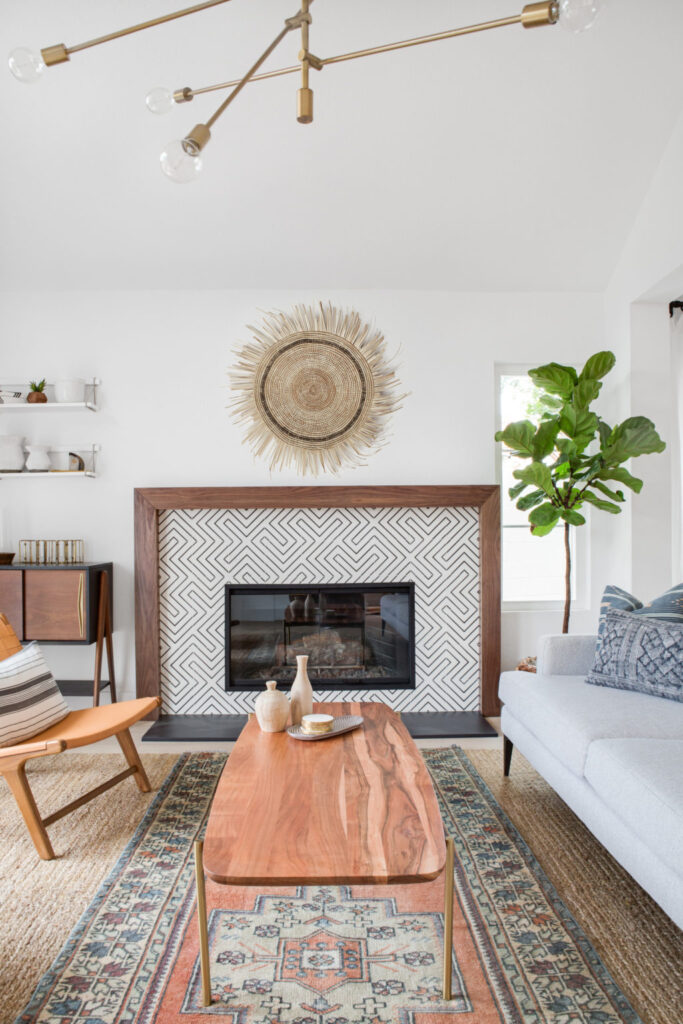
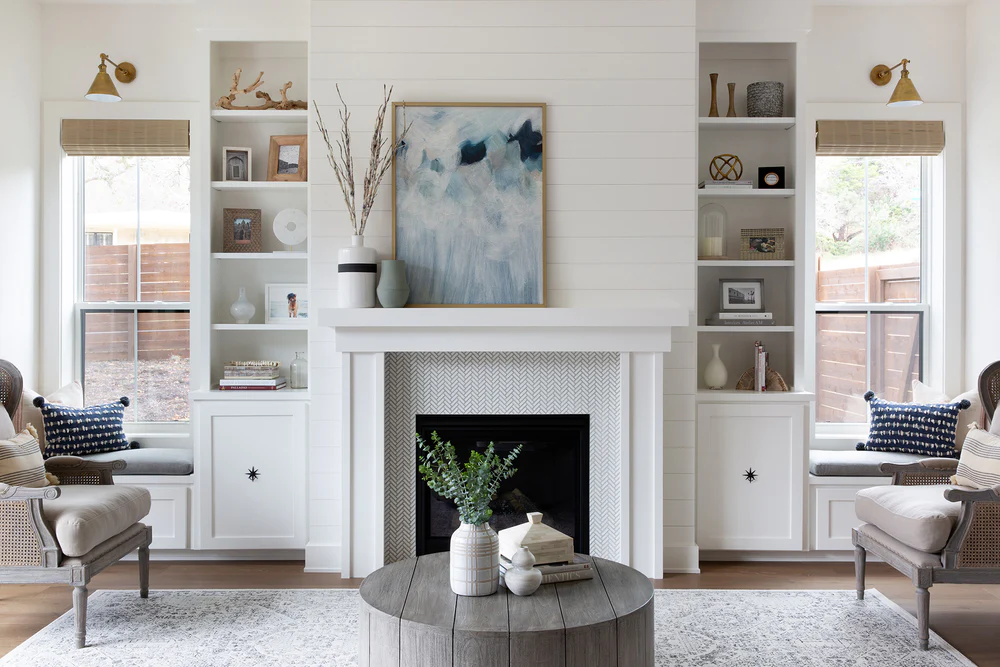
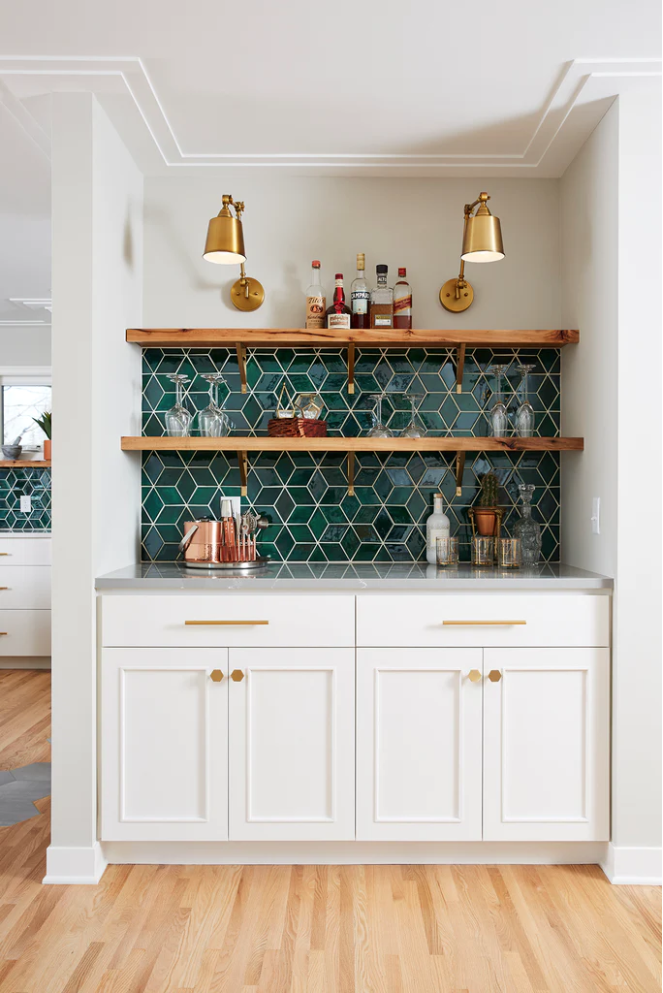
Herringbone Tile PatternsHerringbone fireplace tile patterns are a popular choice for those looking to add a touch of elegance and sophistication to their fireplace design. When applied to a fireplace, this pattern can add depth and dimension to the surface, creating a stunning visual effect. Whether used as a simple accent or as the main feature of a fireplace design, herringbone tiles can add a touch of timeless elegance to any space. 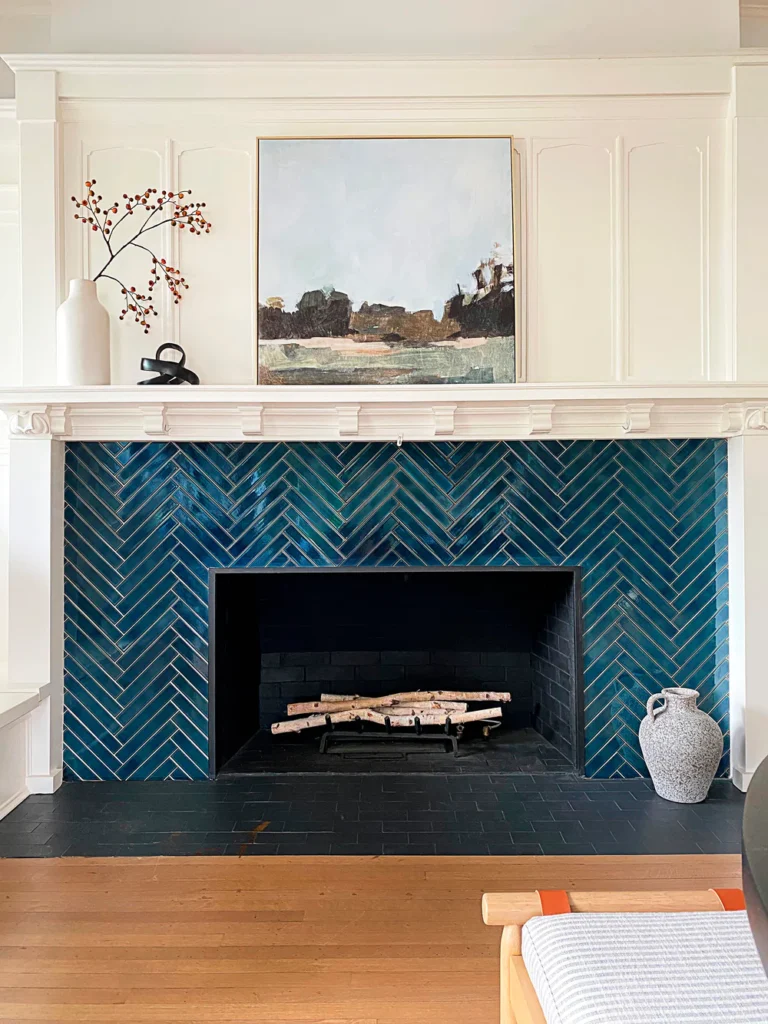
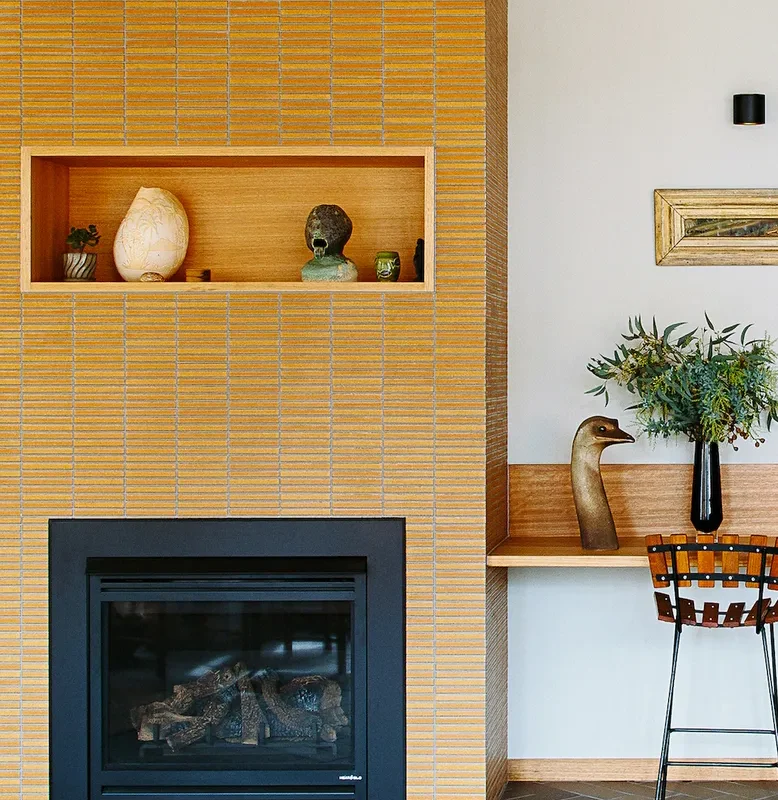
Mid-century TilesThe Mid-century modern design vibe is characterized by clean lines, bold colors, and geometric shapes, and these elements can be incorporated into fireplace tiles in various ways. Bold color choices such as avocado green, burnt orange, and mustard yellow were popular during this era and can be used to create a vibrant and eye-catching design. When combined with other mid-century modern elements such as sleek lines and minimalism, mid-century fireplace tiles can create a cohesive and stylish design that adds character and charm to any living space.
Firebox Tile DesignsThe firebox is the area of the fireplace where the fire is contained, and tiles used in this area must be heat-resistant to withstand high temperatures. Tiles used in the firebox area can be installed in various ways, such as a brick pattern or herringbone pattern, to create a unique and stylish design. Some popular options for firebox tiles include natural stone tiles, which can create a rustic and earthy feel, and metallic tiles, which can add a modern and industrial touch to the fireplace design. 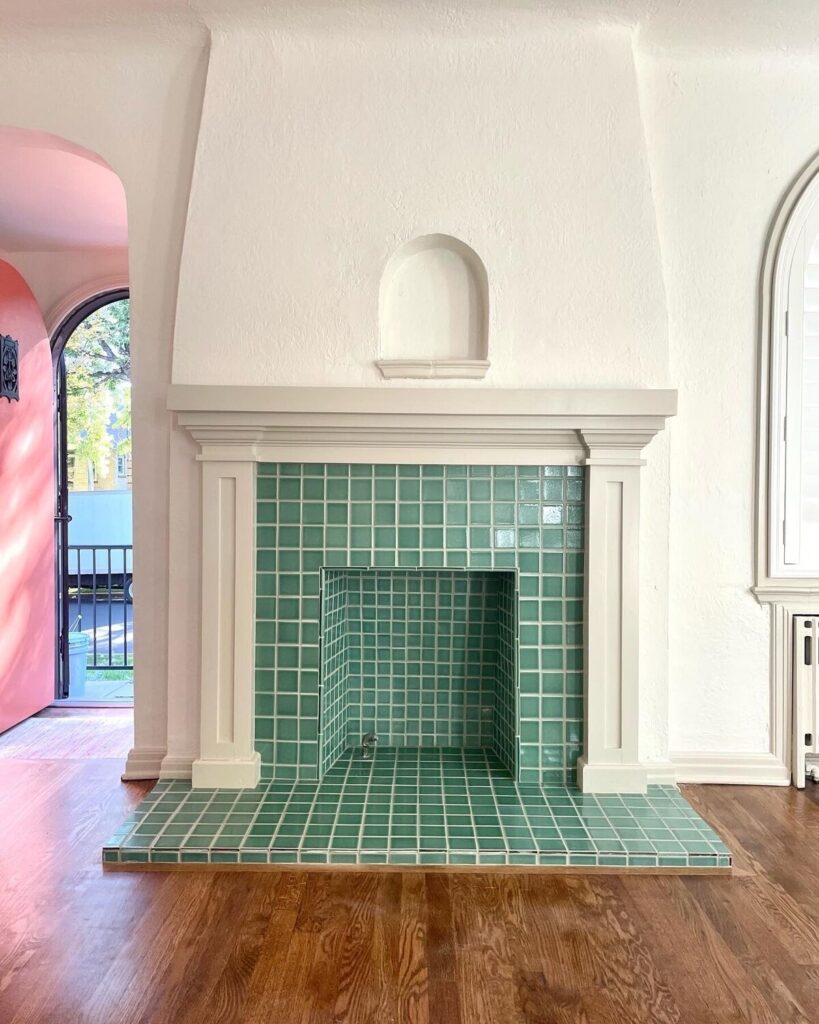
How to Choose Fireplace Tiles for Safety and DurabilityWhen it comes to using tiles for a fireplace installation, safety is a crucial consideration. Not all tiles are suitable for use in a fireplace, as they may crack, discolor or even release toxic fumes when exposed to high temperatures. Here are some steps you can take to ensure that the tiles you’re using are safe for a fireplace installation:
In summary, when choosing tiles for a fireplace installation, it’s important to look for tiles that are rated for high temperatures, made of non-combustible materials, designed for fireplaces, comply with local building codes, and installed by a professional. By taking these steps, you can ensure that your fireplace tiles are safe and will provide years of enjoyment. More Fireplace Ideas from Curbly
The post Get Inspired with These Cosy Fireplace Tile Ideas appeared first on Curbly. Via https://www.curbly.com/get-inspired-with-these-cosy-fireplace-tile-ideas 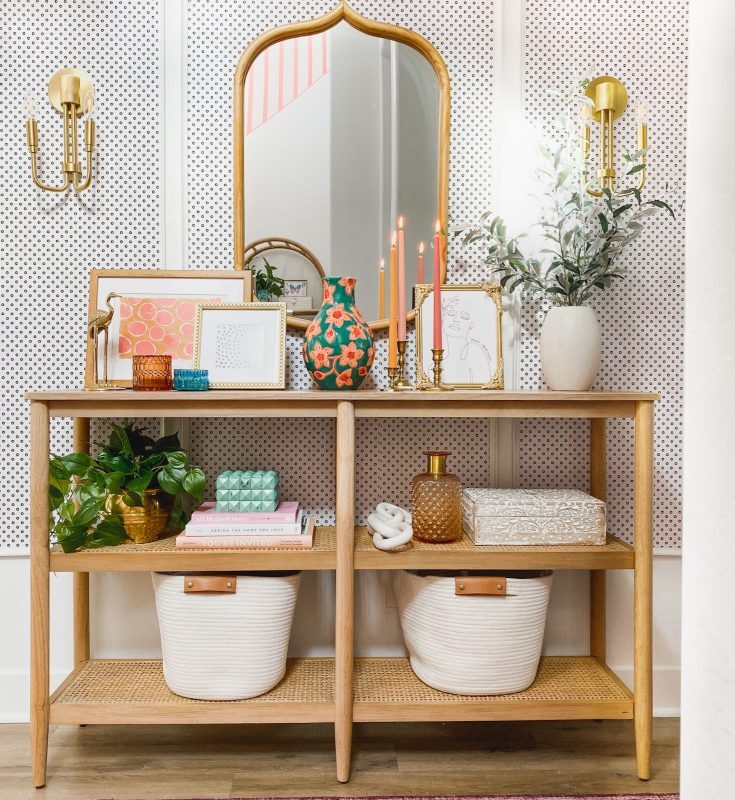
Have you ever been in a room where one wall stands out from the rest? Chances are, that wall was an accent wall. These walls are designed to draw attention and provide a focal point for the overall design of your space. Accent walls can add texture, color, or pattern to any room in your home and can be used to create a unique look that stands out and expresses your personal style. Let’s explore some accent wall ideas and inspiration for your home. Table of contentsPainted Accent Walls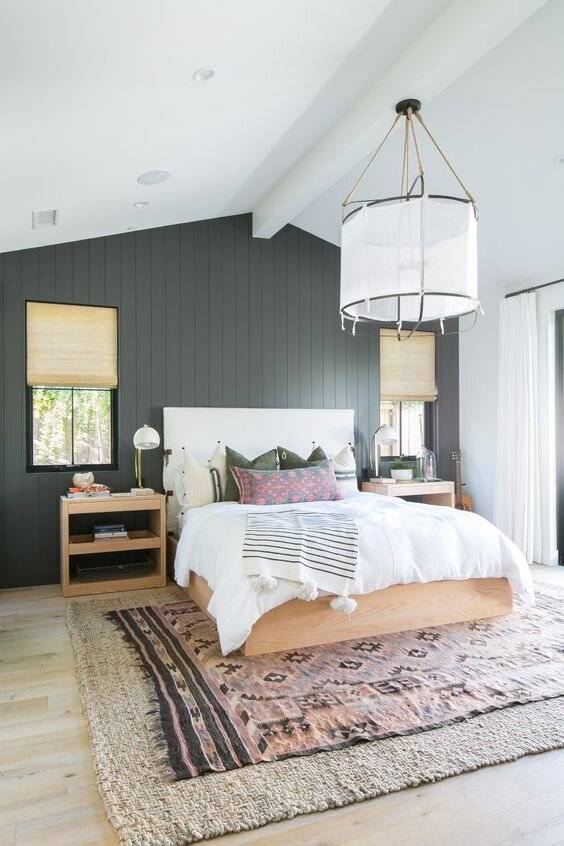
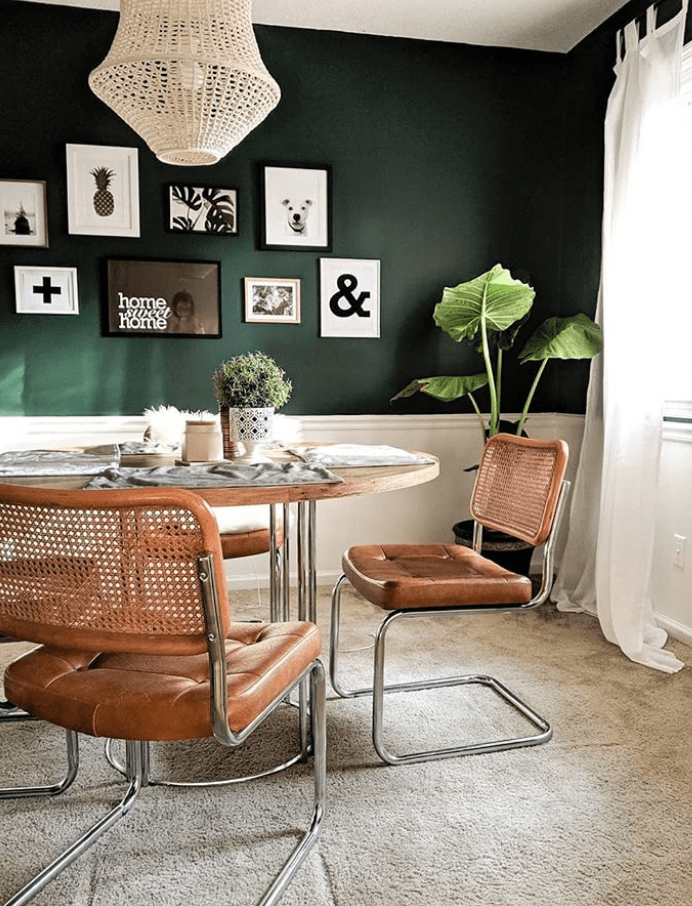
A surefire way to make an impact with your accent wall is to use paint. Painting one wall in an eye-catching hue is a great way to instantly change the look of any room. Whether you choose a vibrant color or more subtle shades, painting will instantly make your accent wall stand out from the rest of the room. If you’re feeling extra daring, why not try a two-tone effect with contrasting colors or paint one half of the wall with vertical stripes? The possibilities are endless when it comes to painting! Wallpaper Wonders
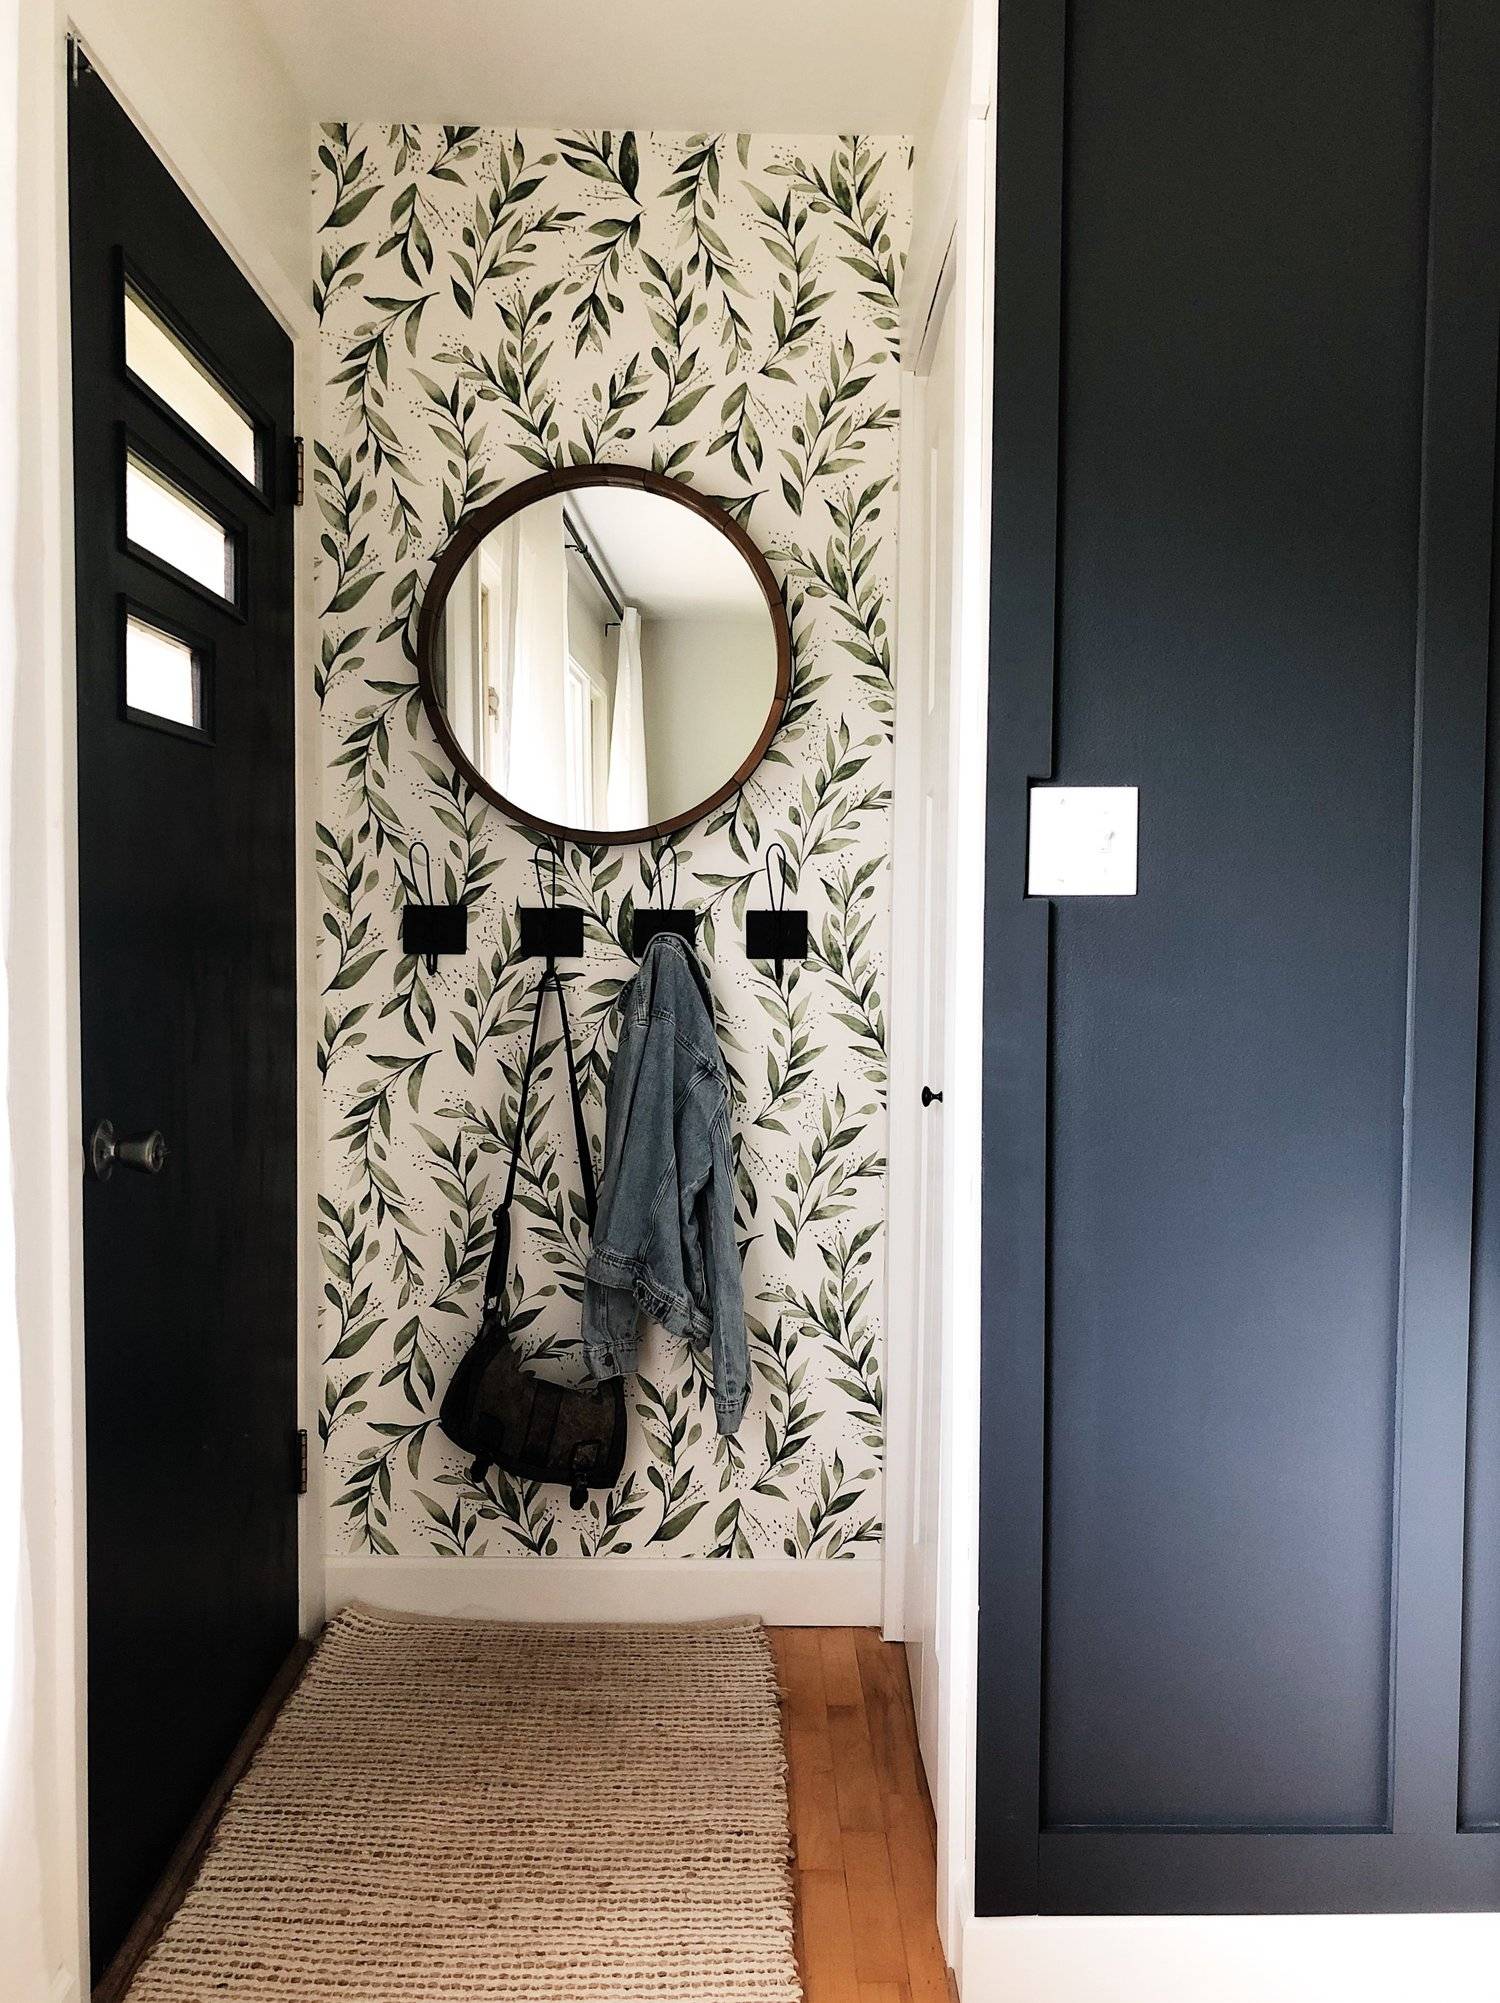
Another great way to bring life into any room is wallpaper. Wallpaper can be used on just one wall as an accent piece or all four walls if desired. With so many different patterns, colors, and textures available these days, wallpaper can be used to create any look imaginable—from classic and elegant designs to bold and modern ones. Plus, there’s no need for extensive preparation as most types of wallpaper come with self-adhesive backing that makes installation easy and mess-free! If you’re a renter, make sure your stick wallpaper also peels off, not all do! Use Your Ceiling as an Accent Wall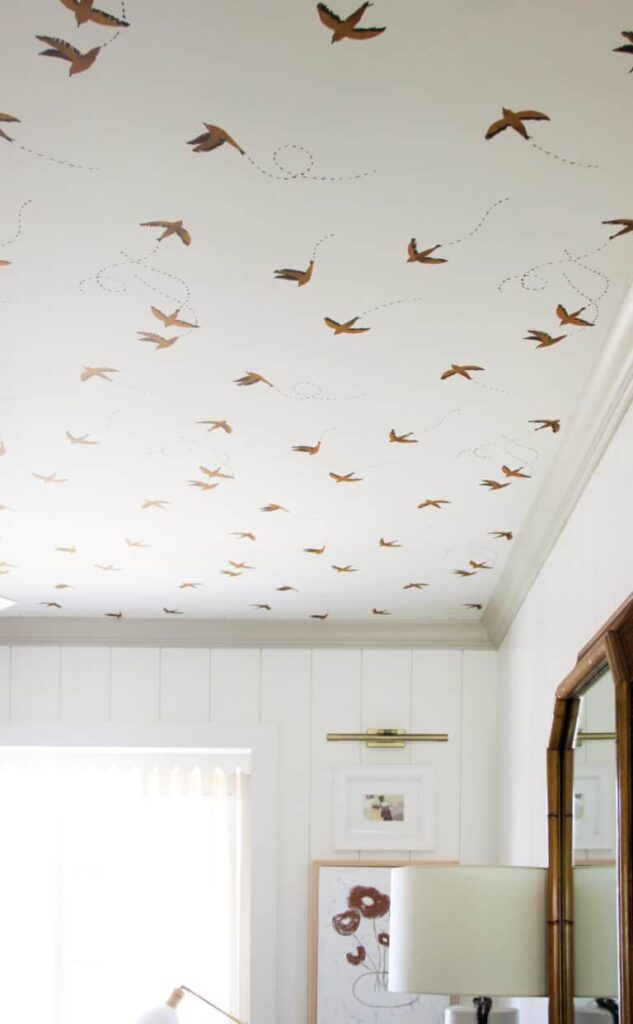
When it comes to accent walls, most people focus on painting or decorating a single wall in a room. However, using your ceiling as an accent wall is a unique and creative way to add visual interest and personality to a space. A painted or patterned ceiling can create a stunning visual effect and draw the eye upward, making the room feel more spacious and inviting. It can also be a great way to highlight architectural details or add an unexpected element of surprise to a room. Tile Textured Accent Wall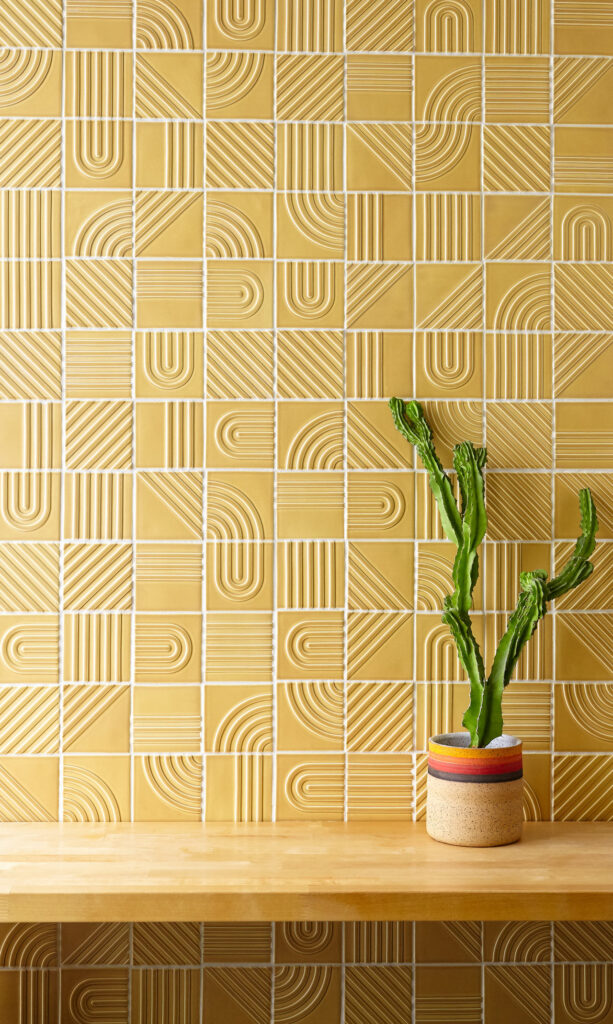
Adding tile or other textured materials to one wall can give your home an instant upgrade without breaking the bank. Tiles are available in various shapes and sizes which means you have plenty of options when it comes to creating the perfect look for your space—whether it’s a rustic feel with natural stone tiles or something more modern with geometric shapes like hexagons or chevrons! And if tiles aren’t quite what you had in mind, wood panels offer a timeless alternative that never goes out of style. Wood Paneled Accent Wall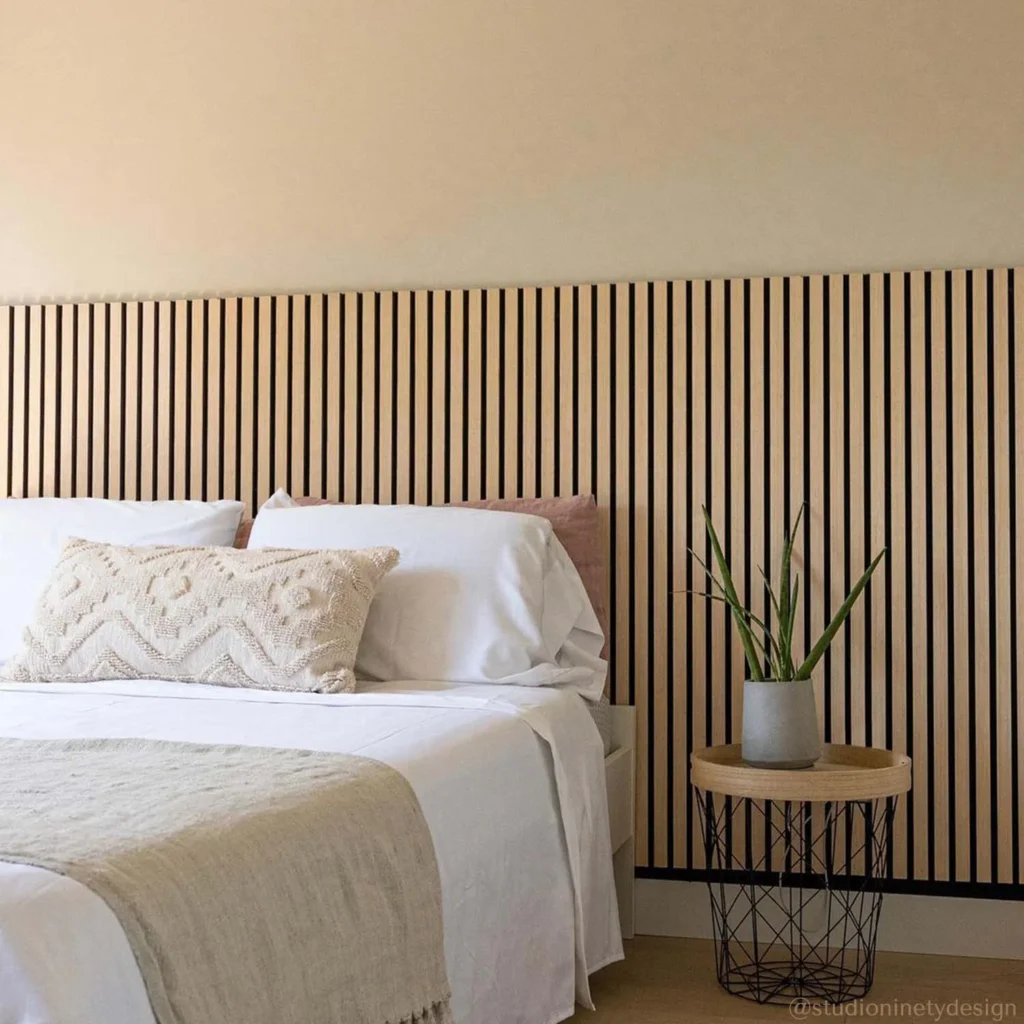
Wood paneling can add warmth, dimension, and texture to any room, making it a popular choice for accent walls. You can use reclaimed wood, shiplap, or other types of wood paneling to create a rustic or modern look. Wood paneling can also be painted or stained to match the existing decor in the room. Wood paneling is also the perfect option for creating a headboard like effect in your bedroom, like the example above from Andor Willow, adding a nice texture to a bedroom with neutral colors. Gallery Wall Art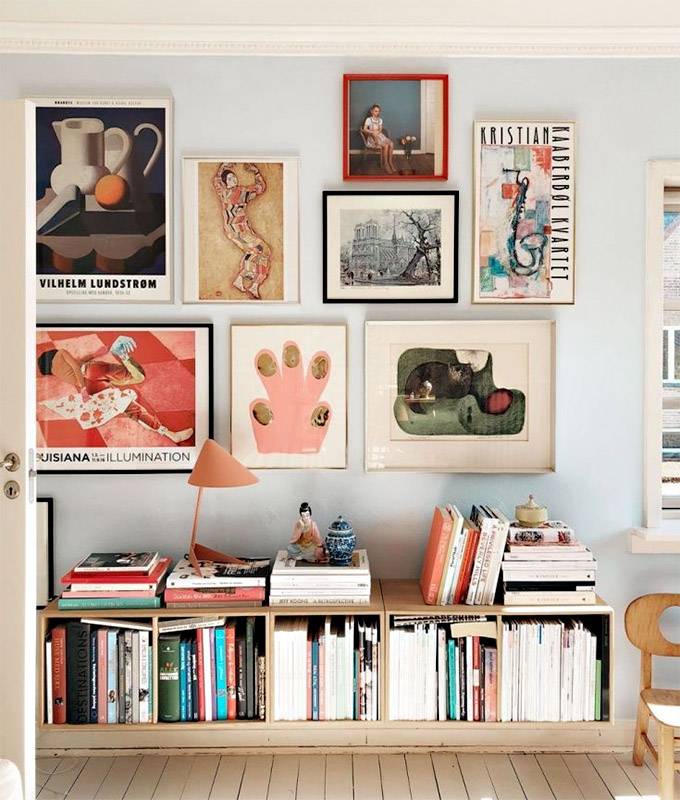

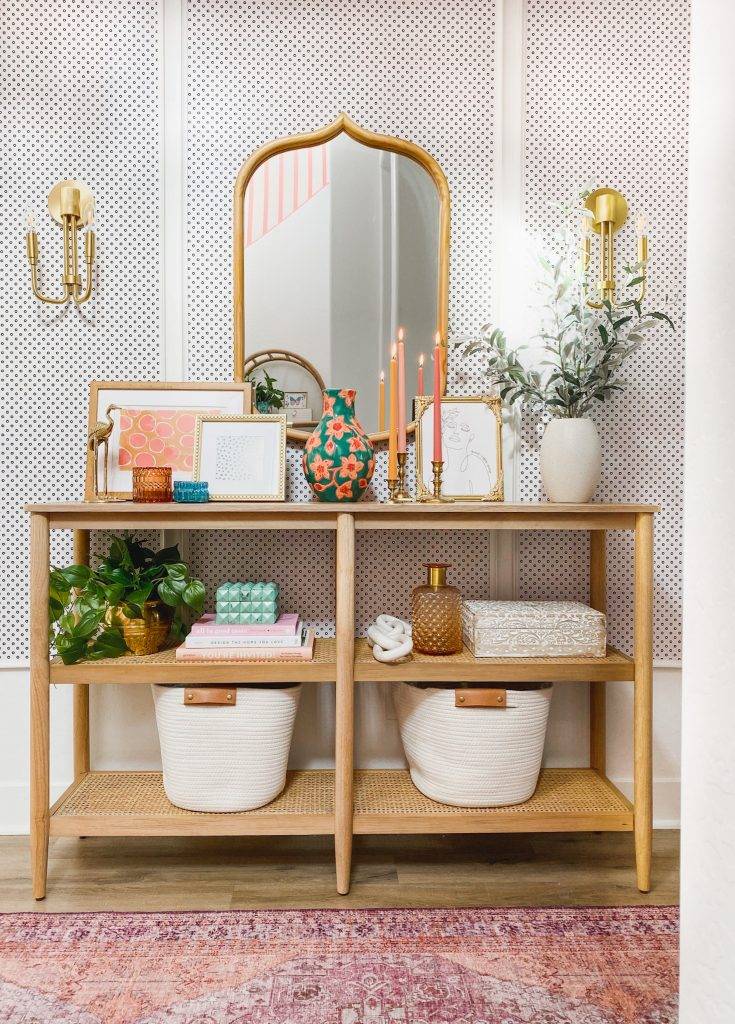
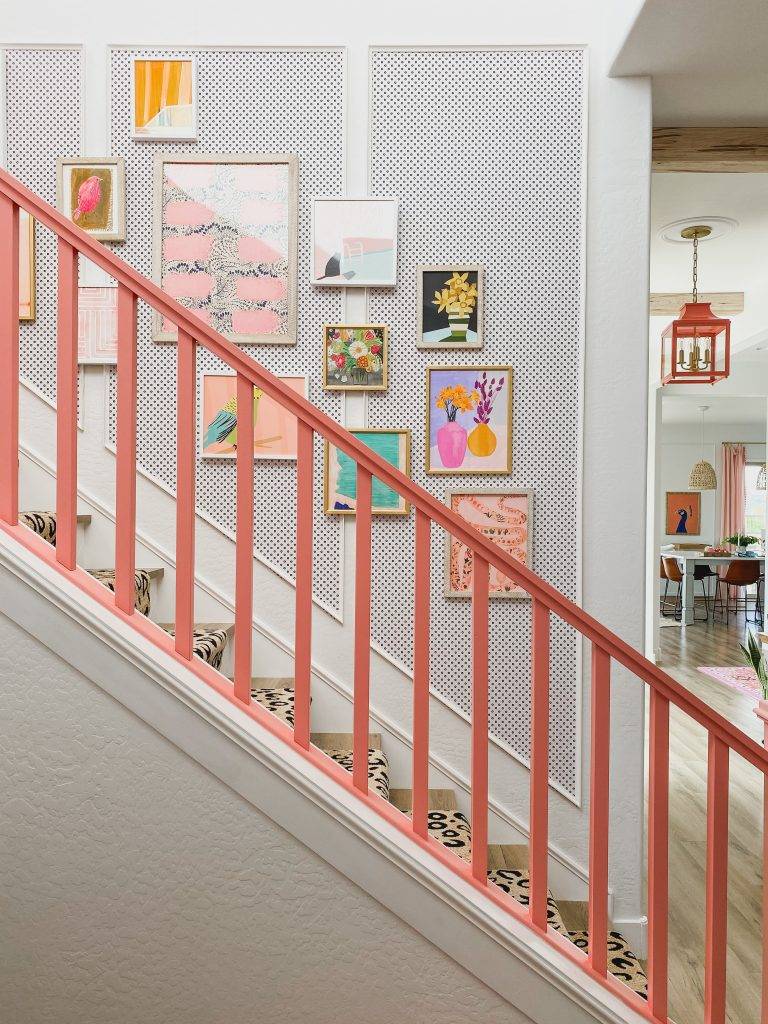
A gallery wall is one of our favorite accent wall ideas and is a great way to showcase your personality and interests while creating an accent wall. You can hang photos, artwork, and other decorative items in a collage-like arrangement to create a statement wall in any room of your house, from living room to bathroom. You can also mix and match different frame styles and sizes to create a unique and eye-catching display. Wall decor is perfect for renters and homeowners alike! Bold Patterns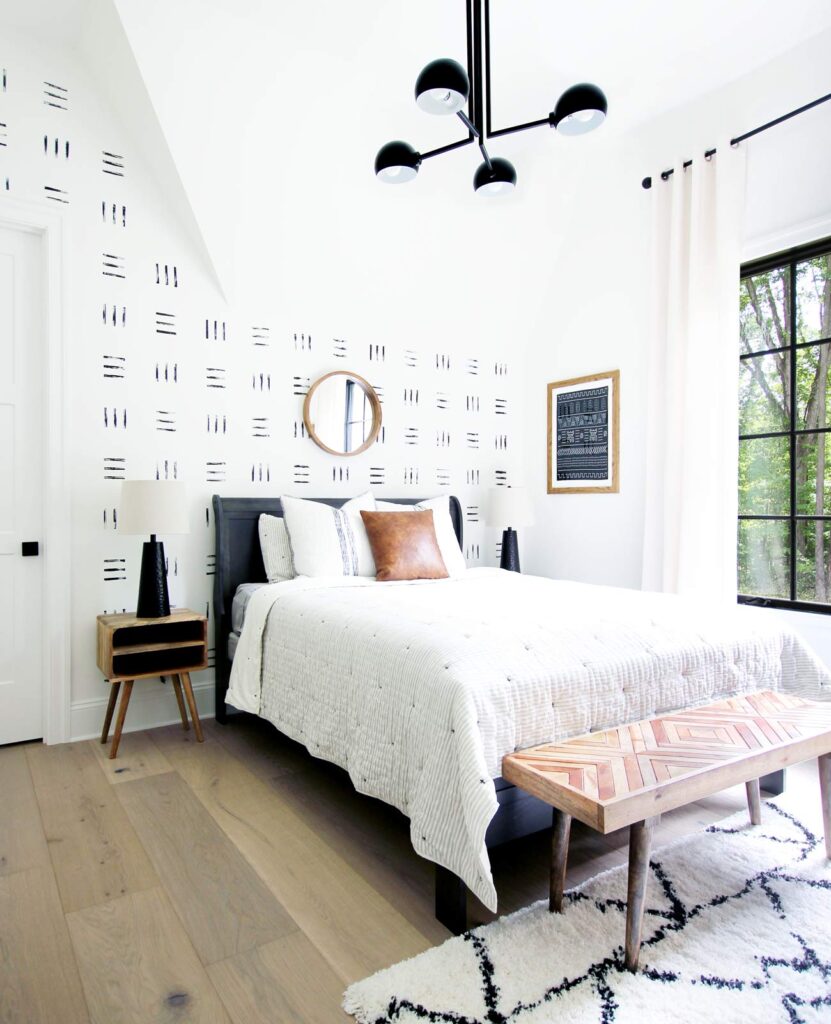

Finally, consider using bold patterns to transform your white walls and create an accent wall in your home. You can use patterned wallpaper, stencils, or even create your own patterns using paint or tape. Bold patterns can add a fun and playful touch to your home, and they’re a great way to showcase your creativity and design skills. When done right, an accent wall can truly transform any room in your home. There are so many creative possibilities when it comes to creating an eye-catching design—from paint colors and wallpaper patterns to tile shapes and textures—that will bring character and personality into any space! Whether you opt for something bold like two-tone paint effects or something more subtle like wood panels, adding an accent wall is always worth considering when looking for ways to spruce up your home interior design. Hope you enjoyed this roundup of some of our favorite accent wall ideas! Looking for more accent wall ideas?
The post 20 Accent Wall Ideas To Add Character To Your Home appeared first on Curbly. Via https://www.curbly.com/20-accent-wall-ideas-to-add-character-to-your-home 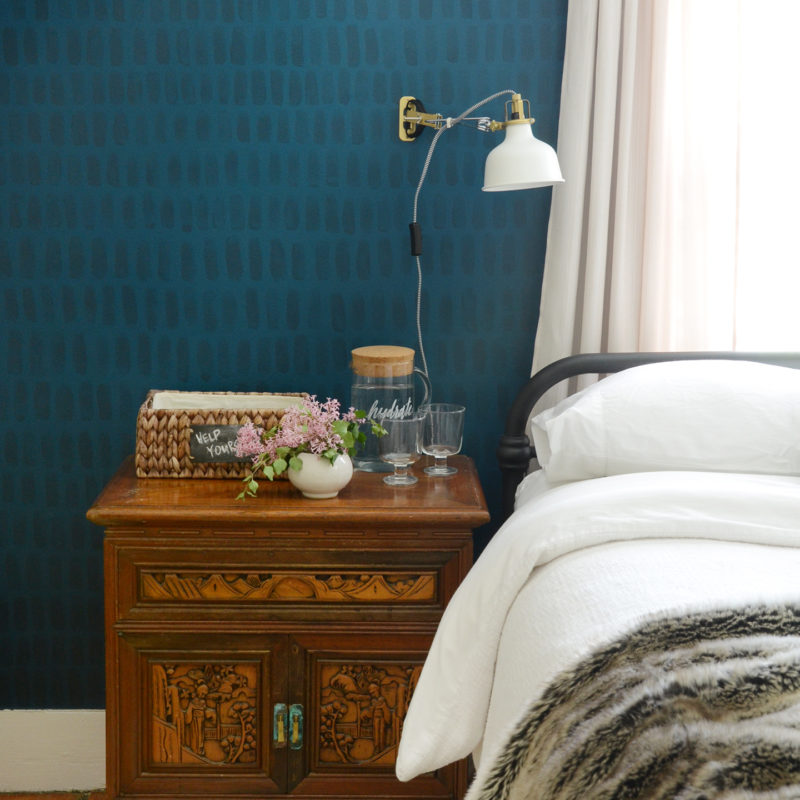

Your bedroom is your personal sanctuary, so why not make it stand out with an accent wall? This budget-friendly how-to for painting an accent wall in your bedroom is the easiest way to add a touch of personality and style to your space without all the fuss and expense of wallpaper. Whether you’re looking for a way to refresh your space or create a cozy atmosphere, an accent wall can make all the difference. We added this accent wall design to our bedroom, where dark walls are relaxing, but you could you this same treatment in pastels or brighter colors in any other room in your house. So grab your paintbrush and get inspired! Materials
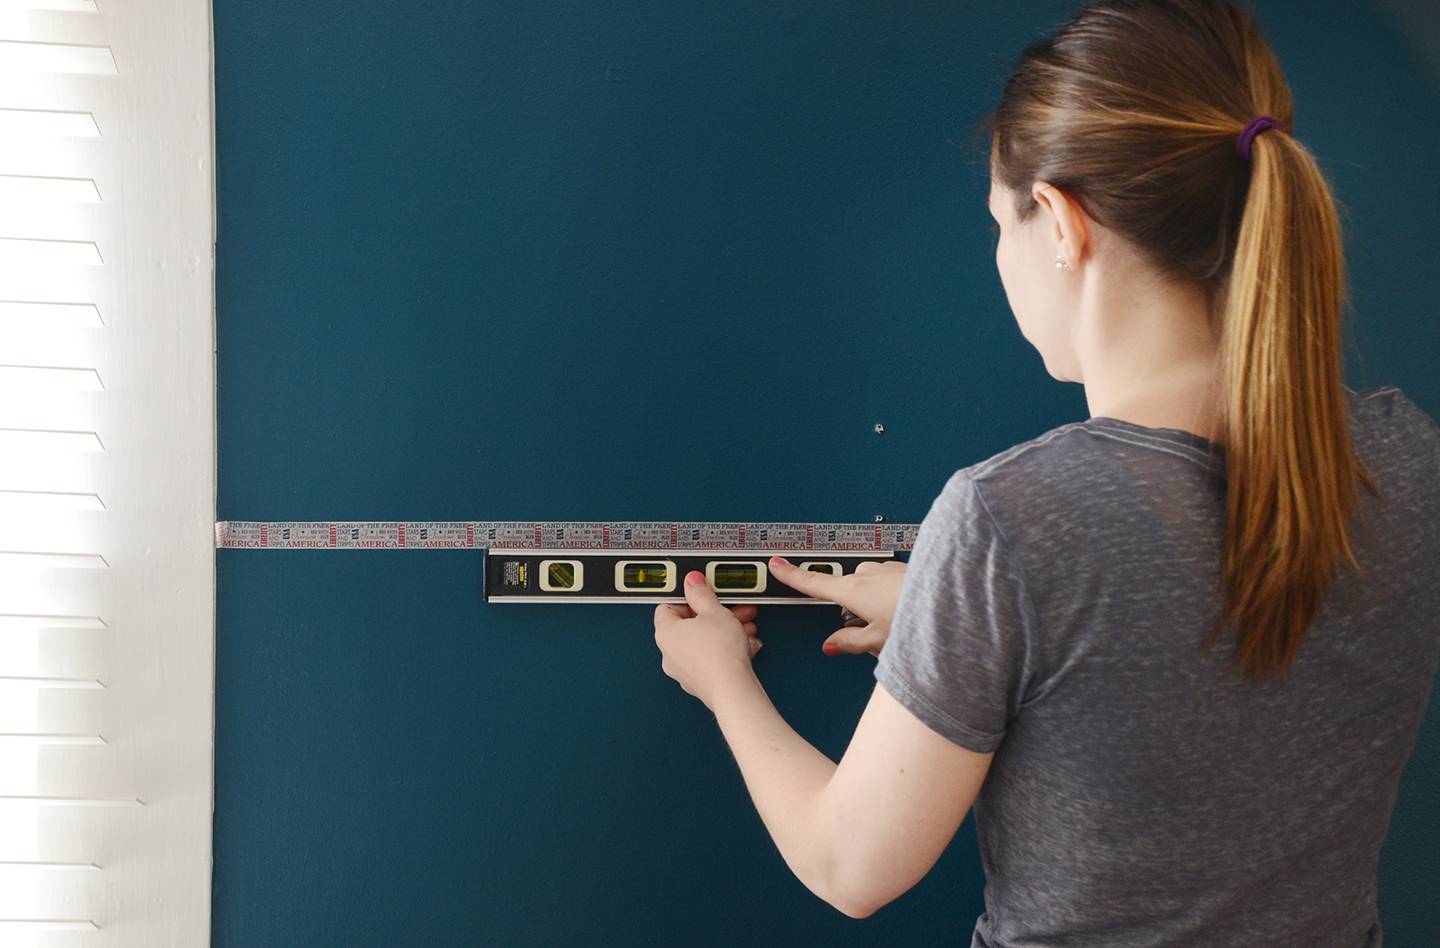
How to Make a Hand-Painted Brushstroke Accent WallThe textures and shades of this bedroom accent wall are for a minimal and relaxing vibe, but feel free to make it your own with different colors or hues for any room in your house, from living room to dining room or your home office. Step 1Begin by stretching a piece of washi tape across the wall, somewhere in the middle. Attach it lightly, and then use a level to make sure it is straight. 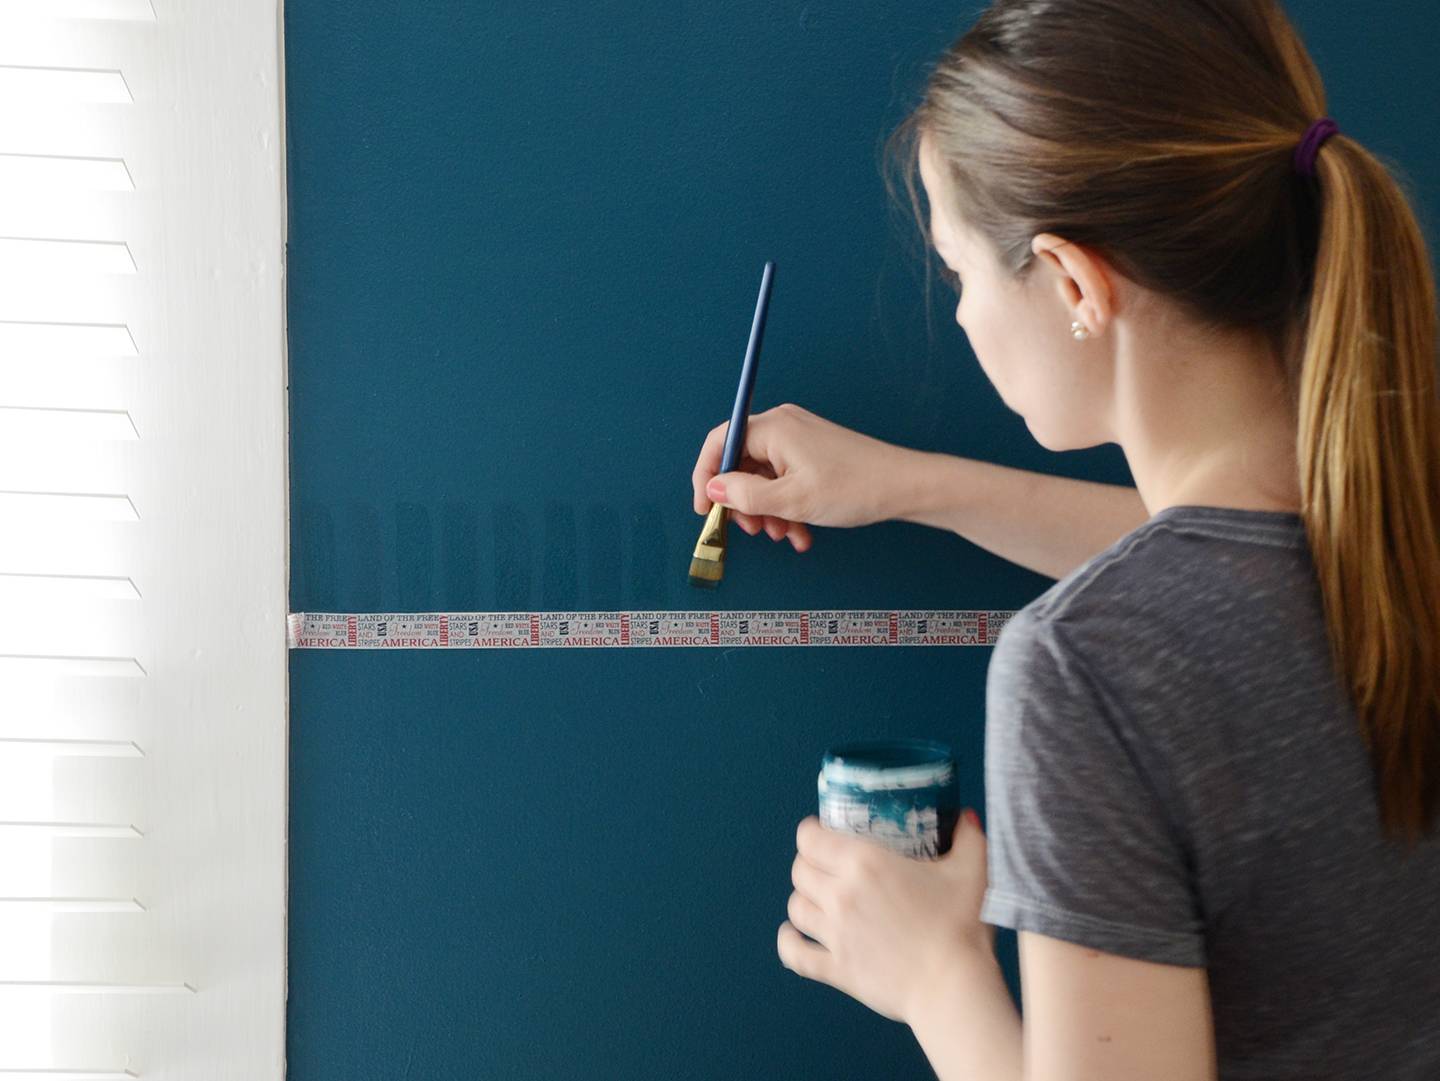
Step 2Next, mix a small amount of black with your wall color. I used about a 1 to 10 ratio of black to blue. Mix it up really well and test it in an inconspicuous area. Let it dry and see how you like the color. Mine looked almost the same as the original color when wet, but dried darker. Once you’ve decided on your color, begin making brush strokes above the tape. They should be about 3 inches tall, and I had the best luck going from bottom to top. 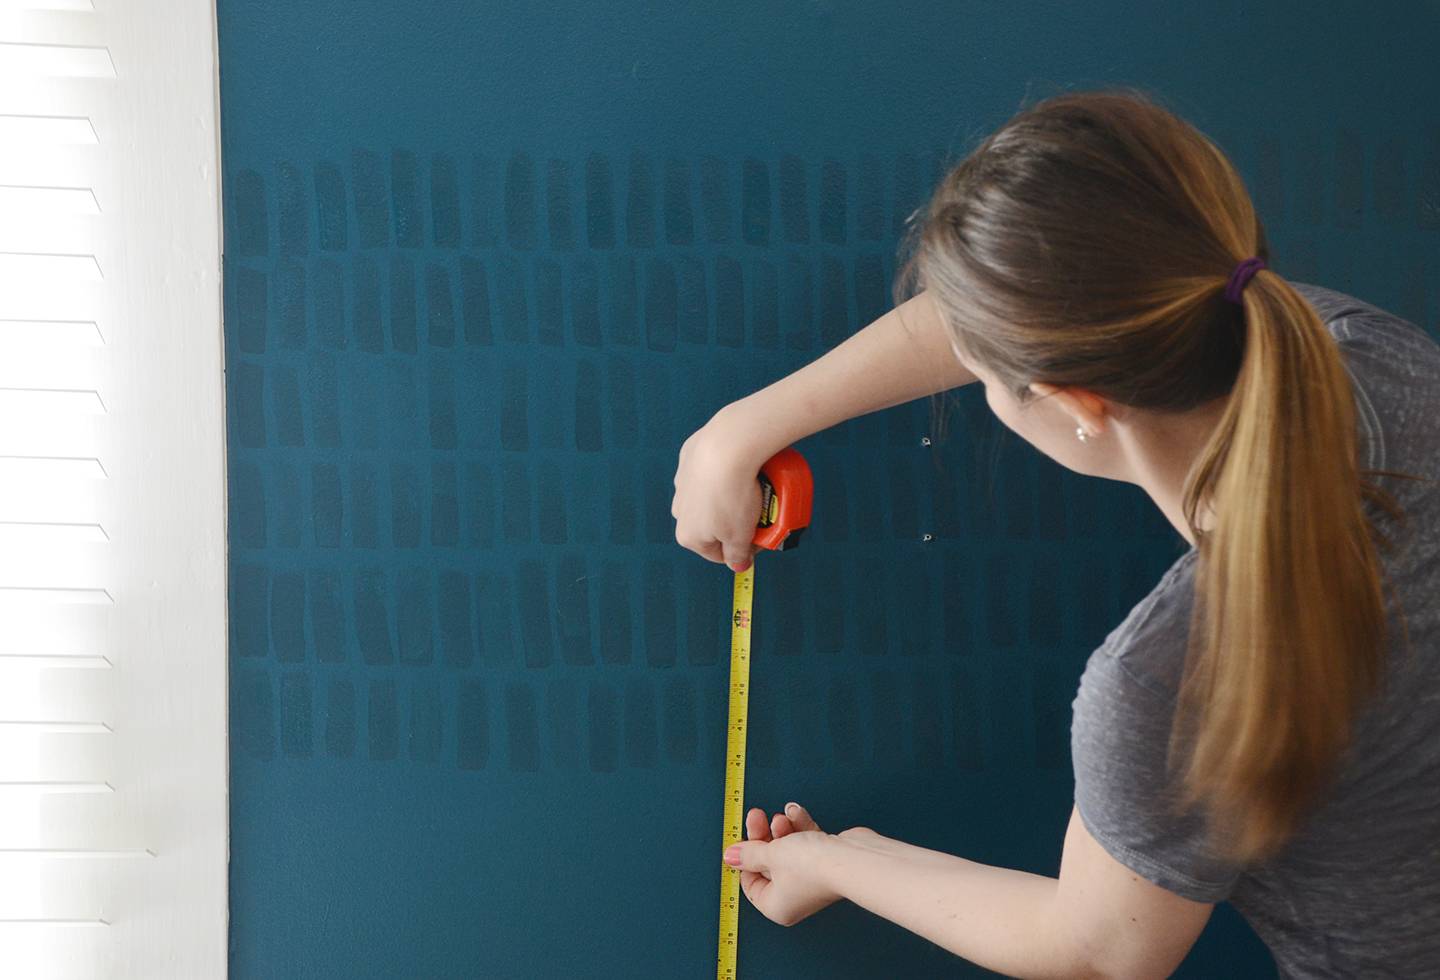
Step 3Continue painting all the way across the wall, and then do additional rows below. You can apply the tape each time if you want to let each row dry in between, but I was going for a more casual look so I did it freehand. I periodically measured up to the bottom of one side of the row and compared it with the other side of the same row to make sure I wasn’t going diagonally instead of straight across. 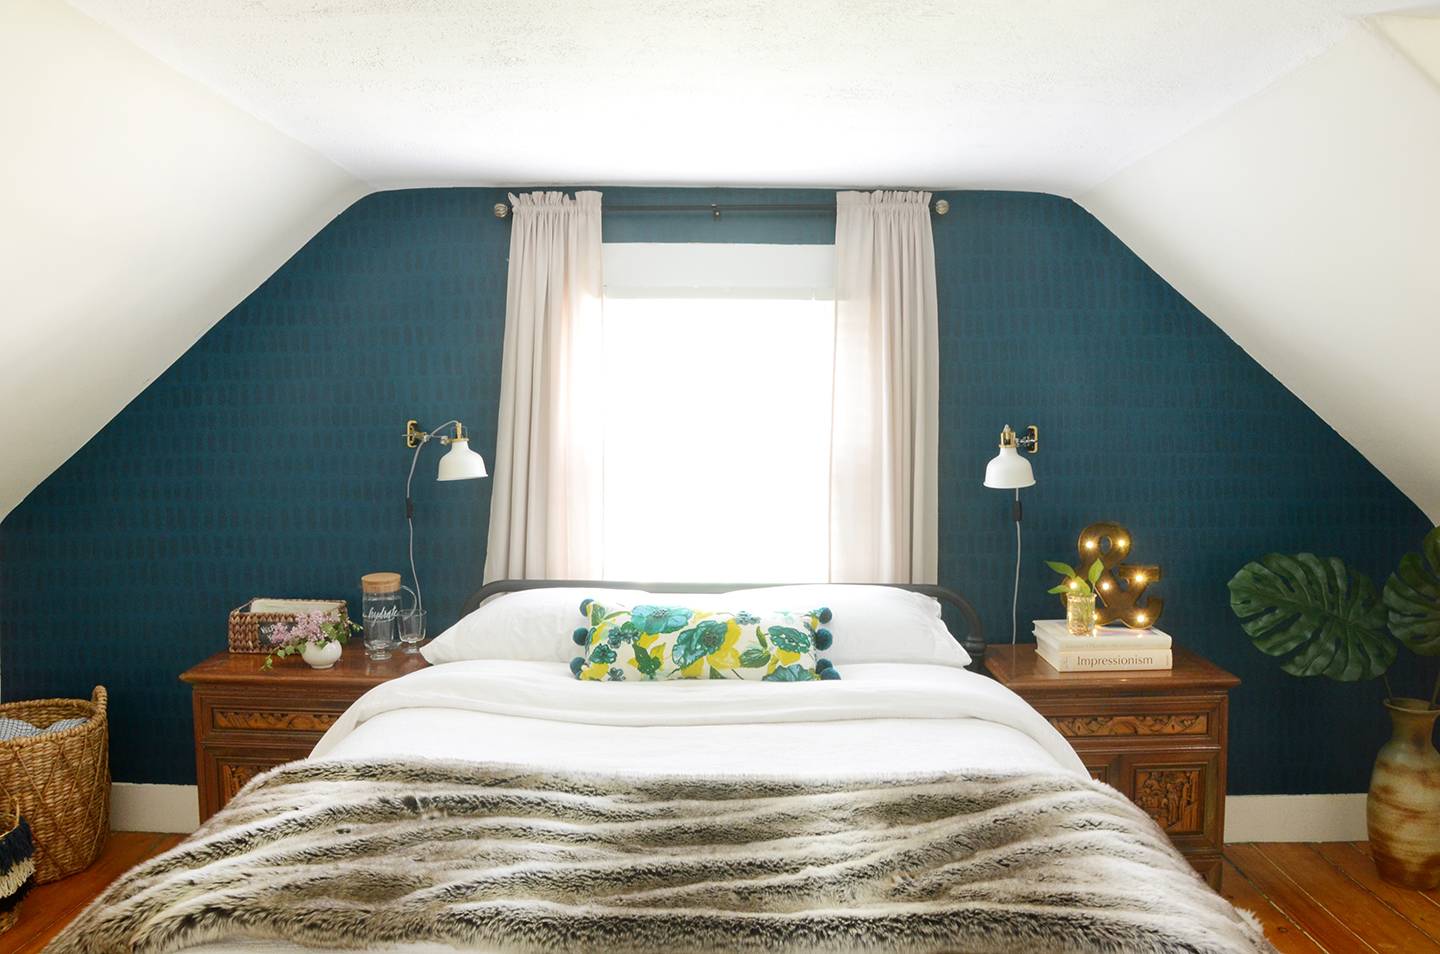
Continue on until you’ve finished your entire wall, and voilà – you have a fun patterned accent wall that will add some serious character to your space. 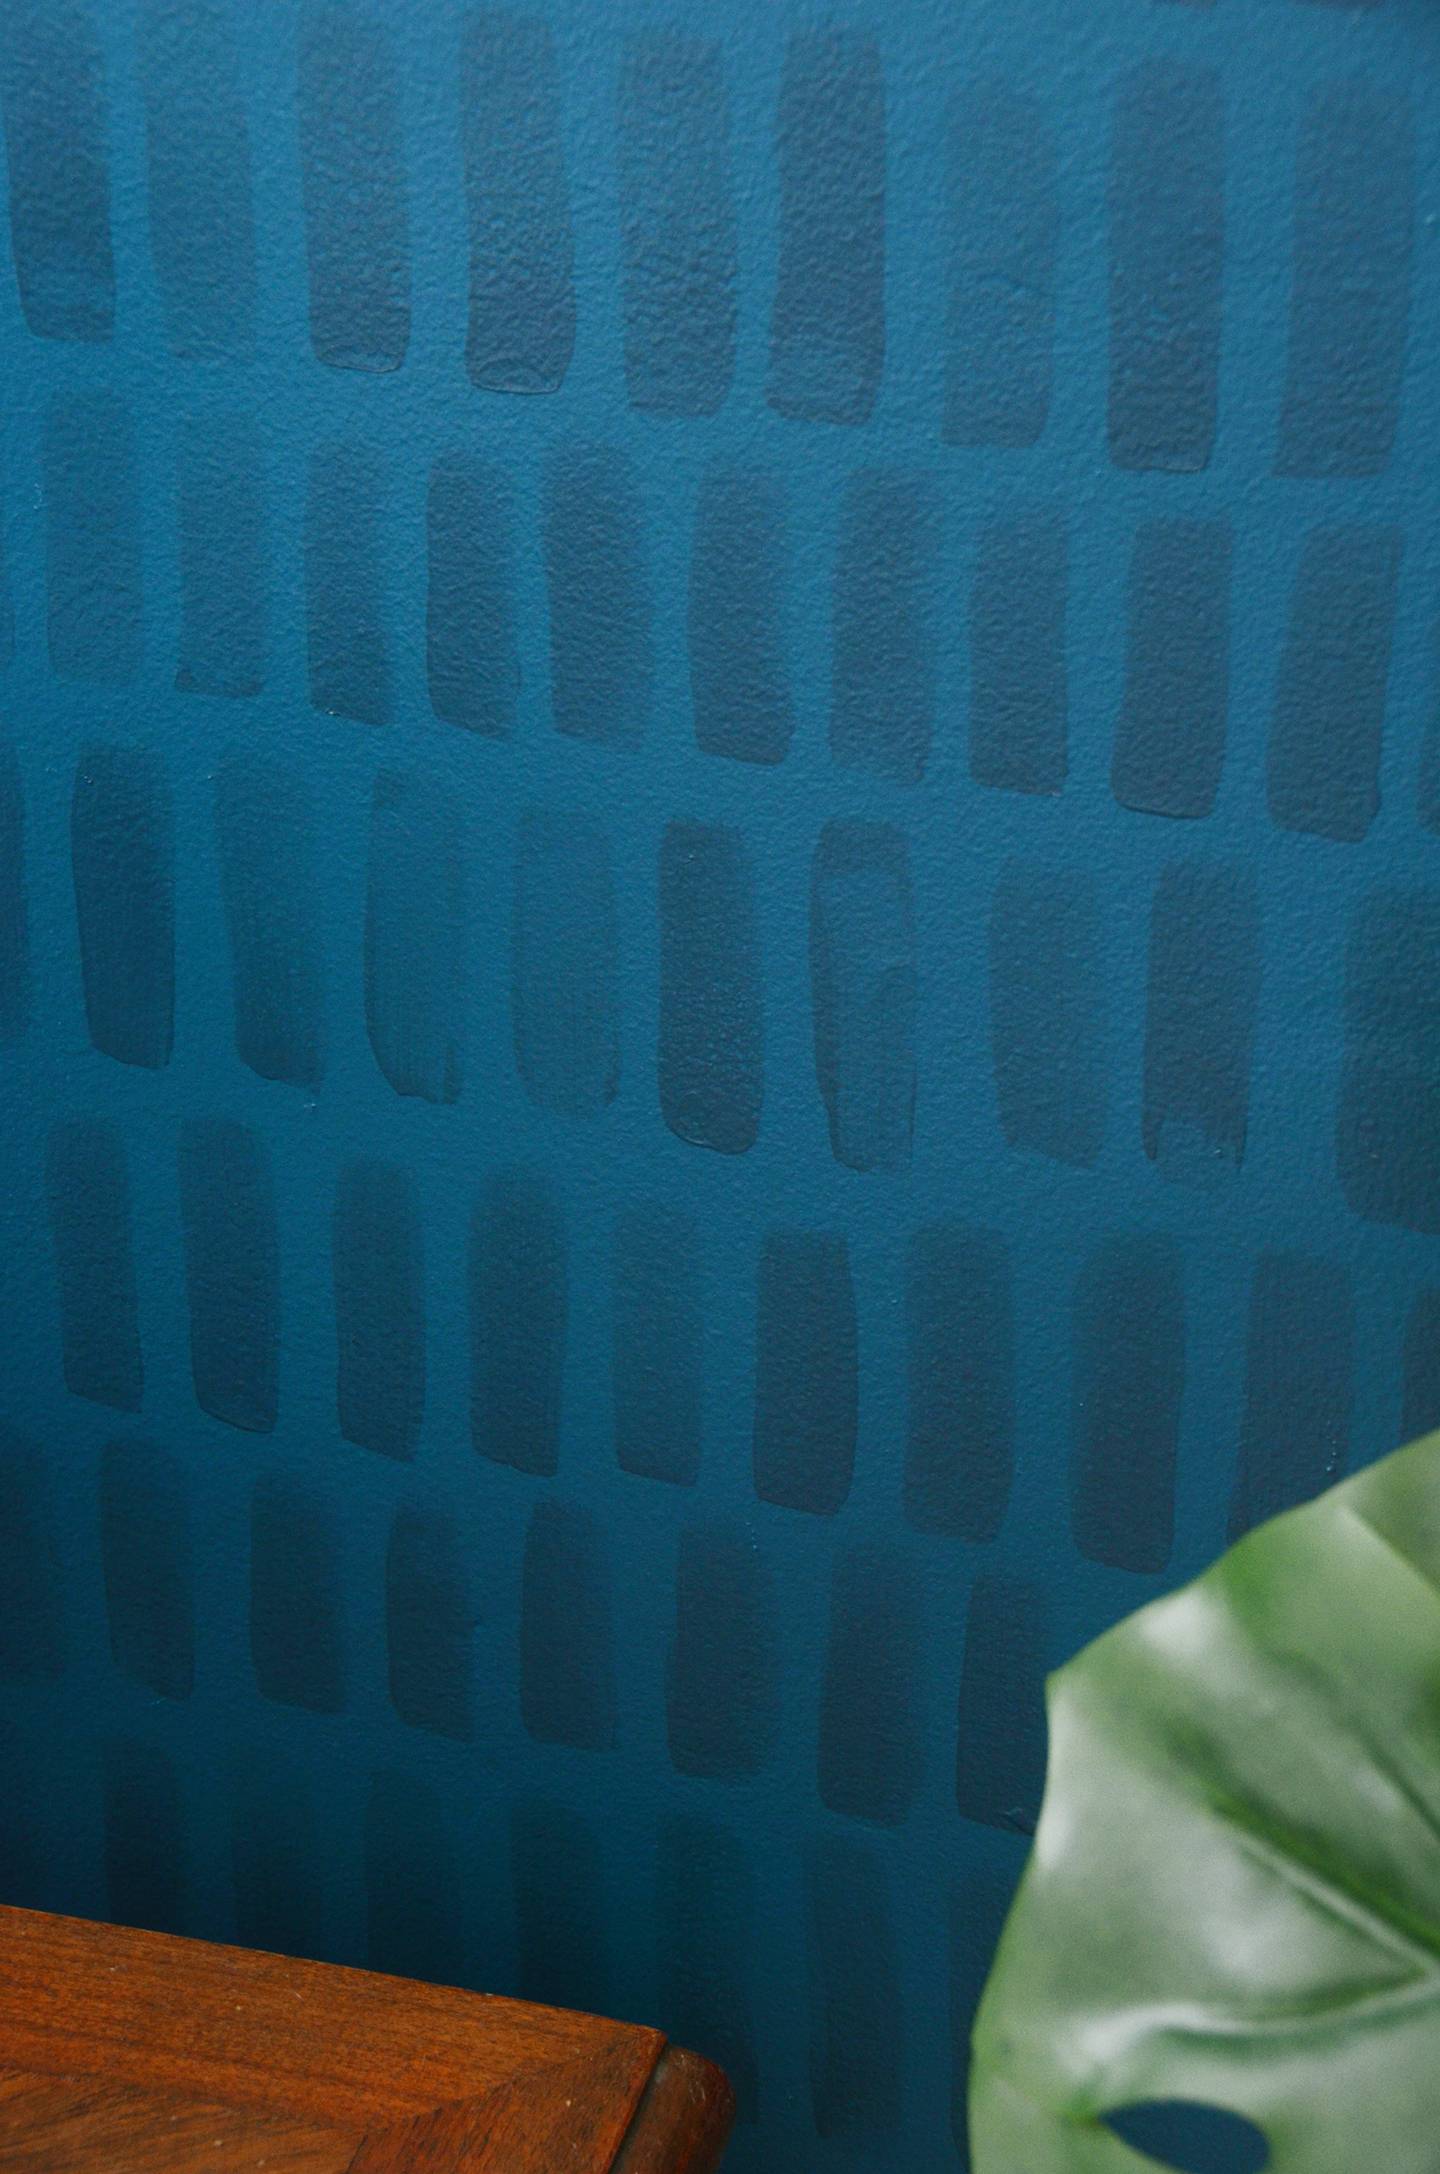
The strokes are not perfect, but that’s what I like about it… it has that hand painted feel that’s so popular these days, but on a large scale. 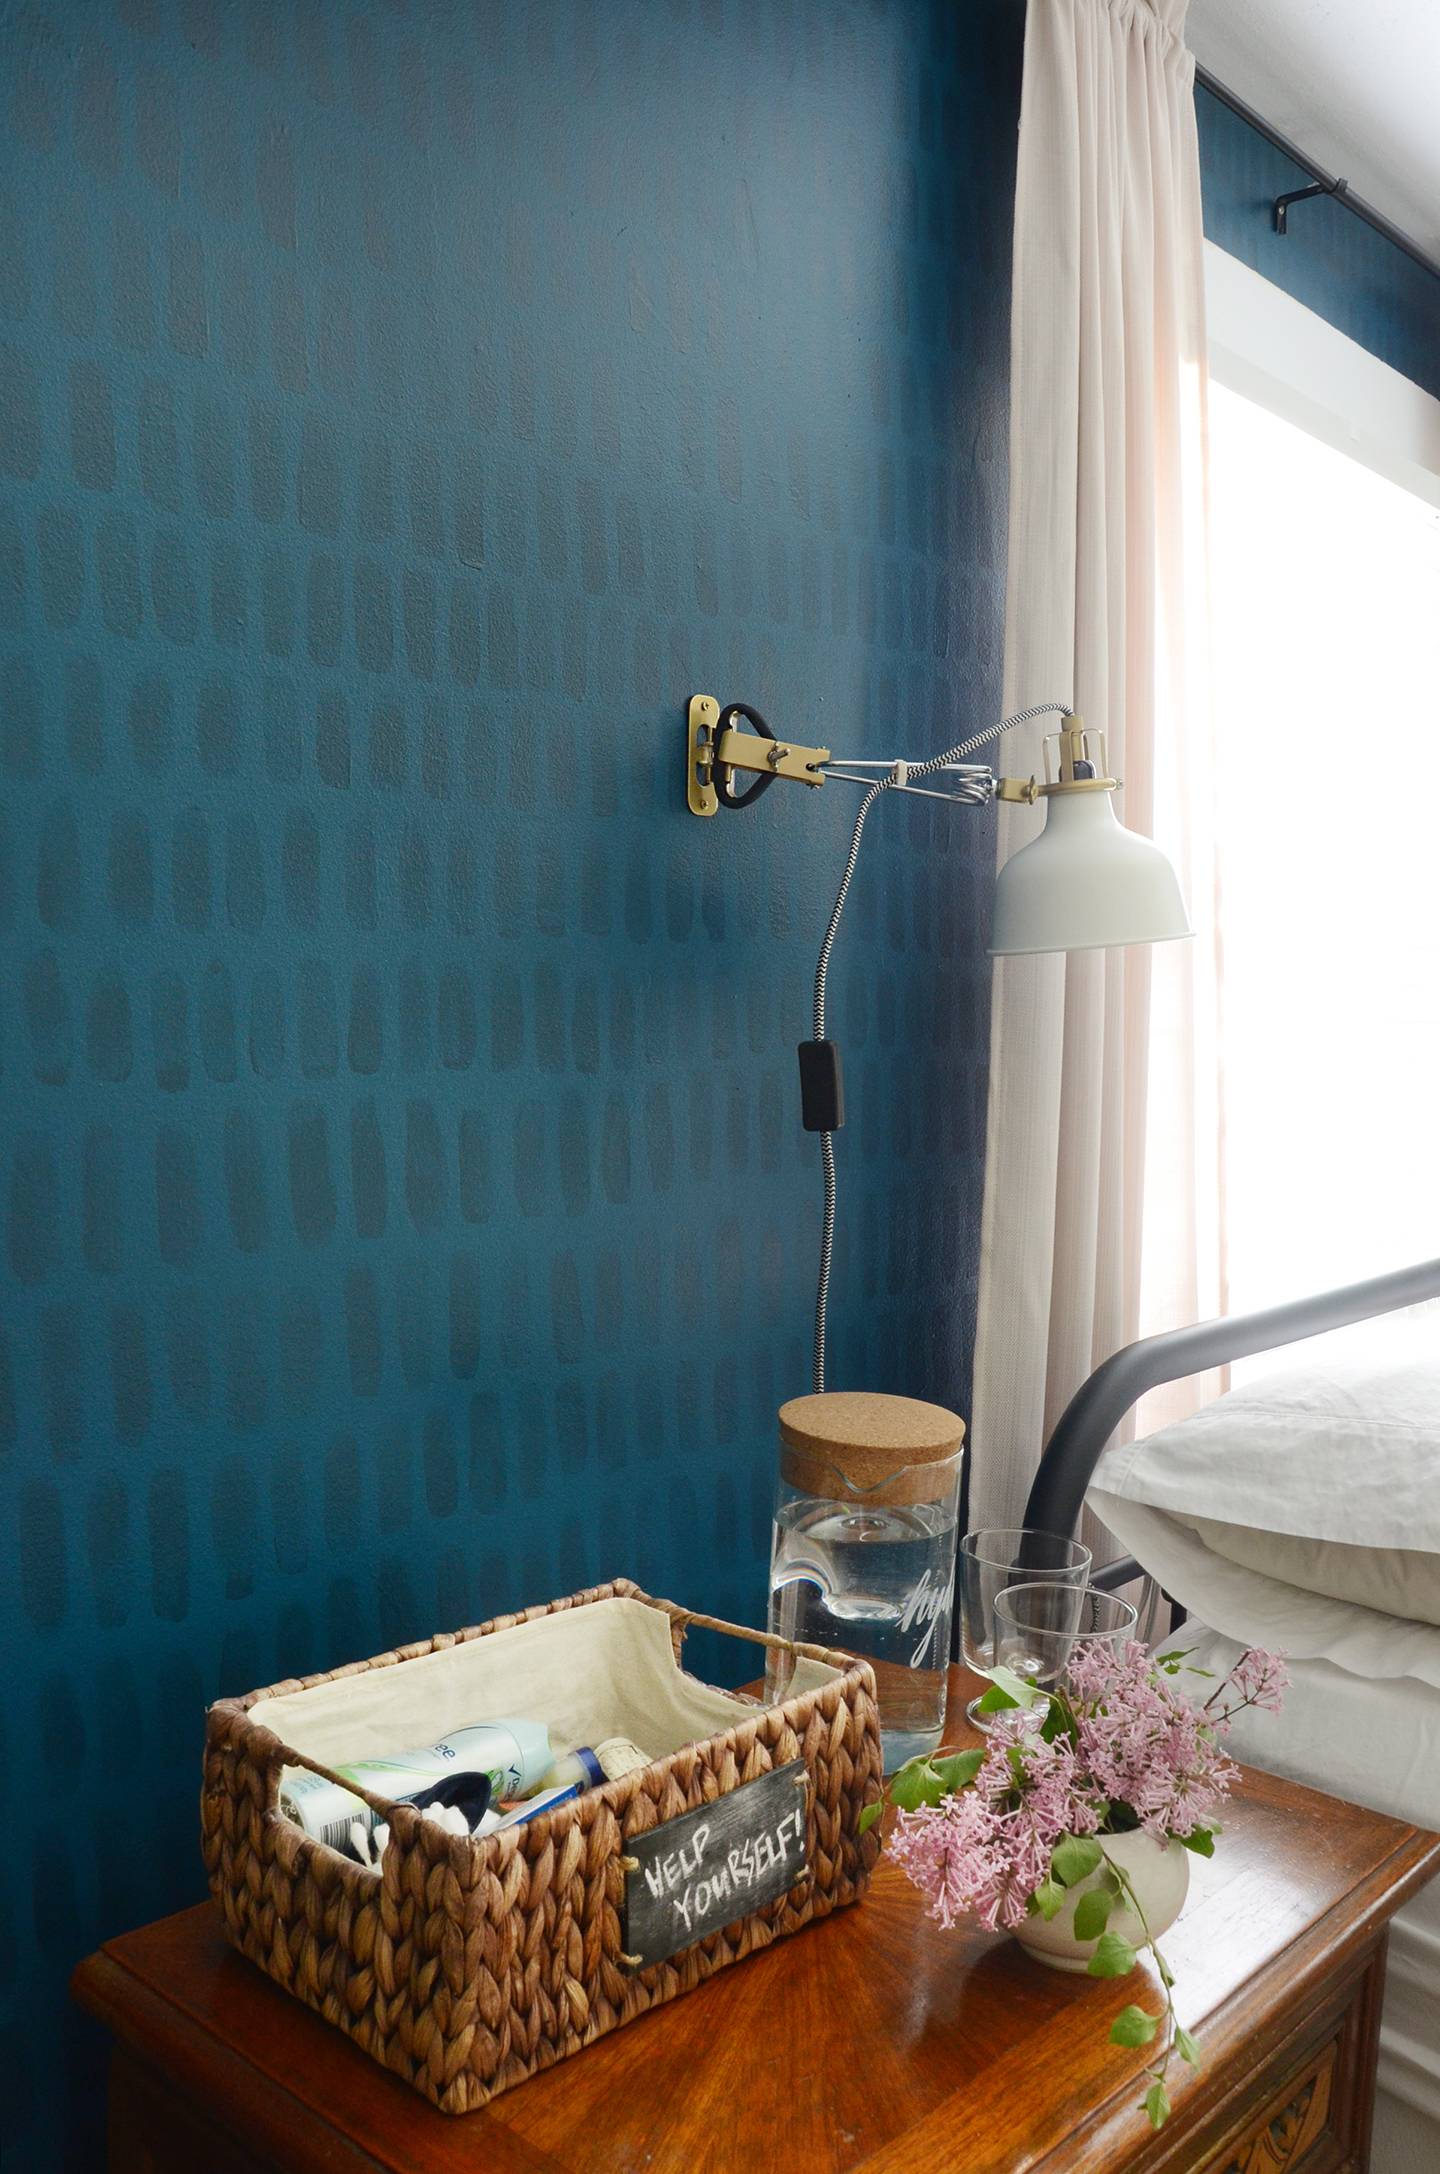
I think it looks a bit like crocodile skin, in a subtle way. But if it’s not bold enough for you, feel free to add more black! Check out what a difference a pattern makes… here’s our original guest room before the big makeover. 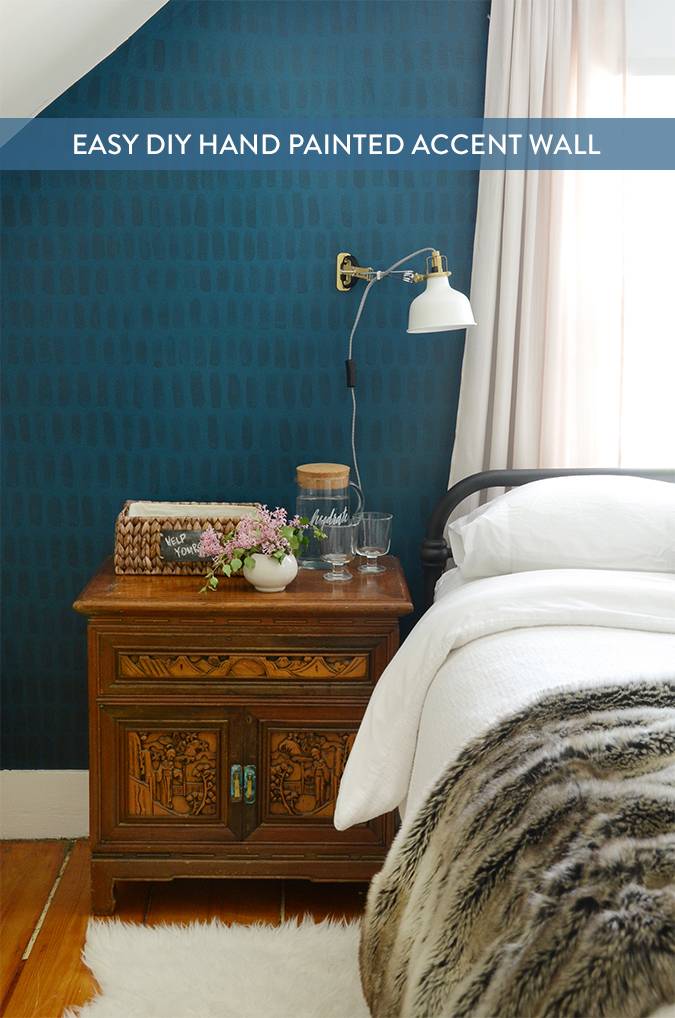
If you enjoyed this post, here are a few other you might like too:
The post How to: Easy DIY Hand-Painted Brushstroke Accent Wall appeared first on Curbly. Via https://www.curbly.com/bedroom-accent-wall-ideas-paint 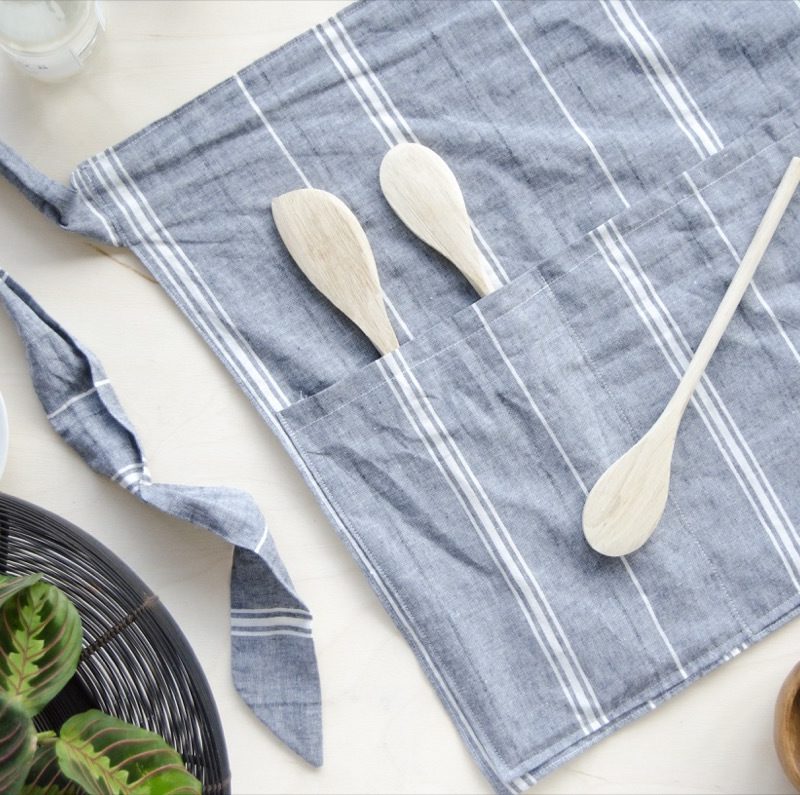
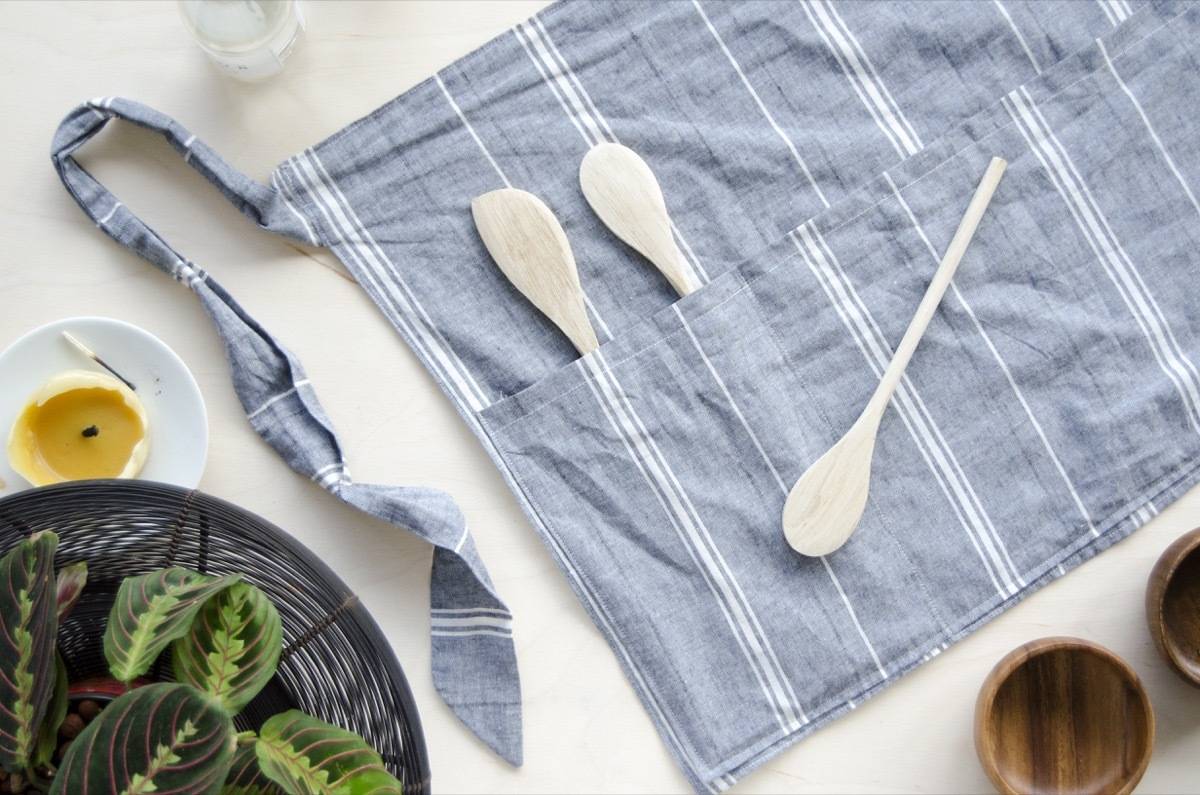
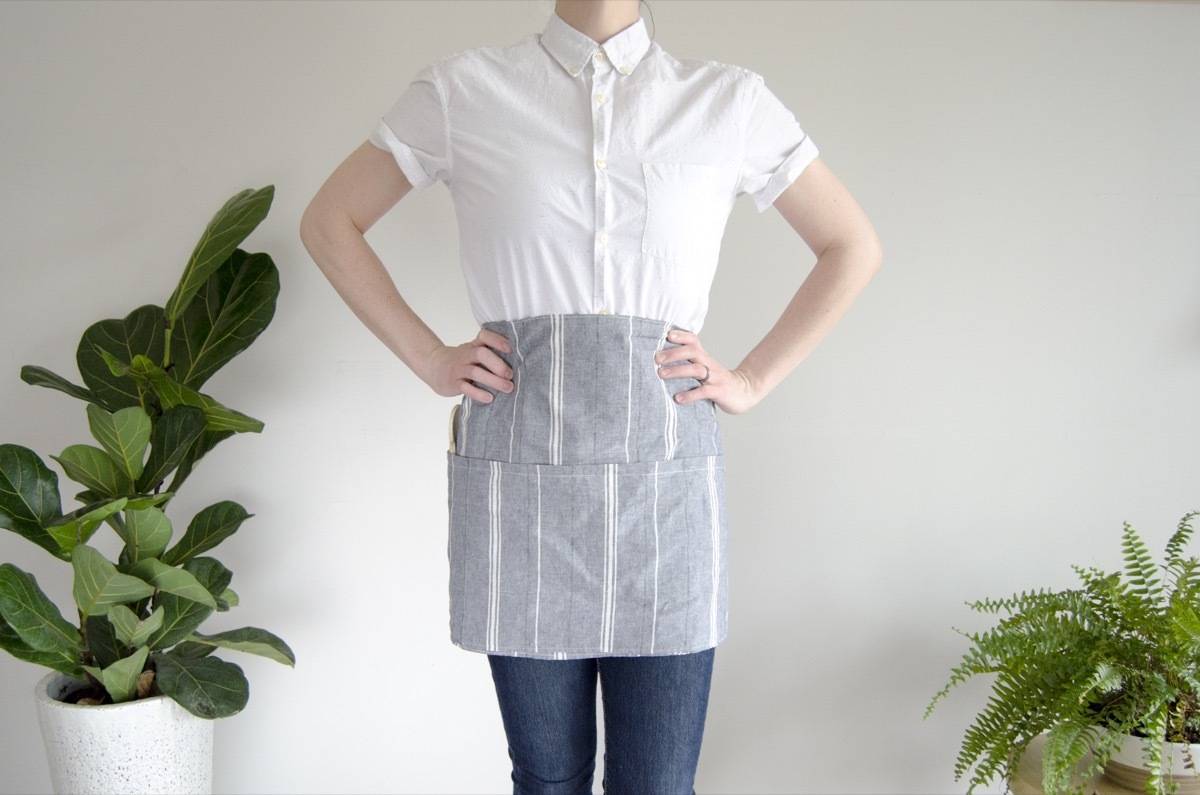
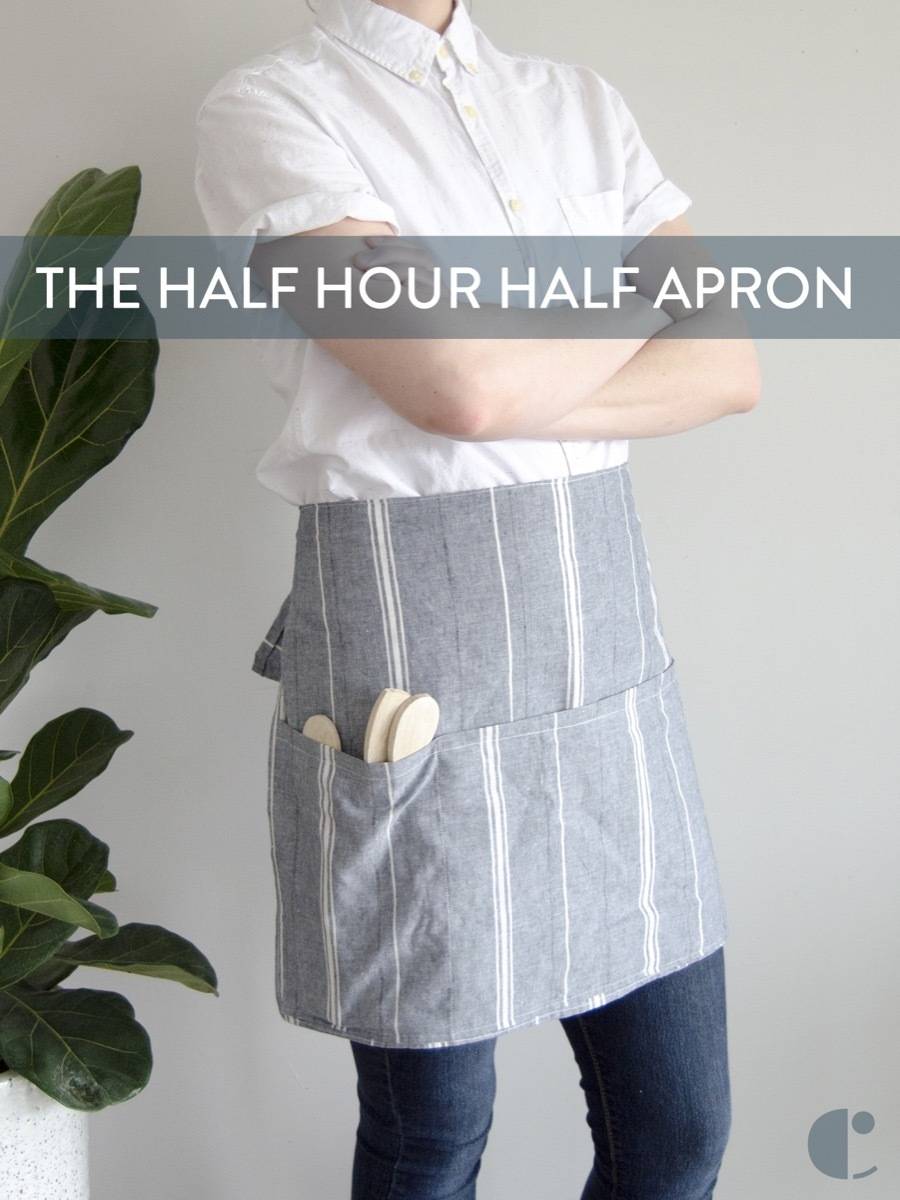
Are you ready for a crazy-quick easy sewing project? I’m calling this the “half hour half apron” because it’s one of the fastest sewing projects I think I’ve ever completed. Honestly, if I busted out a few more of these half aprons, I believe I could get my time down to 15 minutes. No sweat. My point is, this half apron is a breeze to make. This DIY apron is a perfect beginner sewing project. Plus, who doesn’t need an adorable handmade apron in their kitchen? These half aprons also make a great gift. Let’s get started!
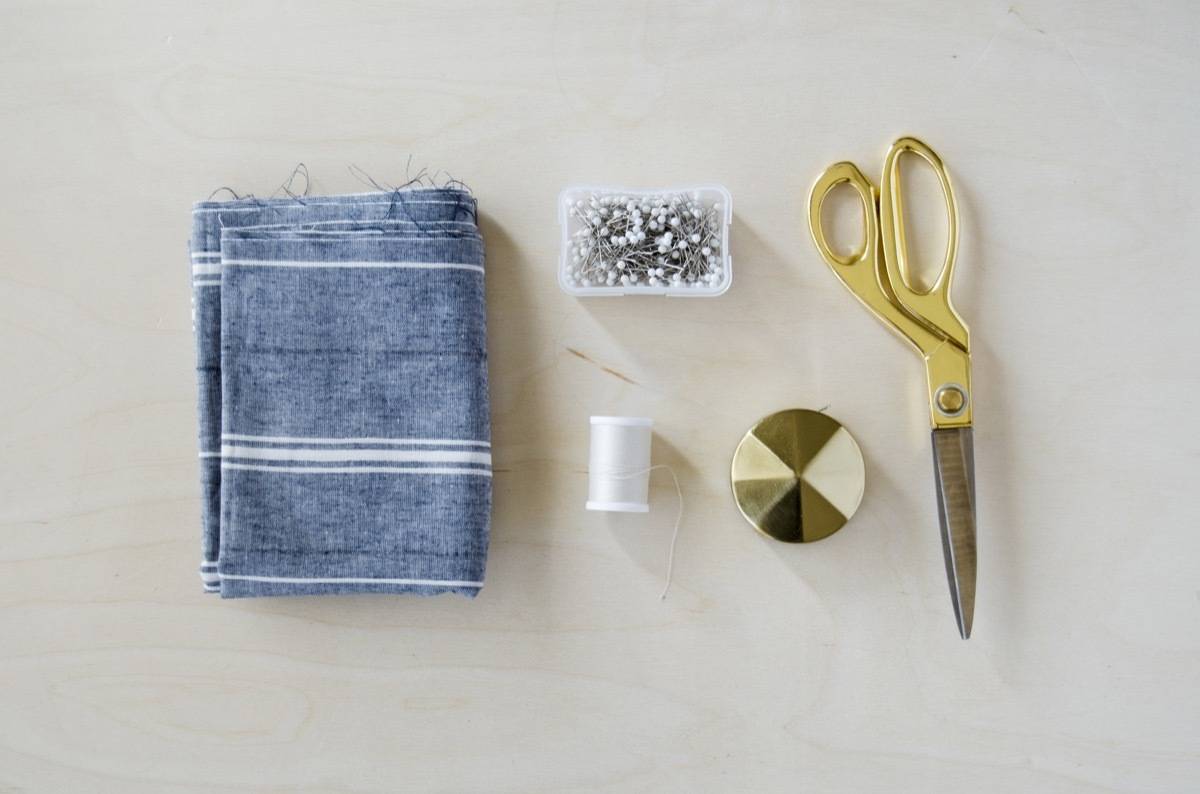
If you’ve ever doubted that you could follow a sewing tutorial, this is not that project! I’ve even put together a video so you can watch how to stitch this half apron together. Watch on, or keep reading for the step-by-step instructions. Best Fabrics for ApronsAprons are a kitchen essential for home cooks and professional chefs alike. When it comes to choosing the best fabric for an apron, there are several factors to consider, such as durability, comfort, and ease of care. The most popular and practical fabrics for aprons are cotton, linen, and polyester blends. Cotton is a natural fiber that is breathable, comfortable to wear, and easy to wash. Linen is also a natural fiber that is known for its durability, absorbency, and ability to resist stains. Polyester blends are a great choice for aprons that need to withstand heavy use and frequent washing, as they are durable, resistant to wrinkles and stains, and can hold their shape well. Ultimately, the best fabric for an apron depends on the intended use, personal preference, and the desired level of care and maintenance. Apron Making Materials
How to Make a Half Apron in 30 MinutesStep 1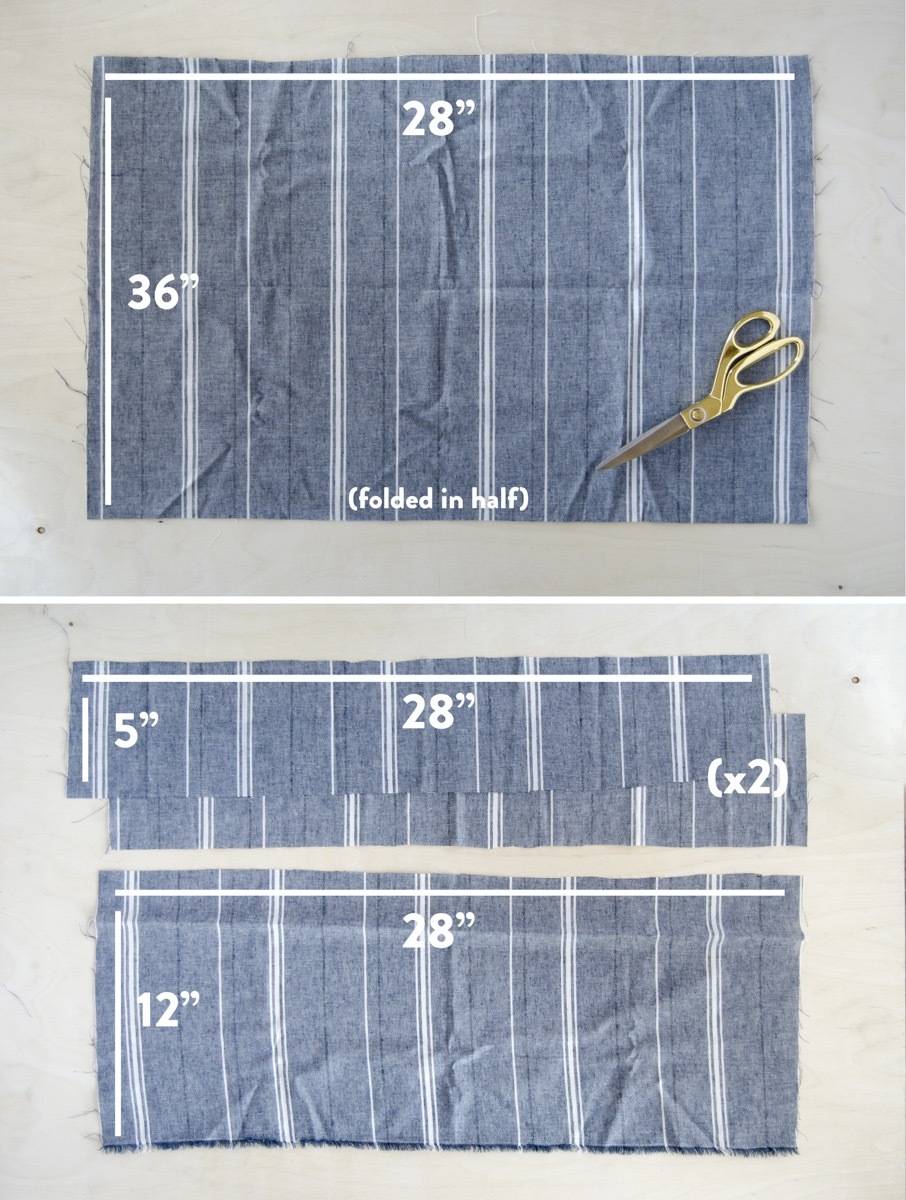
Start by cutting the pieces. There are four pieces total, all cut at a 28″ width. The first piece is the body of the apron, and is 28″ wide and 36″ tall (in the picture this piece is folded in half lengthwise). The waist straps (or apron ties) are made up of two identical pieces, both 28″ wide and 5″ tall. Finally, the pocket is what’s left of your original piece of fabric, being 28″ wide and 12″ tall. Step 2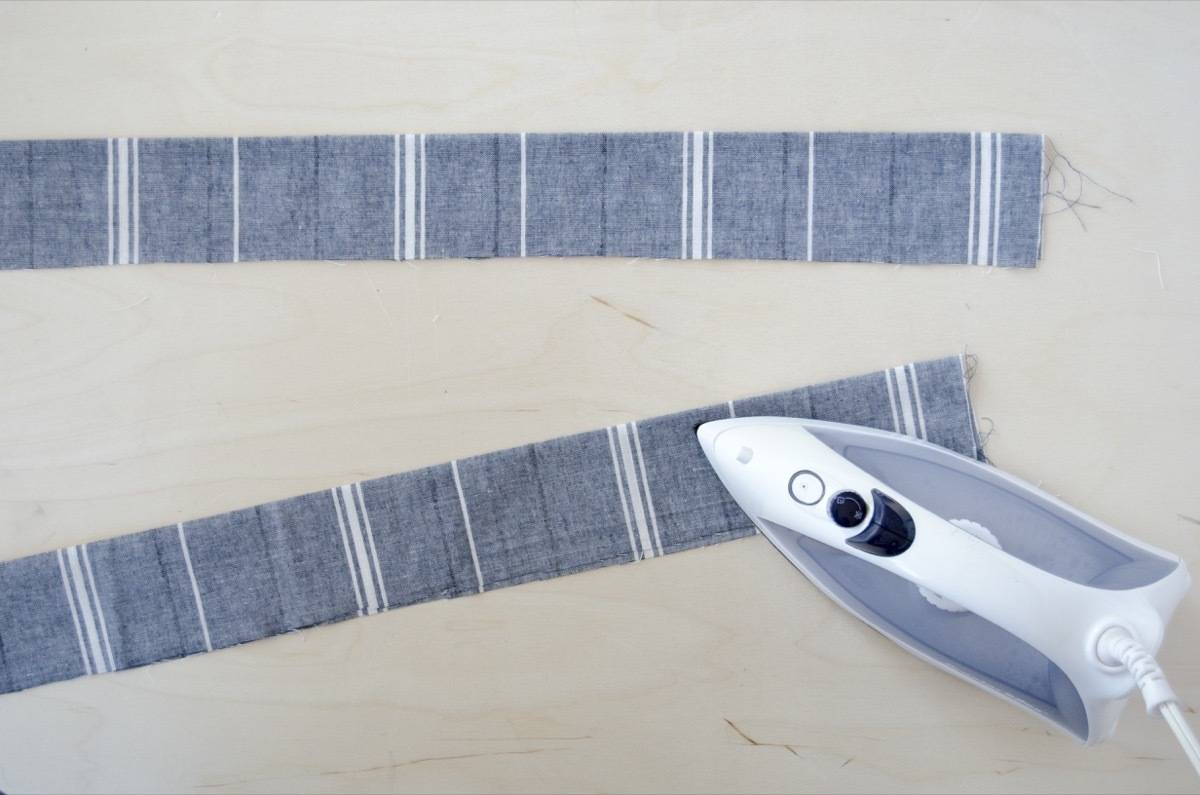
Let’s start with the waist ties. Fold each piece in half, right sides in. Iron the fold folded edge. 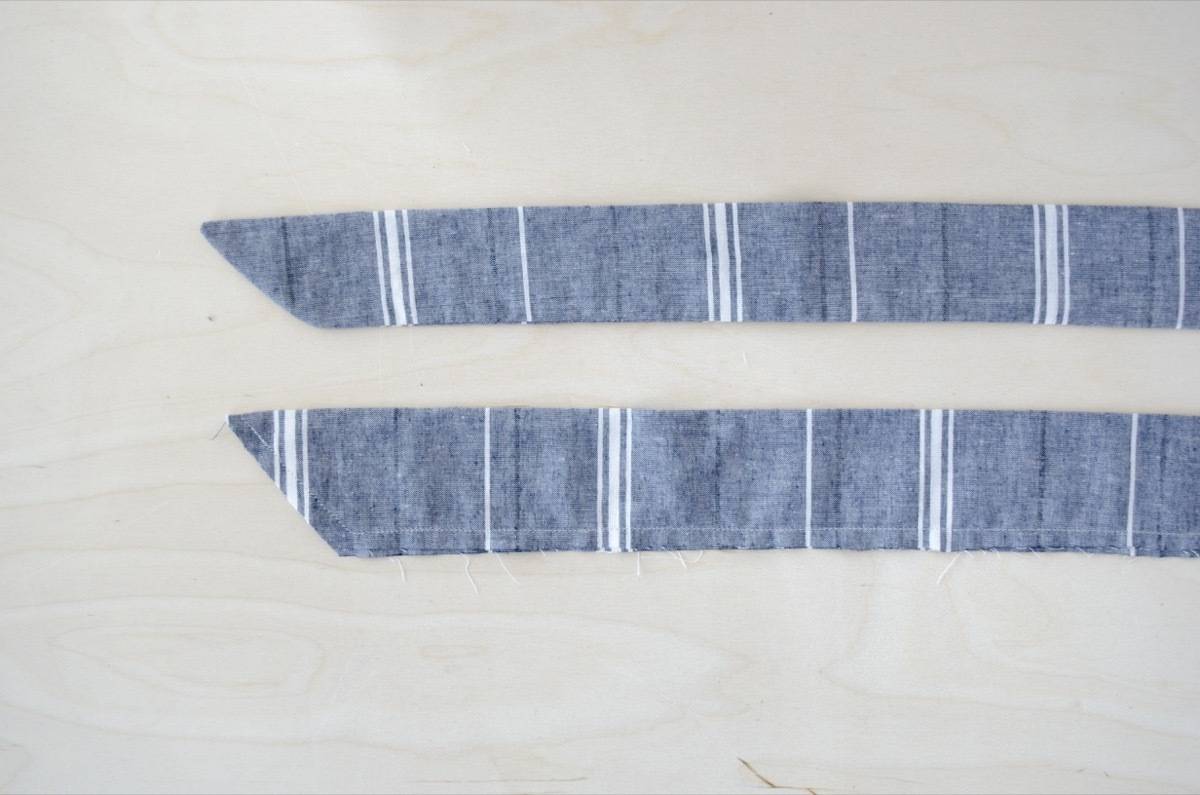
Using a straight stitch, sew down the long side of each strap. At one end, make a 90-degree turn and sew to the opposite corner, creating a right angle. Turn the straps right-side out, and press with the iron. Step 3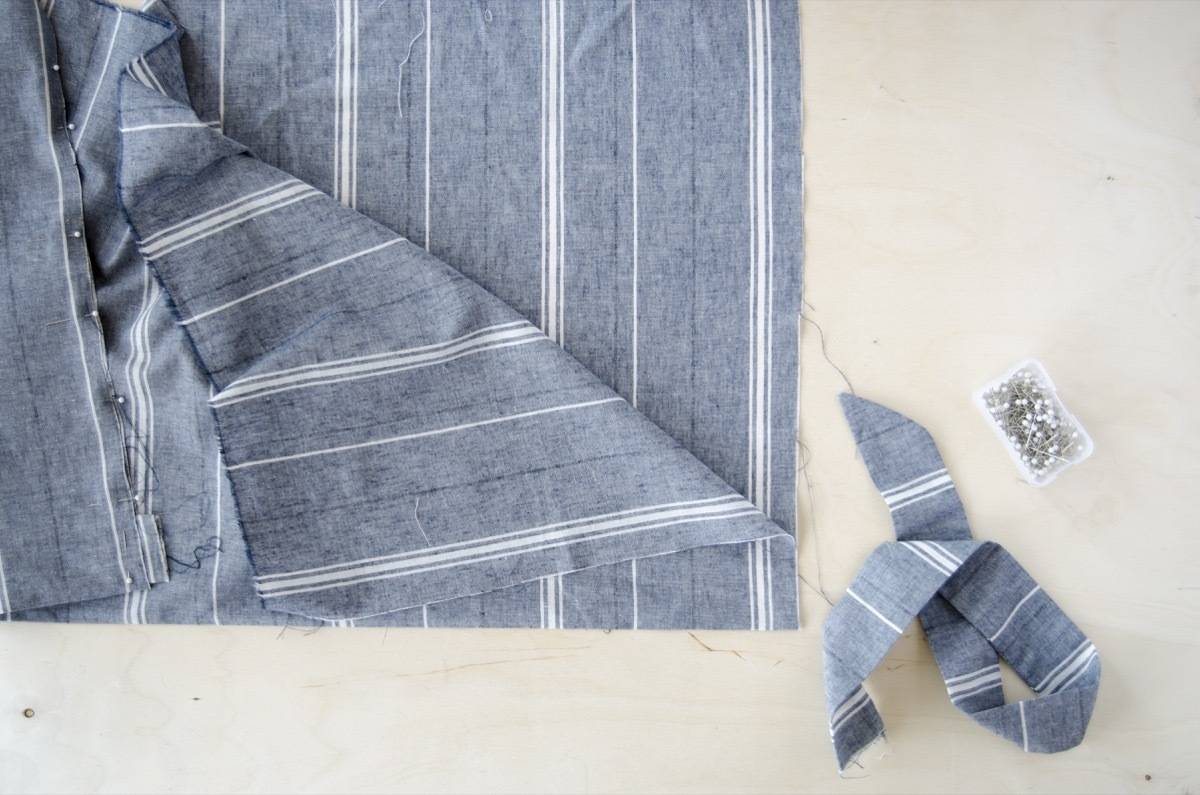
Now to attach the straps to the body of the apron. Take the largest piece of fabric, and fold it in half right side in. It should measure 28″ wide and 18″ tall when folded. Open the fold, and pin the raw end of one strap to the inside of the fold, with the strap leading inside the folded fabric. Repeat with the other strap on the other side of the fold. Both straps should sit inside the folded fabric. 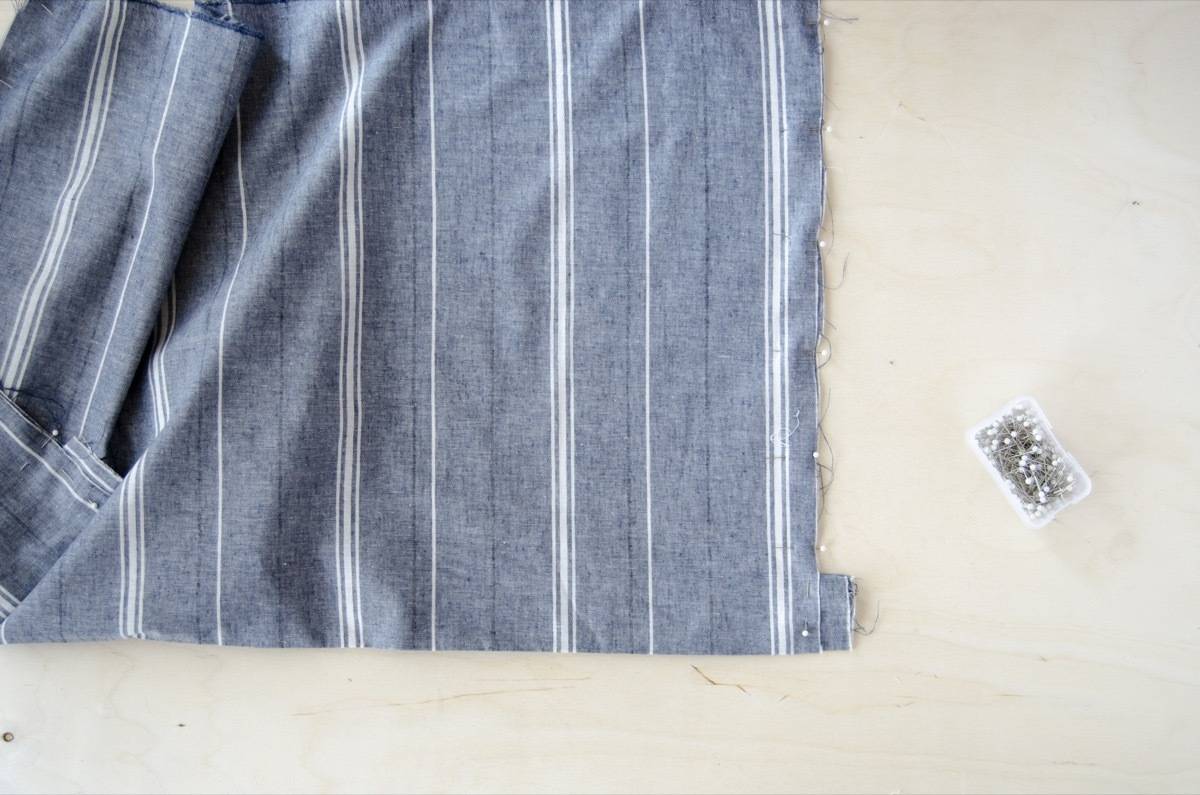
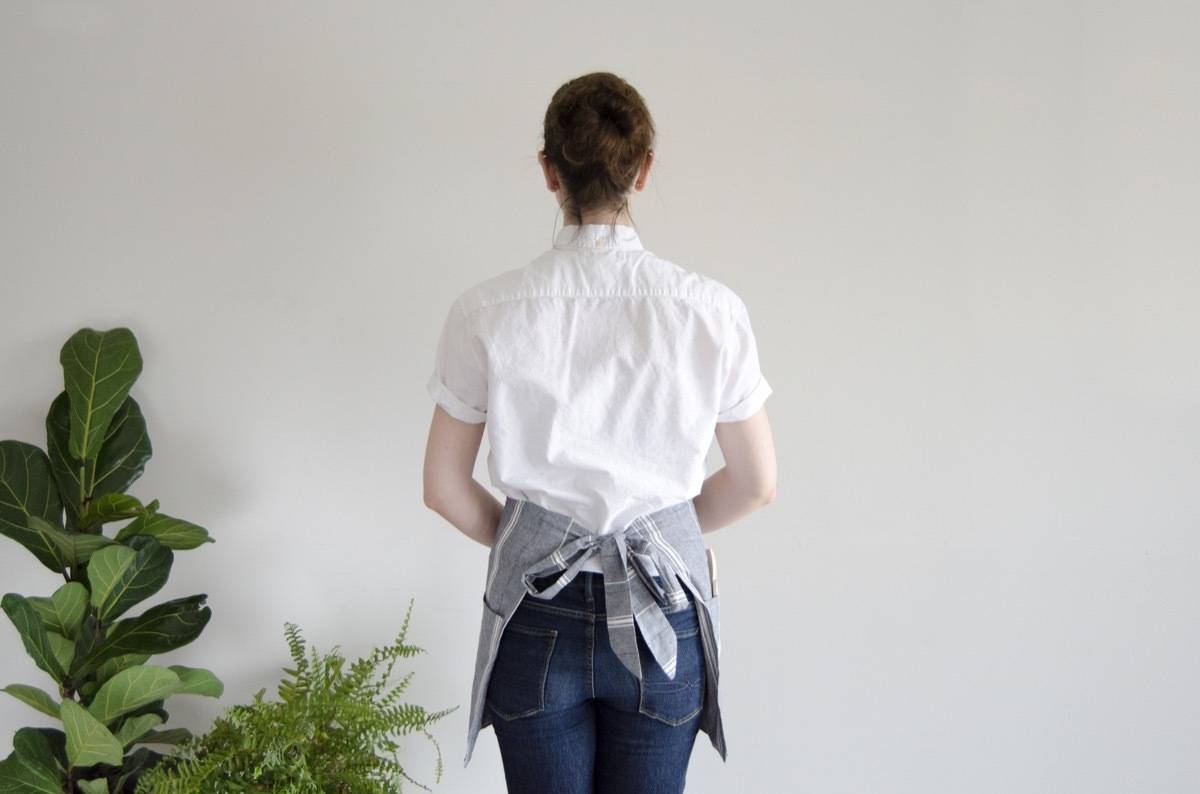
Pin up the sides of the folded fabric. Do the same along the bottom, but leave a 3-4 inch gap in the middle. With a straight stitch, stitch along the three sides where you pinned, sewing the straps in place. Do not sew across the gap in the bottom. Step 4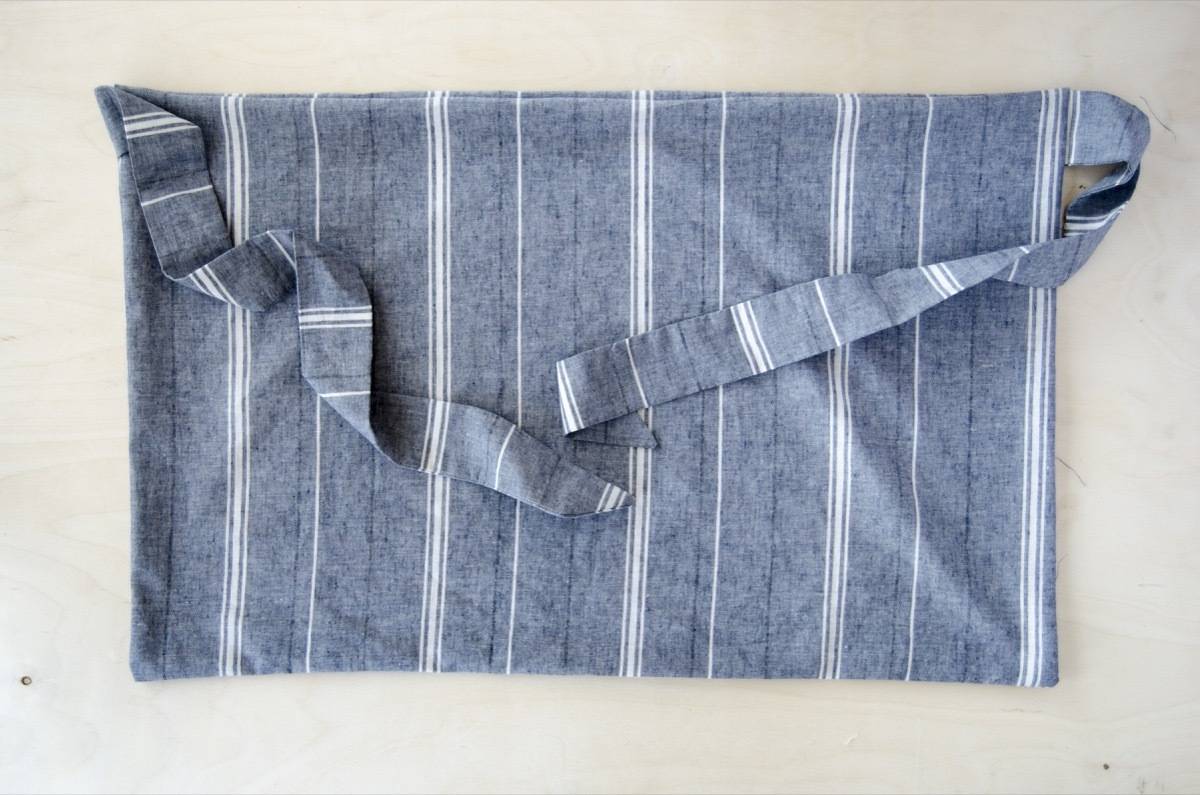
Through the gap along the bottom, turn the apron right-side out. Iron flat. Step 5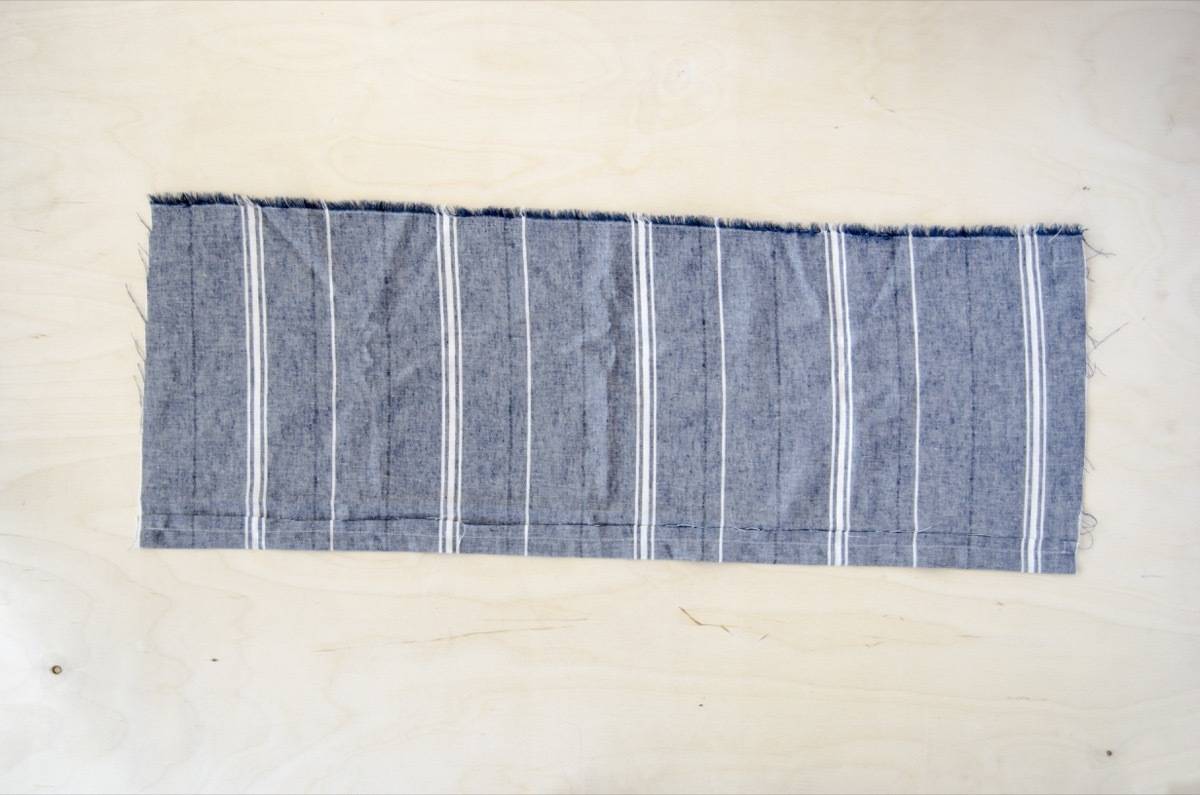
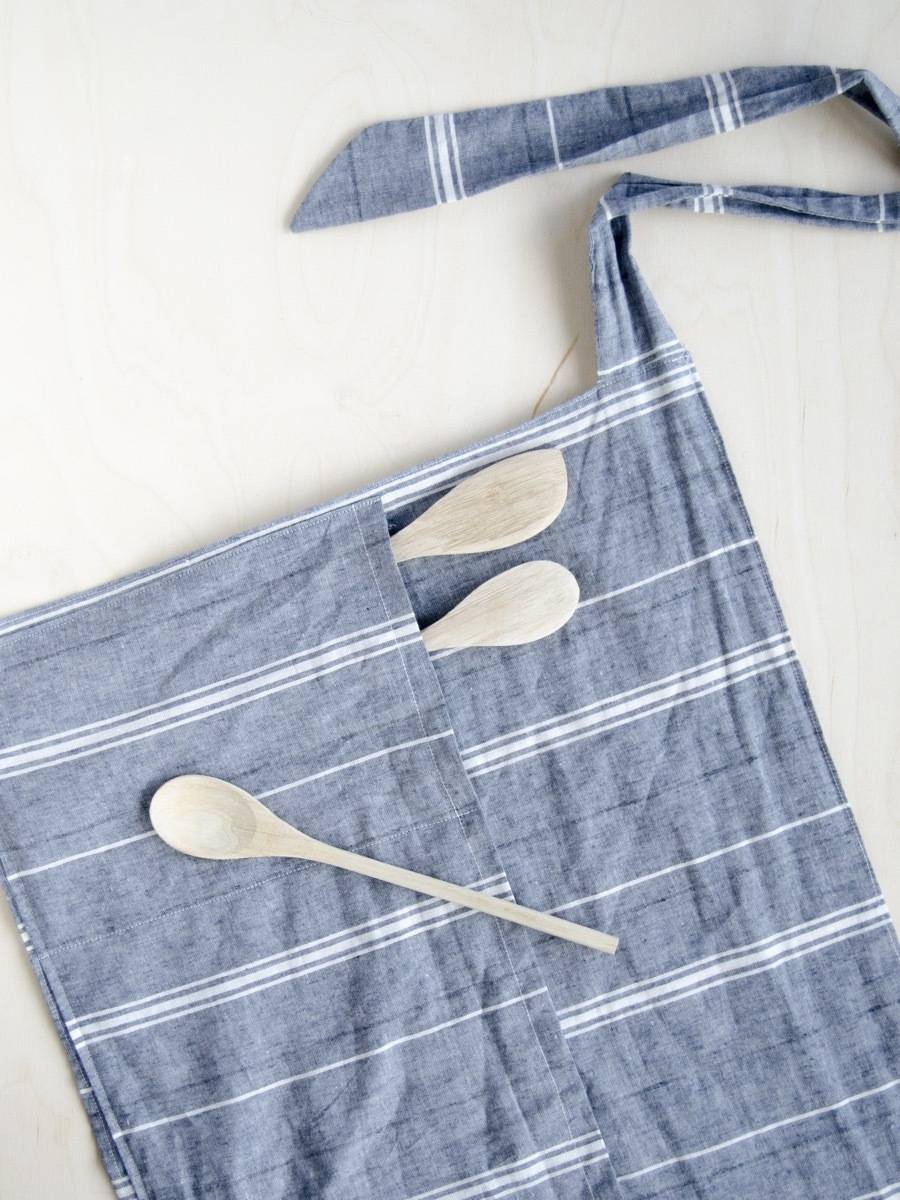
And finally, the pocket! Press and sew a 1/4 inch hem along one long side of pocket fabric. Step 6
With the hem-side up, pin the pocket to the apron, lining up the bottom of the apron with the bottom of the pocket. Turn and press the sides and bottom of the pocket in, and pin in place. With a single stitch, sew the pocket in place along the sides and bottom. 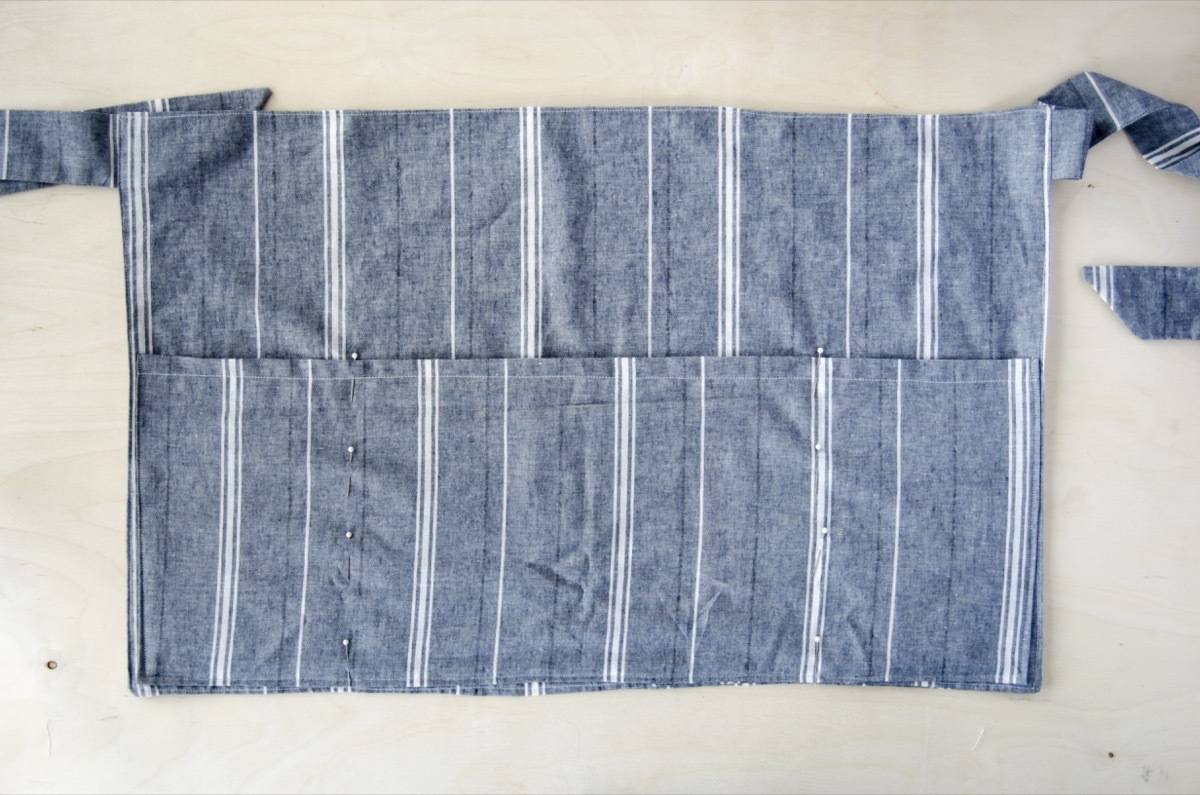
Next, mark 6.5″ in from both sides of the pocket. This divides the pocket into three sections – two small pockets on the side and one large pocket in the middle. Starting from the bottom of the pocket, stitch along both pinned marks with a single stitch. 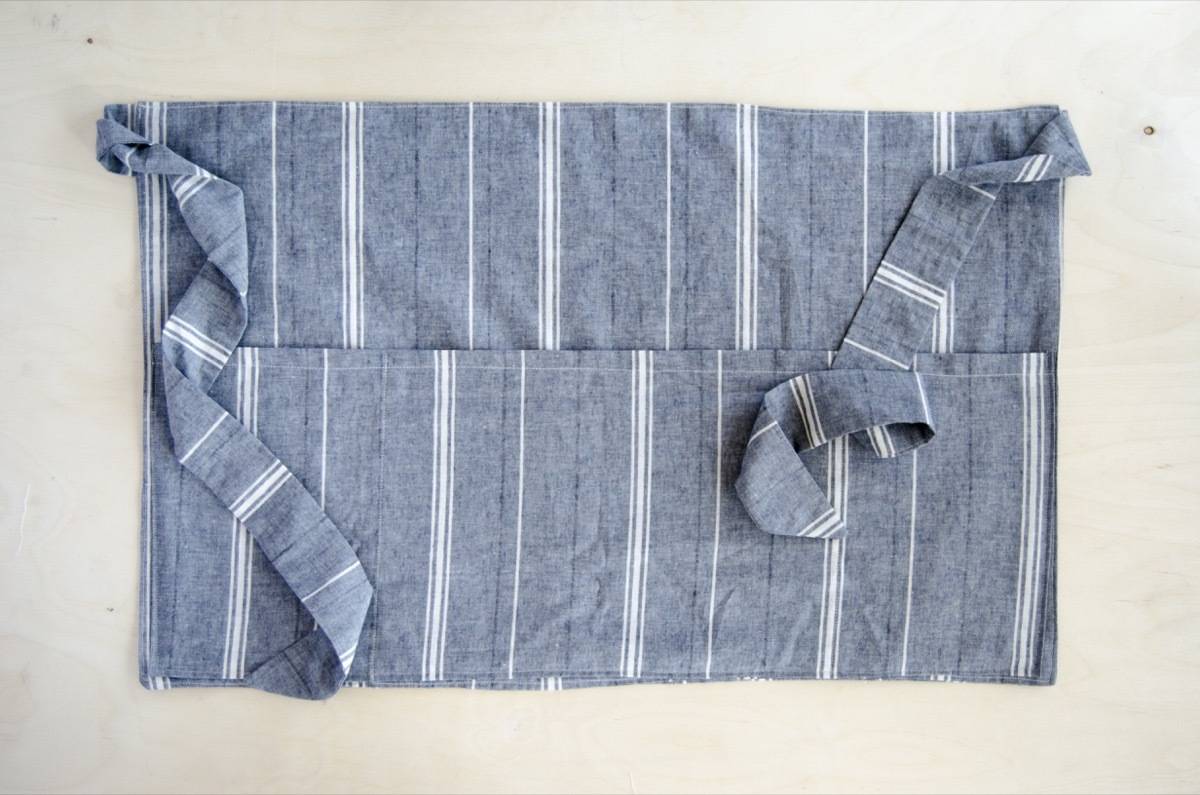
And done! 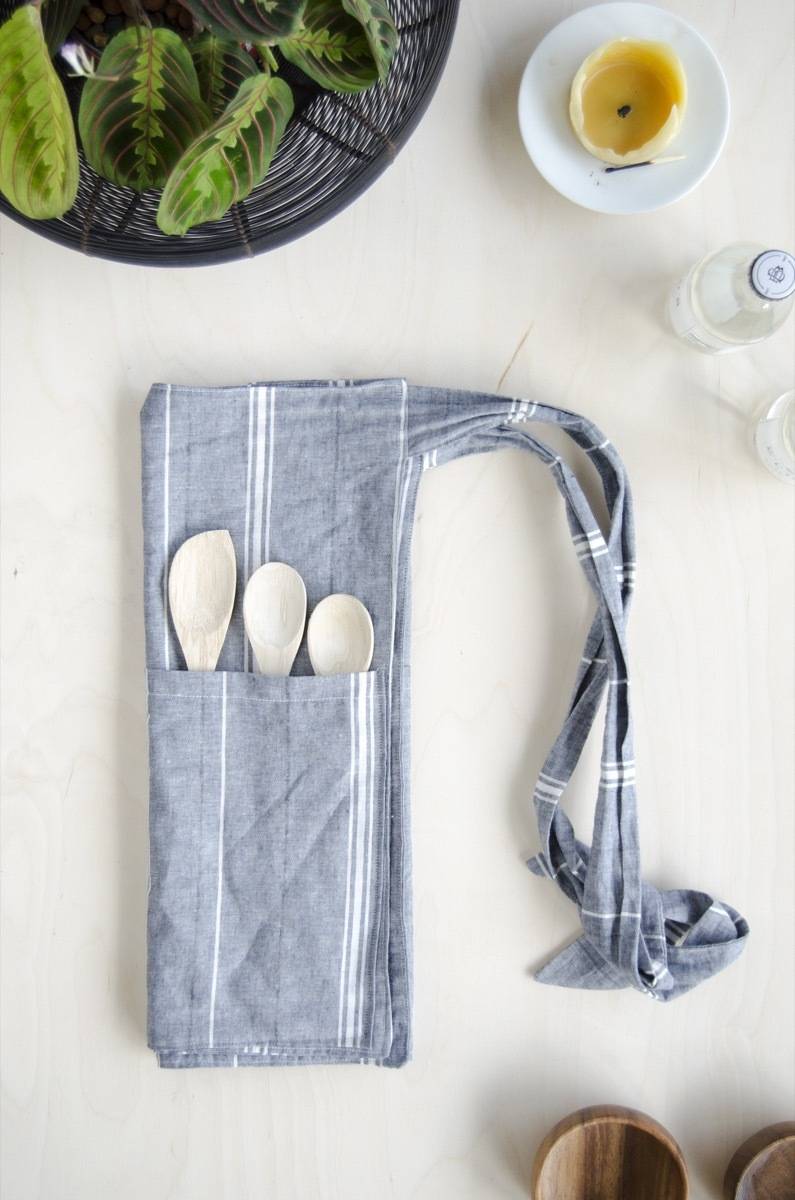
I made my half apron from this sweet and simple linen print that I’m absolutely in love with. I’m already scheming alternative uses for this fabric so I can buy more of it. Happy sewing! If you liked this DIY, check out this tutorial on how to make a full-sized adjustable apron with matching bar tool pouch!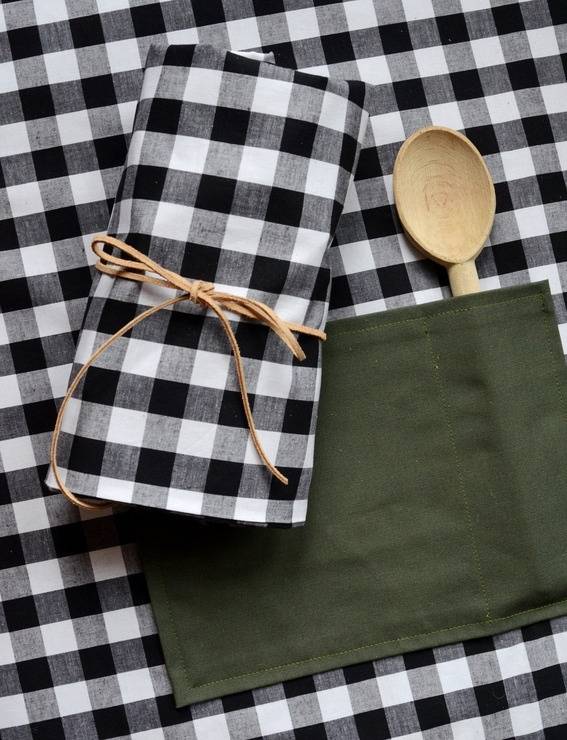
The post How to Make a Half Apron in Half an Hour appeared first on Curbly. Via https://www.curbly.com/half-hour-half-apron 

There’s nothing quite like the frustration of trying to find a shirt in a dresser drawer packed full of balled up clothes. There’s no order, and everything is kind of just shoved in there. While it may be tempting to just close up your dresser drawers when they start to get chaotic, being able to have everything nicely folded and visible will make getting ready in the morning a million times easier and maximize your storage space. So, rather than just tossing that tee in the back of the drawer, fold it properly the first time so you can find it when you need it. Keep reading for the best way to fold shirts, pants, socks, even underwear! 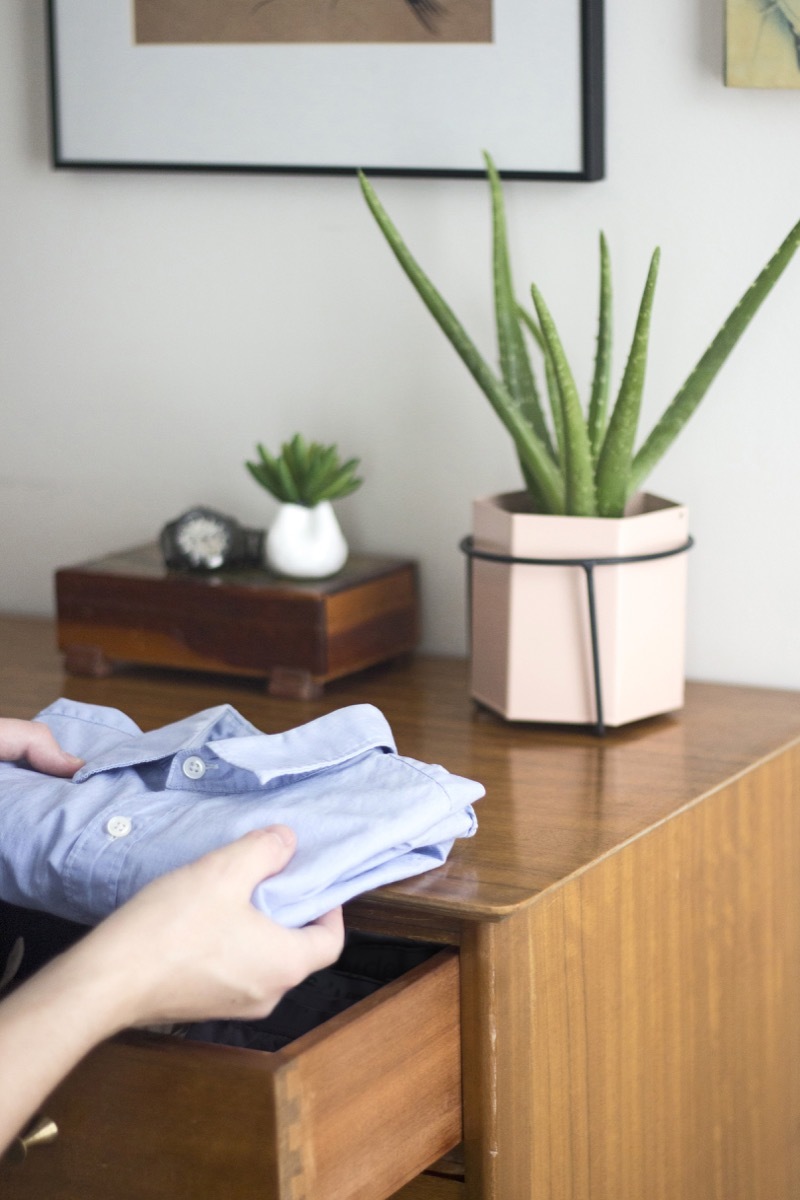
Watch this video on how to fold everything in your closet, and keep reading for the full details. The easiest way to fold laundry is on a clean, flat surface. So clear off your coffee table or dining buffet, and let’s get to folding. Table of contents
Before we get into how to fold t-shirts, I wanted to mention which kinds of shirts you should be storing in your dresser, versus hanging in the closet. Generally speaking, you want to fold t-shirts, tanks, undershirts, or anything that isn’t heavily affected by wrinkles. We’ll cover how to fold a dress shirt, but personally I prefer to hang dress shirts to prevent creases. You always want to fold a sweater, never hang. Using a hanger will pull on the weave of a sweater, leaving stretch marks at the neck and shoulders. How to fold a t-shirtThis is the famous “two second” folding trick—however, on the first few tries it’ll take you just a little longer. It might seem like magic, but after a bit of practice, you’ll be folding your shirts in a jiffy! 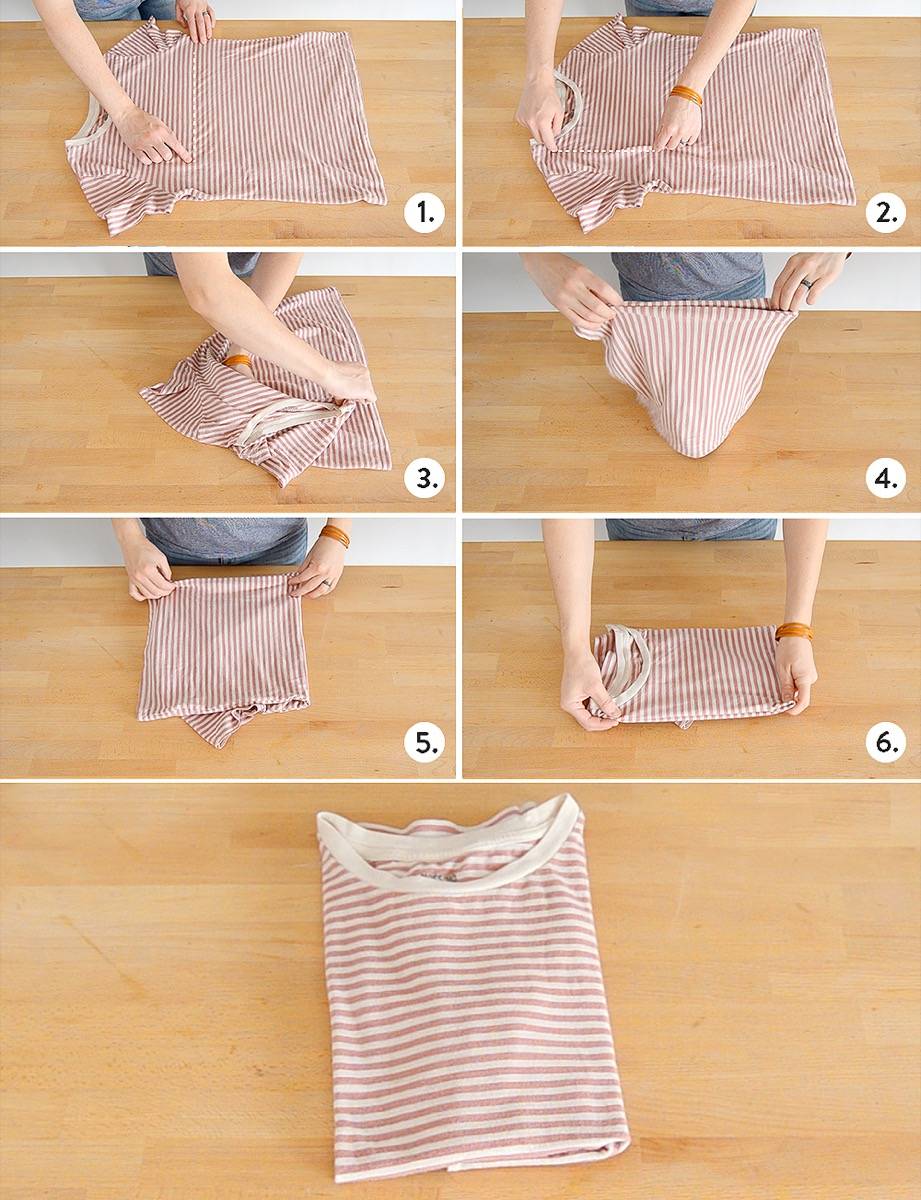
How to fold a dress shirtWhether you’re packing for a trip or packing your dresser, you want to learn how to fold a dress shirt in a way that minimizes wrinkles, and protects the collar. Here’s how: 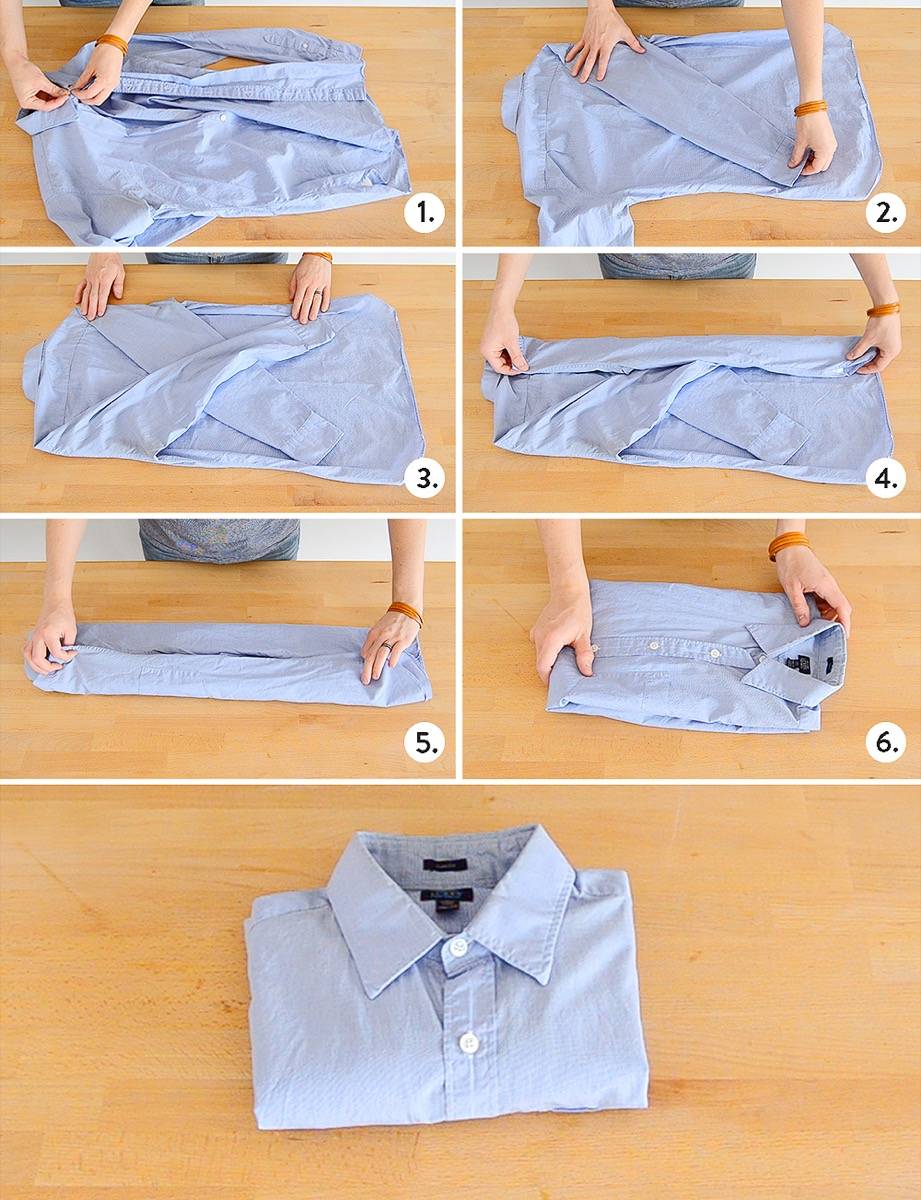
How to fold a sweaterHey, guess what? Now that you’ve learned how to fold a dress shirt, you can fold any long-sleeved shirt! Simply fold the same way. 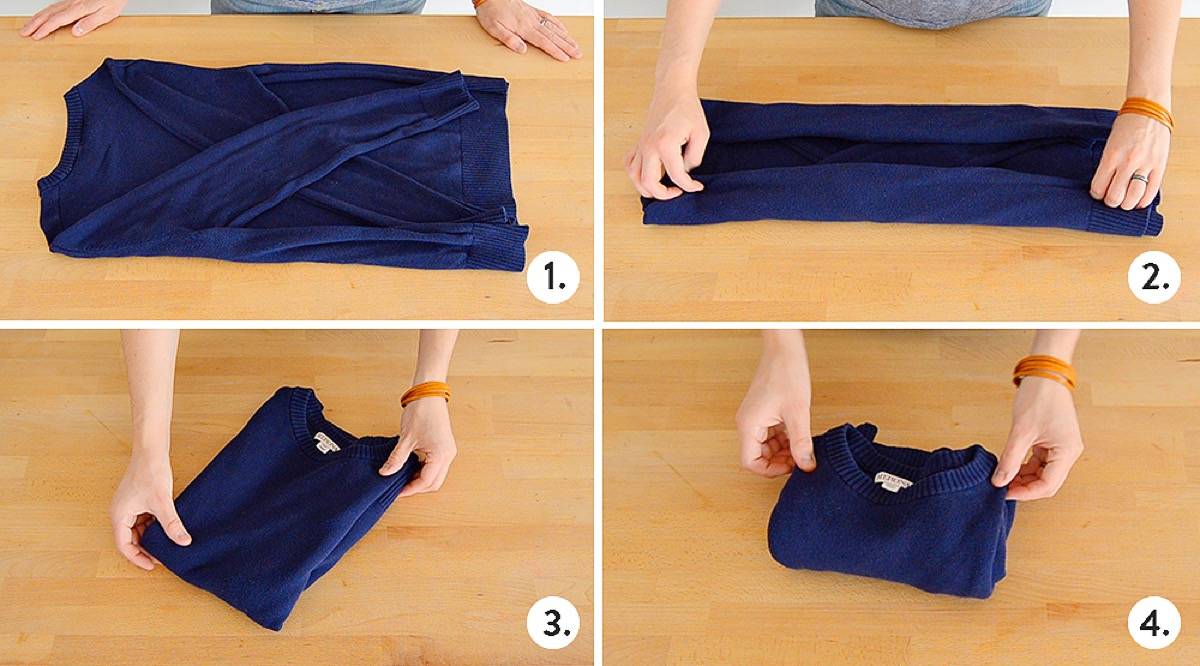
How to fold a shirt with strapsTank tops and spaghetti strap shirts are a little awkward looking when folded, unless you know the secret (psst – the secret is to hide the straps!). 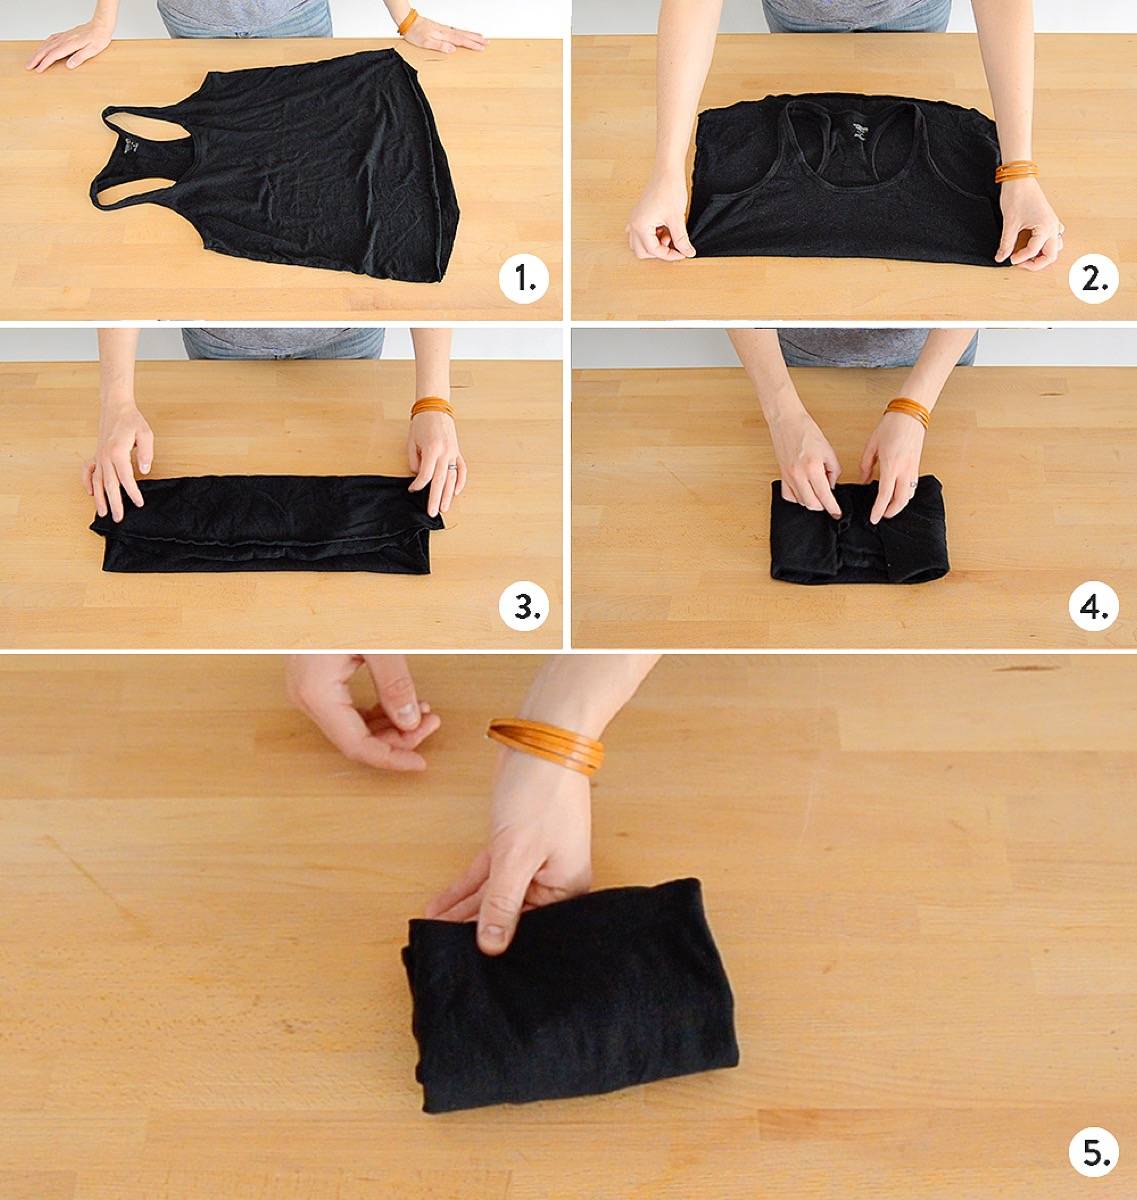
Now that our tops are folded and put away, let’s talk bottoms. Folding pants in a way that keeps them wrinkle-free is simple. How to fold pants and jeans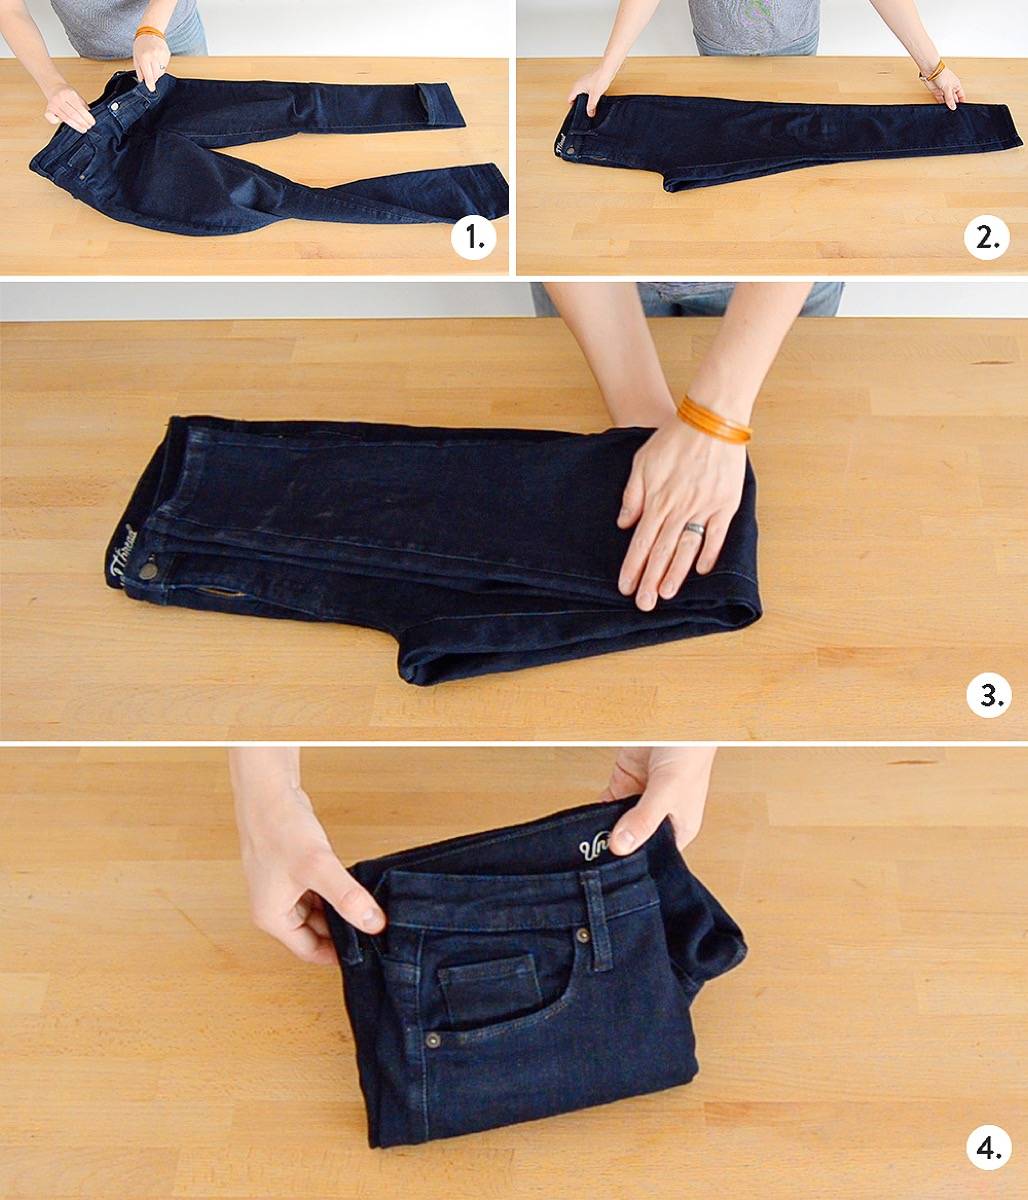
How to fold shortsFolding shorts is just like folding pants, only… shorter! 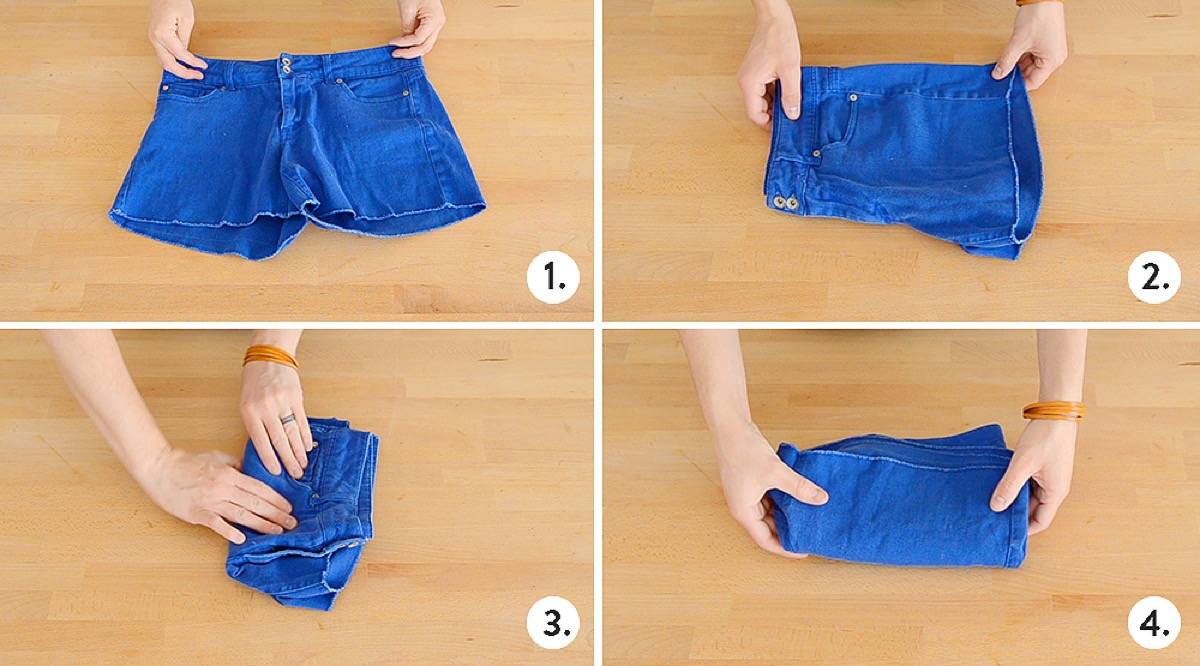
How to fold socks with an ankle (knee-high, crew, quarter-length, etc.)You probably already know how to fold socks, but let’s go over it again, shall we? 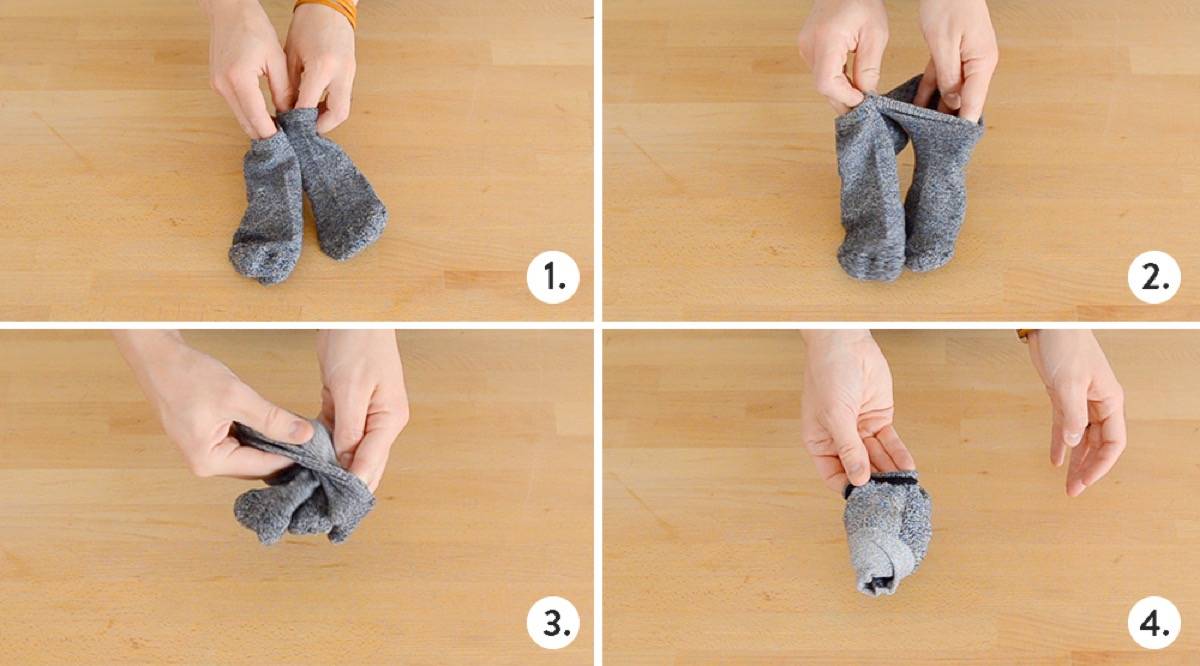
How to fold socks without an ankle, a.k.a. no-show socks or low-cut socksSo, what about socks that are teeny-tiny? We can fold those too! 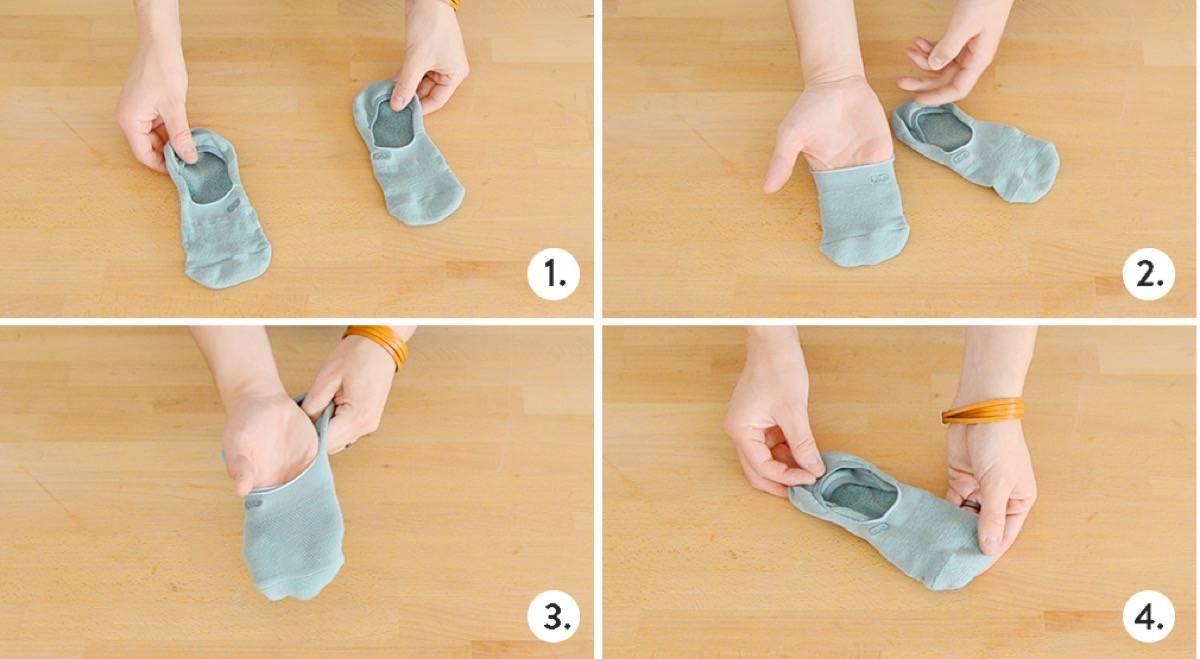
How to fold a braBras are like necklaces, they get all tangled up when you’re not looking! Keep them organized by folding them like this: 
How to fold underwearFinally, let’s talk about how to fold underwear. Do you fold your undies? A lot of us don’t, but folding them sure makes it easy to see what you have available in your drawer. 

Now that you’ve mastered your dresser drawer, let’s talk about that linen closet. Start by learning how to fold a fitted sheet.
The post How to Fold Everything in Your Dresser appeared first on Curbly. Via https://www.curbly.com/how-to-fold-everything 

IKEA mirrors are an inexpensive way to add depth and interest to a wall. Mirrors reflect light and movement in a room, they’re eye-catching, and they can make a space appear bigger than it is. If you know us here at Curbly, you know we LOVE a good IKEA hack. While mirrors serve their purpose, many people look for ways to hack and personalize mirrors to make them unique and more fitting for their individual tastes and needs. 
Whether in your entryway, bedroom, or bathroom, a mirror makes a great addition to any space. And luckily for everyone, hacking a one-of-a-kind mirror is easy, thanks to IKEA. Happy crafting! 
DIY Thumb Tack Mirror from CurblyHere we’ll create a unique mirror by transforming a cork trivet from IKEA into a wall mirror. Read on to check out this impossibly simple process. 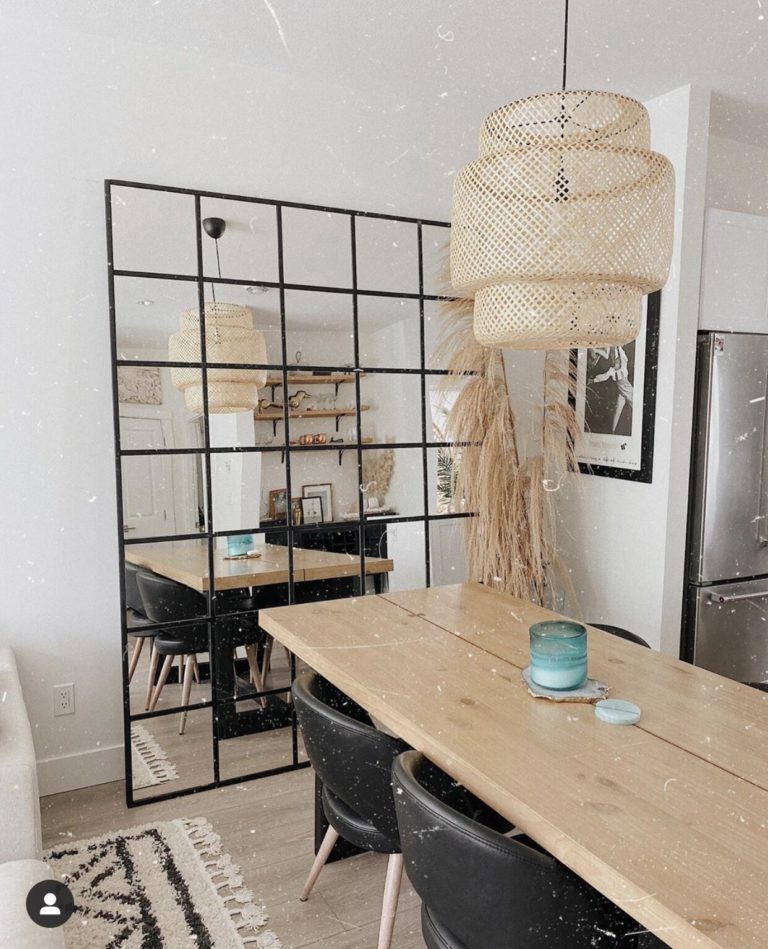
Industrial IKEA Mirror HackThis post features a creative and affordable solution for home decor enthusiasts looking to add a statement piece to their space—a giant IKEA hack mirror inspired by the latest TikTok trends. 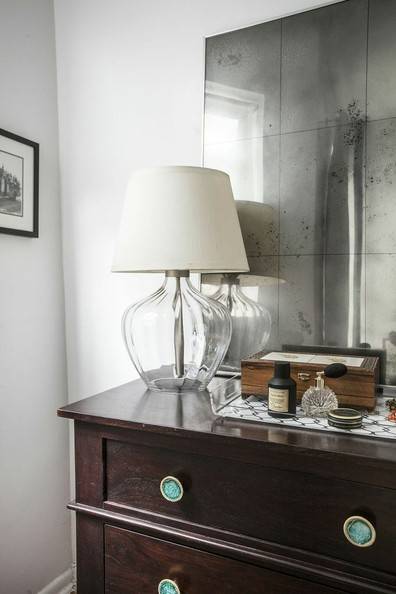
A DIY Antiqued MirrorThis IKEA mirror hack goes back in time with an antiqued look. Believe it or not, to make this aged piece, you don’t need a mirror—it all starts with a picture frame. 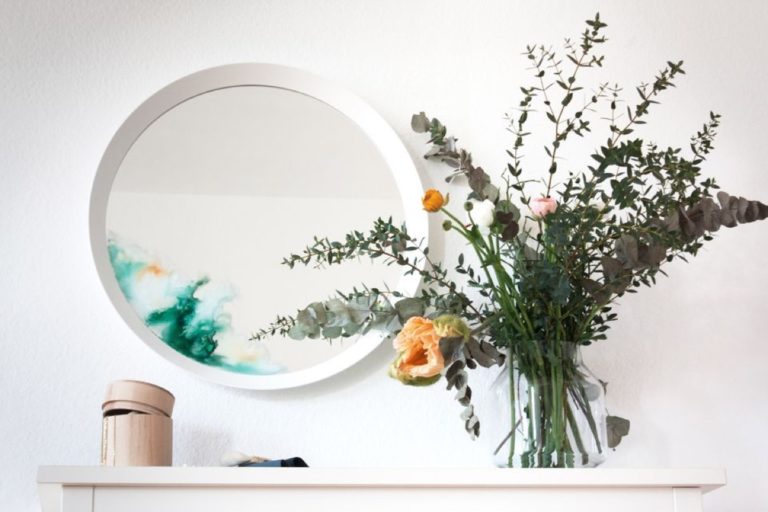
Abstract Watercolor MirrorAdd abstract interest to any IKEA mirror (or any glass, period!) by adding some watered-down glass paint. Here they’re using an IKEA LANGESUND mirror (it costs $27.99), perfect for a small entryway. 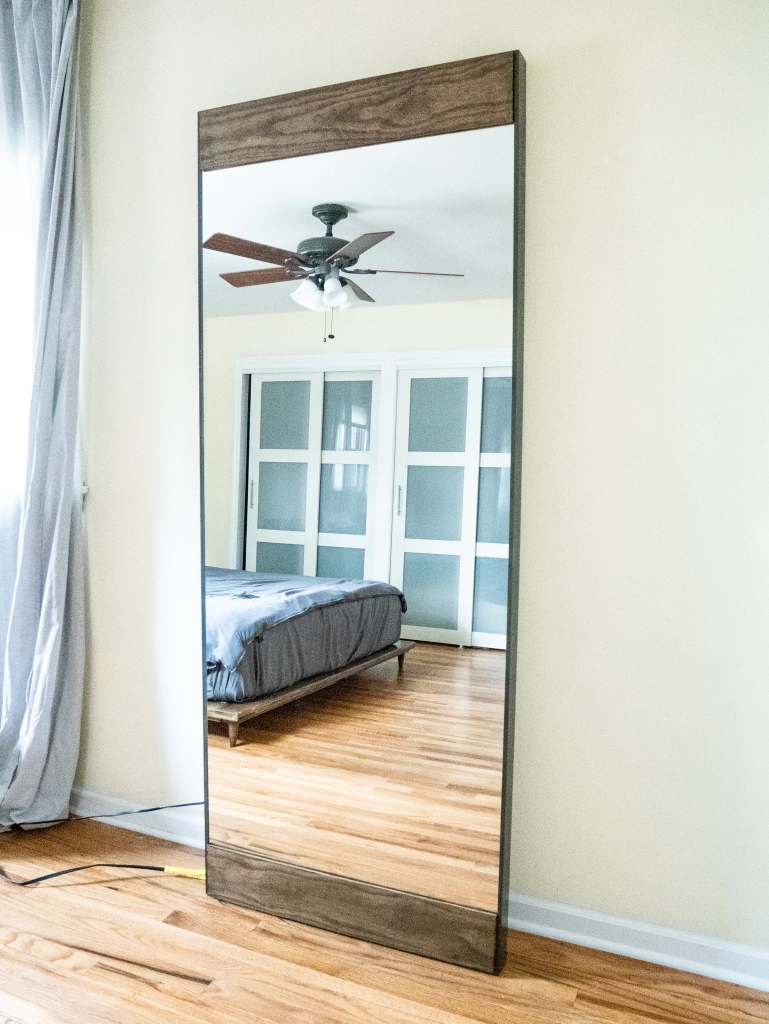
West Elm Mirror HackIn this post, Victoria walks us through, step-by-step, her process for making this gorgeous West Elm dupe from a much less expensive IKEA Hovet mirror. 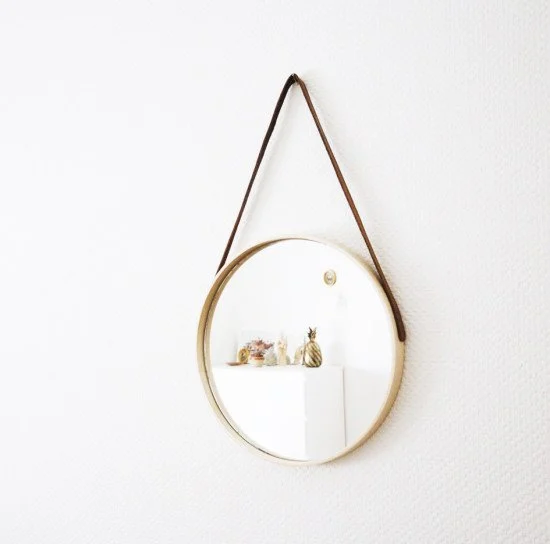
Suspended Mirror HackThis hack doesn’t use an IKEA mirror at all—it’s the tray that’s the hacked piece, paired with a few other simple supplies. 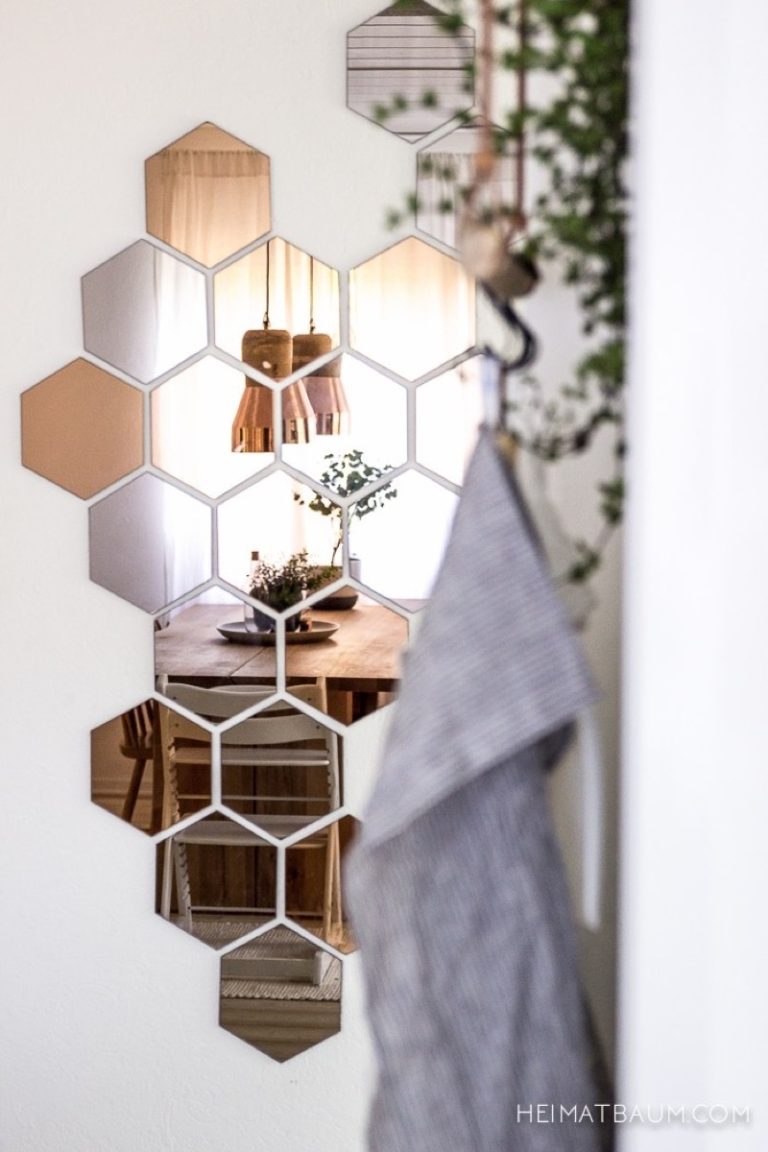 IKEA HONEFOSS Tiled EntryThis one is less of an IKEA mirror hack, and more inspiration. Check out how these HONEFOSS mirror tiles are hung. Note: these mirror tiles aren’t available in the US anymore, but you can purchase them on eBay, details are at the end of the post. 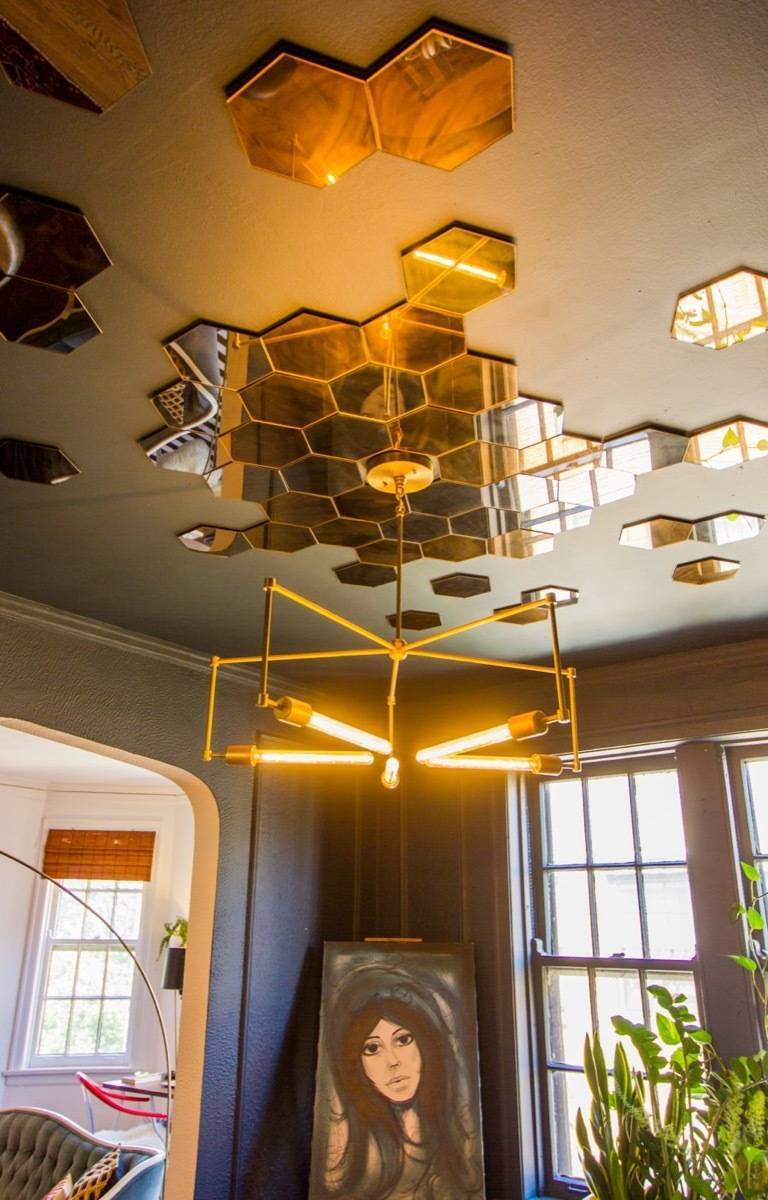
IKEA HONEFOSS Tiled CeilingMore HONEFOSS tile inspiration from Lauren’s Bold Chicago Apartment tour on Apartment Therapy. This time they’re adding height and interest to a dark ceiling. Note: these mirror tiles aren’t available in the US anymore, but you can purchase them on eBay, details are at the end of the post. 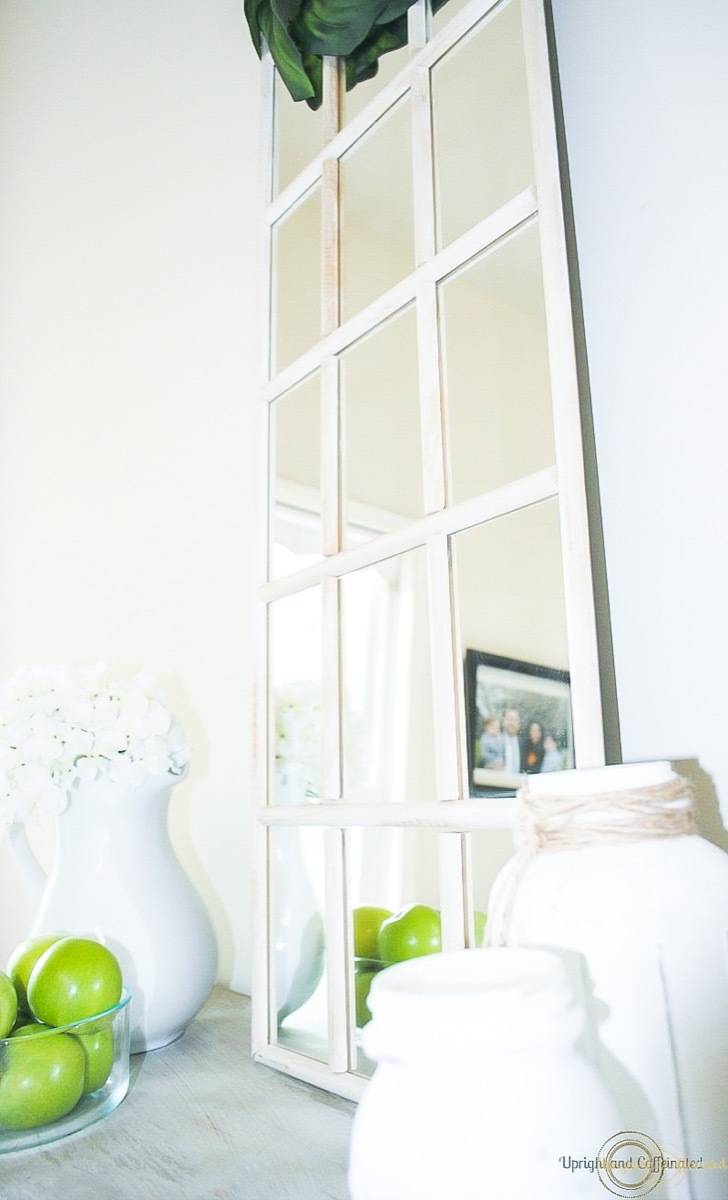
Farmhouse Window Mirror HackCheck out this tutorial for transforming an IKEA floor length mirror into a faux farmhouse window mirror on the cheap.
The Ultimate Gilded Mirror HackDonovan transforms a simple IKEA mirror into a gilded thing of beauty using little more than some wood appliques and some spray paint. Head over to Apartment Therapy for the details. 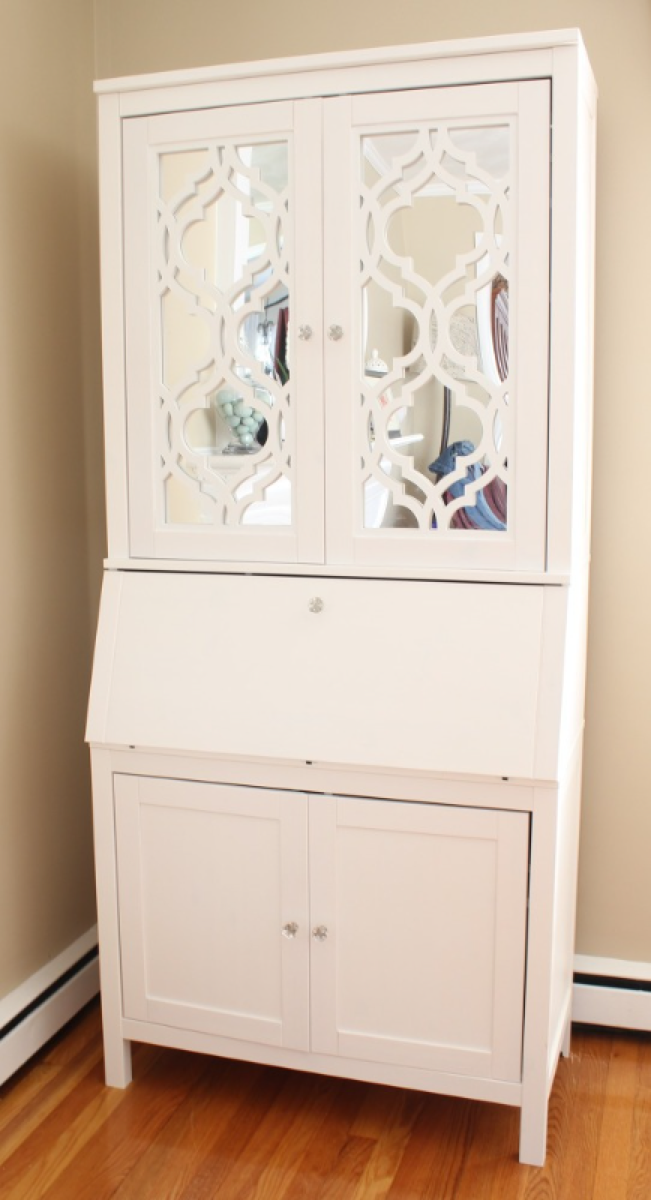
DIY Mirrored Secretary DeskThere’s no need to limit reflection to walls—check out this DIY mirrored secretary desk using a HEMNES secretary desk and some overlays. This treatment could be applied to all kinds of IKEA pieces, from nightstands to the back of shelving. 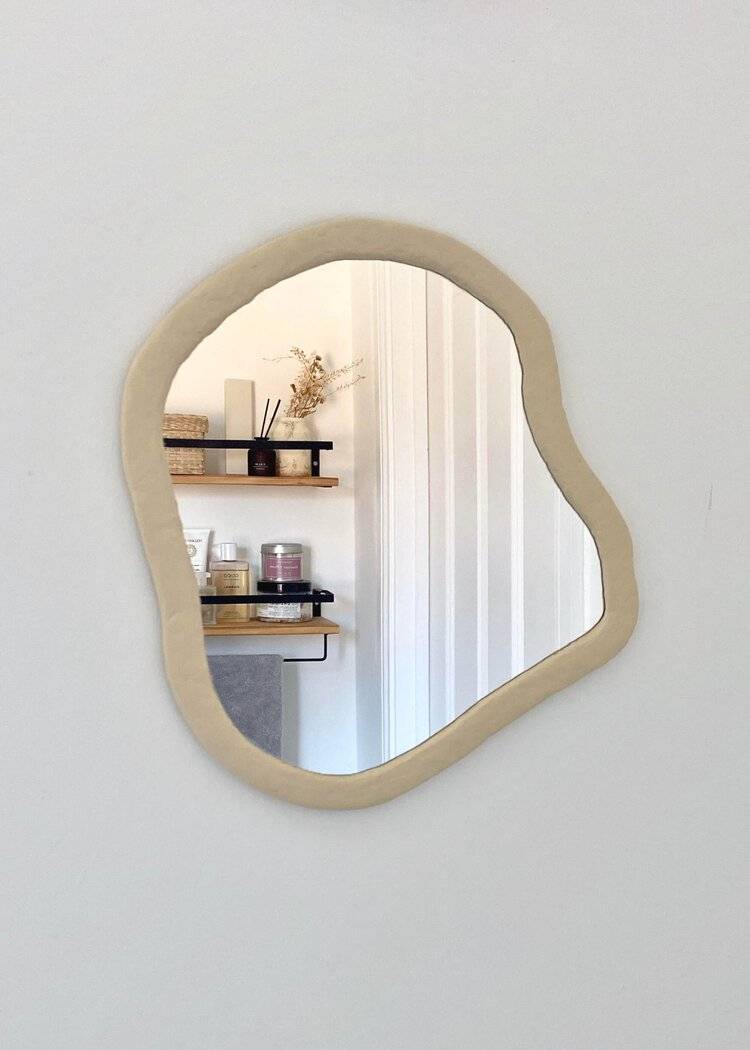
DIY Organic MirrorThis organic mirror is one of the more creative IKEA mirror hacks we’ve found and it all comes together with a simple mirrored tile and a little cardboard and clay. Head over to Isoscella for all the details and buy them a coffee while you’re there! 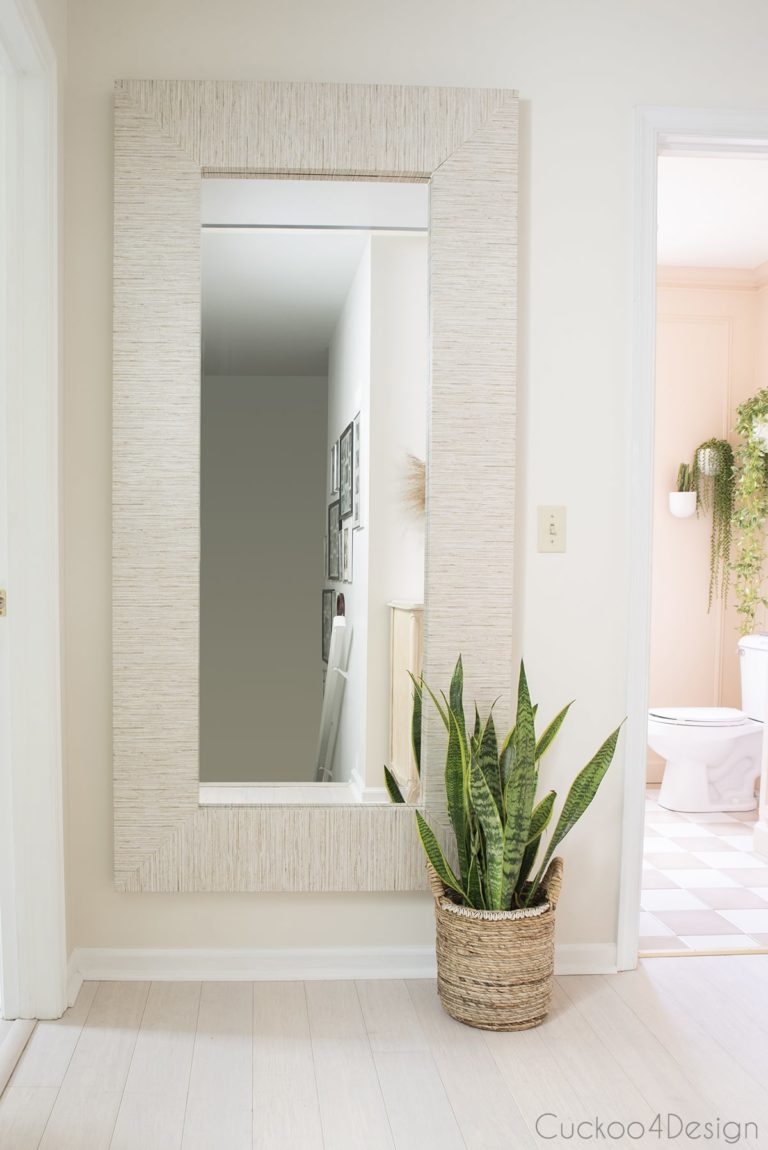
Ikea MONGSTAD Faux Grasscloth Wallpaper MirrorWho would have thought coving a dark, drab mirror with a little wallpaper could completely transform a hallway from a black hole to a lighter and brighter space? In just a few hours, you could be there too. 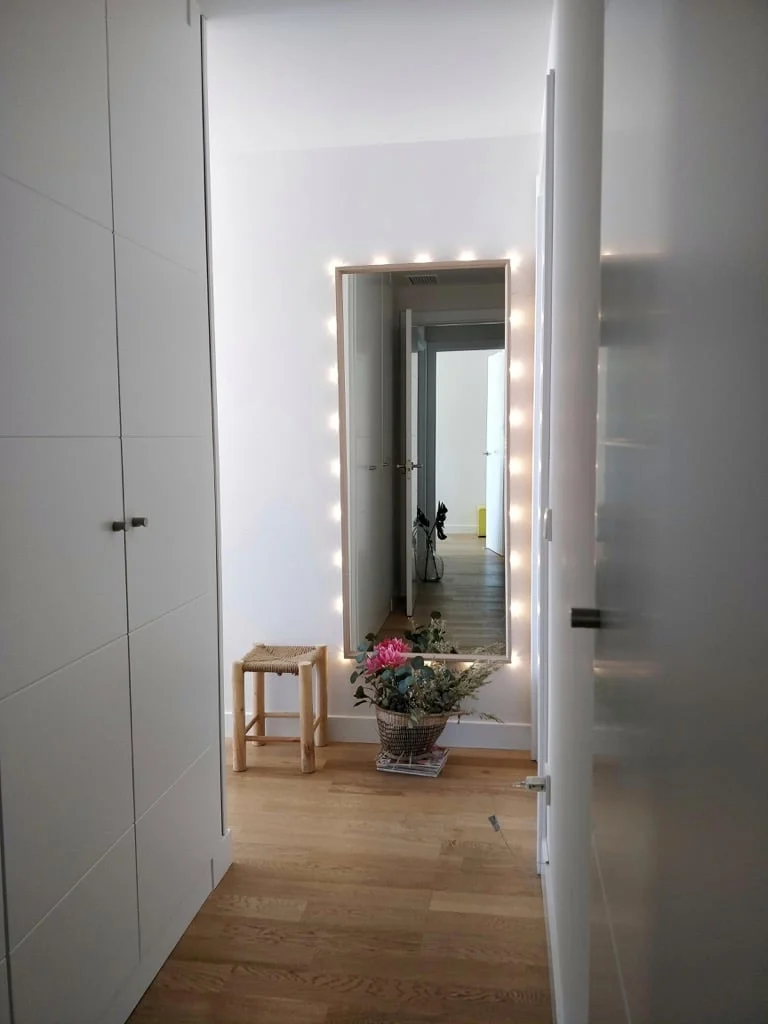
Lighted Mirror With IKEA NissedalAdd a little ambient lighting to your space with this clever mirror project from IKEA Hackers. 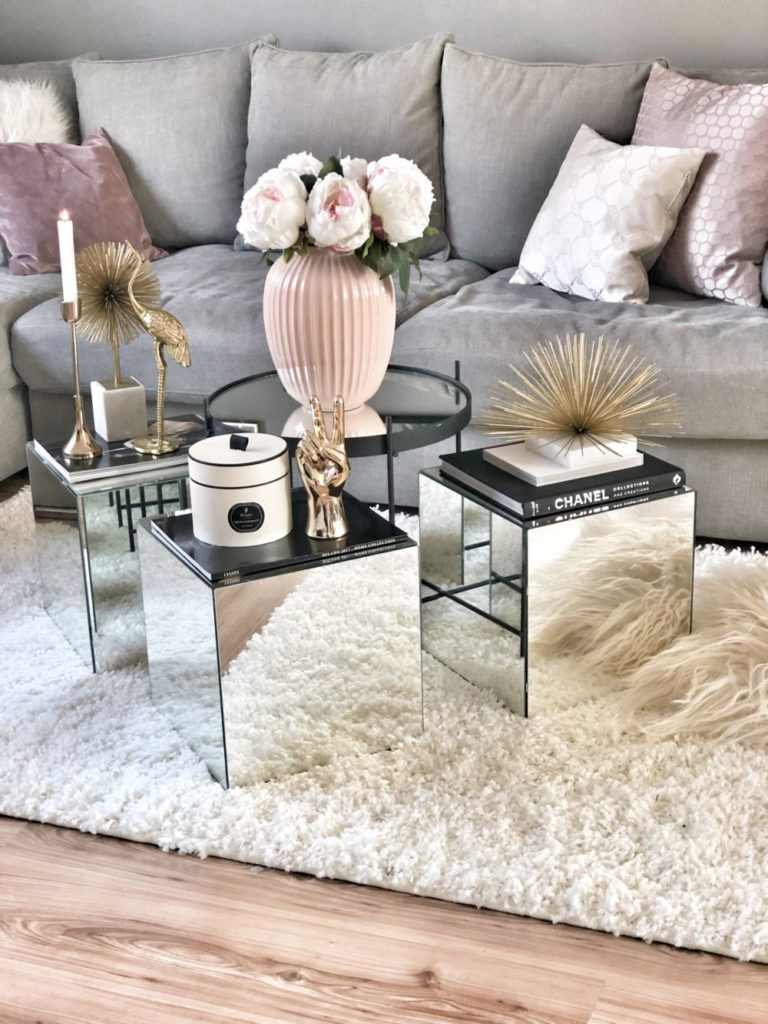
Mirrored Table CubesNo need to keep mirrors on the wall! Add some light to your living room with this project from Easy Interior. 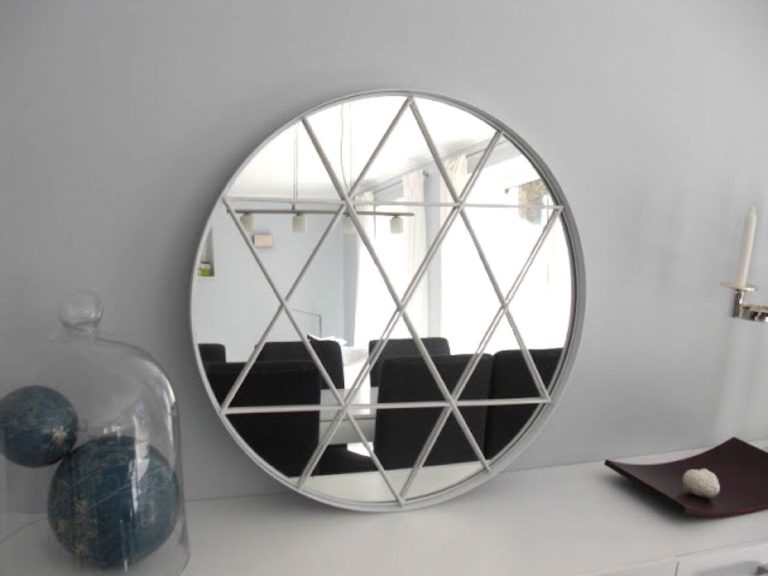
Star Mirror ProjectSure, this may look expensive, but don’t be fooled! This hack only cost a few dollars. All you need is a mirror, some wooden dowels, and a can of spray paint. 
There are many different ways to hack and personalize IKEA mirrors to make them unique and fitting for your individual needs and tastes. Whether you’re looking to add a touch of glamour to your space, or simply create a functional and stylish element, these hacks are a great starting point. So, try out these ideas and get creative with your IKEA mirrors today! Did we miss any IKEA mirror hacks we should know about? Let us know in the comments!Hungry for more IKEA hacks? Here are 100 DIY furniture ideas you won’t want to miss!
The post 16 IKEA Mirror Hacks You’ll Actually Want to Make appeared first on Curbly. Via https://www.curbly.com/ikea-mirror-hacks 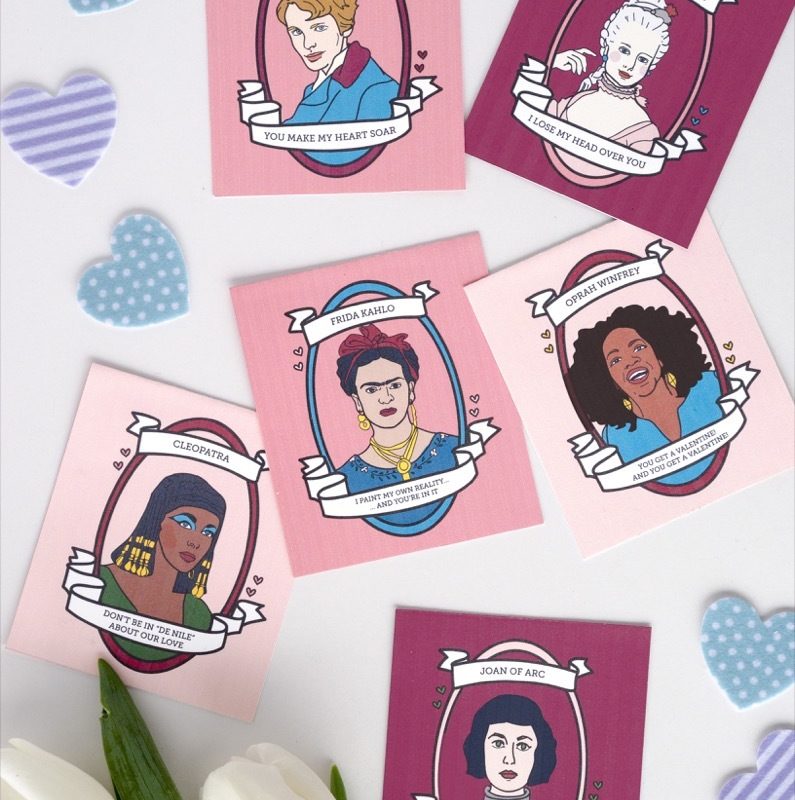
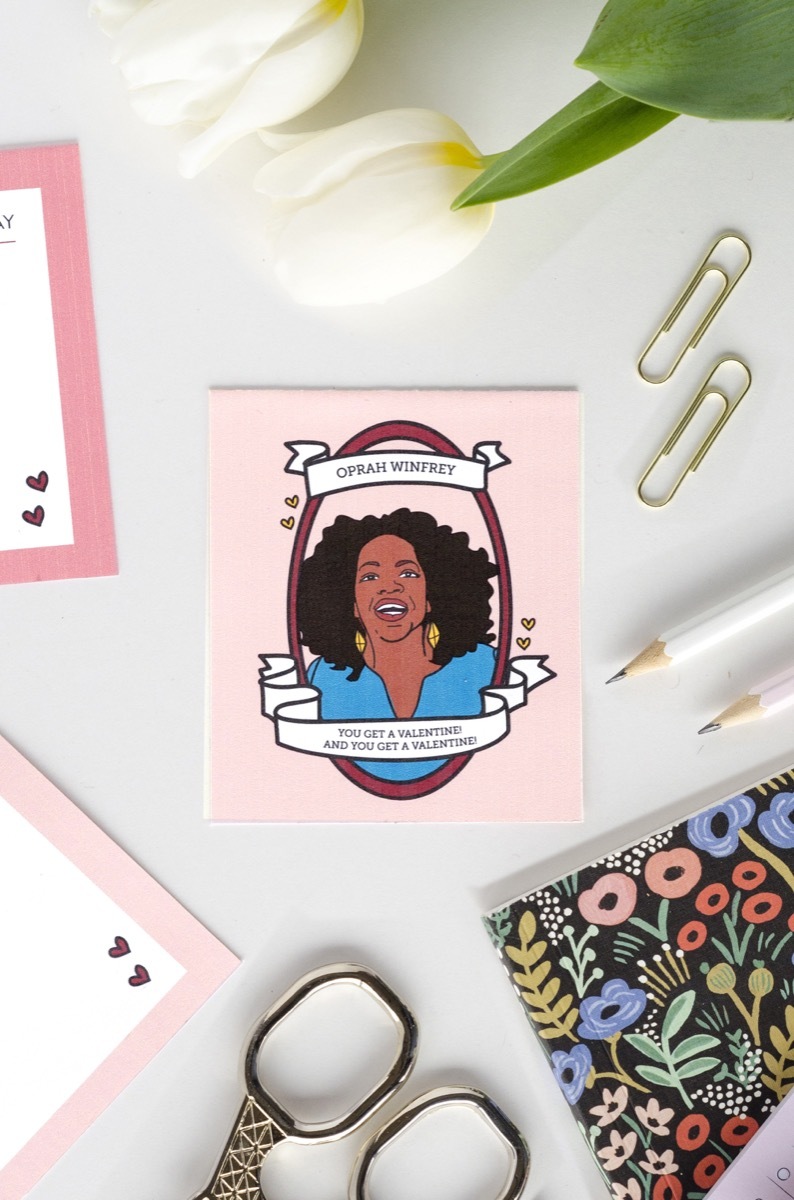
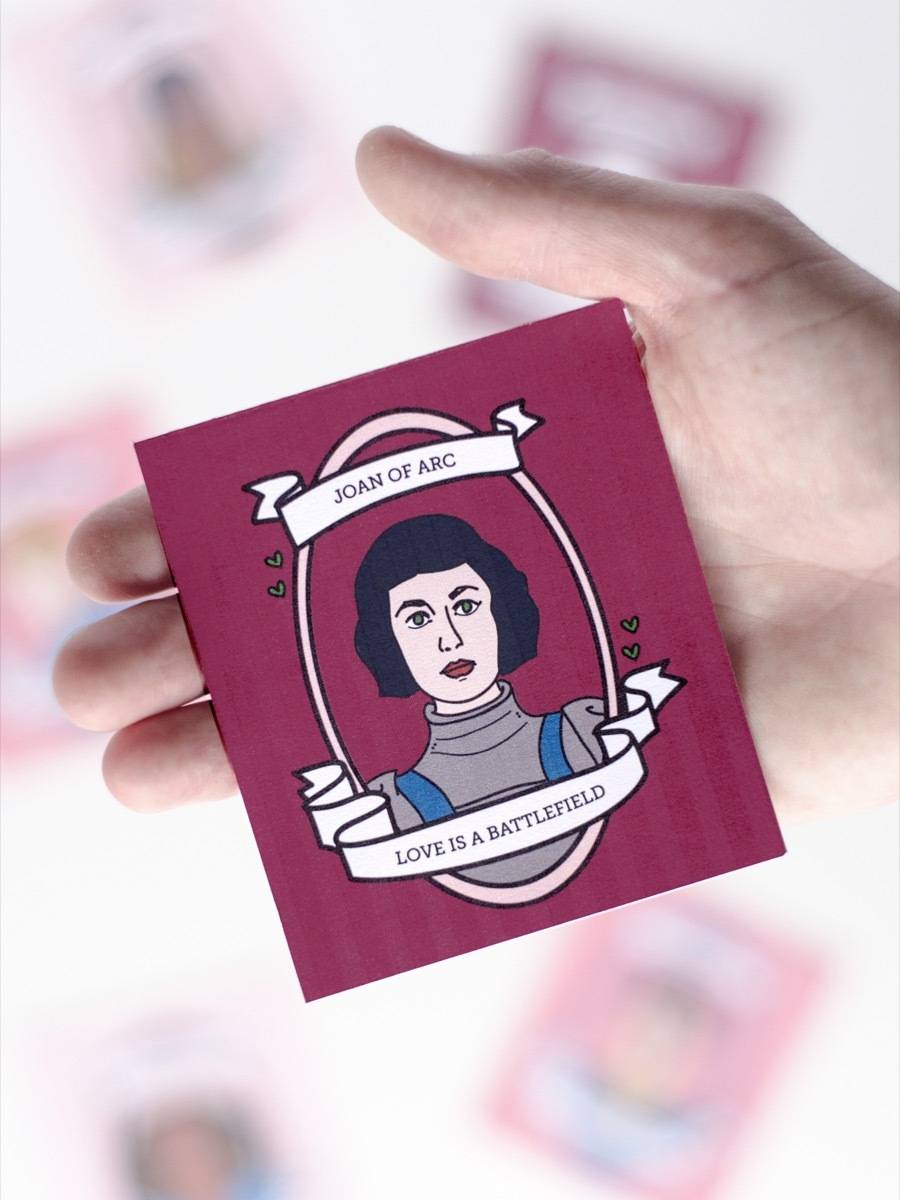
Hello, and happy Valentine’s Day! Okay, it’s not quite the big day yet, but February 14th is just weeks away, and I’m totally ready to celebrate. Ever since the Christmas holiday ended, I’ve been itching for an excuse to decorate, party, craft – whatever! I wanted to make some cards featuring some of my favorite gals throughout history (some are good, some are bad!), and the captions kind of wrote themselves after that. Click through for these printable valentines! Materials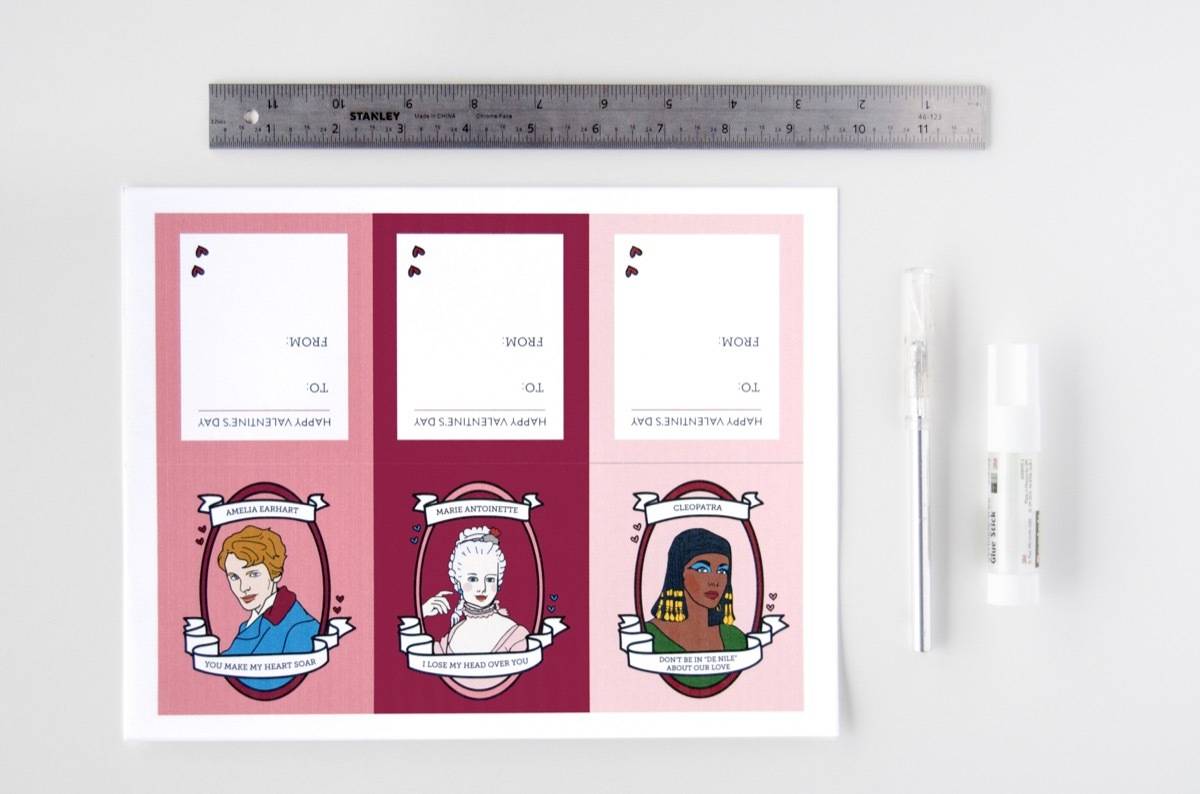
Step 1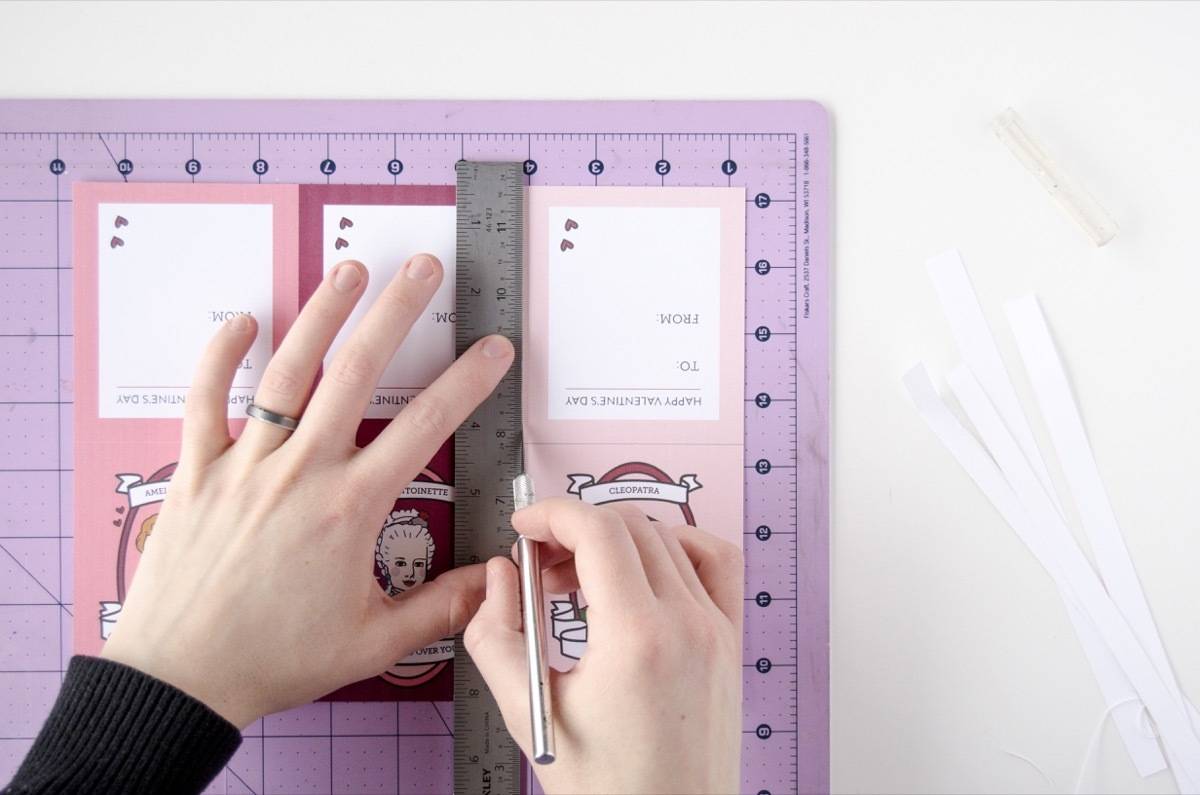
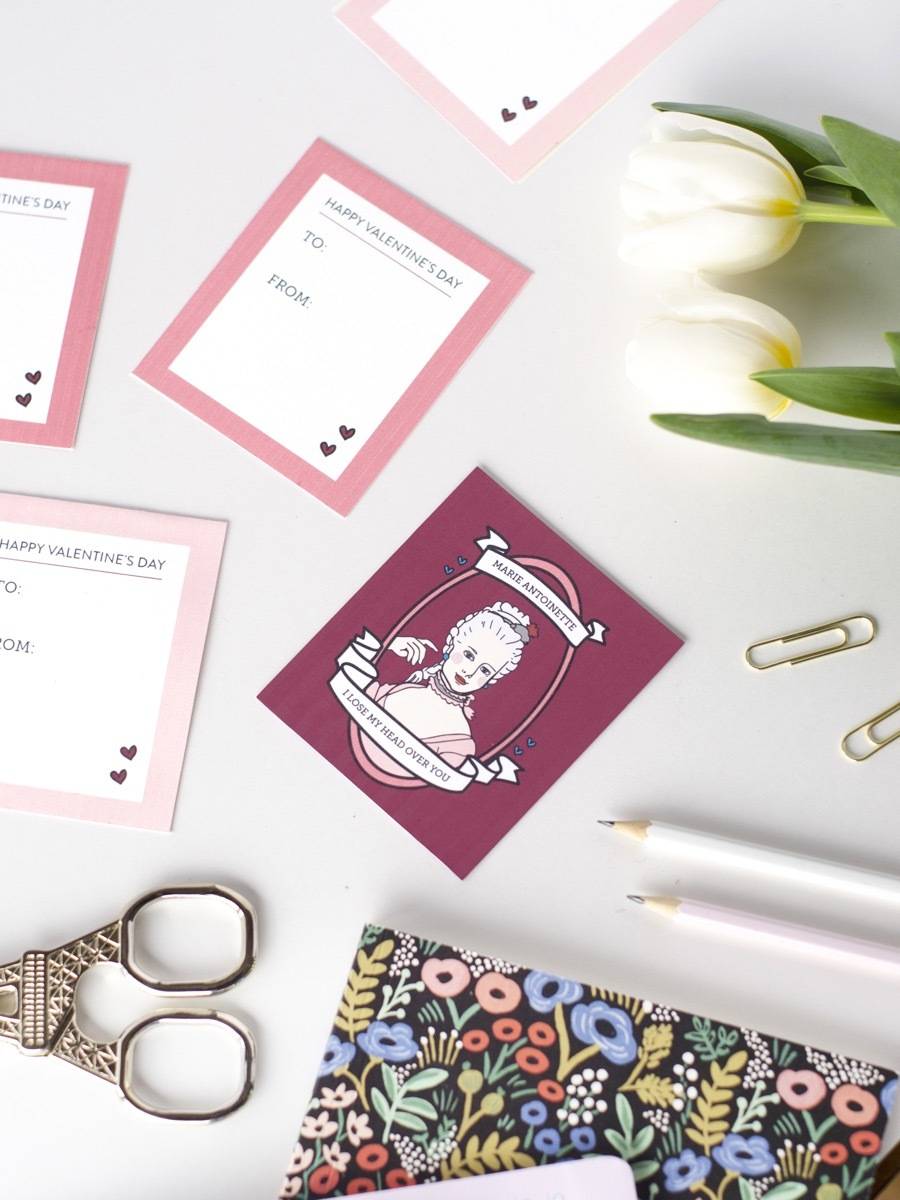
Print both pages of the printable valentines in full color. Cut each of the printable valentines apart using a craft knife and a ruler (a metal ruler works best) on a surface you can cut into (like a cutting board or a piece of cardboard). Line the ruler up with the edge of the valentine, and press down firmly on the ruler so it doesn’t move. Use the ruler as a guide for the blade, and cut along the ruler. If you have a paper cutter, you can cut apart your printable valentines using that tool instead! Step 2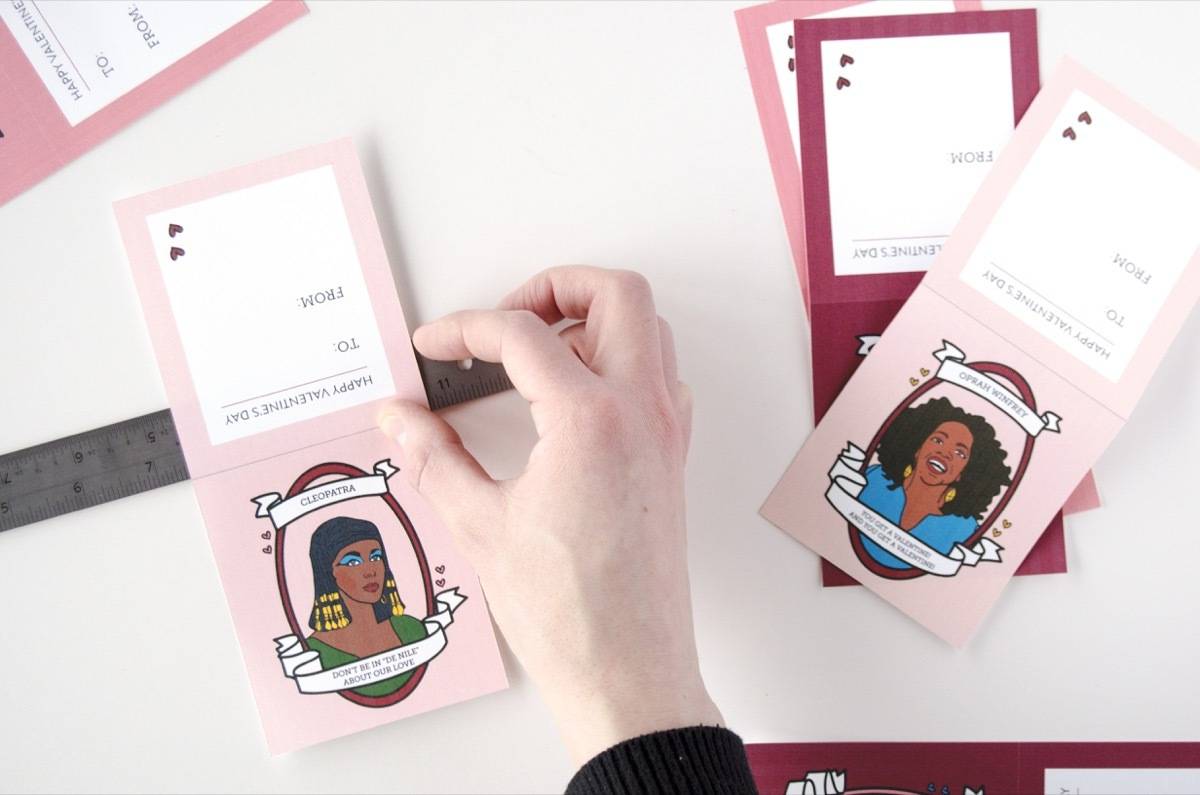
Fold each card in half. To insure you get a nice, crisp fold, lay the halfway point of each card along the hard edge of your ruler. Fold the card over the edge of the ruler, creasing it from the back. Step 3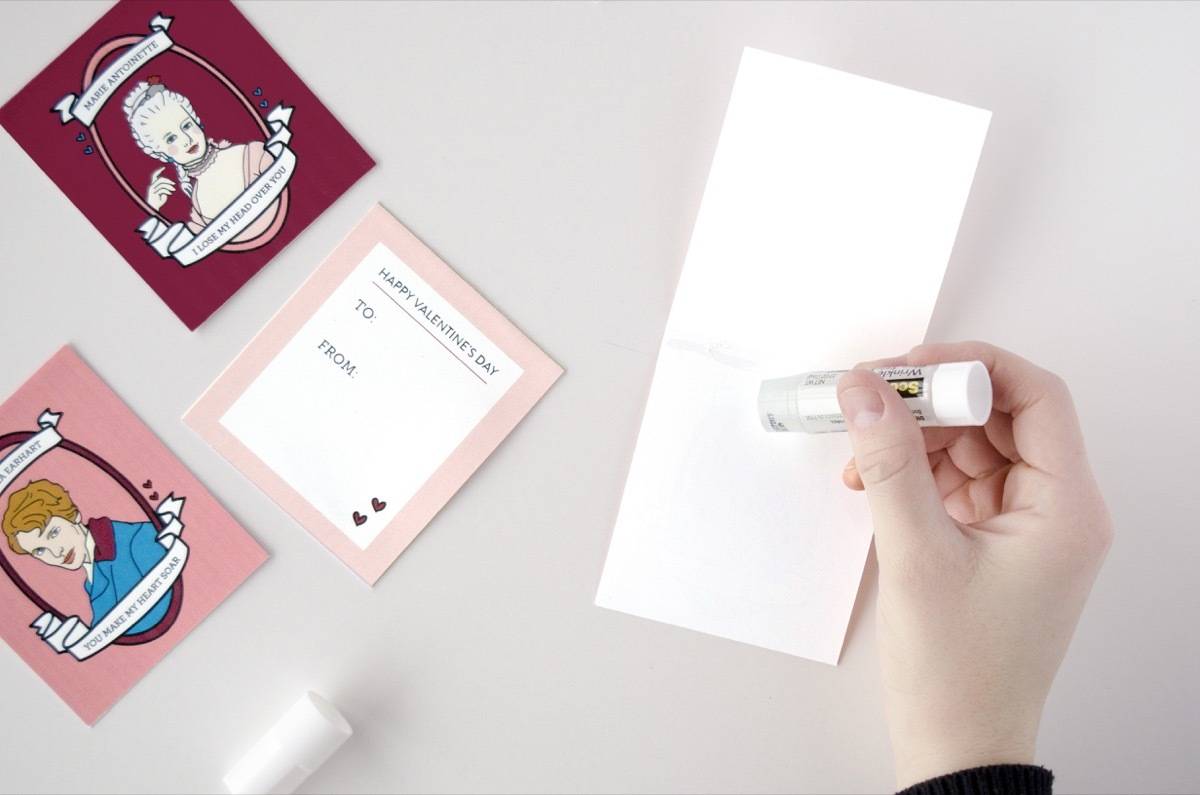
Add a bit of glue along the back of each printable valentine, and fold the card shut. Done! 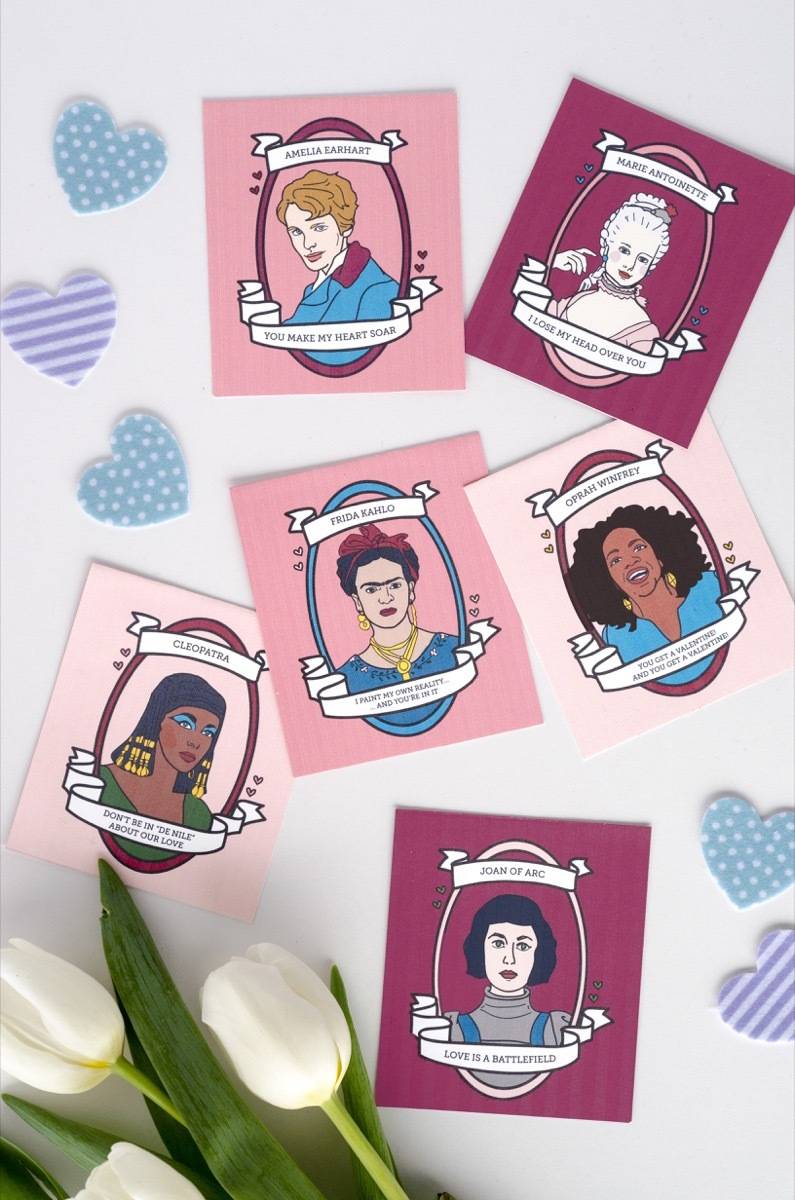

I think my favorite gal in this bunch is Amelia Earhart. I was torn between having her caption read, “You make my heart soar,” and the much, much darker, “I want to get lost with you.” Oh, Amelia. You were a legend. Looking for more do-it-yourself projects for Valentine’s Day? Check out these cute faux enamel pins!
The post Printable Valentines Featuring Badass Women Throughout History appeared first on Curbly. Via https://www.curbly.com/printable-valentines-badass-women 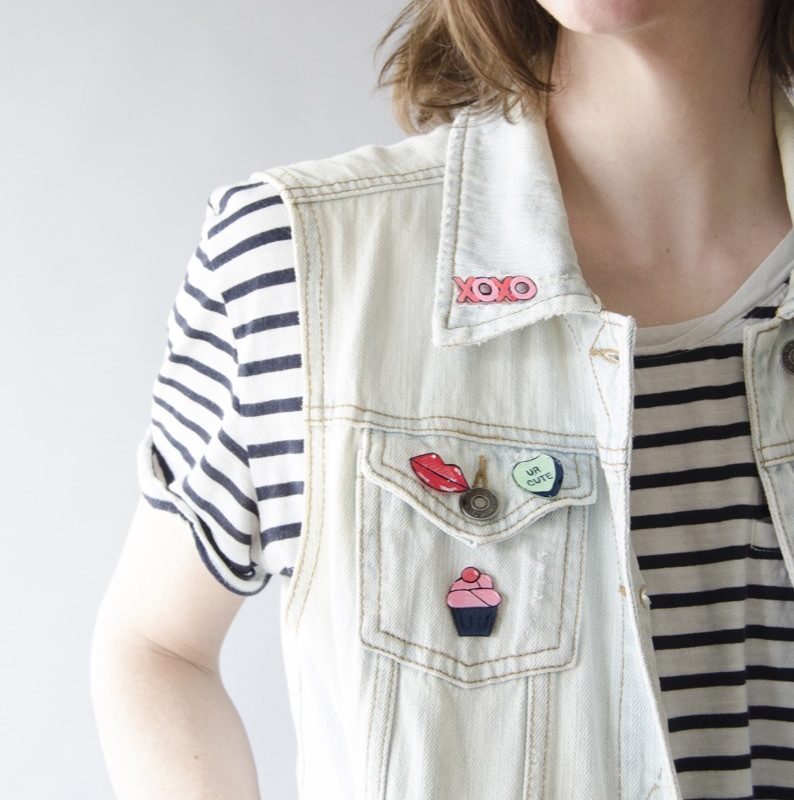

It’s almost Valentine’s Day! I love this holiday because: A. love is a lovely thing, B. exchanging cards or little gifts is always fun, and C. chocolate! What’s not to enjoy? You know what else I’m totally loving right now? Enamel pins (hello 90s fashion – it’s nice to see you again!). If you’re looking for a cute gift to give to your friends, coworkers, or gal-pals, these faux enamel pins are quick and easy to make. Watch our video tutorial for the walkthrough, or follow the steps below. The fun part about this DIY project is that there is lots of room for creativity. You can personalize these Valentine’s pins any way you want, or you can use the printable template available below! Materials
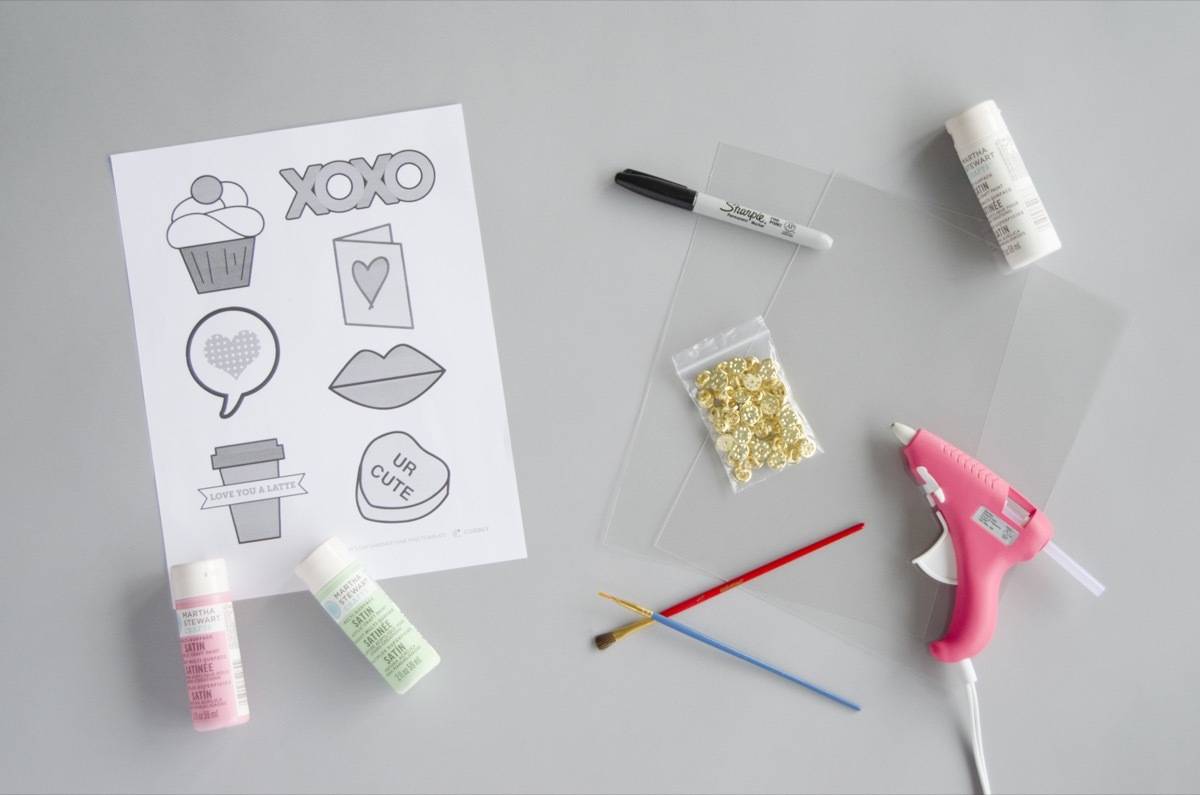
If you want to make these faux enamel pins in even less time, you can purchase printable shrink filmand print these designs directly onto the shrink paper!
Step 1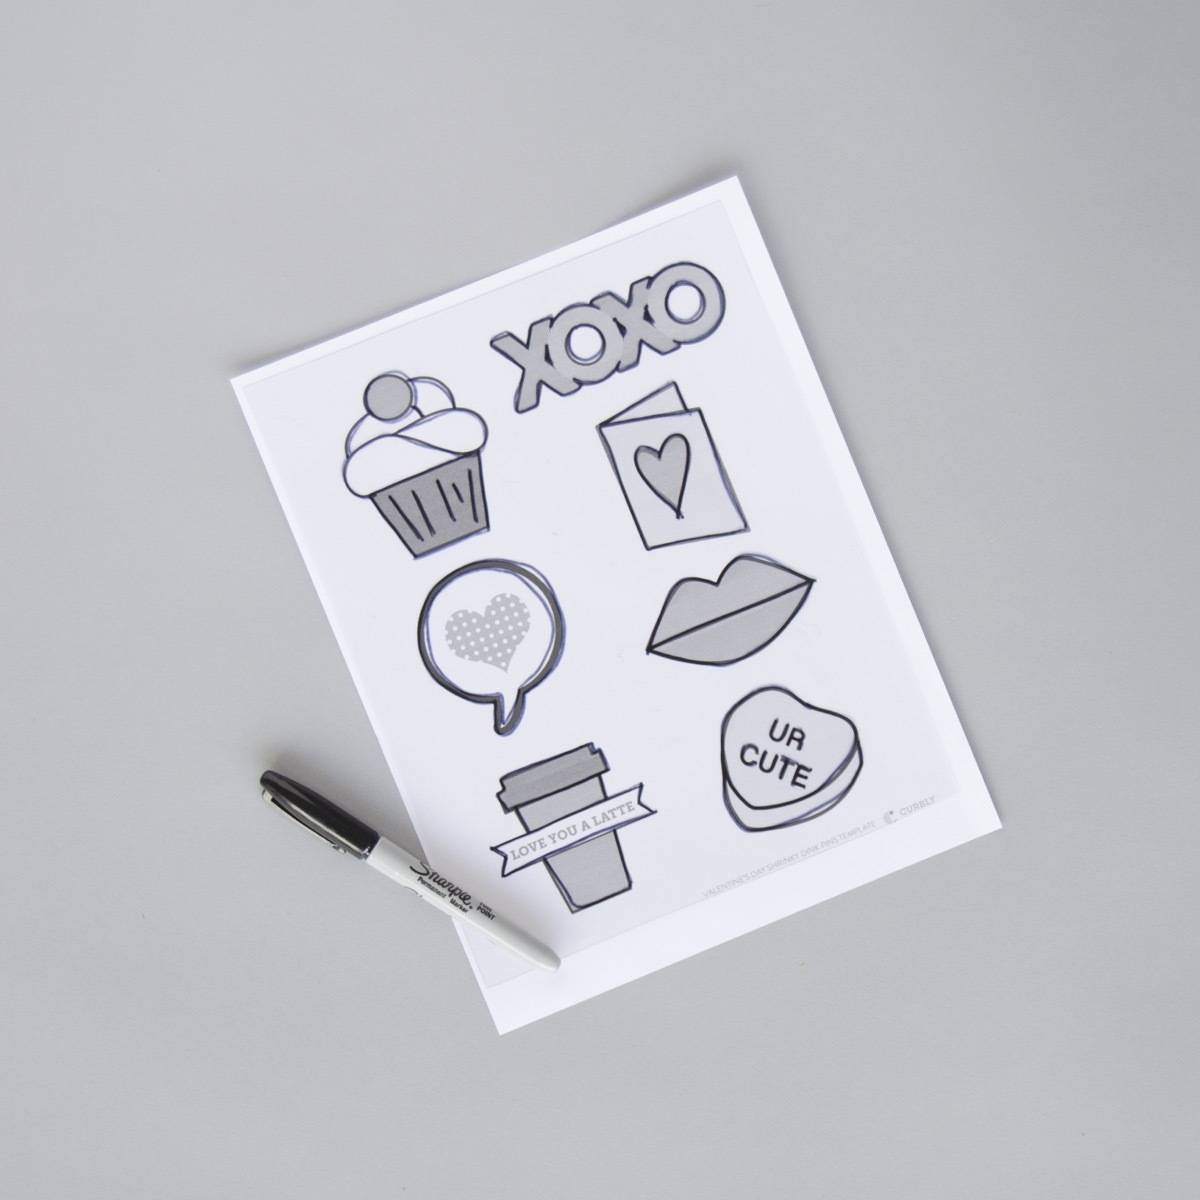
Print out the Valentine’s Day pins template. Lay a piece of shrink paper over the template, and with a marker, trace each shape onto the shrink paper. Step 2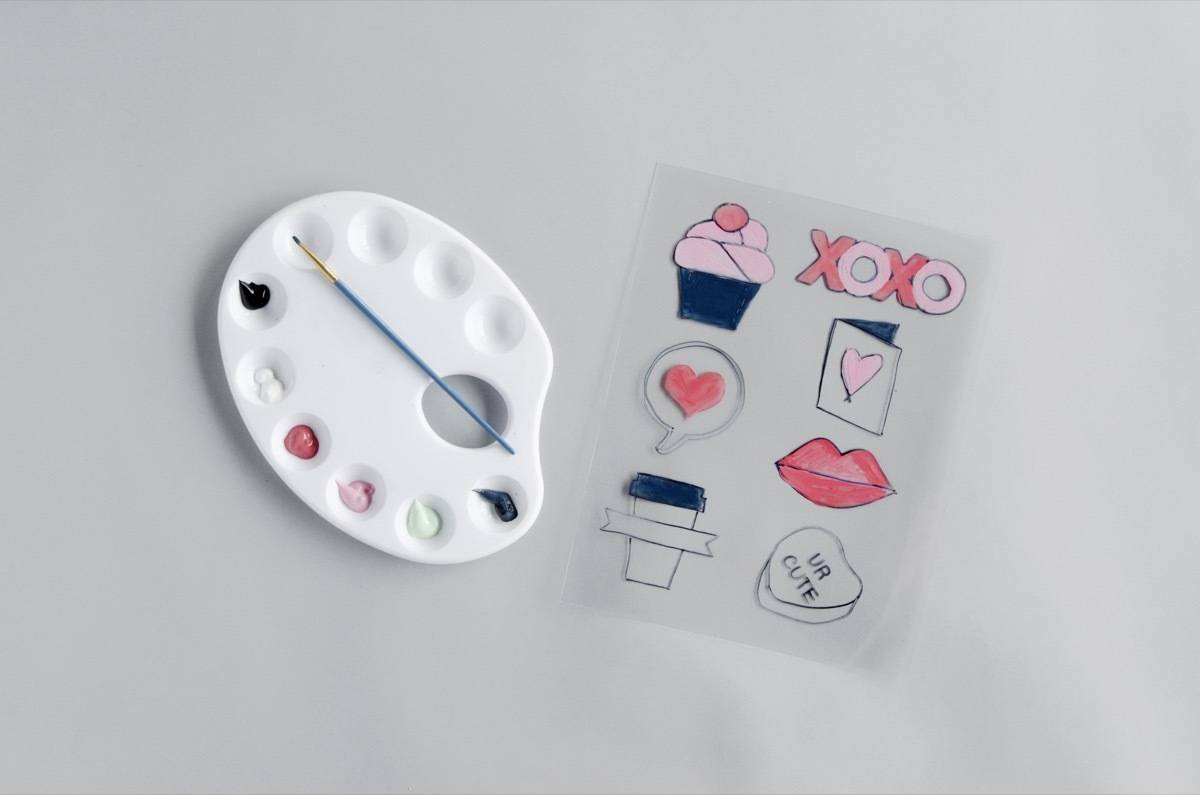
Fill in the designs with a thin layer of acrylic paint. The more paint you apply, the “rougher” the pins will look once they shrink, so keep it light. I recommend using high-quality paints, as cheaper paints require multiple layers to get richer color. Step 3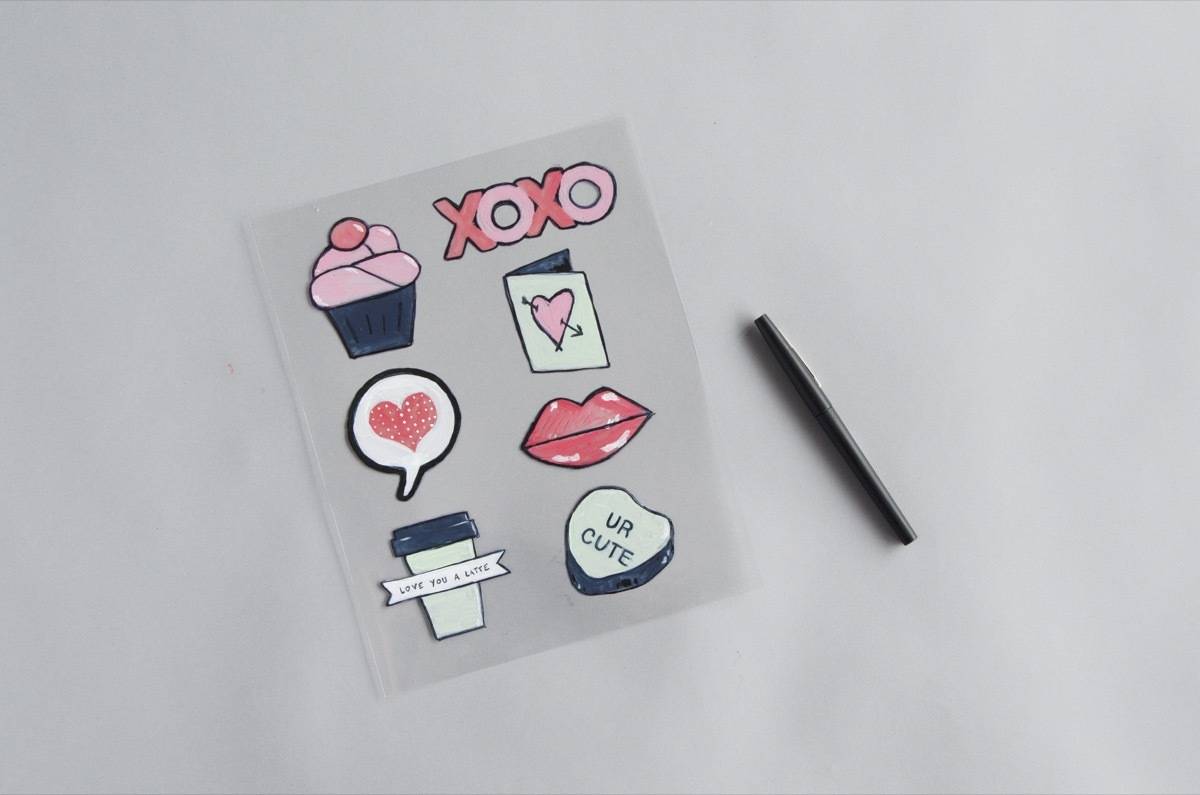
Once the paint has dried, go over the lines of the designs again to redefine any hard edges. Add any lettering over the paint. Step 4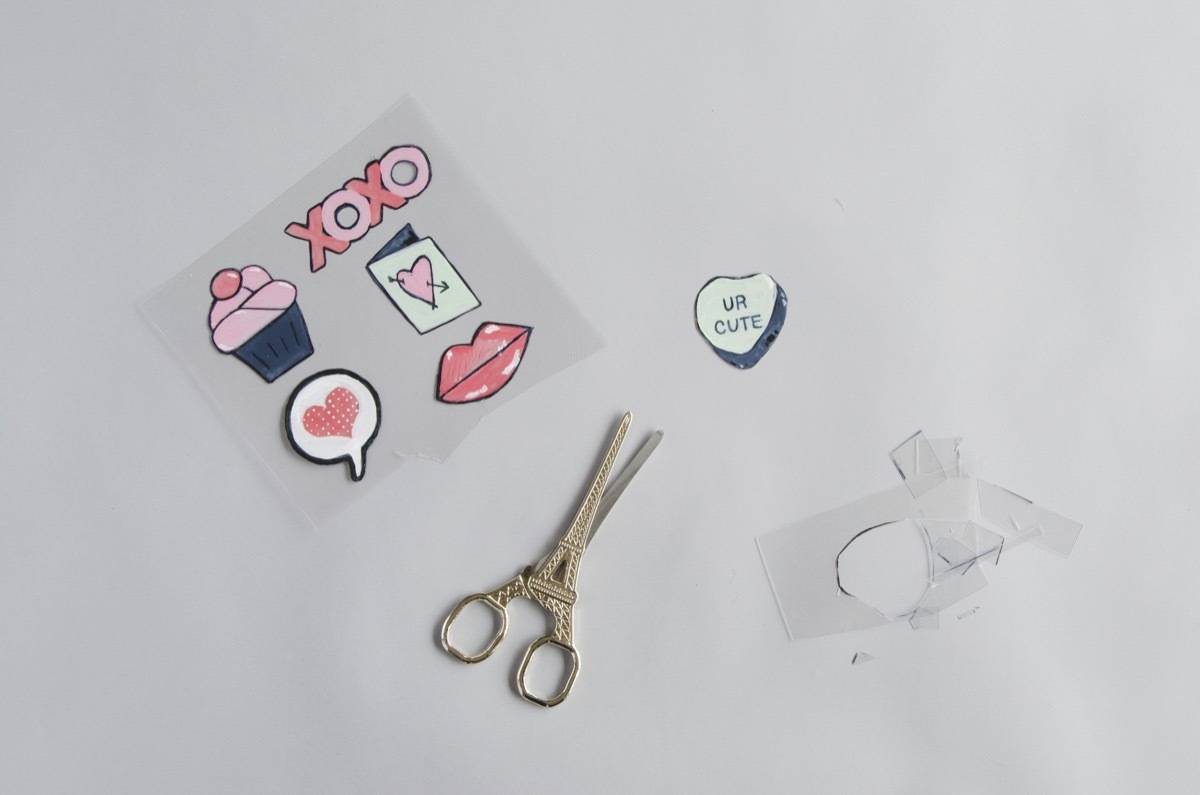
Cut out each design. Take your time with this step, as the shrink paper can rip easily. Step 5Preheat the oven to 325º F. Line a cookie sheet with aluminum foil. Lay the designs on the pan so they are not overlapping. Bake for 1-3 minutes. The shrink paper will initially curl while baking – once the paper has curled it will shrink to 1/3 its original size, and become remarkably thicker. Step 6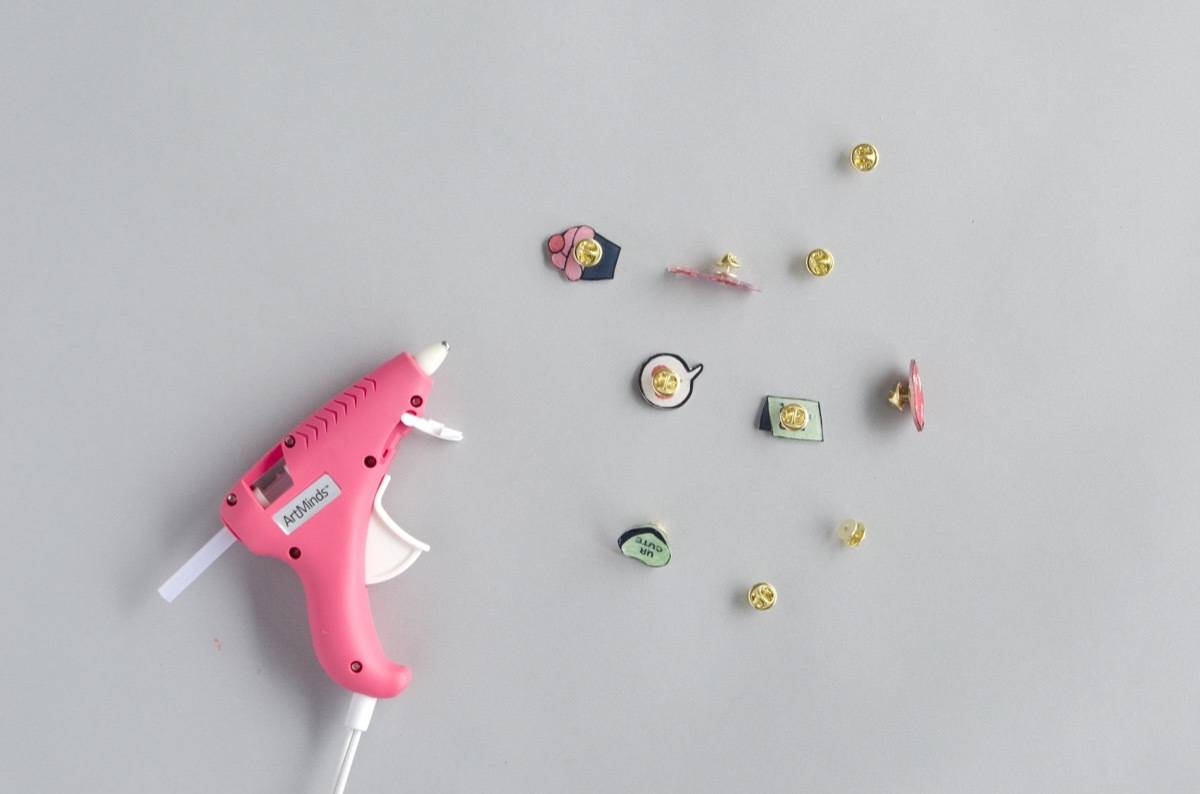
After the designs have cooled, use hot glue to apply the pin backs. If you want to give your pin designs some added protection, you can seal them with a finisher spray. Done! 
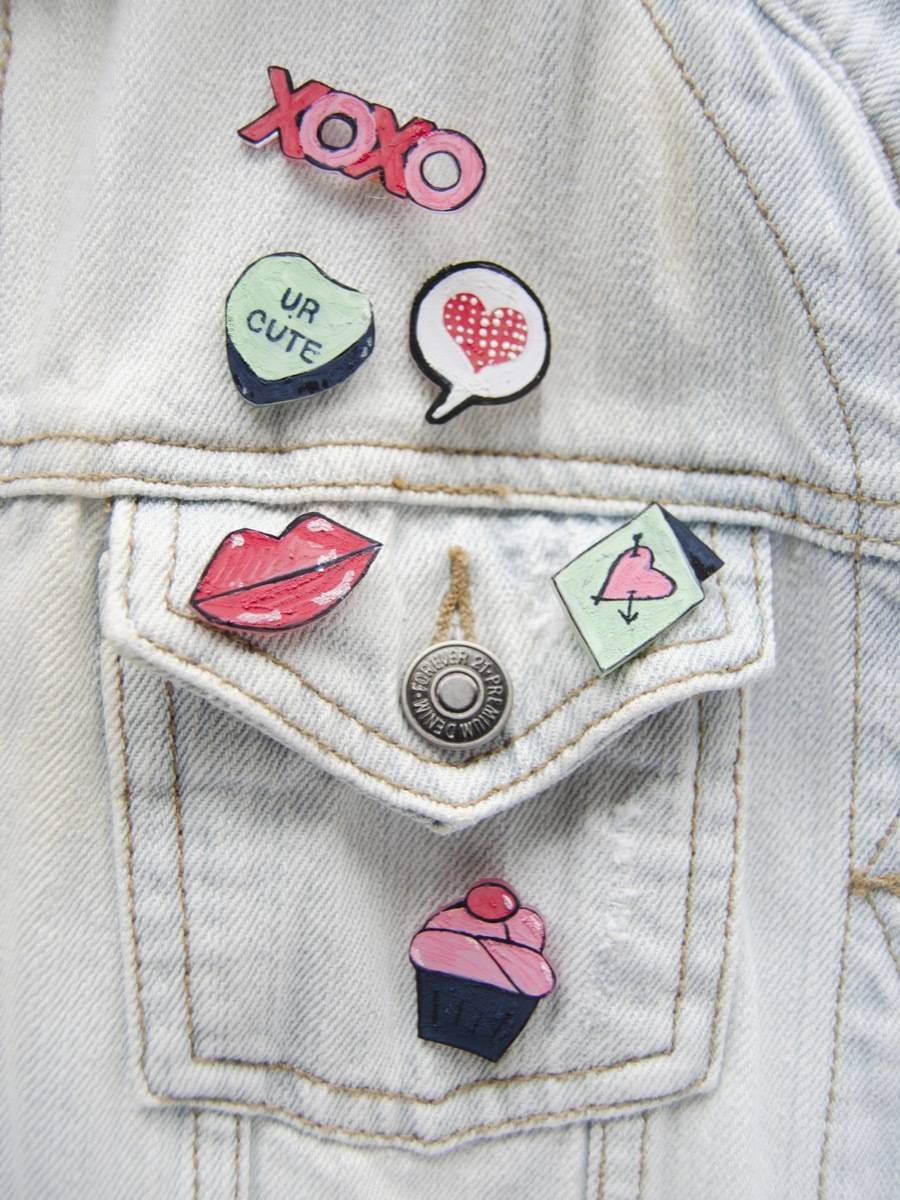

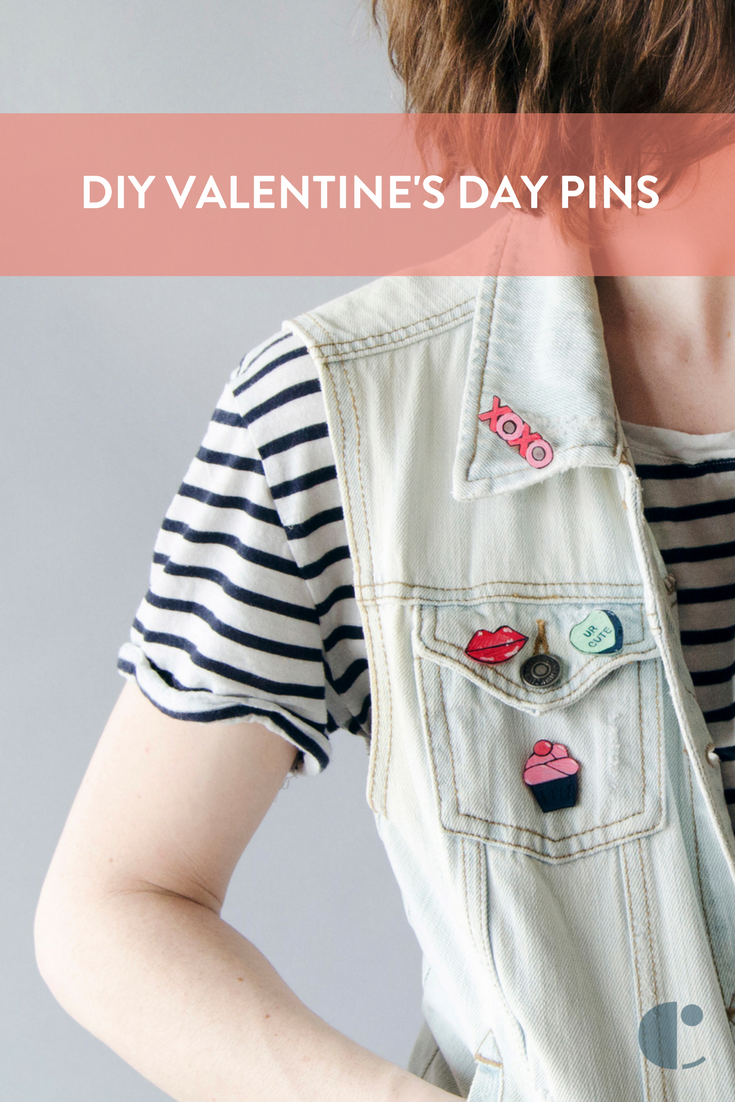
Side note: Like I said earlier, I love enamel pins. That being said, watching fashion come full circle and recognizing the decade this fad came from because I lived through it has me feeling super old! I’ll let it slide though, because 90s fashion really was the best (#DENIM4LIFE). Did you know you can make your own Shrinky Dink? See how it works here!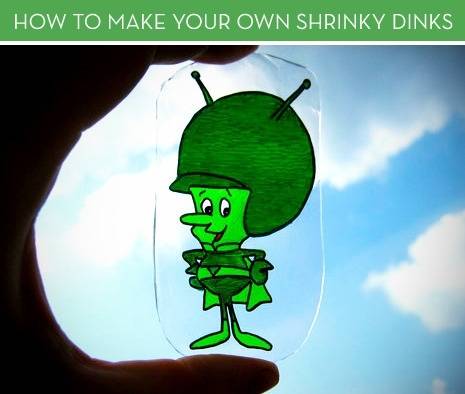
The post DIY This: Make Your Own Super Cute “Enamel” Pins for Valentine’s Day appeared first on Curbly. Via https://www.curbly.com/valentines-day-pins |
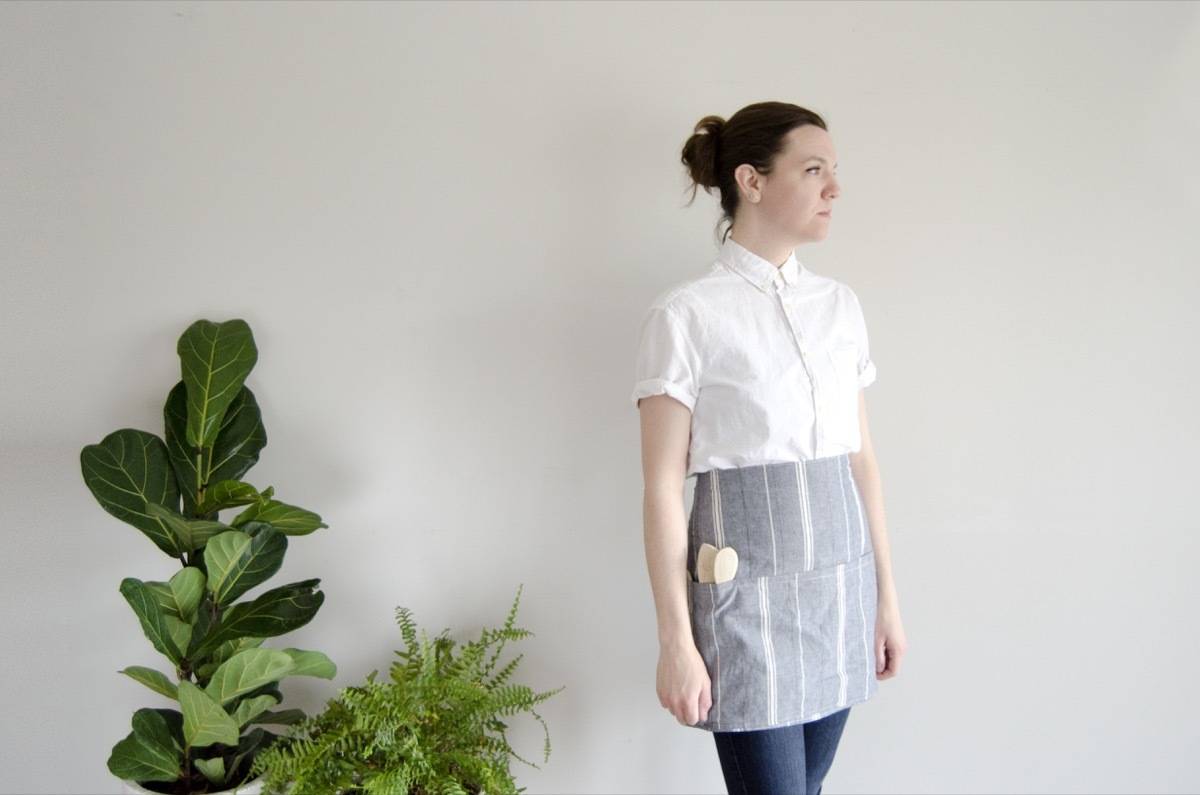 This half apron is made up entirely of rectangles, all of which are the same width. You only need to be able to single stitch in a straight line, and you don’t need a pattern. You don’t even need much fabric. So long as it isn’t stretchy, just about anything you have will work.